
Adding a sticky audio content bar is a great way to feature an audio clip for easy access as a user scrolls through your page content. For example, podcasters can “stick” their featured audio at the top of an episode page so the user can always have access to those audio controls while listening and engaging with the rest of the page content.
In this tutorial, we are going to get a bit creative with Divi and its built-in sticky position options to build a sticky audio content bar in Divi. We’ll to show you how to convert existing audio content on a page (like a row with an audio module) into a sticky audio content bar that stays at the top of the window once the user passes up the audio content while scrolling. Plus, we’ll also show you how to change the content, style, and layout of the bar once the sticky state is engaged (or stuck at the top of the window). The smooth transition and functionality of this design offers a unique solution for showcasing audio content on any Divi website.
Let’s get to it!
- 1 Sneak Peek
- 2 Download the Layout for FREE
- 3 Download For Free
- 4 What You Need to Get Started
- 5 Part 1: Upload the Podcast Premade Layout Pack from the Divi Builder
- 6 Part 2: Creating the Sticky Row to Hold the Audio Content
- 7 Part 3: Adding the Audio Content
- 8 Part 4: Styling the Audio Content
- 9 Part 5: Changing the Alignment of Audio Bar Content in the Sticky State
- 10 Final Result
- 11 Final Thoughts
Sneak Peek
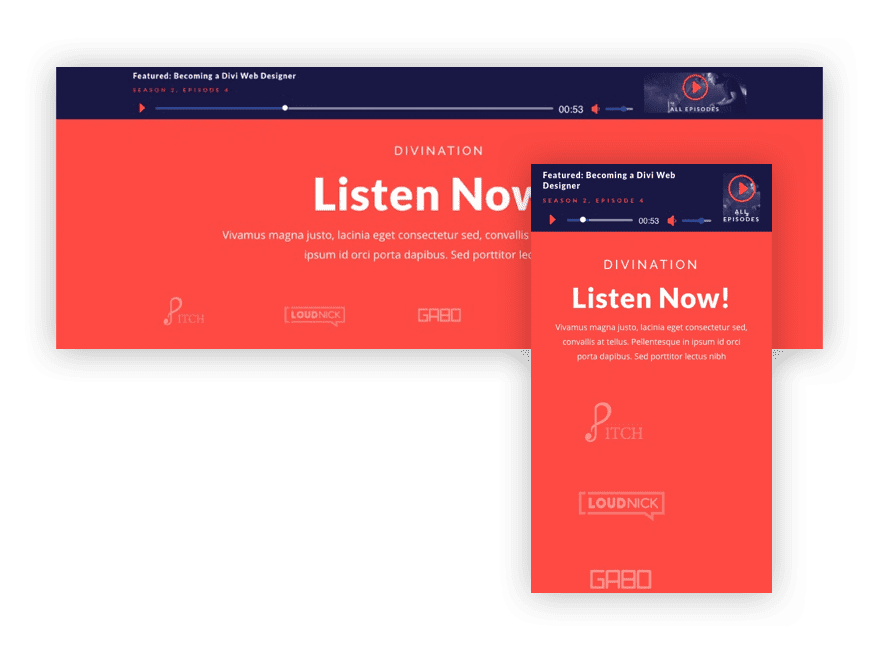
Here is a quick look at the design we’ll build in this tutorial.
Here is a look at the transition of the audio content into a sticky audio content bar.
And here is a look at how one might engage with the audio bar while scrolling through the page.
Download the Layout for FREE
To lay your hands on the designs from this tutorial, you will first need to download it using the button below. To gain access to the download you will need to subscribe to our newsletter by using the form below. As a new subscriber, you will receive even more Divi goodness and a free Divi Layout pack every Monday! If you’re already on the list, simply enter your email address below and click download. You will not be “resubscribed” or receive extra emails.

To import the section layout to your Divi Library, navigate to the Divi Library.
Click the Import button.
In the portability popup, select the import tab and choose the download file from your computer.
Then click the import button.

Once done, the section layout will be available in the Divi Builder.
Let’s get to the tutorial, shall we?
What You Need to Get Started

To get started, you will need to do the following:
- If you haven’t yet, install and activate the Divi Theme.
- Create a new page in WordPress and use the Divi Builder to edit the page on the front end (visual builder).
- Choose the option “Build From Scratch”.
After that, you will have a blank canvas to start designing in Divi.
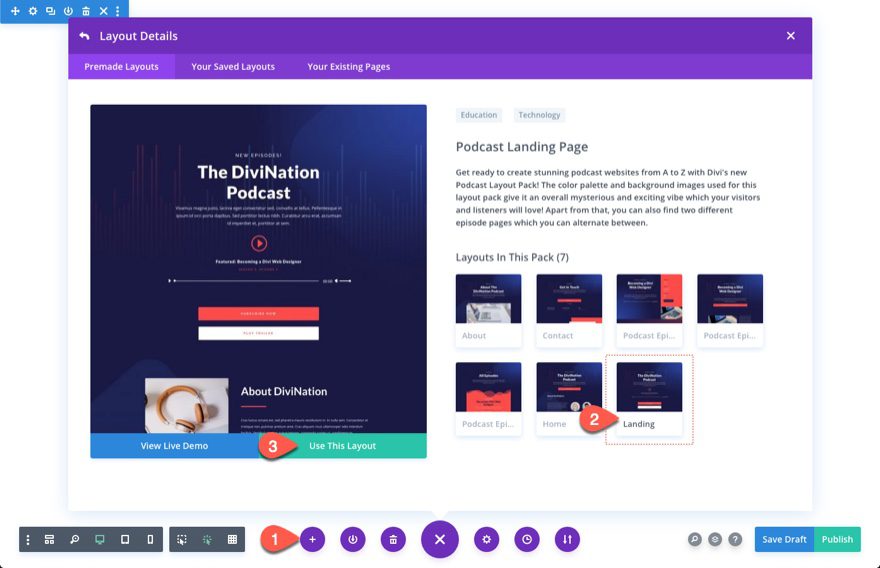
Part 1: Upload the Podcast Premade Layout Pack from the Divi Builder
To jumpstart the design of our sticky audio bar in Divi, we will use the premade podcast landing page layout. From the settings menu, select the “Load From Library” plus icon. Then find the podcast landing page layout and load it to the page.
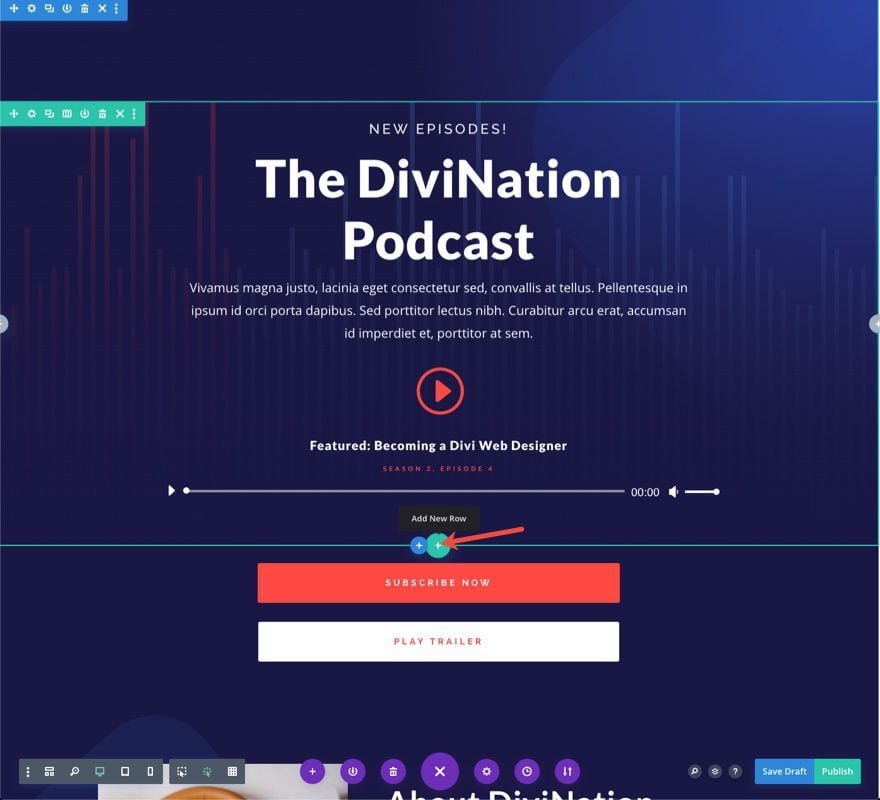
Part 2: Creating the Sticky Row to Hold the Audio Content
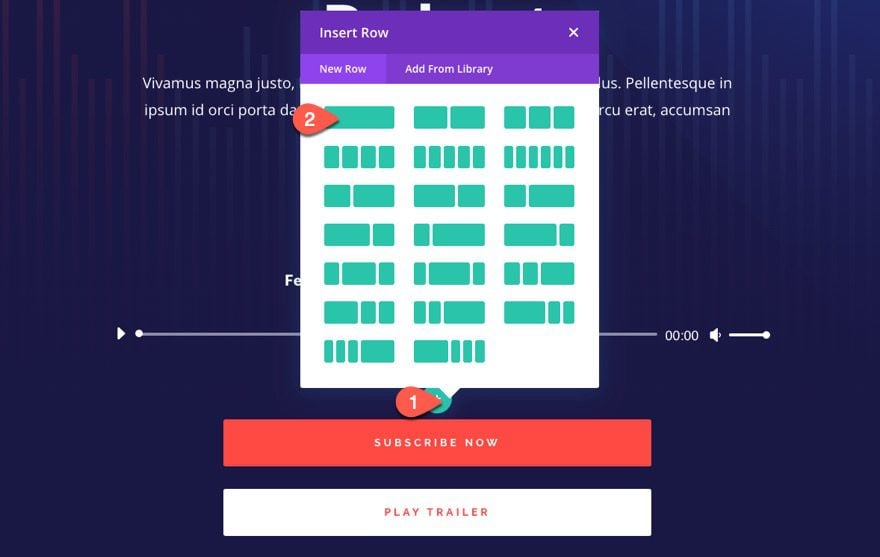
At the very top section of the premade layout, find the row inside that top section. Then add a new one-column row below the existing row.
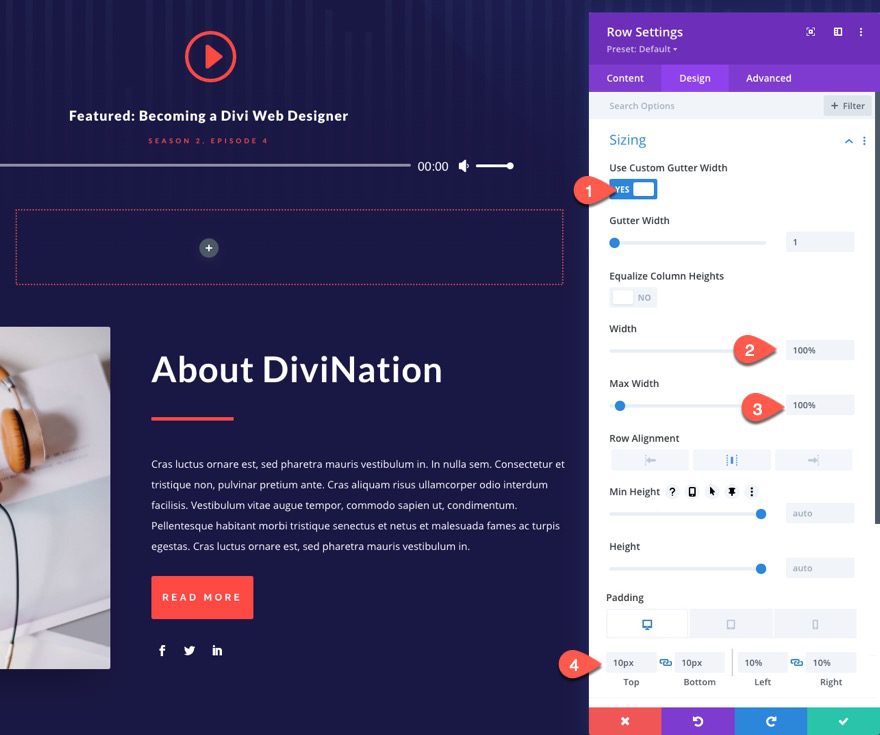
Row Settings
Before adding any modules, open the settings for the new row and update the following:
- Gutter Width: 1
- Width: 100%
- Max Width: 100%
- Padding (desktop): 10px top, 10px, bottom, 10% left, 10% right
- Padding (tablet and phone): 10px top, 10px, bottom, 10px left, 10px right
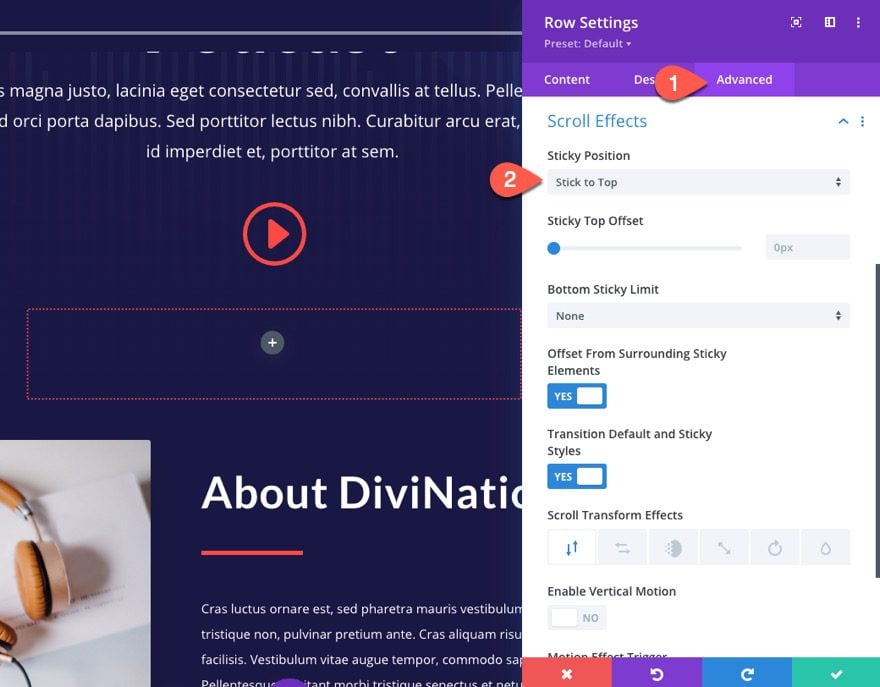
To make the row sticky, go to the advanced tab and update the following:
- Sticky Position: Stick to Top
This will cause the row (soon to be our audio content bar) to stick to the top of the browser window when scrolling down the page.
Part 3: Adding the Audio Content
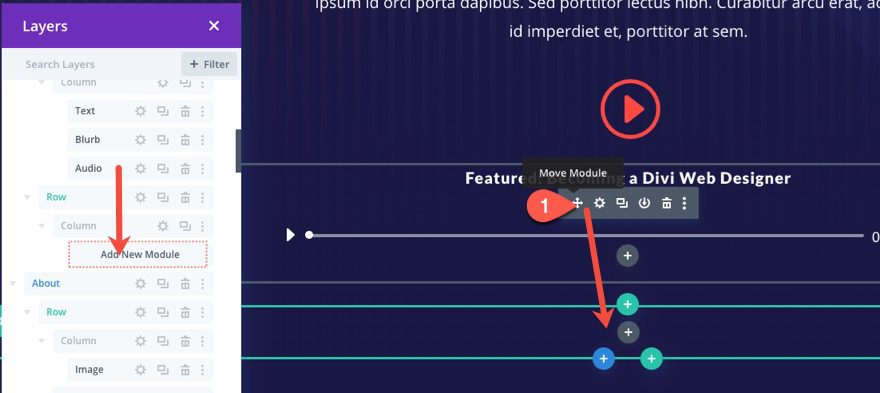
Adding the Audio Module to the Row
Next, move/drag the existing (pre-designed) audio module from the first row in the top section into the new row you just created. This will serve as the featured audio that we will include inside the sticky audio player
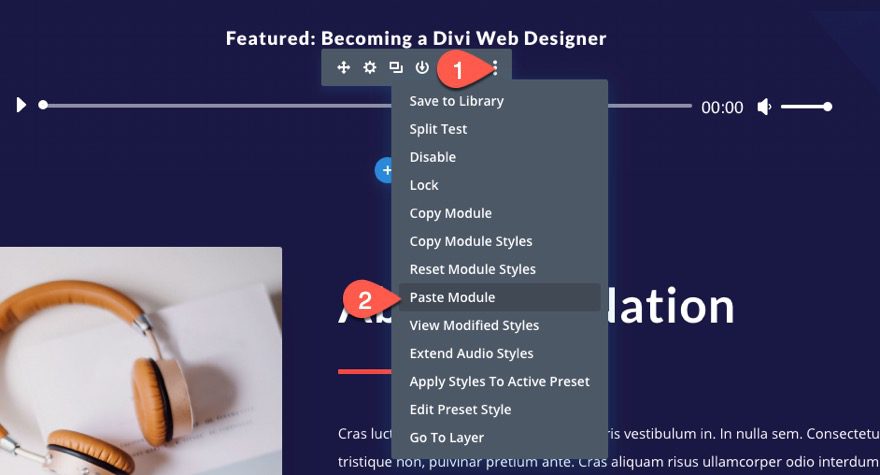
Adding a CTA Using a Blurb Module
Next, we will create a CTA that will show on the right side of our sticky audio content bar.
To create the CTA, copy the blurb module with the play icon in the top section of the layout.
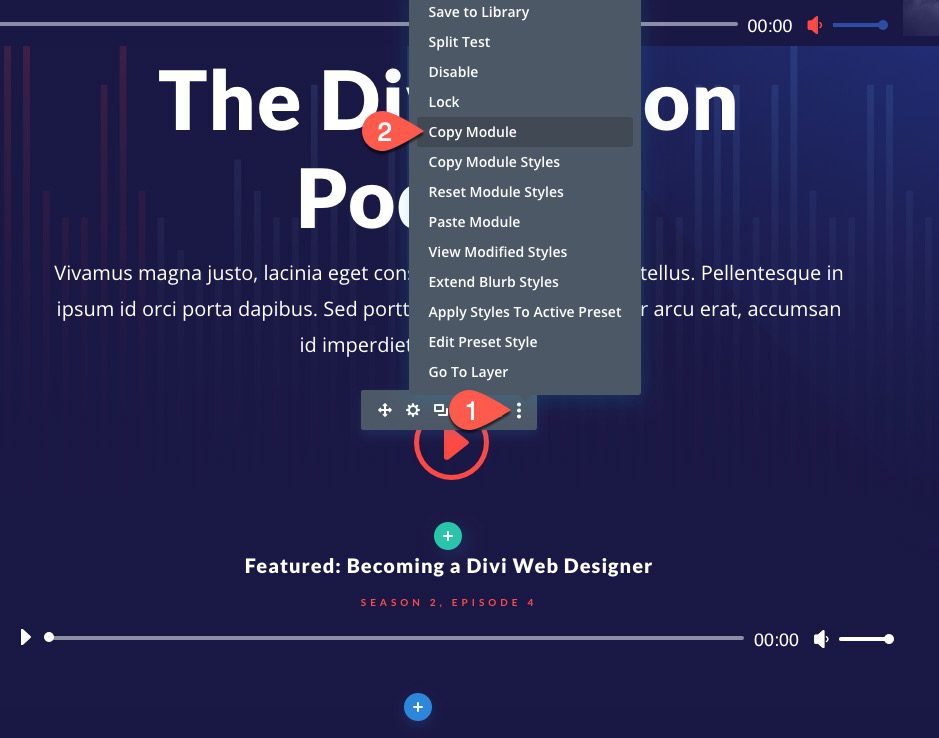
Then, paste the duplicate blurb module under the audio module in the second row of the top section.
Part 4: Styling the Audio Content
Styling the Audio Module
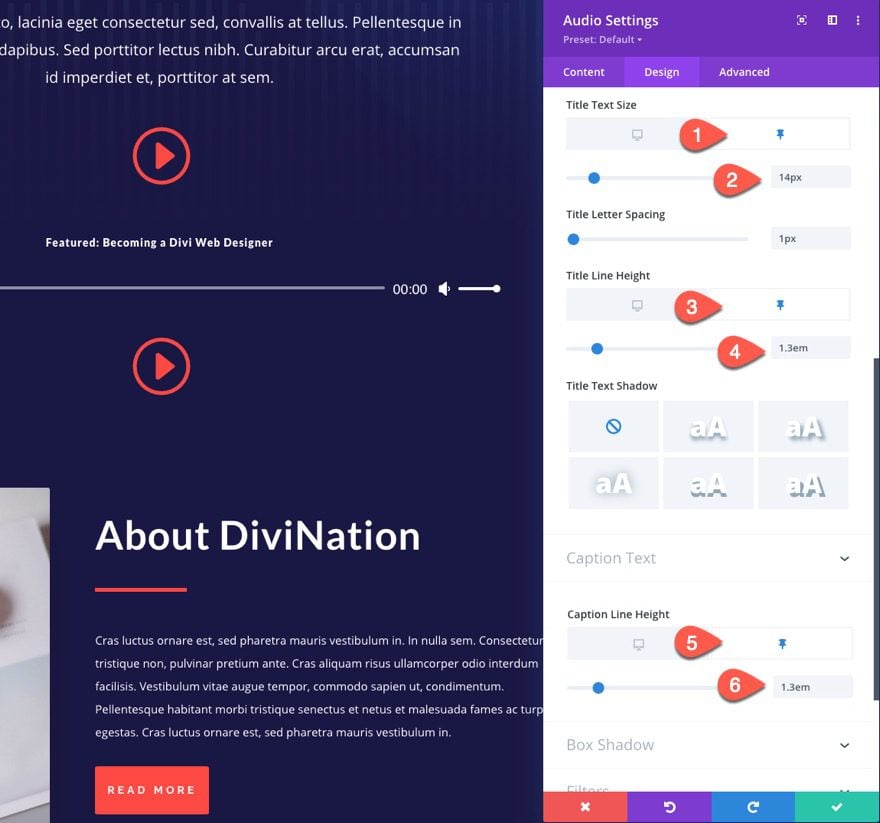
Once the row inherits the sticky position, we want to have different styling for our audio module. To do this, open up the settings for the audio module and update the following sticky state options:
- Title Text Size (sticky): 14px
- Title Line Height(sticky): 1.3em
- Caption Line Height (sticky): 1.3em
All this does is shrink the text and spacing a bit so that the audio content doesn’t take up much vertical space in our sticky bar.
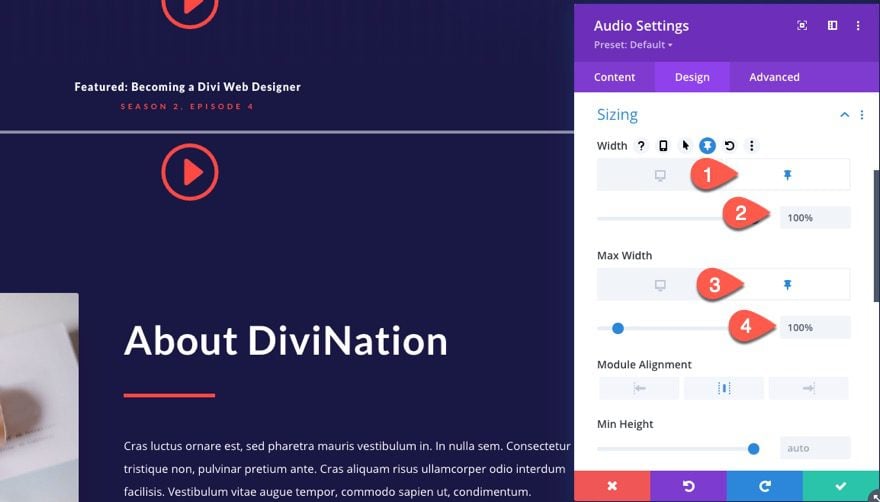
Next, we want to change the width of the audio module in the sticky state as follows:
- Width (desktop): 80%
- Width (sticky): 100%
- Max Width (sticky): 100%
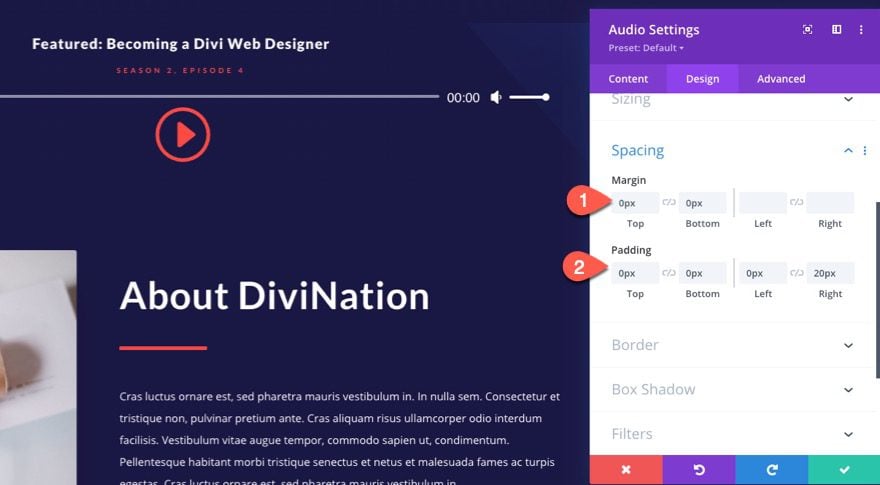
Next, we need to adjust the spacing of the audio module as follows:
- Margin: 0px top, 0px bottom
- Padding: 0px top, 0px bottom, 0px left, 20px right
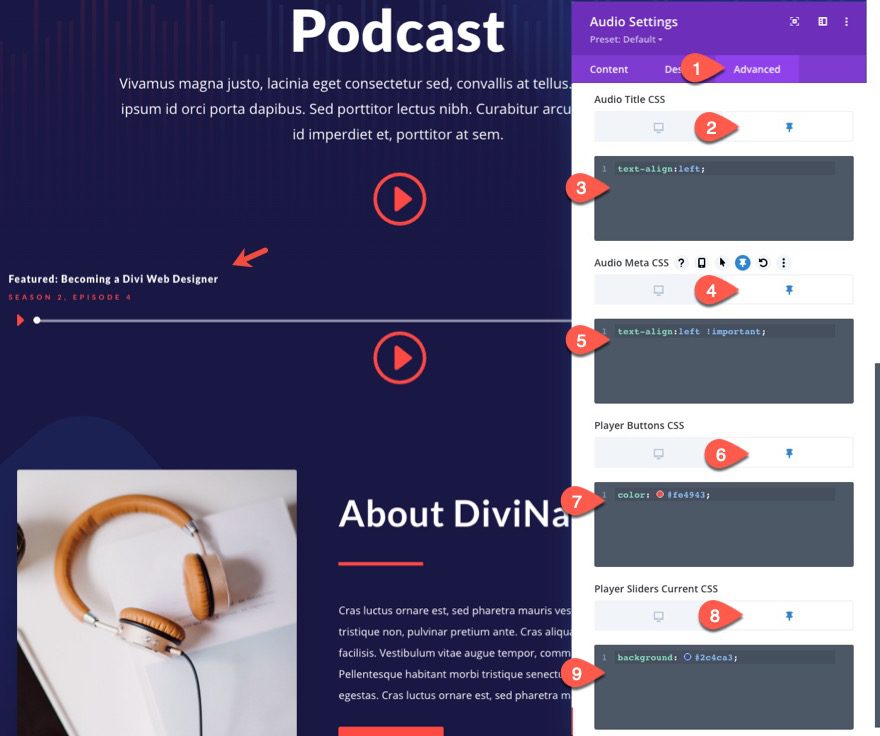
Finally, we need to add a few custom CSS snippets under the advanced settings in order to left-align our text and add unique colors to our audio player button and slider.
Add the following CSS to the Audio Title only under the sticky tab:
text-align:left;
Add the following CSS to the Audio Meta only under the sticky tab:
text-align:left !important;
Add the following CSS to the Player Buttons only under the sticky tab:
color: #fe4943;
Add the following CSS to the Player Sliders Current only under the sticky tab:
background: #2c4ca3;
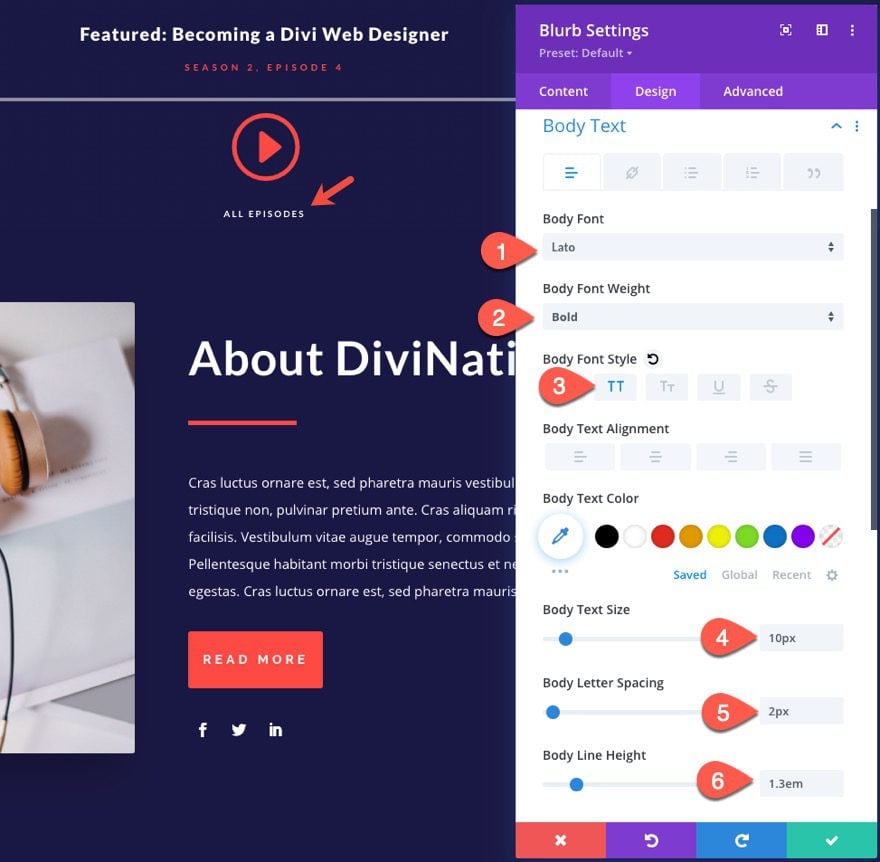
Styling the Blurb CTA
Next, we are going to style our blurb module that is going to serve as a mock CTA to view all episodes.
First, add the text “All Episodes” to the body content of the blurb.

Under the design tab, update the following:
- Body Font: Lato
- Body Font Weight: Bold
- Body Font Style: TT
- Body Text Size: 10px
- Body Letter Spacing: 2px
- Body Line Height: 1.3em
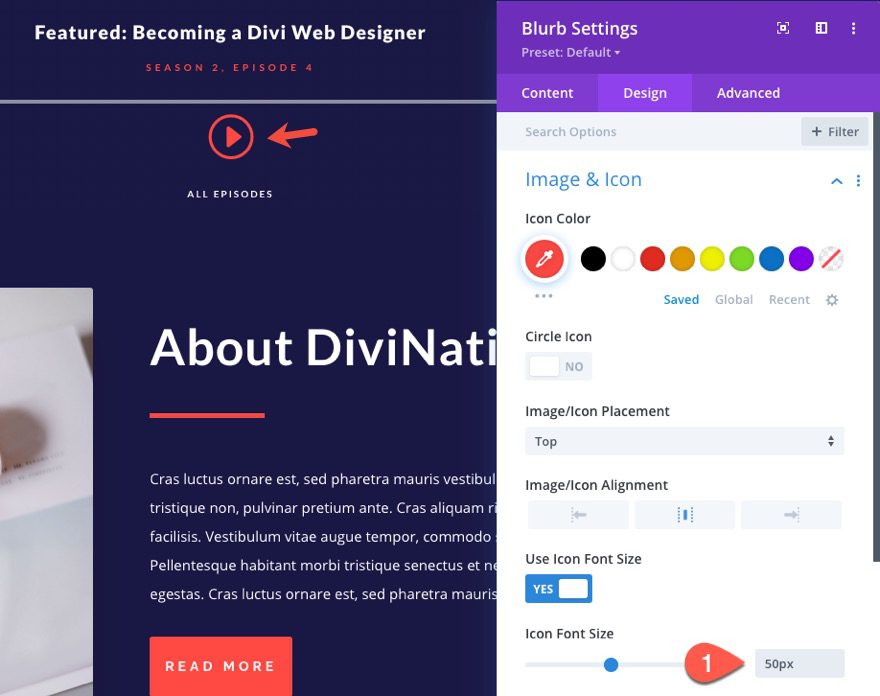
Then adjust the size of the blurb icon:
- Icon Font Size: 50px
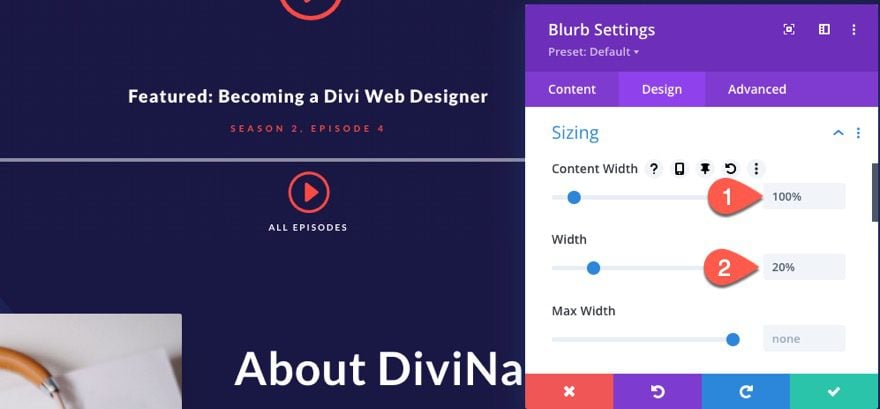
Then adjust the size of the module as follows:
- Content Width: 100%
- Width: 20%
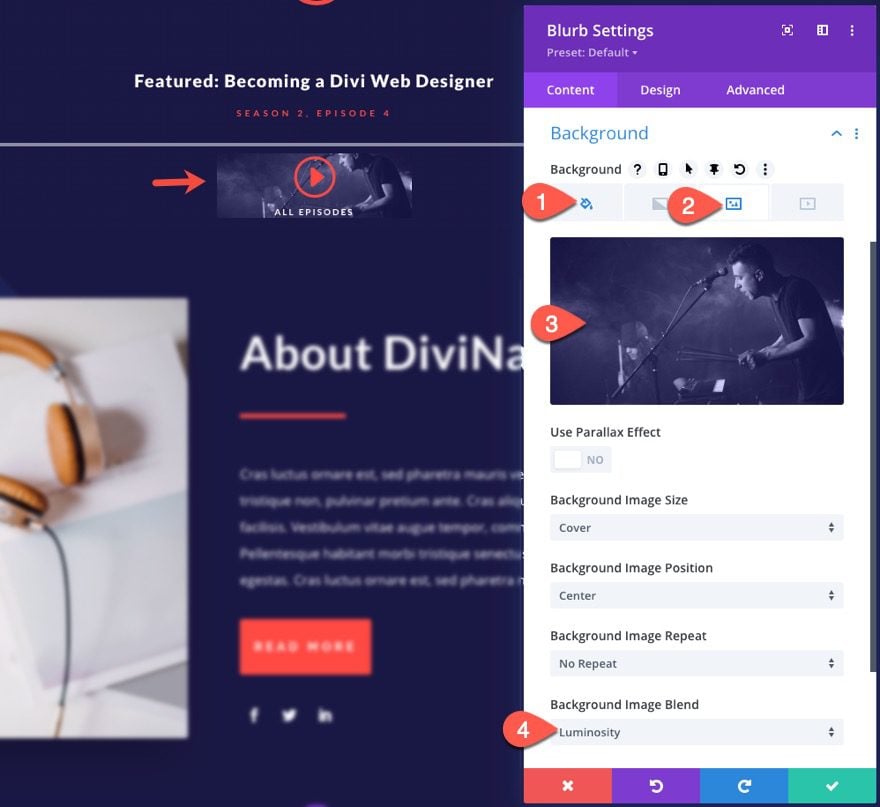
Now go back to the content tab and add a background for the blurb as follows:
- Background Color: #1a1844
- Background Image: [add image]
- Background Image Blend: Luminosity
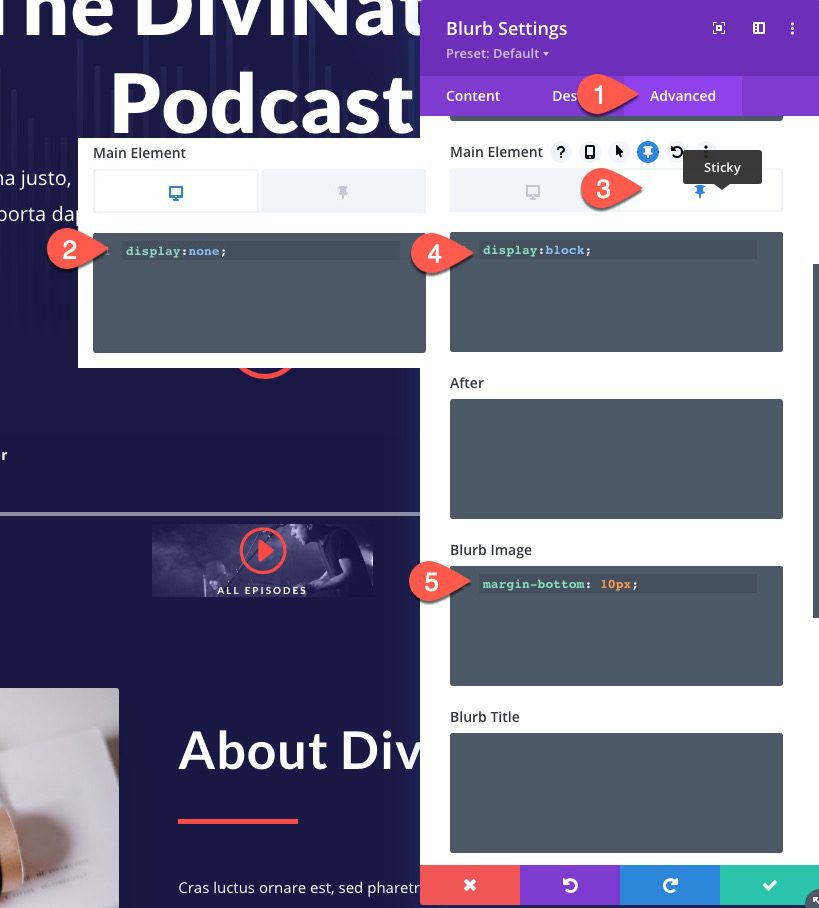
We want this module to be hidden initially from view until the row reaches the sticky state and the audio control bar is stuck at the top of the window. To do this, we can add a few snippets of css that hide the module on desktop and show the module in the sticky state.
Under the Advanced tab, update the following custom CSS:
Main Element CSS (desktop):
display:none;
Main Element CSS (sticky):
display:block;
Blurb Image CSS:
margin-bottom: 10px
Part 5: Changing the Alignment of Audio Bar Content in the Sticky State
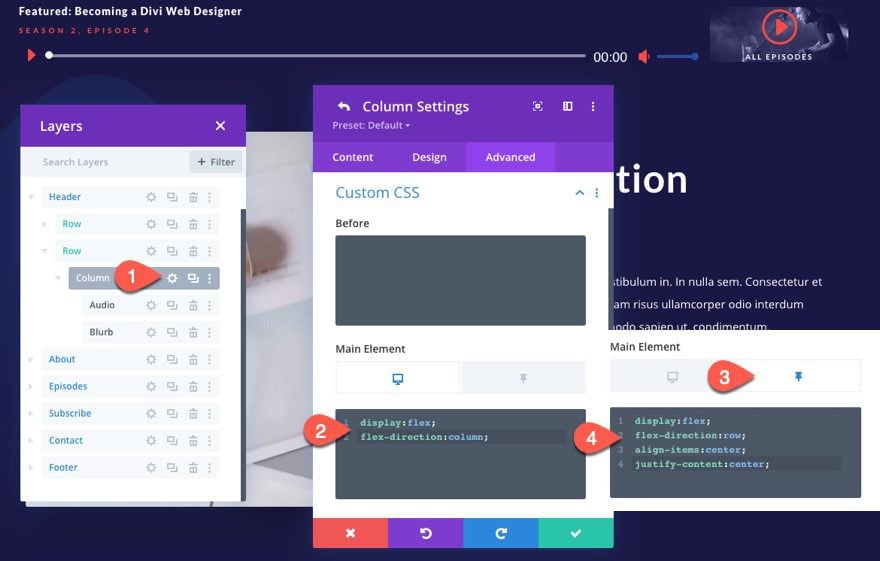
Right now the sticky row has only one column with two modules stacked on top of each other. So the sticky bar would show the CTA blurb below the audio module. This would take up too much vertical space for a sticky bar and wouldn’t look very nice.
To make sure everything is horizontally and vertically aligned within the column, we. can use the CSS flex property to adjust the layout of our modules in the sticky state.
To do this, open the settings for the column containing both modules.
Under the advanced tab, add the following custom CSS to the Main Element
Main Element (desktop):
display:flex;
flex-direction:column;
Main Element (sticky):
display:flex;
flex-direction: row;
align-items:center;
justify-content:center;
That’s it! Let’s review the results.
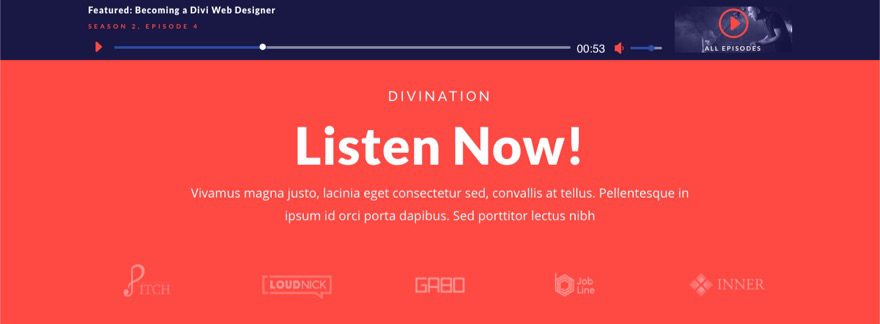
Final Result
Here is the design on desktop once the row is in the sticky state.
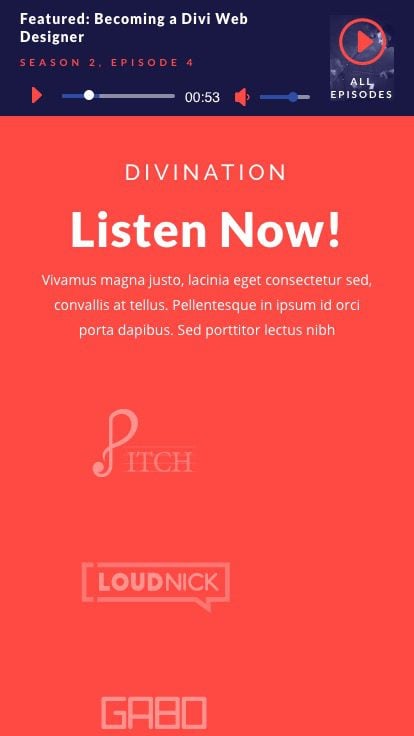
And here is the design on mobile.
And here is a few video clips of how the audio content sticky bar magic works on a live page.
Final Thoughts
Divi’s sticky position options can be a powerful tool for web designers. In this tutorial, we showed you how to create a sticky audio content bar using Divi’s sticky styling options in advanced and creative ways. One of the unique techniques featured in this tutorial was how to align the content of a sticky row using the flex property. Thankfully, Divi’s has a convenient way to adding custom code snippets to the sticky state using the advanced custom CSS blocks to give us the design flexibility we needed. Hopefully, this will give you some inspiration for creating one on your next project.
I look forward to hearing from you in the comments.
Cheers!


Will the sticky audio player respond to multiple audio files on a page, including Soundcloud embeds?
Can the sticky audio player respond to multiple audio files on a page, including Soundcloud embeds?
This is a great idea !