

Welcome to part 4 of 5 of our series Organizing and Taking Control of your Divi Web Design Business. In this series, we’re exploring several tactics, tools and strategies that will help you overcome the daily struggles that we all face as Divi Web Designers. From optimizing your daily routines, to creating systems and processes, to providing the best web design experience for your clients; we’re providing actionable items and steps that you can implement immediately with the purpose of helping you take control of your Divi Web Design business whether you’re a solo freelancer, a small agency or a remote team.
Creating a standardized process for designing and developing a Divi website is crucial to your productivity and well-being as a web designer. Though a website design project rarely goes exactly as planned, if you have a process and path to stick to, it will save some serious time and keep you on track to hit your deadlines when projects grow legs.
Refining and Standardizing Your Divi Design and Development Process
Yesterday we referenced a previous post about creating a getting started page to help prepare your clients. In that post, we talked about how to present your process to your new clients. Here’s the way I present my process to my clients:
- LAYOUT AND DESIGN – A large and time consuming part of designing a website is in the planning and layout stage of the process. I’ll create the sitemap (Page/Menu hierarchy) of the website for approval first, then I’ll design the home page and a sub page (or more upon request) for approval.
- DEVELOPMENT – Once the site layout and design is approved, I’ll move forward with designing the entire site, pages and add all functionality and plugins. We’ll make sure your site looks great and functions nicely across all devices and web browsers before moving to the final step.
- EDITS & REVISIONS – Once the site is ready for final review, you’ll be able to review each page and we can make detailed edits until the site is revised completely. We ask that you please review ALL pages to make sure all spelling, grammar, addresses and information are correct before going live.
Now you as fellow web designers know there’s more to designing and developing a website than a simple 3 step process. Mine is actually more of a 20 step process but I’ve found that if I overload my clients with all that’s involved, they’ll often overthink things when it comes to providing content. Here’s what my Divi Web Design/Development process actually looks like in a little more detail:
- Create page and navigation layout for approval
- Header and footer designed
- Home page designed
- Sub page(s) designed
- Send to client for approval
- Revisions on header, footer, home and sub page
- Once approved, build out remaining pages
- Create templates for standardized sections of website and recurring pages like galleries, projects, products, etc
- Implement all integrations for mail list sign ups, social media, widgets, etc
- Create and test all contact forms
- Adjust and optimize design for mobile and responsive use
- Input necessary SEO settings
- Double check site grammar and content
- Cross browser check and bug fixes
- Send for final review
- Make all final client revisions
- Create client custom dashboard and training video (if necessary)
- Delete unnecessary plugins, images and tools
- Backup site and save locally
- Launch site
This process is often broken down into even more detail but this is a basic structure of all that’s involved with every one of my builds whether it’s a 5 page brochure style site or a 50 page site with events, e-commerce, etc. I have all of this as a checklist and it’s been a good practice for me to make sure I’ve not overlooked anything before launching a site. Creating a checklist like this and putting a timeline along with it can be a very efficient way to make sure your design/dev process is lining up with your project deadlines.
Ok, now that you have an idea of how I’ve organized my internal design/dev process, let’s get into some more detail on how you can optimize YOUR Divi Web Design processes.
1) Creating a Standard Design Process

One of the best recurring questions and discussions I see in the Divi Facebook groups is something to the effect of “How do you design your Divi site?” Do you mock it up in Photoshop or Illustrator? Do you create a basic wireframe for the client to approve? Do you just dive into Divi and do it live?
There is of course no right or wrong way to do this. I’ve found that however you choose your design process, it needs to do 3 things:
- It needs to work for you or your team
- It needs to work for your client
- It needs to save you time
When I start a new project, I tend to create a very rough sketch on paper and dive right into Divi to design the the header, footer, home page and whatever sub pages are needed for initial approval.
Here’s why:
- It works for me – Traditionally web design starts with an extensive wireframe process via paper or program such as Adobe Illustrator to design and show the client for approval before even going online. This method works for some and can be a very efficient route particular if you’re in a team and you turn your design over to a developer to code. But once Divi came along, it changed my process completely. I now dive right into Divi after I have a basic structure and visual concept in my mind and on paper.
- It works for my clients – I’ve found that clients love seeing an actual live preview that they can see on a browser much more than a flat mock up. Sometimes the flow and feeling of a site can get lost in a one page mock up whereas when a client sees the site live in a browser, it often leads to a much bigger “wow factor.” They can see hover overs, scrolling effects and the flow of the site design which makes for a great first impression and often less edits and revisions.
- It saves me time – I can change things so quickly with CSS and my saved layouts and settings in Divi that it would be senseless for me to have to make those revisions in photoshop or illustrator then duplicate the same in my stylesheet and Divi settings. I save a tremendous amount of time with revisions and initial designing by doing things live using inspect element directly on my Divi development site. I can also make changes and revisions on sites often while I’m on the phone with clients. You can look like a real web designer rock star when a client asks you to change a few things and you have it done while on the phone with them or in a matter of minutes.
Now again, this design process is what works for ME as a one man shop. With a team, the process needs to work for all involved. But most freelance web designers are a mix of designer/developer so do whatever process works for you, works for your clients and saves you time!
2) Utilizing the Divi Library and Your Previous Work

One of my favorite features of Divi is the ability to save your layouts and page designs. This feature is a game-changer and can save you some serious time when designing and developing with Divi. In a recent DiviChat episode, the panel talks about saving multiple templates of page designs, then just deleting the ones that they don’t use on a new site. Talk about a way to save some time! If you can come up with a series of page layouts and page templates and all you have to do is import and change content, colors and images, you’re shaving off hours of potential designing and development.
Here are 3 quick tips I’ll offer when it comes to saving Divi Library items and previous work:
- Save your CSS – I have a “master stylesheet” with the majority of CSS code I’ve written for certain modules, page sections and classes I want to mimic on other sites. That way I can open it up and pull whatever code I’d like to use on the current project. It’s done wonders for saving time instead of having to rewrite lines of CSS over and over.
- Create Divi Library Items – Saving layouts as library items can be a great way to save your work in pages or as a full site that can be duplicated and easily changed with images and colors. If you’re not sure how to do this, follow this tutorial.
- Export json Files – I’ll often have clients that will reference a page from a previous site so instead of having to recreate that from the ground up, I’ll often export that page from the old site, import it to my new site and adjust the styles and images accordingly! Again, another great way that Divi saves us time in the design and development process. More details on that here if you’re not familiar.
3) Revealing Your Website to the Client

This is one of my most important, yet overlooked and underrated aspects of web design in my opinion. So much rests on a first impression and what the client thinks initially when they see your new design. If you do a mockup or wireframe, naturally the first impression will be slightly underwhelming until the client sees a live version online which is totally understandable and again, may work depending on the complexities of your process from design to development. As you saw in my process above, I prepare the header and footer and design the home page in full along with typically one subpage or more depending on the needs of the project then send for review. How I send the client my initial design has recently changed however, to great effect.
I used to just send the live development link so the client could view the site themselves, at their own leisure. This worked pretty well but I found that the rare chance that I got to do a preview in person or over Skype, those first impressions went even better and why? I believe it’s because the client got to hear my vision when they saw the site and it allowed me to walk them through my ideas of design, color and aesthetics without them making their own judgements first.
Now I create a quick (usually less than 5 minute) preview video of me walking them through the site! This has been received with overwhelmingly positive feedback so far. Is it a little time consuming but I find it well worth it to get an amazing first impression from my clients.
Here’s a screenshot of how I show off a new site to a client on Basecamp:
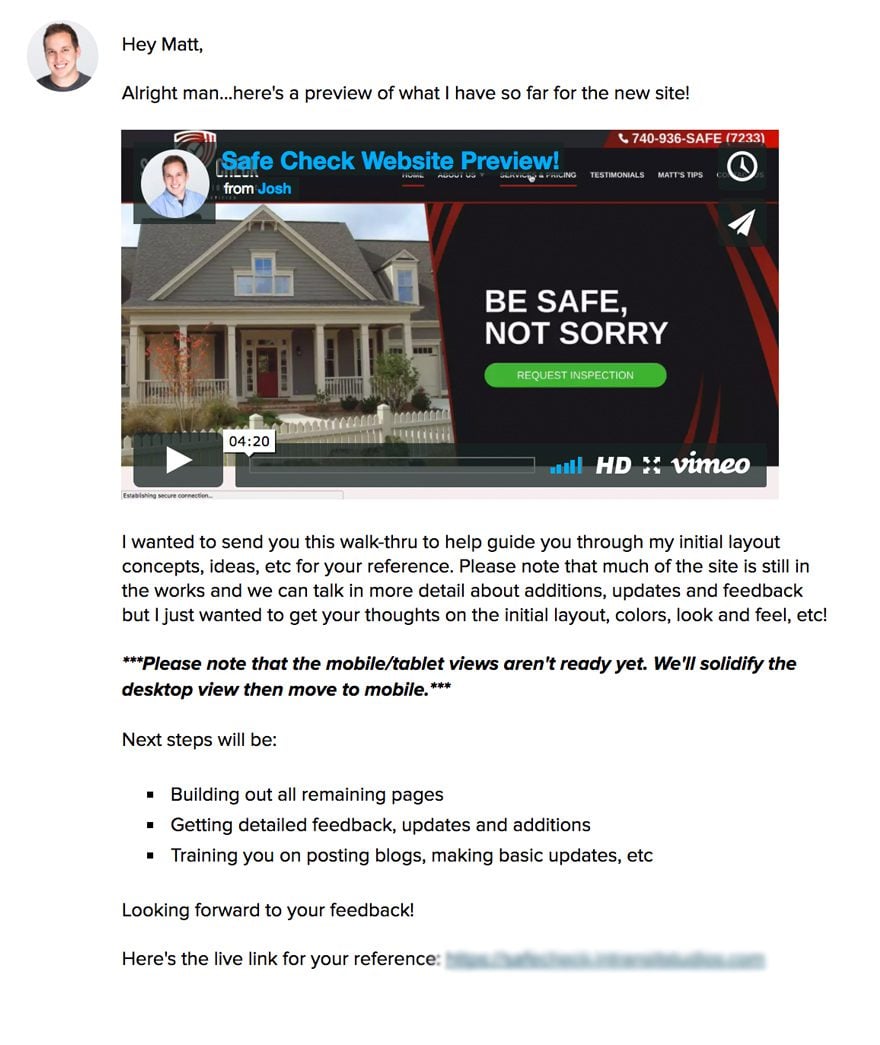
I record my walk-through videos with Screenflow for Mac. I then upload the video to my Vimeo channel and make it a private video. From there, as you can see in the snapshot above, I send that video link to the client along with a short description, a bullet list of what to expect next and the actual URL of the dev site for the client to see on their browser after they watch the video.
Here are a couple of my recent preview videos if you’d like to see how I present the new sites to clients:
4) Handling Revisions and Edits

Finally, a major part of your design and development process is going to be how you handle client revisions and edits. If you’ve been designing websites for any amount of time, you know that this process can be time consuming. In-person meetings, extended calls and random emails with little changes here or there can be massive time wasters in the editing and revision process.
There are a few ways to combat this. I try to get all my clients to post all their revisions (per page if necessary) in Basecamp where I create a discussion for revisions. I will agree to a phone call or in person meeting if necessary but only after initial changes are sent the way I want to receive them first. I also make it VERY clear that I don’t want to get revisions one at a time, over multiple days via email. I tell my clients if possible to collect them over a few days and post them all at once or as many of my clients seem to like to do, to organize them all in a .doc or .pdf.
Going back to the previous post in this series and my talk with the guys from Artillery Media, they have a very streamlined process for revisions in which they require their clients send their edits in a doc on Google Drive and so they can then make the edits all at once. This is also big time saver. The trick here is to make the editing and revisions process work for you in the most time saving manner possible. And just a word of advice, each client has his or her own way of doing things, so it’s your job to guide them on how you want revisions and edits 🙂
In Closing
Well I hope these ideas and my design/development process have encouraged you to create your own if you don’t have a standardized process in place already! If you have some processes that work well for you, feel free to let us know in the comments below!
Next Up: How to Effectively Manage Multiple Divi Web Design Projects

When you have multiple projects going on, it’s hard to manage all of them while staying creative, juggling deadlines and meeting client expectations. In our final post in this series, we’ll talk about some ways you can effectively manage all of your Divi Web Design projects so that you’re able to balance onboarding new clients, designing, developing and sticking to the deadlines you’ve set out to hit. All while staying creative and fresh. Till then!
Be sure to subscribe to our email newsletter and YouTube channel so that you never miss a big announcement, useful tip, or Divi freebie!


Really great article! I learned a ton from reading about how you approach the website design and customer interactions aspects of your freelance business.
I have recently started a website freelance business and I’m finding it a slow burn when trying to get new customers. I have several thoughts on how to turn this around, but if you have any feedback I would greatly appreciate it.
Again, I just wanted to thank you for sharing this information, it’s invaluable.
All the best in business pursuits. And you can rest assured I will be incorporating some of your strategies.
Take care.
Victor R Bennett
Hey Victor,
Thanks for your feedback and for taking the time to read and implement some of these ideas! Getting new clients is definitely something that takes time and more importantly, effort and honest, ingenuity. I did go over some options as to how I got started in this article: elegantthemes.com/blog/divi-resources/how-to-start-getting-clients-for-your-divi-web-design-business
Let me know if that helps!
Thanks again Josh. Will check out the link.
Thank you so much for this post. This is going to help me a lot with my work.
GREAT to hear! Thanks for your feedback, Angela!
About: Like I said, my actual checklist is perhaps more along the lines of 100 points ? But I thought 20 would be sufficient for the post.
If you don’t mind sharing it, the more detailed checklist would be great for beginners like me!
Thanks for your comment, Dave. With some of these steps, there are so many different tools to use and ways to go but I can certainly understand wanting to see things in more detail if you’re just getting started.
I’m actually revising and updating my process currently to be more efficient so once I have that in place, I may work on a similar post in more detail!
A lot of great ideas to consider! Do you have any advice or resources for those of us who do prefer to create a mockup in Photoshop first? Also – you should provide a link to the first installment of this series in the first paragraph or someplace. Thanks!
I don’t know if any off hand for photoshop to development but there was some good points on that covered in this DiviChat episode that might be useful for you! divi.chat/divi-changed-workflow/
And I’d love to be able to link back to the first post in here but once these posts are submitted for scheduling, the posts aren’t live so there’s no URL to link them back. But you can just go back through the blog page here or I’ll have the whole series achieved and linked back on my blog once they’re all up!
Thanks for the lead re the divi.chat Josh, I’m excited to check that out!
I know about not being able to add a link to something that isn’t live yet. But presumably, since this is part 4, you could add the link now to Part 1. Or if you don’t have access to the website, could you just paste the link to Part 1 here?
Here’s part 1 for you!
https://www.elegantthemes.com/blog/divi-resources/creating-efficient-routines-for-your-divi-web-design-business
Josh thanks for the video walkthrough, it’s much appreciated as a way to replicate.
Great to hear, Bruce. Glad it was of some inspiration for you!
Thanks again, I read this to start my day as apposed to checking all my emails and social. Thanks for the advice…
I am looking forward to the final article…
haha awesome. Love hearing that and seeing some of these ideas played out!
Saving the layout or design in the library is the most exciting feature in Divi. It saves a ton of time especially if you are recreating similar kind of pages or modules.
Thanks to your team.
Totally agree, Rupesh. It is one of the many things I love about Divi. Thanks for your feedback!
Josh, thanks for sharing your process. My process is similar to yours. I’ve been “live concepting” with Divi for a couple of years now.
Some steps just before or after launch that I would add to your list:
– (for existing sites) Do a Google site search for existing links and create all necessary 301 redirects in .htaccess or via redirect plugin.
– Verify (twice!) that search engine robots are not blocked in WordPress settings.
– Add Google Analytics script via header.php or plugin.
– Force https via .htaccess or plugin if the hosting environment supports it.
– Check launched site via Chrome Icognito mode, to be certain browser caching and/or cookies are not masking anything about final version of site.
– Run site through favorite SEO analyzer to see if there are any glaring errors or serious performance problems.
That’s great input, Rich. Yea I actually do most of that (though a couple in there I need to get better at doing). Like I said, my actually checklist is perhaps more along the lines of 100 points 🙂 But I thought 20 would be sufficient for the post.
Thanks again for your feedback and valuable insight on the going live checklist!
Awesome article Josh, as usual!
Do you develop your clients’ websites directly on your website? How do you handle that aspect of development?
Hi Josh. Thanks for the very detail tips.
For mobile layout, do you use responsive mode or you make a new design separately?
I just use responsive mode and either turn off/on modules where needed and use CSS media queries to adjust certain things. I try to give mobile and desktop the same feeling depending on the client and their needs. Thanks for your comment!
Very cool on the walk through. Nice work!
Thanks, Kolleen!
Great info! Definitely love the video walk-through idea and those tips on revisions I’m going to implement right away! Thanks Josh!
Awesome to hear, Jeremy. I love knowing that the community is able to take some of these ideas and put them into action. Thanks for your feedback!
Video walk-through is a great idea! Thanks for sharing this handy tip.
I can’t agree more. That’s my biggest takeaway from this series.
No problem, Chathura! Happy to help 🙂