

Text underlining styles have always been pretty limiting. The most common method for underlining text on the web is to use the CSS property “text-decoration: underline”. Divi even allows you to deploy and style this type of underlining within the Divi Builder Module settings. But this standard method of underlining does come with limitations when it comes to style and cross-browser support.
Granted, in most cases, underlining text doesn’t need to be complicated. For example, underlining all the links on your site to show they are clickable is a standard application that doesn’t necessarily need any alternative methods. But, if you are looking to take underlining to the next level, this post may help.
In this tutorial, I’m going to walk you through how to apply some alternative text underlining styles to your text in Divi. I’ll show you the standard method using Divi’s built-in options for underlining text. And I will also show you how to use bottom borders as an alternative method for underlining text. Using a bottom border not only gives you more control over the styling, but it is also supported across all browsers.
Let’s get started.
- 1 Underlining Text with Text Decoration (common method)
-
2
Underlining Text Using a Bottom Border
- 2.1 Limitations to Using Bottom Borders for Underlining
- 2.2 Understanding the Difference Between Block and Inline Elements
- 2.3 How Add Bottom Border Underlining to a Single Line of Text (a block element)
- 2.4 How to Add Bottom Border Underlining on Block Elements (like headings) that Split Across Lines
- 2.5 Adding a Bottom Border Underline to Inline Links in Divi
- 3 What about Dividers?
- 4 Final Thoughts
Underlining Text with Text Decoration (common method)
The most common and straightforward way to underline text is using the text decoration CSS property. In fact, Divi allows you to style text using this method easily within a module’s built-in options. Simply look for the Text Font Style option and select the “U” icon to deploy the underline text decoration. Once the underline font style is selected, you will also have the option of customizing the color and style of the underline.
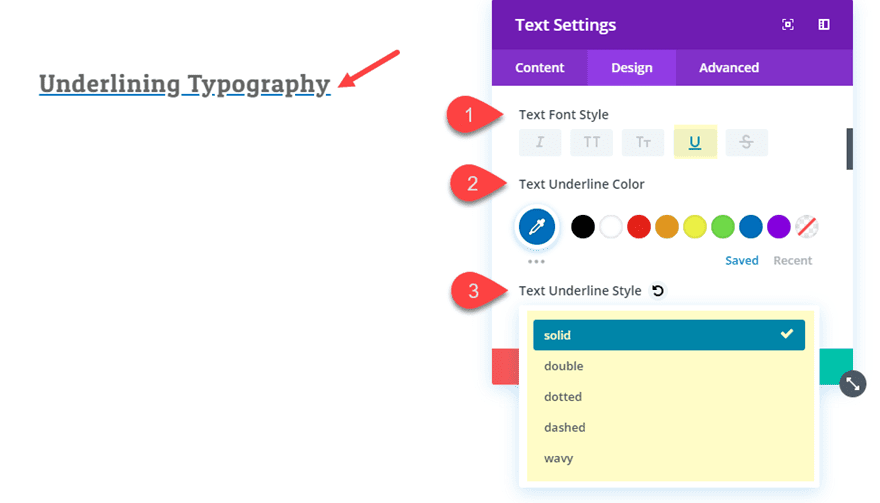
This allows you to have an underline color that is different from the actual text color.
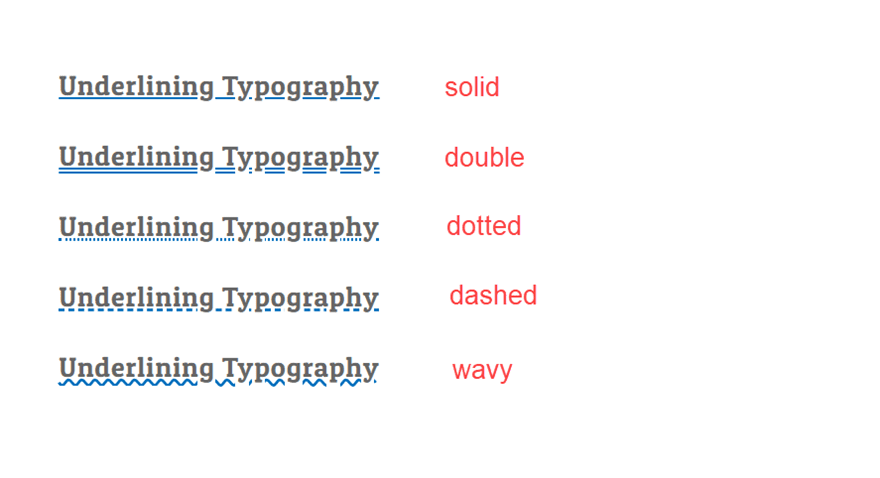
And you can choose from the following underline styles:
- Solid
- Double
- Dotted
- Dashed
- Wavy
You can even target the underline style of links inside of body text. This gives you more control over the design when using the Text Module. Simply select the Link Font tab under the text design category toggle. For the Link Font Style, choose “Underline”. Then you can customize the link underline color and style accordingly.

Text Decoration Underline Style Limitations
Lacks Ability to Adjust Width and Position of the Line
Unfortunately, when adding the text-decoration: underline css property using Divi’s built-in settings, there is no option to adjust the width of the line or the position of the line. The width of the line is relevant to the font size so it will increase as you increase font size. And because the position of the underline sits at the baseline, the descenders (lower case letters that drop below the baseline) will get in the way of the line causing some inconsistencies especially with words that have a lot of descenders (like “Typography”).
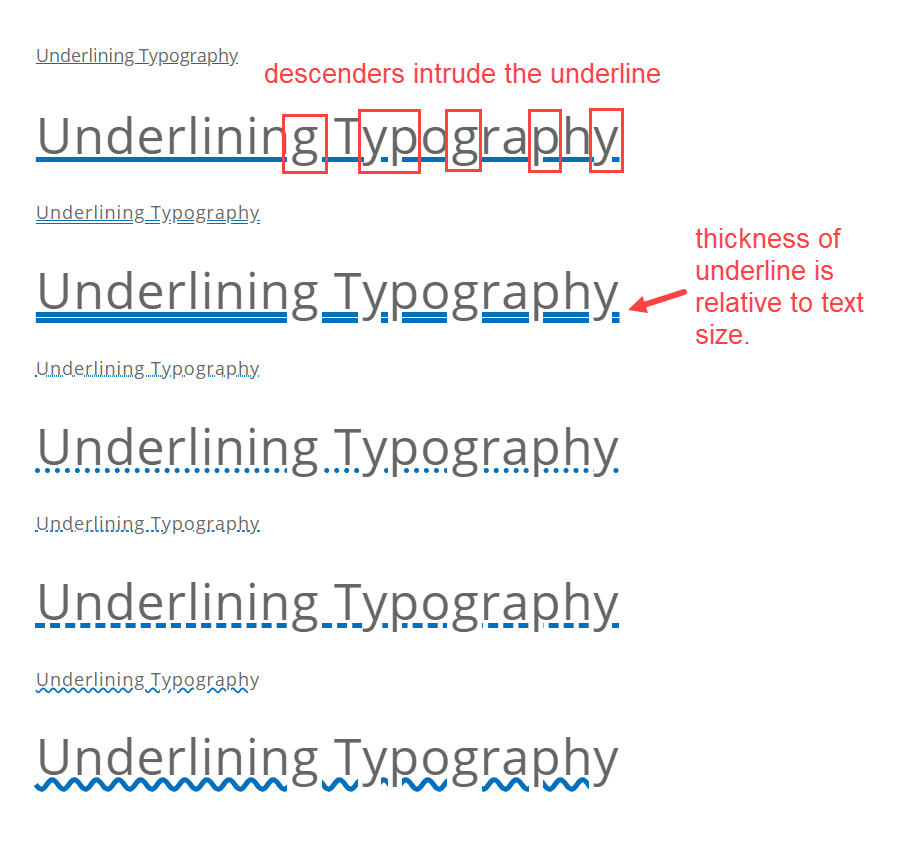
This limitation may not be an issue if you are using all uppercase text because you won’t have any descenders to worry about. It would be nice if there was support for adjusting underline width and underline position, but for now we are out of luck.
Lacks Browser Support
Internet Explorer does not support the text-decoration-style or the text-decoration-color property, so the underline style (double, dotted, dashed, etc…) and underline color can’t be customized. Safari does not support the text-decoration-style property either but you can change the underline color.
This lack of support is not limited to Divi. Even custom CSS won’t help you.
Underlining Text Using a Bottom Border
If you are looking for an alternative solution for underlining text styles, the best option in my opinion is to use a bottom border. Here are some good reasons to do so:
- A border supports eight different border-styles to style your underline including: dotted, dashed, solid, double, groove, ridge, inset, and outset.
- You can customize the width (thickness) of a border independant of the font size.
- You can position borders to be closer to or farther from the text.
- You can add any color your want to borders.
- Border Styles are supported by ALL browsers.
Limitations to Using Bottom Borders for Underlining
- Limited to a Single line of text on block elements. But there are ways around this (see below).
- Positioned completely below descenders and a little difficult to get the position right (but doable).
Understanding the Difference Between Block and Inline Elements
In order to understand how border underlining works, you need to know the difference between block and inline elements.
Block elements
Block elements will automatically span the full width of its container (unless a custom width is set) and begin on a new line. Websites (including those built with Divi) are full of block elements.
Some examples of common block elements include:
- Divi Sections, Rows, Modules (div)
- body text or paragraphs (p)
- headings (h1, h2, h3, h4, h5, h6)
- lists (ol, ul)
When adding a bottom border to block elements, the border will sit below the entire block. So if the you have a paragraph of text (p) or a heading (h1) that breaks into two or more lines, the bottom border will only be applied to the bottom of the block, not the individual lines of text.
Here is an example of what adding a bottom border to a h1 heading block element looks like when the text breaks into multiple lines.
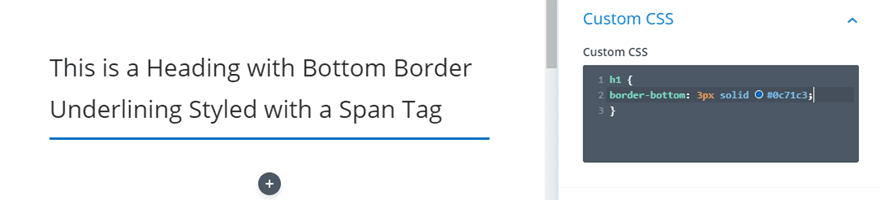
Even though the css is targeting the h1 tag, the line is only applied to the block element. Therefore the line is only applied to the very bottom and not to each line individually.
Inline Elements
Unlike block elements, inline elements can split across multiple lines. So if you add a bottom border to an inline element (like a link for example), the bottom border underline will be applied even if the link breaks into a new line. Also, you can adjust the padding of inline elements without affecting the line height of the body text which is great for positioning the bottom border underline.
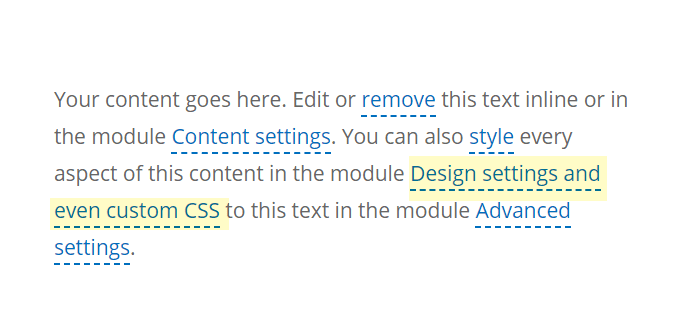
Here is an example of some links (which are inline elements by default) that have bottom border underlines.
Simply put, inline elements can have bottom border underlining when breaking into multiple lines and block elements cannot.
How Add Bottom Border Underlining to a Single Line of Text (a block element)
Here is an example of how you would add a bottom border to a single line of text using the Text Module built-in settings. This option works best for headers since you will be limiting the text to a single line.
Create a new section with a one column row. Then add a text module with the following content:
Underlining Typography
Then update the text module settings as follows:
- Text text Size: 46px (desktop), 40px (tablet), 26px (phone)
- Text Line Height: 1.8em
- Width: 517px (desktop), 450px (tablet), 293px (phone)
- Bottom Border Width: 2px
- Bottom Border Color: #0c71c3
- Bottom Border Style: Dotted
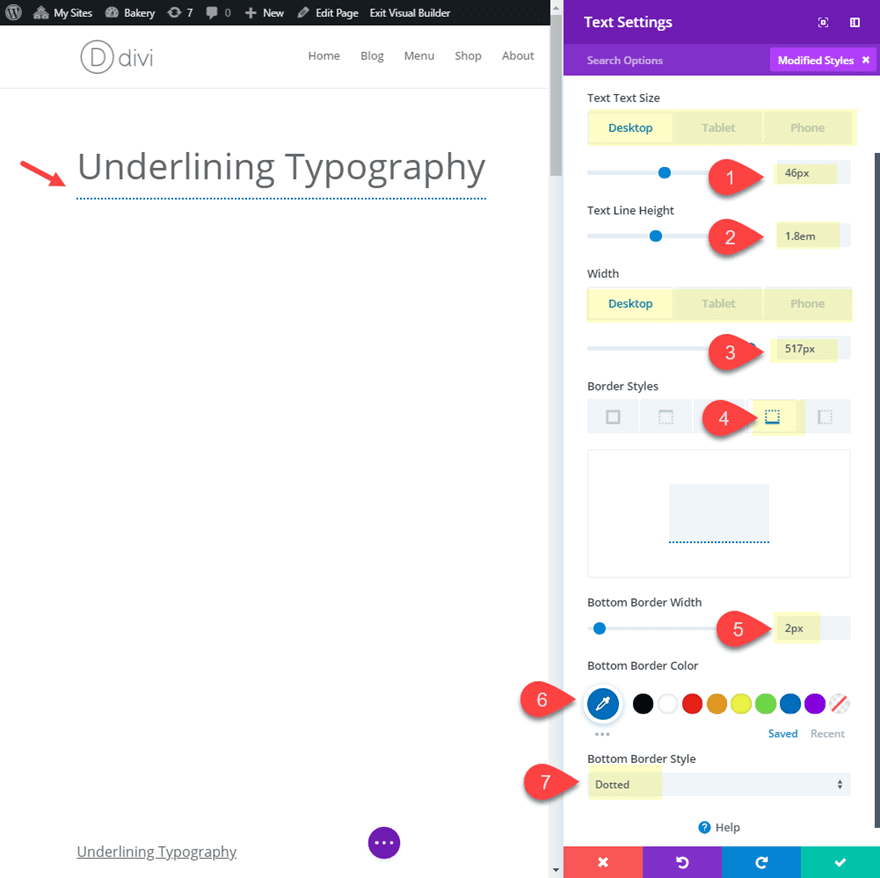
As you can see, the border can be styled using width, color, and style. Since the bottom border is being applied to the module, it is necessary to adjust the width of the module to the same width of the text. So, you will need to modify the text size and module width accordingly.
How to Add Bottom Border Underlining on Block Elements (like headings) that Split Across Lines
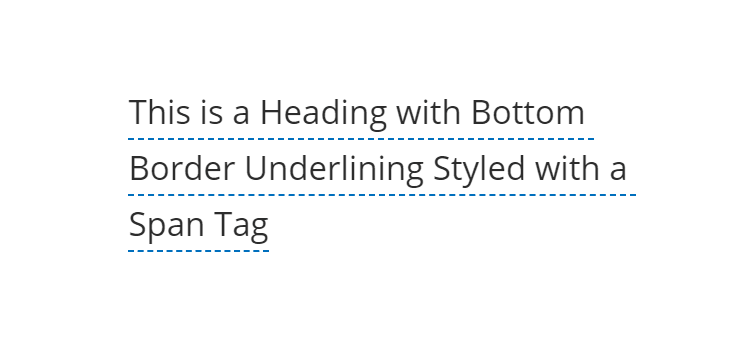
As mentioned earlier, block elements like headings (h1, h2, h3, etc…) don’t allow the bottom border to be applied inline on each line break. To get around this, we can simply wrap our text with a span tag. A span allows you to group inline-elements (like a group of text) together to add styling to those elements. So, if we want to a bottom border to an h1 tag (a block element), we can wrap the text inside the h1 tag with an additional span tag. Then we can add the bottom border underline style to the span tag. This will allow us to underline the h1 tag text (or portions of it) even when it breaks to another line.
Here is an example of how you would add a bottom border to block elements (like headings) that split into multiple lines of text using custom CSS.
First, add a new section with a one column row. Then add a text module to the row. In the content box, replace the default mock text with the following:
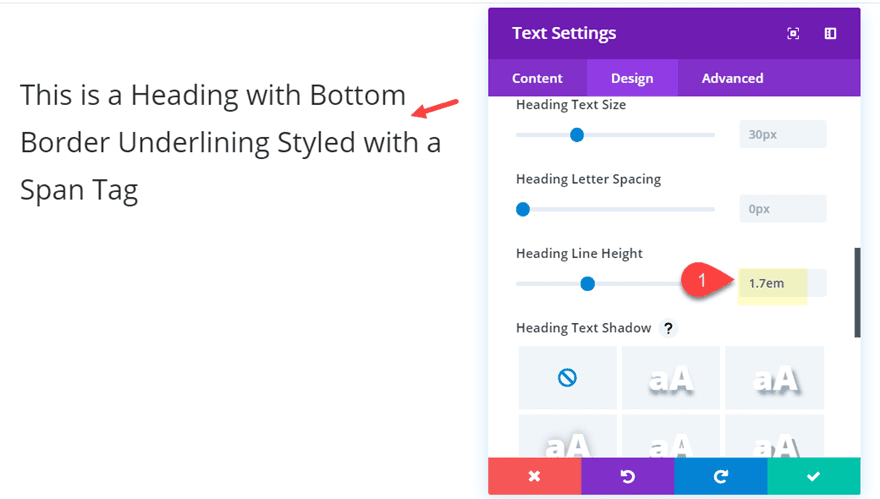
<h1><span>This is a Heading with Bottom Border Underlining Styled with a Span Tag</span></h1>
Since we are going to be adding a bottom border underline, let’s increase the h1 heading line height as follows:
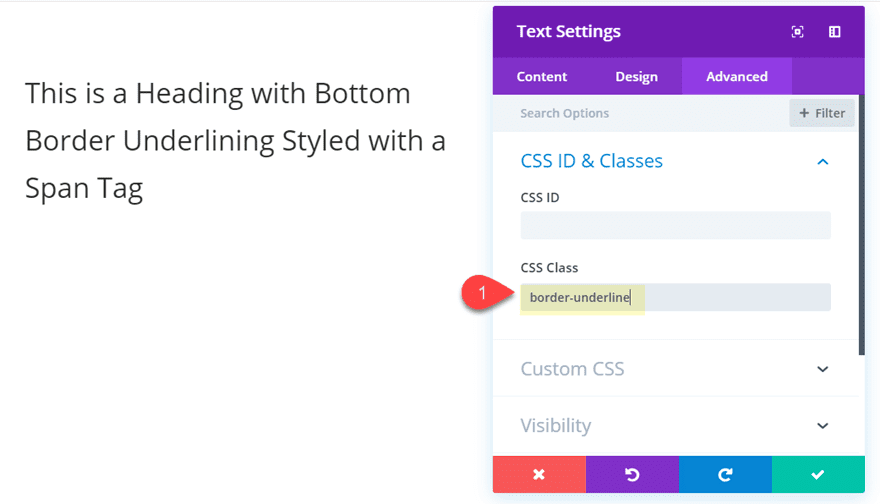
Next add the following Custom CSS ID under the advanced tab:
CSS ID: border-underline
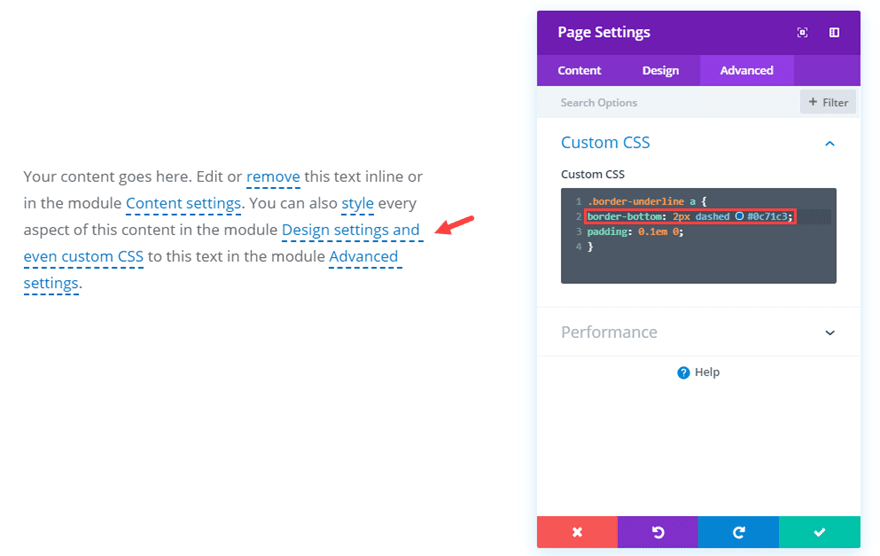
Next open the page settings modal and add the following Custom CSS:
.border-underline span {
border-bottom: 2px dashed #0c71c3;
padding: 0.1em 0;
}
This bottom border styling is being applied to the elements within the span tag. And because the span tag is an inline element, the underline will will be applied to the text on each line.
The border-bottom property can be customized however you want. The first value (2px) sets the thickness (or width) of the border. The second value (dashed) sets the style of the border. Don’t forget, you can also use the following border styles: dashed, dotted, double, groove, ridge, inset, and outset. And the third value (#0c71c3) sets the color of the border. You can also tweak the custom padding css in conjunction with the text line-height value in the text module built-in options to get the spacing just right as well.
If you don’t need the span tag and want to convert the entire h1 tag to an inline element, you can use this CSS in page settings instead:
.border-underline h1 {
border-bottom: 2px dashed #0c71c3;
padding: 0.1em 0;
display: inline;
}
Notice that this css is targeting the h1 tag. In addition to the bottom border and padding styles, the “display: inline” changes the h1 tag to an inline element which allows h1 text to have underlining on multiple lines.
Adding a Bottom Border Underline to Inline Links in Divi
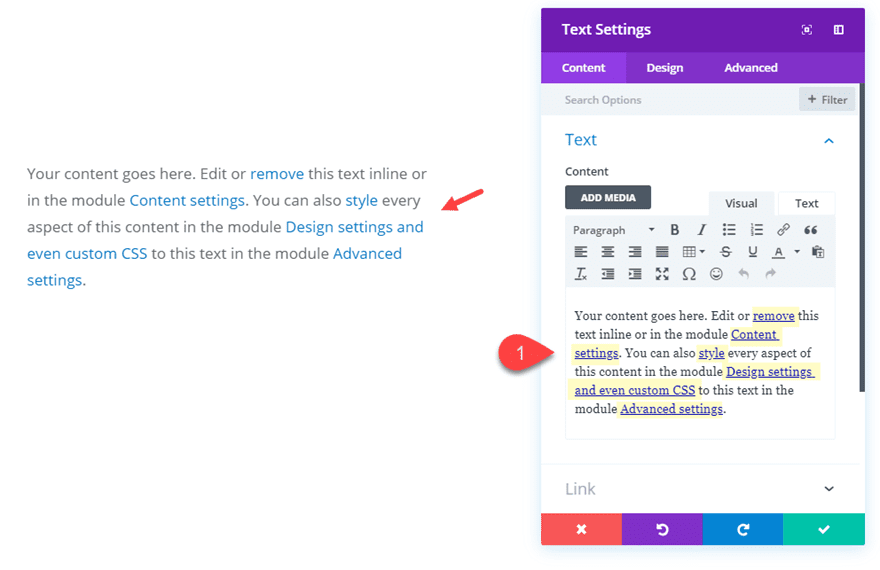
Here is an example of how you would add a bottom border to your inline link text in Divi using custom CSS. First create a new section with a one-column row and add a text module to the row.
Then use the wysiwyg editor to add some links to the body text so you have some links to work with.
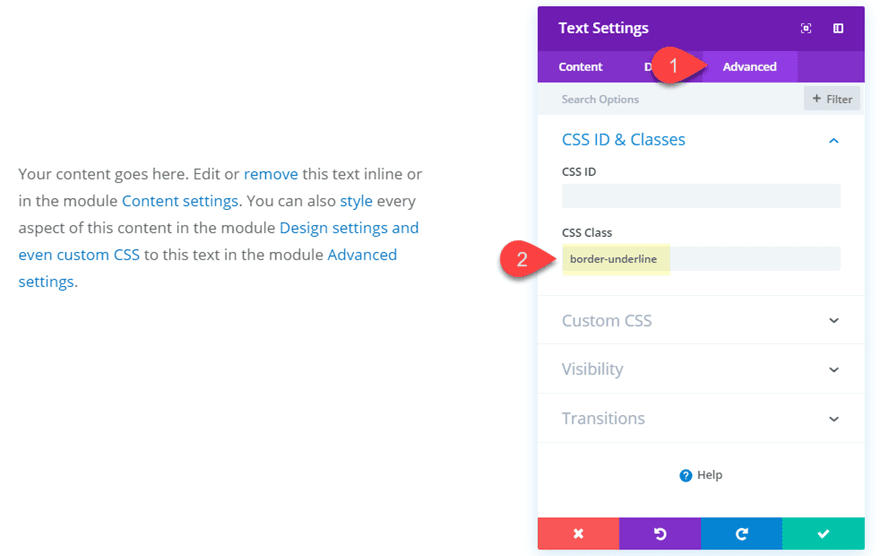
Then add a custom CSS class under the Advanced tab as follows:
CSS Class: border-underline
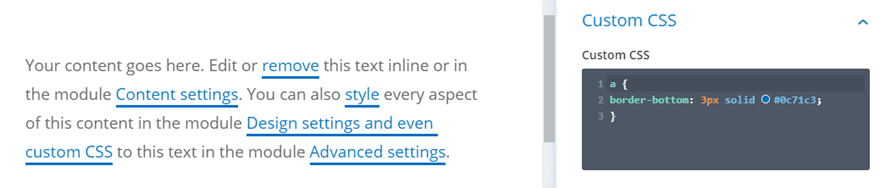
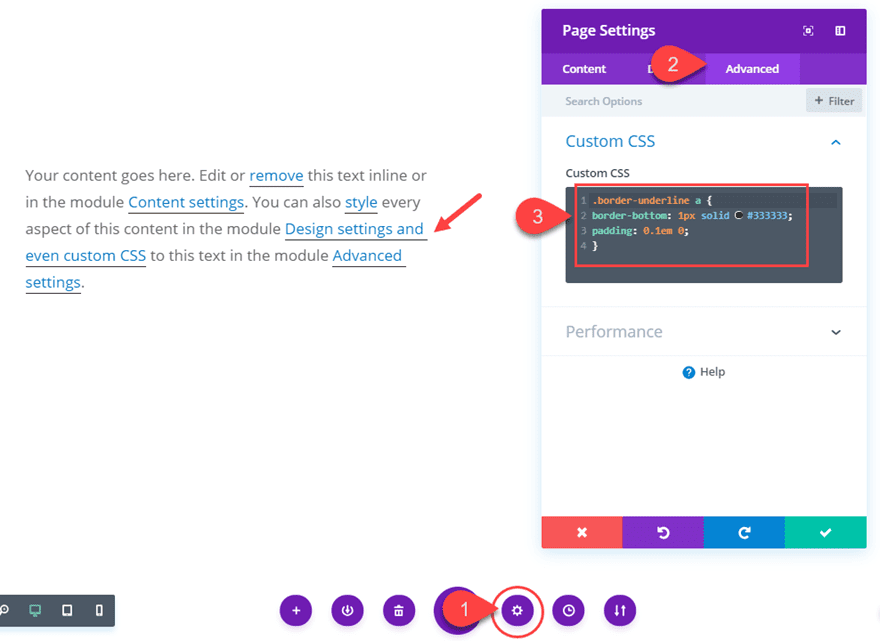
Now open the page settings and add the following custom CSS to apply the bottom border to all the links inside the text module.
.border-underline a {
border-bottom: 1px solid #333333;
padding: 0.1em 0;
}
The border-bottom property can be customized however you want. The first value (1px) sets the thickness (or width) of the border. The second value (solid) sets the style of the border. Don’t forget, you can also use the following border styles: dashed, dotted, double, groove, ridge, inset, and outset. And the third value (#333333) sets the color of the border.
So if you want a bottom border underline that is 2px wide with a dashed style, and a different color, you could replace those values with something like this:
border-bottom: 2px dashed #0c71c3;
The padding value can also be adjusted to position the border underline vertically. So if you want the line farther down from the text, you could increase the padding value to something like the following:
padding: 0.3em 0;
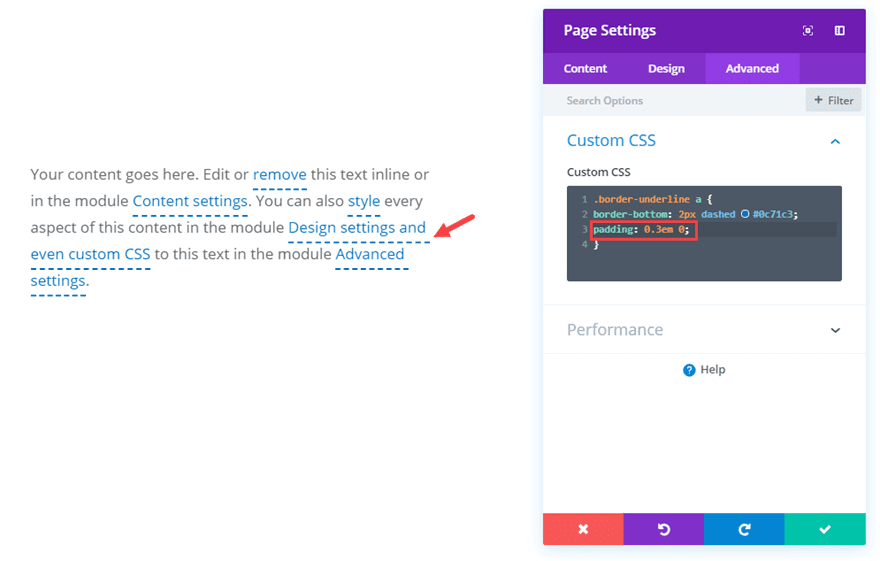
You can also use this custom padding in conjunction with the text line-height value in the text module built-in options to get the spacing just right as well.
And since the links are inline elements, the border underline remains on links that split across lines.
What about Dividers?
If you want to get really creative with underlining single lines of text (block elements), you can always use Divi’s divider module. The divider module has many built-in options like style, height, width, backgrounds, border, box shadow, and more. You can even stack dividers on top of each other for even more custom looks.
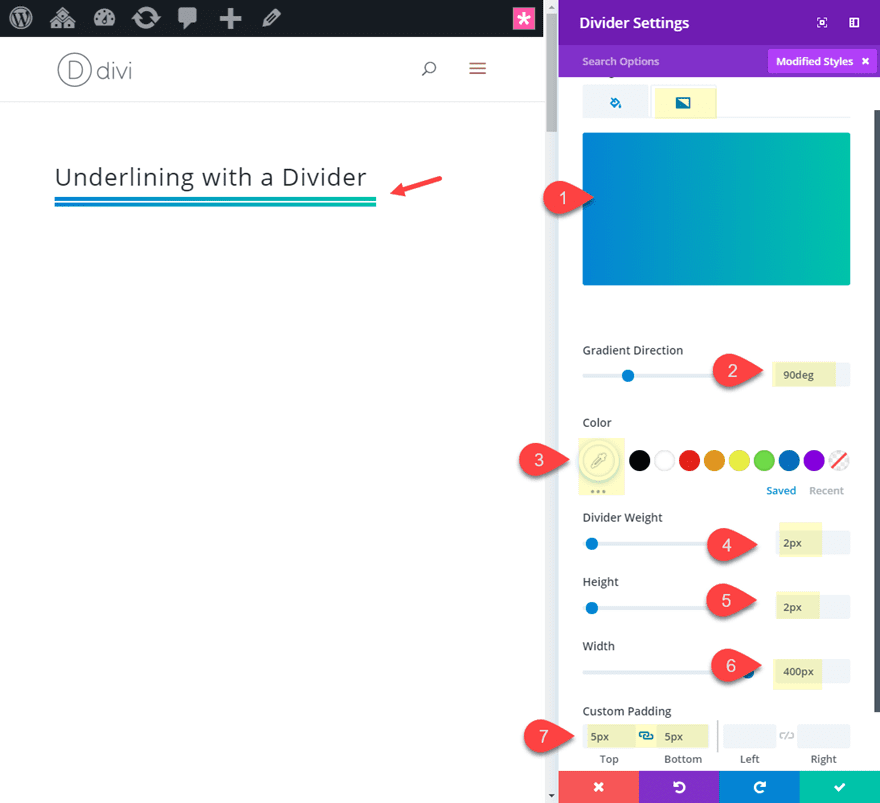
Here is an quick example of divider module used to underline text with a double line with a gradient background.
Simply add a divider module directly under a text module containing your text. Then update the following:
- Background Gradient Left Color: #2b87da
- Background Gradient Right Color: #29c4a9
- Gradient Type: Linear
- Gradient Direction: 90deg
- Color: #ffffff
- Divider Weight: 2px
- Height: 2px
- Width: 400px (this will need to be adjusted to the width of the text above)
- Custom Padding: 5px top, 5px bottom
Final Thoughts
I hope this tutorial gives you a useful alternative to adding text underlining styles in Divi. The common method using “text-decoration: underline” is by far the easiest solution but the limitations can be a drag. The bottom border underline method does give you a bit more control over the style and placement of the lines. And the custom CSS is definitely not cumbersome and can easily be tweaked according to your needs. So, if you want to take your text underlining to the next level, this should help.
As always, I look forward to hearing from you in the comments.
Cheers!


Thank you for this great tutorial!
Using CSS classes is really good, because you can also use effects with “hover” and customize everything! Awesome 🙂
Great point, Bruno. There really are endless possibilities!
Jason,
This is great, you explain it so well with clear step by step process. I love how you can do this all in Divi. Really appreciate your blog posts.
Thanks, Joan. Your comment means alot.
This is great – thanks Jason…
You’re welcome, Chris. Glad you liked it.
Nice One
Thank you ,I like how you explain everything as i am new to it.Hopefully i would get everything right.
Thanks, Miley. I’m sure you will 🙂
Underlining Styles in Divi was just another typical work to me because I really have a lack of knowledge about it. Hopefully, I will able to do that. Thanks for your tutorial.
Glad it was helpful, Sunny.
I always get the giggles when I see the wavy underlines. Somebody on a computer science corse I was on called them flying snakes. Fitting for the day thats’s In it
Lá feile Padraig / St Patrick’s Day
haha. Nice connection you made there!
Thanks for the comment, Irishetcher.