How To Create a Custom Field For a Divi Builder Module
Note: This tutorial series is intended for advanced users. At least a basic understanding of coding in PHP and JavaScript is required. Custom Fields for Divi Module Settings Creating a custom field for a Divi module is similar to creating a custom Divi module in the Divi Builder. Both methods require some Javascript, HTML, & […]
Note: This tutorial series is intended for advanced users. At least a basic understanding of coding in PHP and JavaScript is required.
Custom Fields for Divi Module Settings
Creating a custom field for a Divi module is similar to creating a custom Divi module in the Divi Builder. Both methods require some Javascript, HTML, & CSS code. However, to create a custom field for a module, there is no need for any PHP because you don’t need to write a PHP class to render the HTML output on the frontend. The main component needed is a ReactJS component class that handles rendering the field inside of the Divi Builder. Then you can define the custom field on your module definition.
In this tutorial, you’ll learn how to create custom fields for a Divi Builder module that will be fully functional in the builder.
Getting Started
Keep in mind. Custom Divi Builder fields must be implemented within a theme, child-theme, or Divi Extension. In this tutorial, we’re going to create a custom field for a custom module in a Divi Extension.
Also, this tutorial is a continuation of previous tutorials that have a specific setup already in place.
If you haven’t already done so, go ahead and do the following before you start this tutorial:
Once done, you are ready to continue.
Run Yarn
Before we can test our custom field later on in the Divi Builder we’ll need to compile the JSX code into regular JavaScript. To do that, we need to run yarn. To do this, simply run the following command inside your plugin’s directory:
yarn start
IMPORTANT: Be sure that yarn start is running in the root folder of your plugin. Furthermore, you should keep yarn start running as you develop so that the files continue to compile successfully.
Upgrading Divi Scripts
Custom Divi Builder Fields is a new feature and only available on divi-scripts version 1.0.2 above. So, if you want to add custom field on your existing extension, please upgrade your divi-scripts to version 1.0.2. You can do this by changing divi-scripts version on your package.json located at at the root of your extension directory.
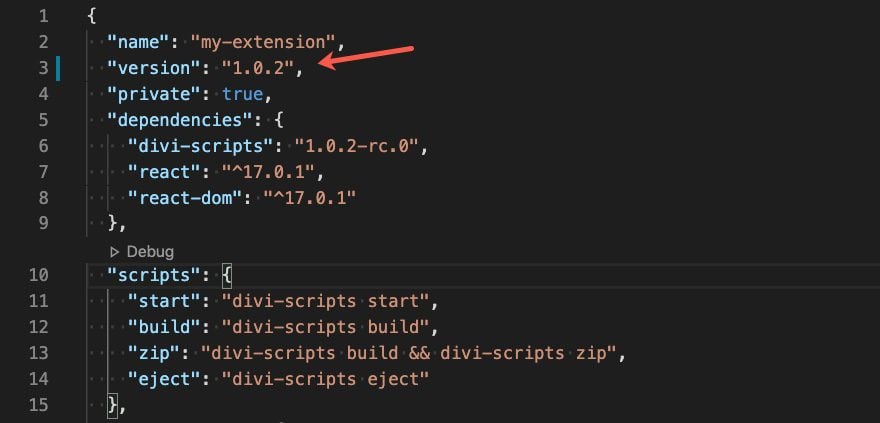
Then run yarn install to update. You can also find a custom field example on this documentation here.
Update Field Directory and File Names
We’ll get to update the code in our files in a bit. But before we can do that, we need to change the default directory and file names for our new custom field.
Look inside your extension’s directory and locate the example custom field located at /includes/fields/Input/Input.jsx.
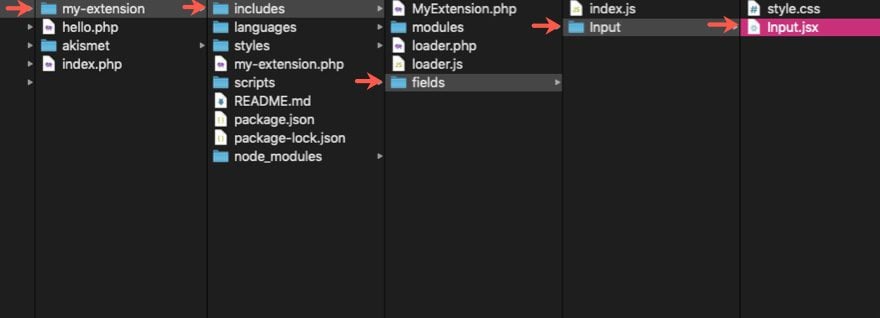
We’ll use this as a starting point to create a custom input field.
First, rename the Input directory to SimpleInput.
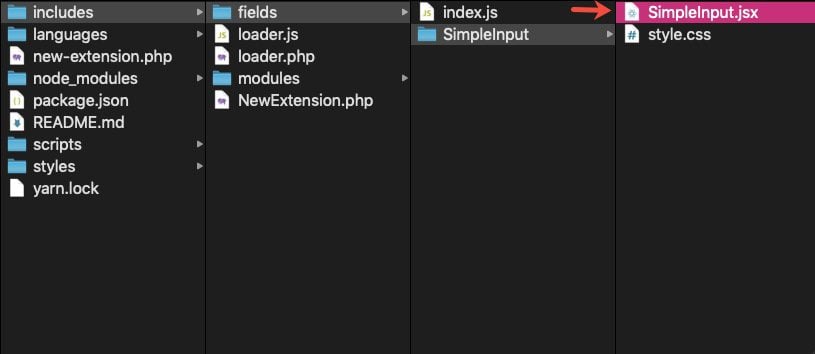
Inside the directory (now named SimpleInput), rename the file Input.jsx to SimpleInput.jsx.
The path to the file should now be includes/fields/SimpleInput/SimpleInput.jsx
Update the Field File
Open the SimpleInput.jsx file and edit it as follows:
Update the React Component Class
For our custom field to be available and fully functional inside the Divi Builder we must create a React Component class that handles the rendering of our custom field based on its props.
By default, the component class is named Input. Change the name of the class Input to SimpleInput.
Then change the name Input to SimpleInput at the bottom of the file to reflect the new name of our component class in order to be exported for use.
Also make sure to update the slug, input id, and input className to reflect the name of the new field.
(NOTE: Depending on the prefix id you chose when setting up your Divi Extension, you may see different names for the static slug, input id, input class, etc. This example has the prefix simp which was chosen when creating the Divi Extension.)
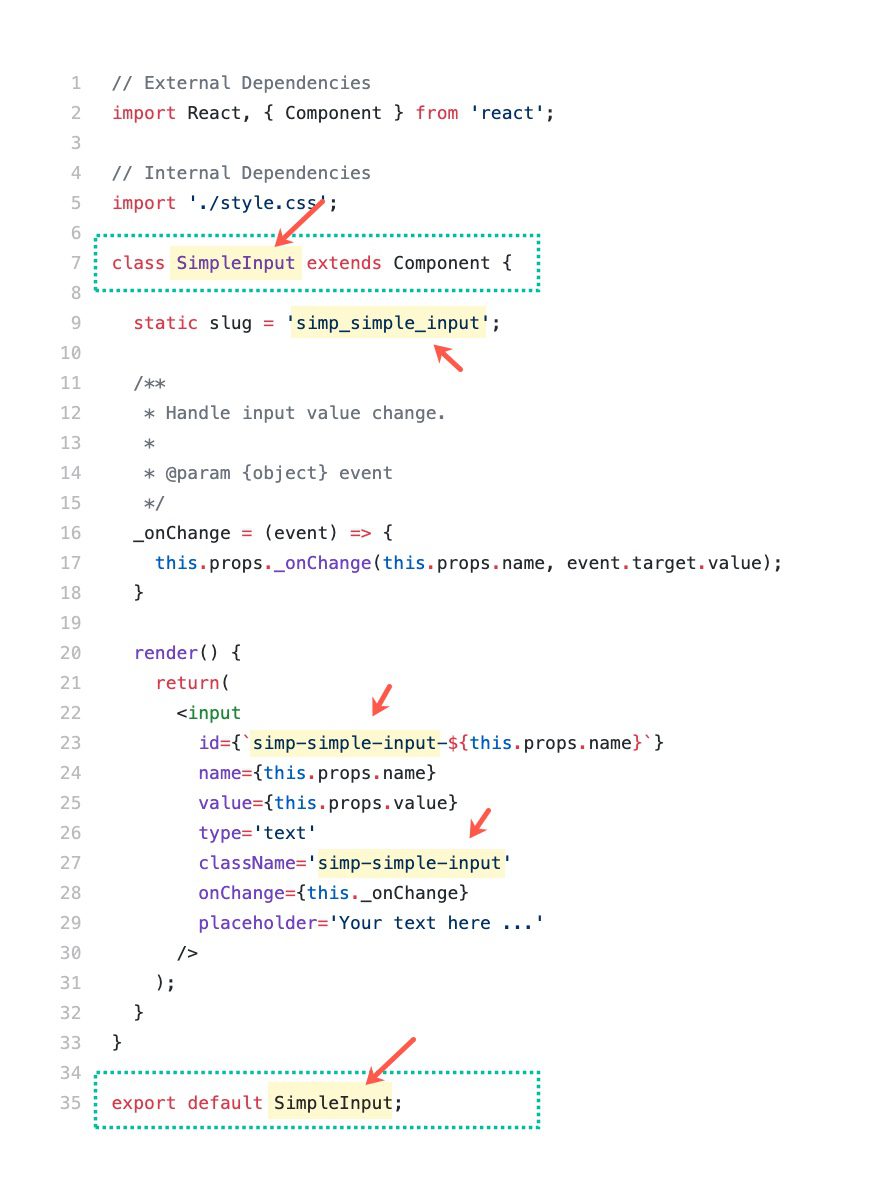
Here is an example of what the code should look like after the change has been made:
// External Dependencies
import React, { Component } from 'react';

// Internal Dependencies
import './style.css';

class SimpleInput extends Component {

  static slug = 'simp_simple_input';

  /**
   * Handle input value change.
   *
   * @param {object} event
   */
  _onChange = (event) => {
    this.props._onChange(this.props.name, event.target.value);
  }

  render() {
    return(
      <input
        id={`simp-simple-input-${this.props.name}`}
        name={this.props.name}
        value={this.props.value}
        type='text'
        className='simp-simple-input'
        onChange={this._onChange}
        placeholder='Your text here ...'
      />
    );
  }
}

export default SimpleInput;
The _onChange() prop is a method handler to save or remove the field setting’s value. It passes 2 parameters.
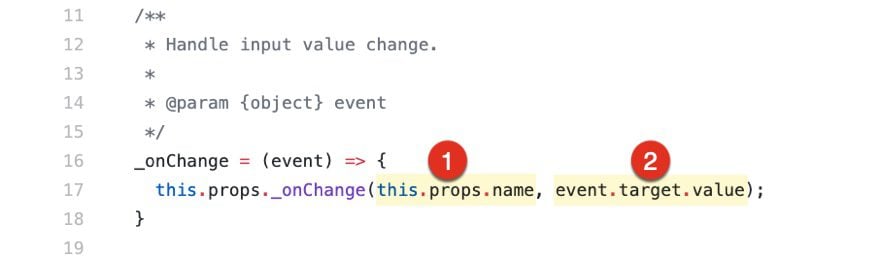
The first parameter is the field setting’s name. You can use name prop here because it’s already supplied with the correct field name based on the current active tab mode. For example: when you are editing the Title option in Tablet tab mode, the field’s name generated is title_tablet. The second parameter is the field setting value that you want to save.
The field setting type is actually a third parameter that is automatically defined with the current field type prop. So we don’t have to include that parameter with the other 2.
Update the index.js file for the Custom Field
Next, let’s update the import and export statements in the index.js file located at /includes/fields/index.js. To do this, open to edit the index.js file.
Replace all instances of the name for the class and directory (which is Input by default) to the new name SimpleInput.
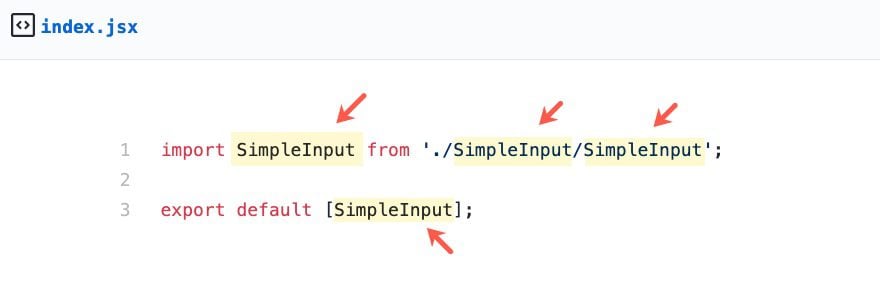
Here is an example of the final code:
import SimpleInput from './SimpleInput/SimpleInput';

export default [SimpleInput];
Custom Field CSS Styles
Styles for our custom field can be defined using the style.css file in its directory located at /includes/fields/SimpleInput/style.css.
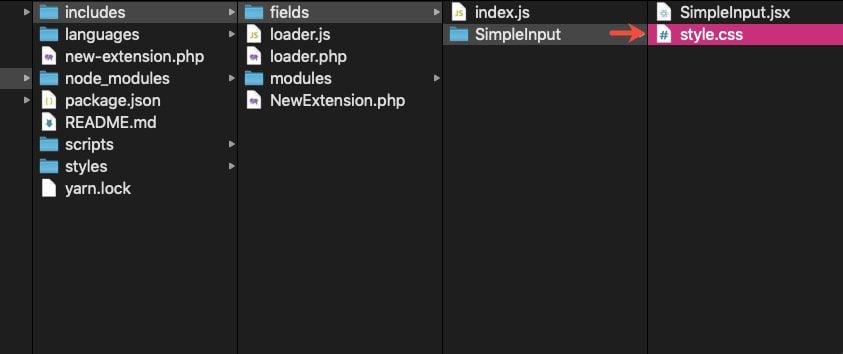
Our custom field is only a basic input element that comes with default builder styling. For now, let’s change the default class selector to .simp-simple-input (rendered in SimpleInput.jsx) throughout the style.css file:
input.simp-simple-input {
  background: #f1f5f9;
  max-height: 30px;
  border: 0;
  border-radius: 3px;
  padding: 7px 10px;
  box-sizing: border-box;
  transition: background 200ms ease;
  color: #4C5866;
  font-family: 'Open Sans', Helvetica, Roboto, Arial, sans-serif;
  font-size: 13px;
  font-weight: 600;
  line-height: normal;
  display: block;
  width: 100%;
}

input.simp-simple-input:focus {
  background: #e6ecf2;
}

input.simp-simple-input::-webkit-input-placeholder {
  color: #98a7b8;
}

input.simp-simple-input:-moz-placeholder {
  color: #98a7b8;
}

input.simp-simple-input::-moz-placeholder {
  color: #98a7b8;
}

input.simp-simple-input:-ms-input-placeholder {
  color: #98a7b8;
}

input.simp-simple-input[readonly] {
  background: #ffffff !important;
  border: 1px solid #eaedf0 !important;
  cursor: not-allowed;
}
Field Definition
To use our custom field, we need to define it on the module definition of our intended module. For this example, let’s add it to the Simple Header module we created in the previous tutorial.
Open the SimpleHeader.php file located at /includes/modules/SimpleHeader/SimpleHeader.php.
Then add the code to define the custom field. Don’t forget to use simp_simple_input as the field type.

The final code will look like this:
class SIMP_SimpleHeader extends ET_Builder_Module {

	public $slug       = 'simp_simple_header';
	public $vb_support = 'on';

	public function init() {
		$this->name = esc_html__( 'Simple Header', 'simp-simple-extension' );
	}

	public function get_fields() {
		return array(
			'heading'     => array(
				'label'           => esc_html__( 'Heading', 'simp-simple-extension' ),
				'type'            => 'text',
				'option_category' => 'basic_option',
				'description'     => esc_html__( 'Input your desired heading here.', 'simp-simple-extension' ),
				'toggle_slug'     => 'main_content',
			),
			'content'     => array(
				'label'           => esc_html__( 'Content', 'simp-simple-extension' ),
				'type'            => 'tiny_mce',
				'option_category' => 'basic_option',
				'description'     => esc_html__( 'Content entered here will appear below the heading text.', 'simp-simple-extension' ),
				'toggle_slug'     => 'main_content',
			),
			'field'       => array(
				'label'           => esc_html__( 'Custom Field', 'simp-simple-extension' ),
				'type'            => 'simp_simple_input',
				'option_category' => 'basic_option',
				'description'     => esc_html__( 'Text entered here will appear inside the module.', 'simp-simple-extension' ),
				'toggle_slug'     => 'main_content',
			),
		);
	}

	public function render( $unprocessed_props, $content = null, $render_slug ) {
		return sprintf(
			'<h1 class="simp-simple-header-heading">%1$s</h1>
			<div>%2$s</div>',
			esc_html( $this->props['heading'] ),
			$this->props['content']
		);
	}
}

new SIMP_SimpleHeader;
The properties that were added to the field are only the required properties you need to define. But you can add more properties to use on the custom field if you want. For instance, you can add both responsive and hover options for your custom field as well.
Divi Builder and Frontend Output
Our field definition is ready. We just need to update the render() method so that it will display the custom field value. Let’s start with the render() method on the module PHP class.
Open the SimpleHeader.php file and update the render() method as follows:
The final code should look like this:
class SIMP_SimpleHeader extends ET_Builder_Module {

	public $slug       = 'simp_simple_header';
	public $vb_support = 'on';

	public function init() {
		$this->name = esc_html__( 'Simple Header', 'simp-simple-extension' );
	}

	public function get_fields() {
		return array(
			'heading'     => array(
				'label'           => esc_html__( 'Heading', 'simp-simple-extension' ),
				'type'            => 'text',
				'option_category' => 'basic_option',
				'description'     => esc_html__( 'Input your desired heading here.', 'simp-simple-extension' ),
				'toggle_slug'     => 'main_content',
			),
			'content'     => array(
				'label'           => esc_html__( 'Content', 'simp-simple-extension' ),
				'type'            => 'tiny_mce',
				'option_category' => 'basic_option',
				'description'     => esc_html__( 'Content entered here will appear below the heading text.', 'simp-simple-extension' ),
				'toggle_slug'     => 'main_content',
			),
			'field'       => array(
				'label'           => esc_html__( 'Custom Field', 'simp-simple-extension' ),
				'type'            => 'simp_simple_input',
				'option_category' => 'basic_option',
				'description'     => esc_html__( 'Text entered here will appear inside the module.', 'simp-simple-extension' ),
				'toggle_slug'     => 'main_content',
			),
		);
	}

	public function render( $unprocessed_props, $content = null, $render_slug ) {
		return sprintf(
			'<h1 class="simp-simple-header-heading">%1$s</h1>
			<div>%2$s</div>
			<p>%3$s</p>',
			esc_html( $this->props['heading'] ),
			$this->props['content'],
			$this->props['field']
		);
	}
}

new SIMP_SimpleHeader;
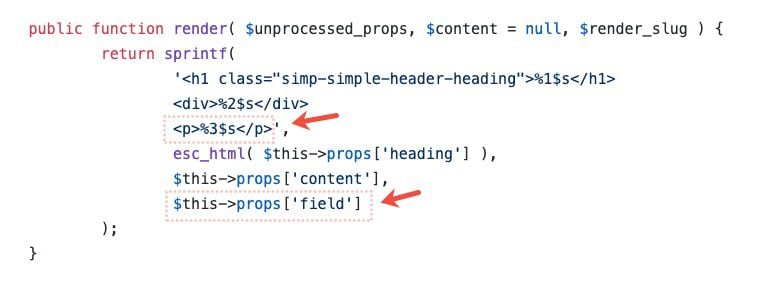
Now, let’s edit the render() method of the React component and make it produce the same output that we defined in our PHP render() method.
Open the SimpleHeader.jsx file and update the render() method as follows:
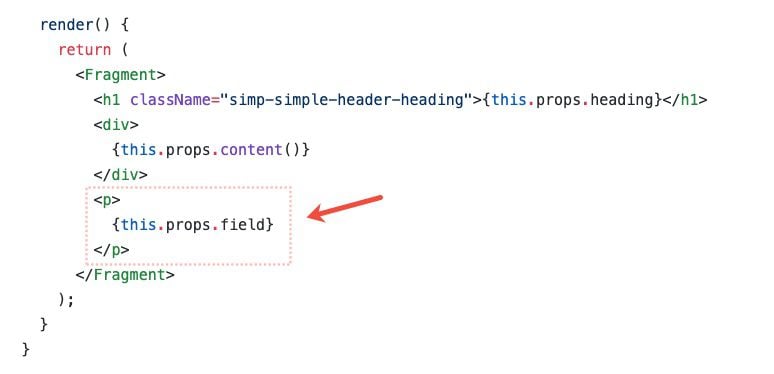
The final code should look like this:
// External Dependencies
import React, { Component, Fragment } from 'react';

// Internal Dependencies
import './style.css';


class SimpleHeader extends Component {

  static slug = 'simp_simple_header';

  render() {
    return (
      <Fragment>
        <h1 className="simp-simple-header-heading">{this.props.heading}</h1>
        <div>
          {this.props.content()}
        </div>
        <p>
          {this.props.field}
        </p>
      </Fragment>
    );
  }
}

export default SimpleHeader;
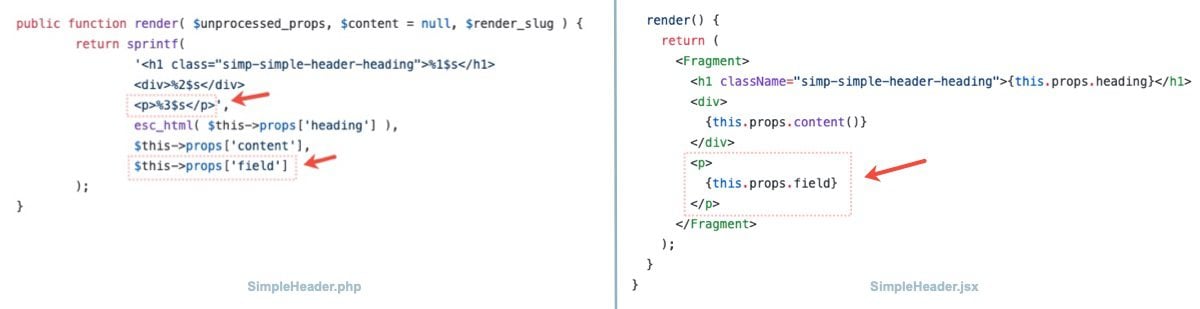
Here you can see how the output of the render() method of the php file corresponds to the output of the render() method of the php file which now includes the new field wrapped in a p tag.
Add Selectors if Needed
Wrapping the new field output with a p tag makes sense here because we are interested in simple text output. This also is a good opportunity to add your own custom selectors (CSS ID, CSS Class) to the p tag for your own needs. Just make sure you add the same selectors to the output of the render() method of the PHP file and the JSX file.
Testing Your Custom Fields
If you already have yarn start running as we suggested in the first step, you can now launch the Divi Builder and check out your Simple Input field!
If not, before we can test our custom field in the Divi Builder we need to compile the JSX code into regular JavaScript. To do that, simply run the following command inside your plugin’s directory:
yarn start
As a reminder, you should keep yarn start running as you continue to edit your files so that the files continue to compile successfully.
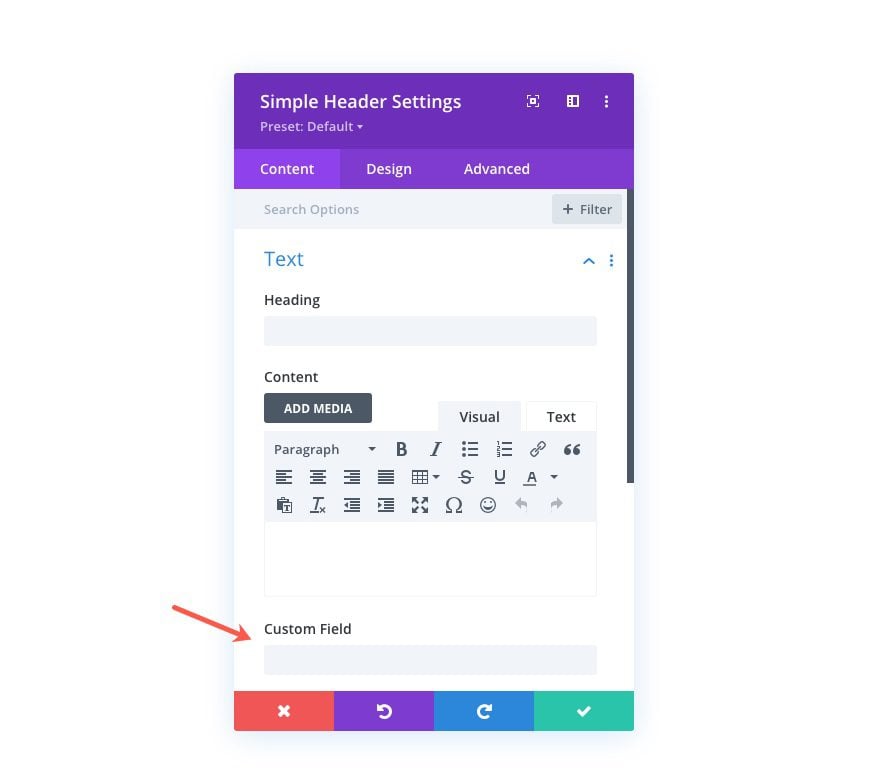
To test out the custom field, go to your Divi site and open the settings of the custom Simple Header Module. The new Custom Field will be under the content tab.
Wrapping up
When you are finished development, remember to stop yarn start from running in your terminal (hitting ctrl + c within the terminal usually does the trick).