

Enriching your WordPress pages and posts with content like helpful resources, related products, promotional CTAs or entertaining curated pieces can help you or your brand offer more value to your audience. A plain link won’t always cut it, though – unless the anchor text and surrounding sentiment are compelling enough, those links may be grazed right over. By creating visual links for your website, like the enhanced ones you see on Facebook, you can add engaging, interactive content that your visitors will pay attention to. The Visual Link Preview plugin for WordPress is a simple way to add more panache to your links.
Here are just a few ways you can use this plugin:
- Add a CTA to an affiliate link.
- Back up claims, facts and statistics.
- Curate content from other sites.
- Include helpful resources for readers to learn more.
- Promote your ecommerce shop products.
Also, in its simplest form, the Visual Link Preview plugin is a more attractive way to link to related posts and get people to stay on your site for longer.
The plugin lets you create a visual preview for any internal or external link, and you can also create a custom template with a style that matches your brand or site. Then, place a streamlined preview box anywhere on your post or page. Let’s go over how to add a preview box to WordPress in both Gutenberg and the classic editor.
- 1 Finding and Installing the Visual Link Preview Plugin
- 2 Getting Started with Settings and Customizations
- 3 Using the Plugin with the Gutenberg Block Editor
- 4 Using the Plugin with the Classic Editor
- 5 Customizing the Visual Link Preview Template and Box
- 6 Disadvantages of the Visual Link Preview Plugin
- 7 Wrapping Up
Finding and Installing the Visual Link Preview Plugin
You probably already know how to do this, but just in case, here’s a super fast run-through of how to install a new WordPress plugin:
- Sign in to your WordPress dashboard.
- Select Plugins from the left sidebar.
- Select Add New in the sub-menu that will show up below Plugins.
- Type “Visual Link Preview” into the search bar on the top right of the page.
- Click Install Now on the top right of the plugin preview box.
- Once installed, click Activate.
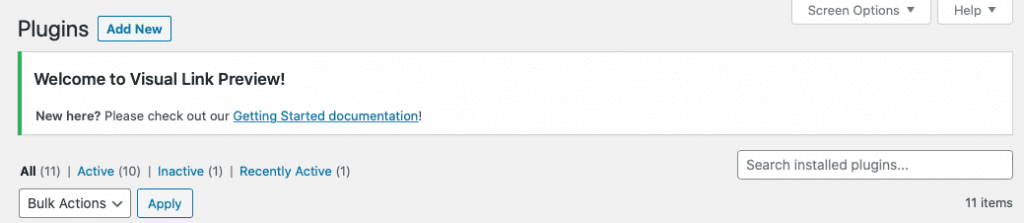
Once you’ve activated the plugin, you’ll be redirected to your plugin page, and you’ll see this notice on the top. (The Getting Started documentation takes you to this page.)
Getting Started with Settings and Customizations
Once the plugin is activated, scroll down your plugins list to find it. Under the plugin name, click the Settings link – you’ll be sent to this page:
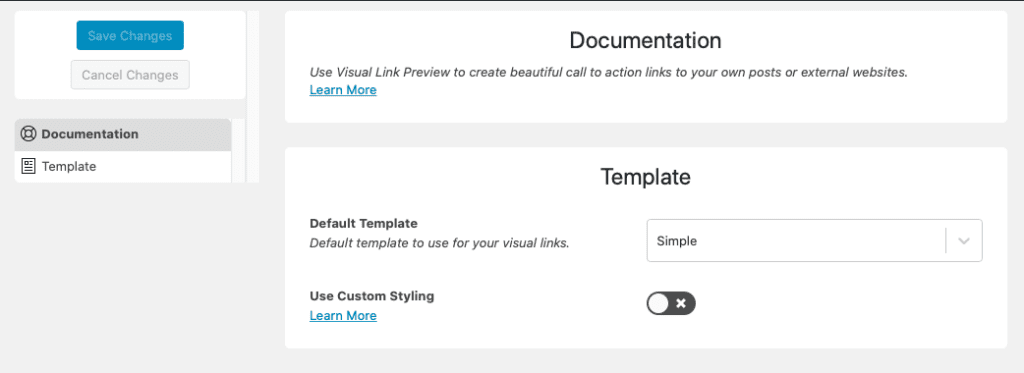
By default, the Use Custom Styling toggle will be turned off. If you toggle it on, a bunch of options come up.
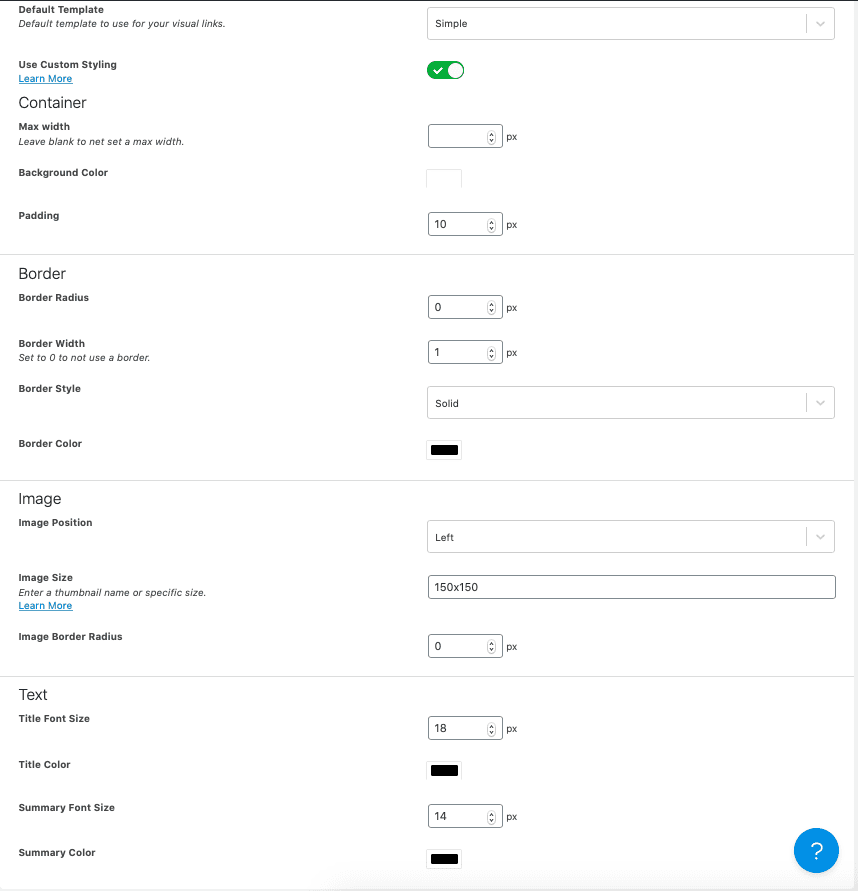
There are customizations for the following:
- Container width, background color and padding.
- Border radius, width, style (solid, dashed, dotted, etc.) and color.
- Image position (left, right, top or bottom), size and border radius.
- Size and color for the title and summary fonts.
Most of these are pretty self-explanatory, but there are a few things to know about image size. You can either set a thumbnail size or a custom size. For a thumbnail, the standard sizes are “thumbnail,” “medium” and “large,” so you’d just type whichever you want in the field. Or, you can set a custom size in this format: widthxheight (150×150, for example).
For now, I’m going to leave everything as-is to see what the default link box looks like. Then, I’ll go back in to make tweaks.
Using the Plugin with the Gutenberg Block Editor
I went into a blog post draft and added a block below a paragraph. You’ll find the Visual Link Preview block under Widgets, or you can just search for it at the top of the block picker.

This is what the Visual Link Preview block looks like:
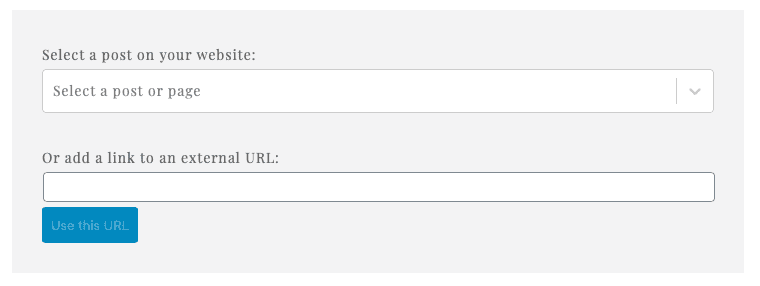
When you click into the Select a Post or Page box, you won’t see a dropdown of your content; you’ll have to search for what you want. You can also add a link to an external URL (I’ll go over that in a bit).
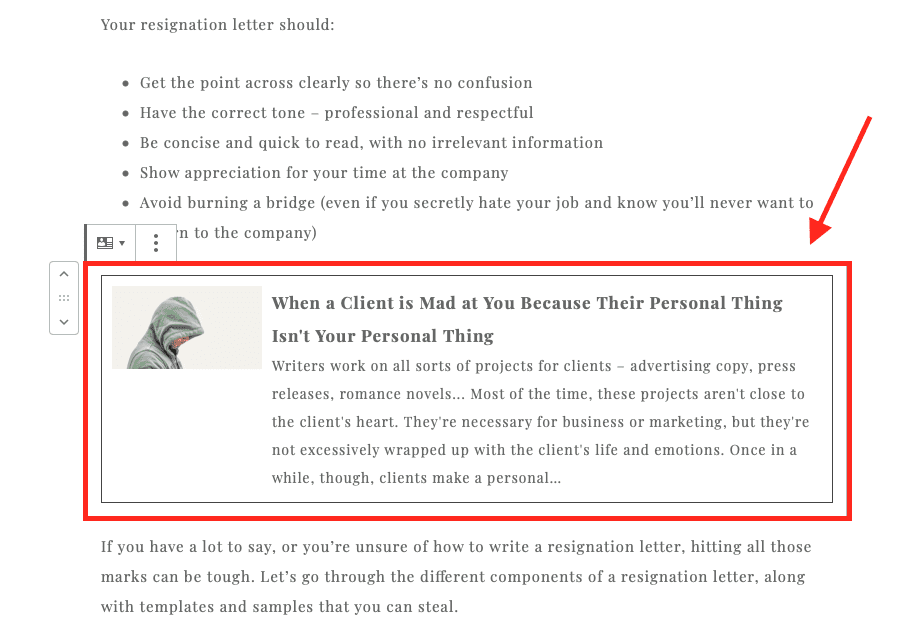
I chose a published blog post. This is what it looks like without me making any customizations to the style:
Visual Link Preview’s Block Settings in Gutenberg
If you click the stack of three dots at the top of the block, you’ll see a dropdown menu. Select Show Block Settings to bring up a right sidebar with options. From here, you can make several changes:
Change the link. Note that if you click Change Link, the link you have will immediately be removed, so make sure you don’t click it by accident.
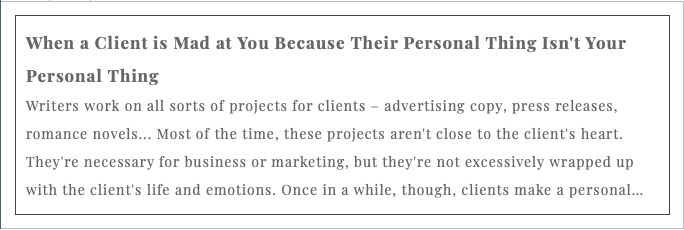
Change or remove the display image. If you remove the display image, this is what the Visual Link looks like:
If you don’t like how it looks without an image, you can click Choose Image to add one back in. However, you’ll have to go through your Media Library or upload an image – you won’t have the option of auto-adding the featured image again, like it did when you first added the link.
You could, of course, find the featured image in your Media Library, but it may be buried. You could also just re-add the link so it auto-adds the original content.
Toggle link settings on and off. You can opt to open the link in a new tab, and you can also turn the link into a nofollow link.
Adding an External Link with Gutenberg
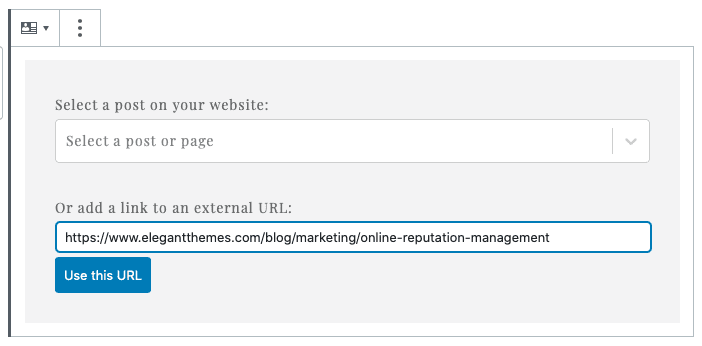
This time, I’m adding an external link. I’ve copied and pasted it into the correct field:
When you click Use this URL, the same thing happens as when you add an internal link. An image, title and excerpt will be auto-populated, and you can make changes in the right sidebar. You can also click Save Image Locally in the Content section, and the display image the plugin grabbed from the URL source will be added to your WordPress Media Library.
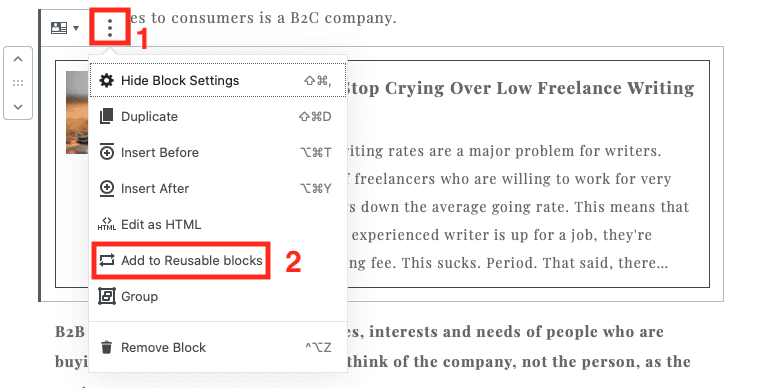
Saving Reusable Blocks
If you have a page, blog post or external link that you’re going to use often, you can create it once, then save it as a reusable block to easily add it in the future. This only works in the Gutenberg editor, FYI.
When you’re finished creating your block, click the three-dot icon on the top, the same one you used to access the options sidebar. Then, choose Add to Reusable Blocks. You can title the block, and it’ll be in your block library for future use.
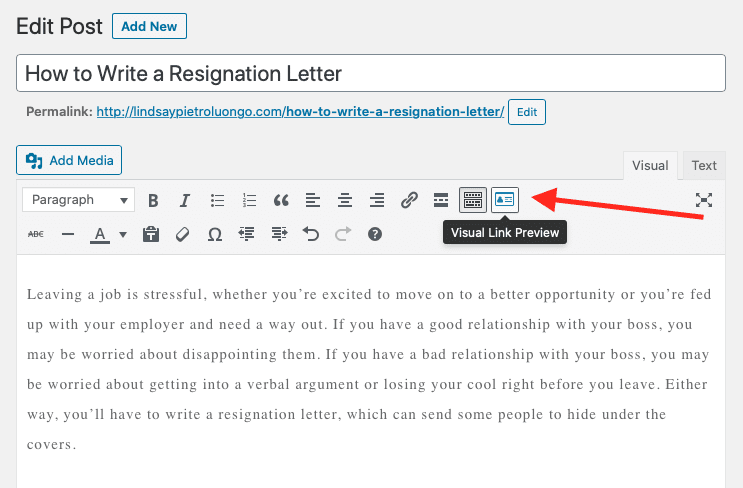
Using the Plugin with the Classic Editor
Using the classic editor, head into your post or page and go to where you want to add the visual link. Click the Visual Link Preview button at the top of the page:
This box will come up:
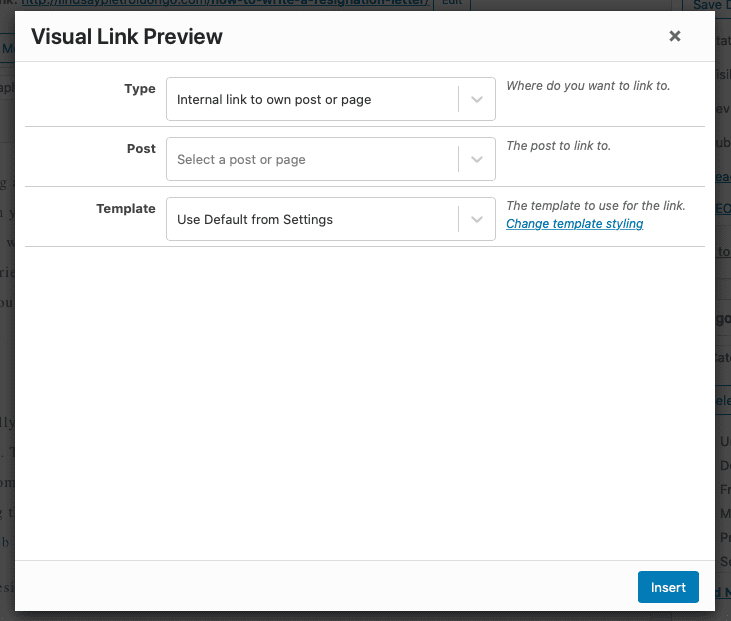
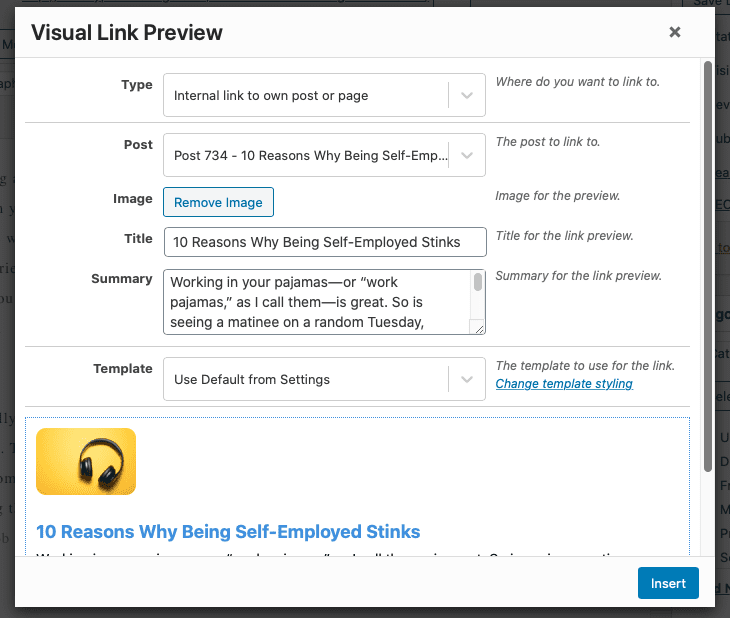
From the Type dropdown, you can choose to add your own link or an external one. First, I’m going to add my own link. Once you’ve chosen content to link to, the fields will auto-populate, same as with Gutenberg. This is where you’ll make any changes. You can remove the image and opt to add a new one, change the title and update the summary from this window. You can also use the plugin’s default settings or your custom template here, just like with Gutenberg.
Adding an External Link with the Classic Editor
This time, I’m going to add an external link. These are the fields for an external link:
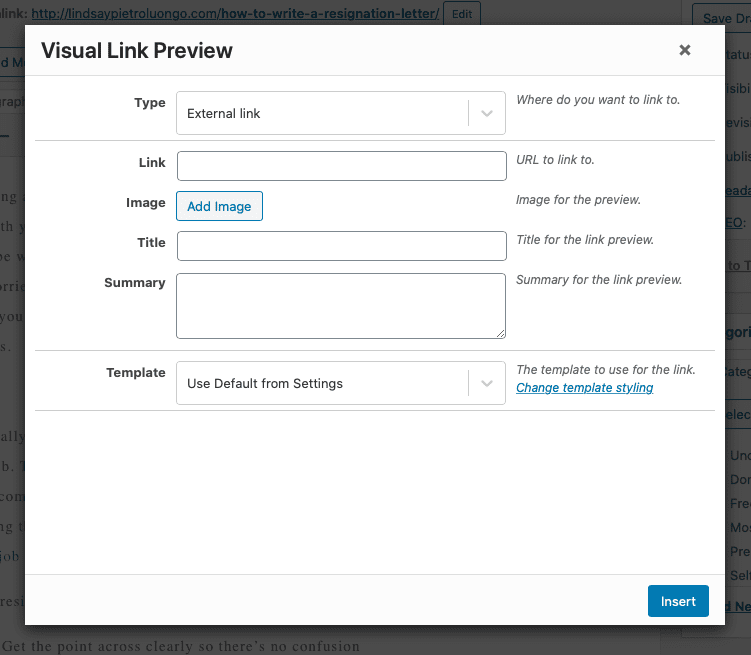
When you add the URL, the fields will update automatically – same as with an internal link. You can then make any changes you want before inserting it into your page or post. You have the Save Image Locally option in the classic editor, too.
Customizing the Visual Link Preview Template and Box
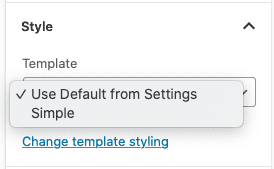
That block settings bar also includes a Style section at the bottom where you can choose between the Use Default from Settings template or the Simple template. It’s confusing, though, because they’re actually the same thing. I’ll explain more in a bit. First, let’s get into how to customize the link preview box.
From that Style section, click Change Template Styling link. A new page will open where you can create a custom template (you can get here through the plugin settings, too). Again, the customizations are simple, explanatory and straightforward, so you should have an easy time finding your way around. Here’s what the template looks like after I played around with some customizations:

Not great. Part of the problem is that the preview text is too long. Back on your post or page, if you click the block, the editor should come up in the right sidebar. You can then go to the Content section and click into the title and excerpt fields to make changes.
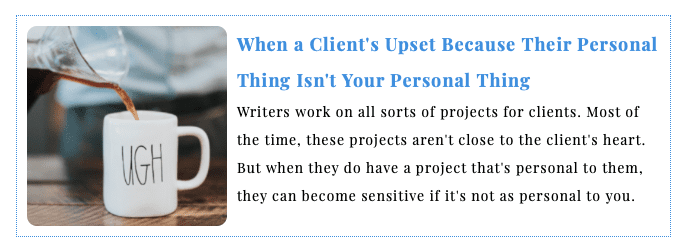
Instead of using a thumbnail, I went back to the template customization page and entered a custom size for the image, which turned it into a square (and, luckily, a perfectly-cropped one). I played with the title and excerpt copy some more so that it was sized better in the block and next to the picture. This is better:
You could spend a lot of time figuring out the right customizations, and you should, especially since you only get to create one custom template.
Previewing Your Template Customizations
You can’t see a live preview when you’re customizing the template. You have to have your post or page open in a new window, make the changes on the template customization page and then click back to the post or page. Switch back and forth between the two dropdown Template options (remember, they’re not actually any different from one another) – this refreshes the box so you can see your latest changes.
How to Get the Default Style Back
Let’s say you make a bunch of changes, and then you realize you prefer the default style. If you leave the Use Custom Styling toggle turned on in the template settings, your customized settings will be applied when you’re back on your page or post, whether you select Use Default from Settings or Simple from the Template dropdown (like I said, confusing).
If you want to revert to the plugin’s defaults, you can go to the template settings page and toggle off the Use Custom Styling button. All of your customizations will be there if you want to toggle it back on eventually, but this will let you use the plugin’s defaults if you prefer the way they look.
Disadvantages of the Visual Link Preview Plugin
The Visual Link Preview plugin is a simple and straightforward plugin that does what it says it’ll do, and it’s super easy to learn to use. However, because it’s so basic, it’s also lacking in a few areas that could use improvements.
There isn’t a dropdown menu with all of your content. I wanted this option instead of having to remember the name of a blog post or page to add as a link.
You can’t see a live preview of the customized template. It’s pretty clunky to go back and forth between the post and the template settings page every time you want to see if that’s the perfect amount of padding or what type of border to use.
You can only create one custom template. This is the biggest drawback of the plugin. You can’t create several templates and then pick and choose the one you use to match a specific page, blog post or type of link. You also can’t set some preview boxes to use your custom template and others to use the plugin’s defaults – it’s one or the other.
Wrapping Up
All in all, even despite its drawbacks, I liked the Visual Link Preview plugin. It’s a total breeze to set up and use, no matter which editor you prefer working with – Gutenberg or classic. And this is definitely a more aesthetically-pleasing and eye-catching way to add links, which can go far should you want to link to your landing pages. If you’re in an affiliate program like Amazon, there are a number of Amazon affiliate plugins that you can try and use in tandem with Visual Link Preview plugin. Right now, since you can’t create more than one template, it’s best for websites with a standardized look across all posts and pages. So, if you have a number of different landing pages in a variety of styles, you’ll have a hard time creating one preview box template that fits in wherever it’s placed. Otherwise, though, this is a lightweight plugin that does its one job well.
You may also like this article with five cool things you can do in Divi with anchor links.


For quite long I have been searching how to preview a link in WordPress and this blog post has been very useful and timely.
Not compatible with pages built with Divi though? Am I missing a trick?
Using the shortcode requires a lot of manual input.
Hi Lindsay,
A really long and very detailed article. Thank you.
Would it be a problem for SEO?
Oooh, nice one! On my calendar now to add to several sites.
Looks nice, but how does it affect page performance?
Thanks for this! I can think of a few places where this could be really handy. I’ll give it a try.