

WordPress revision history is a handy feature in WordPress for anyone who publishes content on a regular basis. As a writer, it’s easy to make mistakes when you’re drafting a post, even if you are a seasoned writer. At times, you might have even deleted a part of your WordPress post and wished you could get it back. However, thanks to WordPress Revisions, your changes are not lost forever.
In this article, we’ll explain what the WordPress Revision history feature does, which content types you can use it with, and offer some tips for getting the most out of it.
What Is the WordPress Revision History Feature?
Did you know WordPress automatically saves all the changes you make to your posts. You can undo those changes and go back to an earlier version at any time. This feature is called WordPress Revisions and it has been available since WordPress 2.6.
Thanks to this feature, WordPress will store a post as a revision every time you click the Save as Draft button or on each auto save of the post. The auto save feature happens every 60 seconds as a special revision, in which case older autosaves are replaced by new autosaved revisions.
It’s worth mentioning that there is only one autosave available per user for any given post and it does not overwrite published content. The autosave feature is especially useful in situations when your browser crashes or your power suddenly goes out. In those circumstances, when you return to edit the post, WordPress will show you a warning that it has a backup of your post and a link to restore the backup.
How to Use Your WordPress Revision History
As you can see from the screenshot below, Revisions shows up in the Publish section on the post editing screen. You can also display revisions below the post editor by clicking Screen Options and ticking the box next to Revisions.
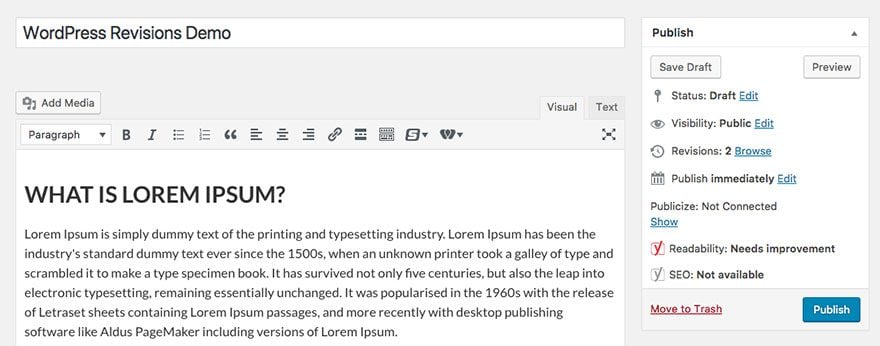
When you click the Browse link, you’ll be taken to the Revisions screen. Here, you can see the changes that were made in each revision by dragging the slider at the top of the screen. You can also use the Previous and Next buttons, as well as compare any two revisions by checking the box above. The window will indicate what was added, what remained unchanged, and what was deleted.

In terms of what you can do with post revisions, there are only two options: restore a revision or leave the post as is. If you want to restore a particular revision, all you need to do is click on the Restore this revision button. Clicking on Return to post editor will allow you to go back to your post, without making any changes.
What Types of Content Can You Restore With WordPress Revision History?
WordPress Revision history is enabled for all posts and pages on your site as well as for custom post types such as Portfolio and Testimonials added by Jetpack.
If you’re using a theme that has its own set of custom post types (such as directory listing, staff members, portfolio, testimonials or other custom post type), revisions will not be enabled by default unless the theme author added support for revisions. In that case, you can enable revisions yourself manually using the following line of code:
$supports = array('title', 'editor', 'revisions');
Usually, you’ll find the code for custom post types in the functions.php file. Place the line above just above the line of code that starts with register_post_type.
Tips For Using WordPress Revision History
Now that you know what WordPress revision history does, let’s share some tips on getting the most out of it.
Enable Or Disable Revisions Completely
By default, the Revision feature is automatically enabled on every WordPress installation. If you’re not seeing the Revisions option on the post editor and you’ve made changes to your post, chances are the Revisions feature has been disabled at the configuration level.
You can manually enable it by adding the following line of code to your wp-config.php file:
define( 'WP_POST_REVISIONS', true );
You can also disable the revisions completely by setting the above value to false like so:
define( 'WP_POST_REVISIONS', false );
Limit the Number Of Available Revisions Globally
If, for some reason, you want to limit the number of revisions that are available for each post and page, you can add the following line of code to your wp-config.php file:
define('WP_POST_REVISIONS', 5);
This will create a maximum of five revisions per post on top of the autosaved version. This is useful if your host limits the size of your database or if you find that you don’t use the revisions all that often.
Control Revisions on a Post by Post Basis
If you don’t mind doing a bit of custom coding, you can control how revisions are handled on a per post basis. For this, you’ll need to use the wp_revisions_to_keep filter.
Here’s how the code looks:
add_filter( 'wp_revisions_to_keep', 'filter_function_name', 10, 2 );

function filter_function_name( $num, $post ) {

return $num;

}
In this code, you’re passing the WP_Post object that represents the post you want to target and the number of revisions to keep.
Using Plugins To Manage Revisions
As you might have guessed, there are quite a few plugins to help you manage revisions in WordPress. You can use the following plugins to help you tidy up the old revisions of your posts and enable them for custom post types. We’ve selected the plugins that have a 5-star rating, include ongoing support, and have features that improve control over WordPress Revisions on the official plugin repository.
Optimize Database After Deleting Revisions

The Optimize Database after Deleting Revisions plugin allows you to clean out unnecessary revisions and optimize your database. Some of the main features include:
- Delete revisions of posts, pages, and custom post types
- Choose a number of recent revisions to keep
- Delete trashed posts, pages, and comments
- Delete spam comments and unused tags
- Remove ‘pingbacks’ and ‘trackbacks’
- Optimize the database tables
- And more
This database optimization plugin is multi-site compatible and you can even set it to run automatically.
WP Revisions Control

WP Revisions Control is a simple plugin that allows you to control how many revisions WordPress will keep for each post or page. Once you have enabled the plugin, visit Settings > Writing to specify the how many revisions to retain for each post type.
Better Revisions
Better Revisions is a relatively new plugin but it takes revisions a step further. WordPress will only store revisions if the title, the content or the excerpt has been changed. If you modify the post author or change the permalink to your post, it won’t create a revision. This is where the Better Revisions plugin comes in handy.
It adds the following fields to the revision system:
- The Author
- Post Date
- Permalink
- Post Status
- Post Password
- Comment Status
- Ping Status
- Post/Page Parent
- Menu Order
This plugin is handy if you run multi-author blogs or simply want more control over the revisions of your post.
WP Revision Master
WP Revision Master has similar functionality to the plugins above, however, it allows you to add or limit the number of revisions for any custom post type.
Other features include:
- Disable revisions
- Limit post revision for the whole site, for each post type, and for every single post
- Trash revisions individually or in bulk
- Active support
The plugin has a 5-star rating and more than 900 active installations.
Wrapping Up
WordPress Revision History is a handy feature that allows you to revert changes to your posts and pages by restoring an earlier version of a post or page. If you ever accidentally deleted a part of your post or if you lost your Internet connection due to a power outage, it saves you from writing the entire post from scratch. With our tips, you’ll never have to worry about losing changes to your posts.
Have you used WordPress Revision history before? Share with us in the comments below!
Article thumbnail image by AVIcon / shutterstock.com


Thx for this article.
Btw. I use wp sweep plugin to delete the revision data of the article I created.
I needed that I average between 90-125 revisions that is way too much storage.
This is going to really help keep it clean.
TFS
Thanks for this blog post. I love the revision feature.
Thanks for information. A relevant explanation indeed.