

Creating unique list designs is an important aspect of web design. Readers appreciate the structure and aesthetics of a well-designed list because it allows them to process information much quicker.
With Divi and its text module, you have everything you need to transform ordinary lists into beautiful works of art. Divi’s text module settings allow you to target and style different html elements within your content – including lists. And with a few design techniques, you can harness the power of these options to customize your lists in surprising ways.
In this tutorial, I’m going to show you how you can create unique list designs in Divi.
Let’s get started.
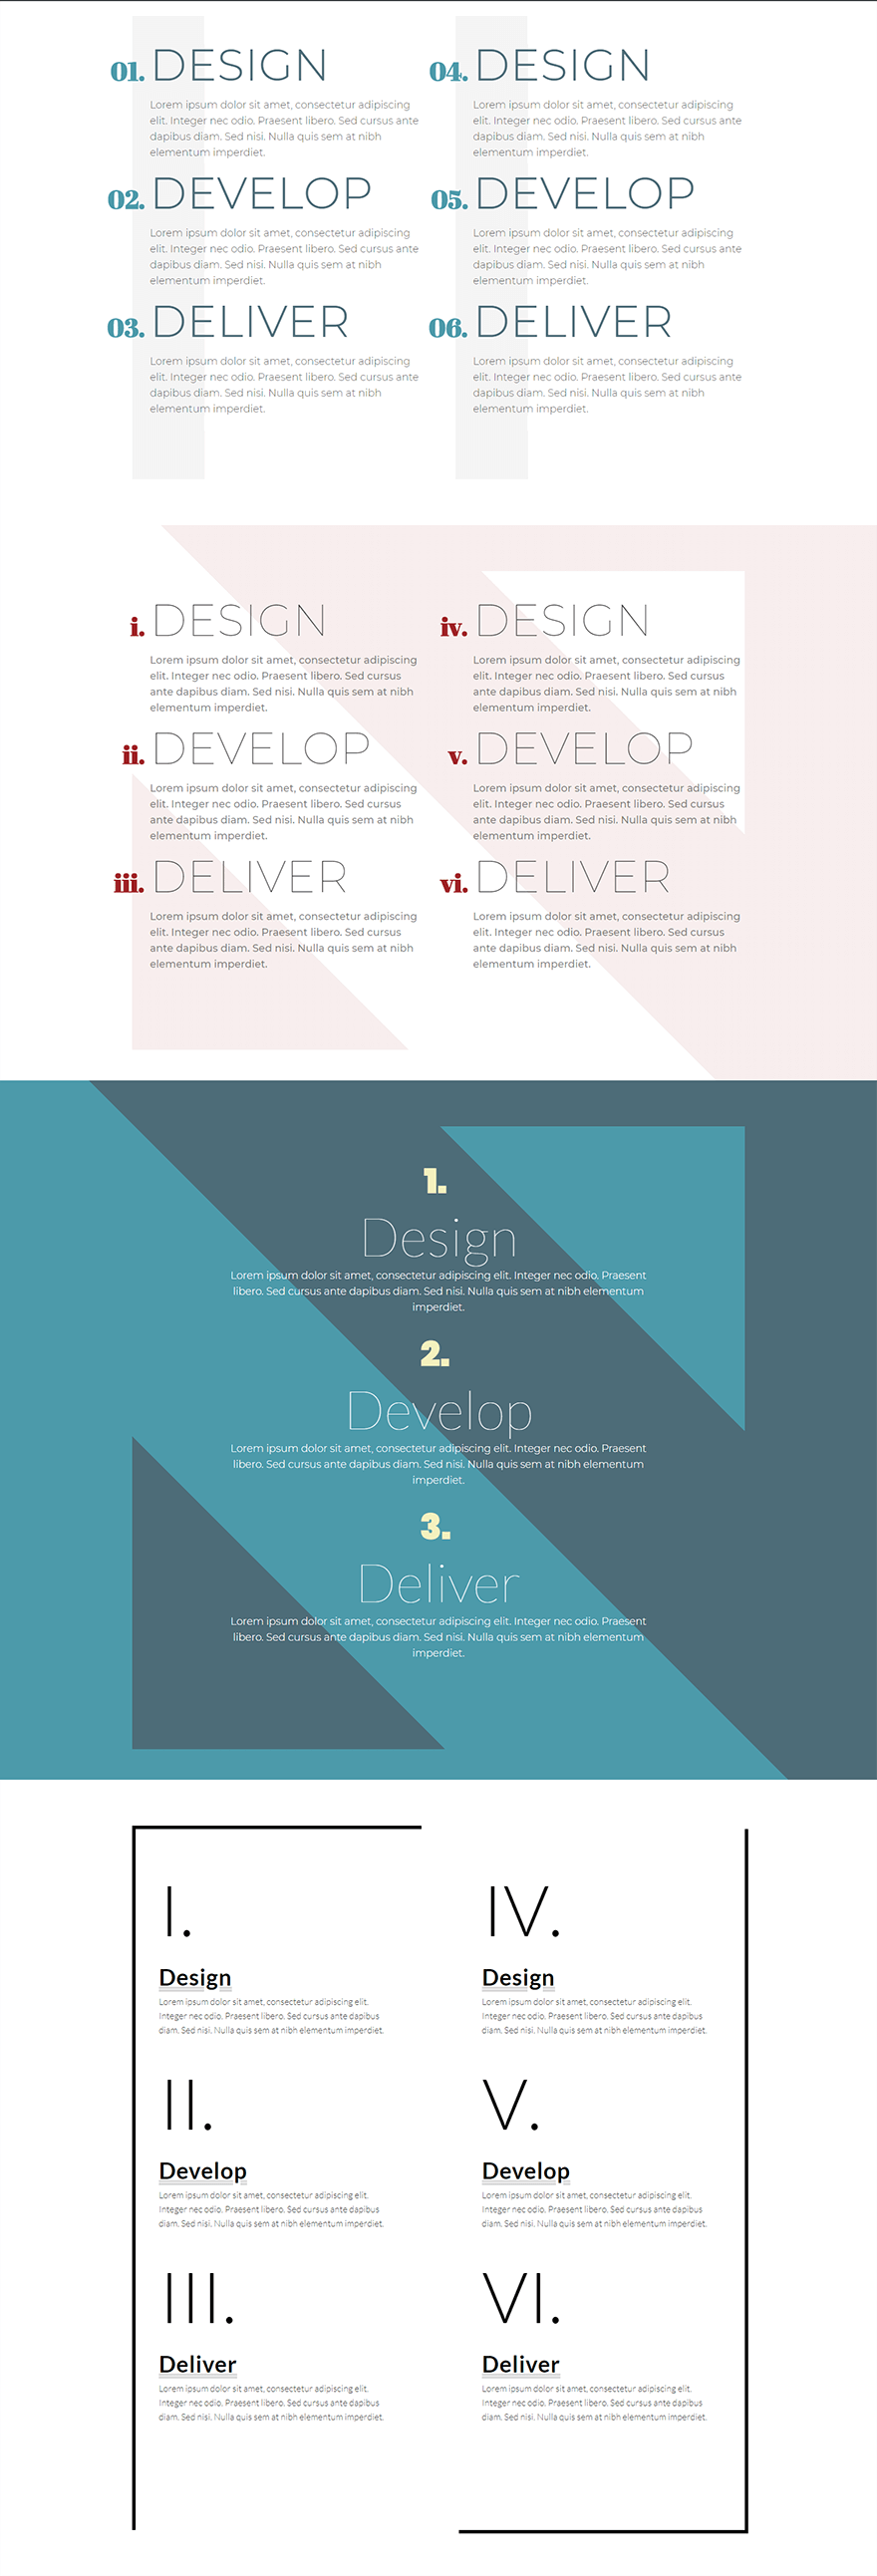
Sneak Peek
Here is a peek at the four list designs we will build in this tutorial.
Inspired by the Text Module Settings
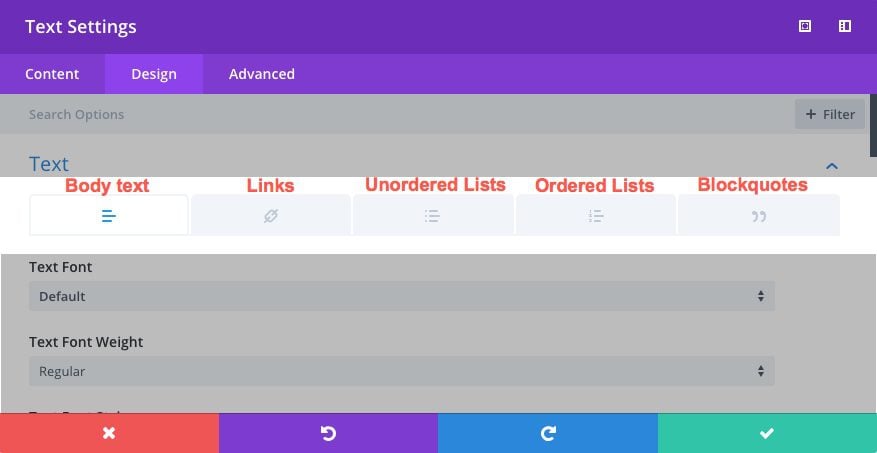
If you are like me, you may tend to overlook some of the “hidden” options lurking deep inside the Divi Builder. One module that has a few buried treasures is the Text Module. The Text Module settings have multiple tabs that hold style options for different html elements. This can be an extremely convenient and creative design tool. These tabs include options for body text, links, unordered lists, ordered lists, and blockquotes.
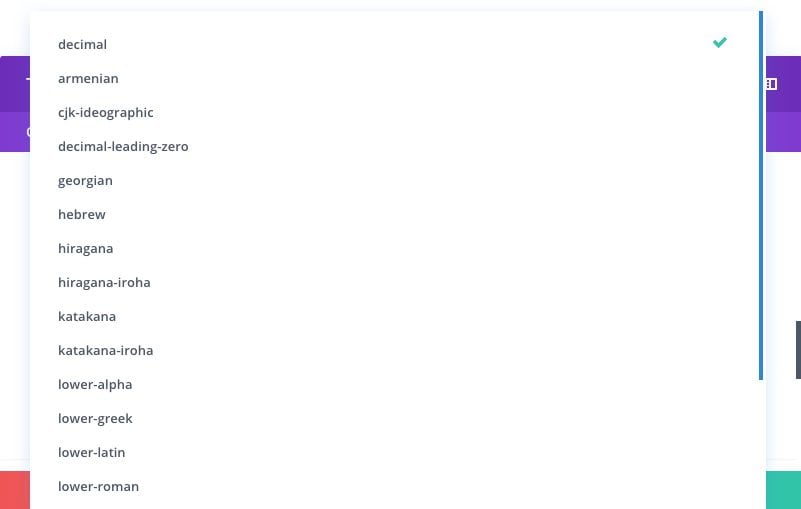
And, there are a few hidden gems under these tabs that you may not have thought to utilize in your design. For example, did you know that you can change the list style options for unordered lists? There are a number of unique options available (18 to be exact), including Roman Numerals and decimals with a leading zero.
These may seem insignificant, but when you harness the design options, you can produce some really creative designs.
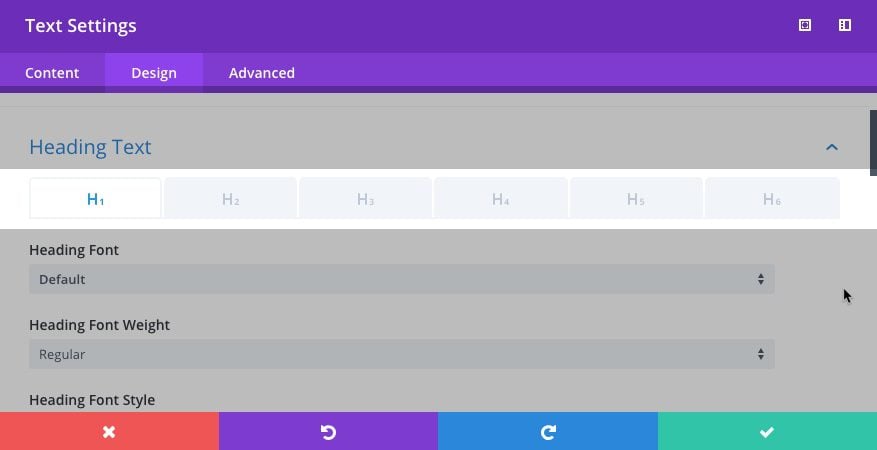
You can also target the style of different heading levels (or tags) under each of the tabs under the heading style options.
This ability to target multiple html elements in your content opens up some wonderful possibilities. Hopefully, they will inspire you as well.
For more on this, check out the feature update that explains some of these wonderful text options.
Creating your HTML List
An html list can either be “ordered” (with numbers, roman numerals, etc.) or “unordered” (with square icons, circle icons, etc.). For unordered lists, the list items will be wrapped in a “ul” tag (“ul” stands for “unordered list”). For ordered lists, the list items are wrapped in a “ol” tag (“ol” stands for “ordered list”). Each list item is wrapped in a “li” tag (“li” for “list item”).
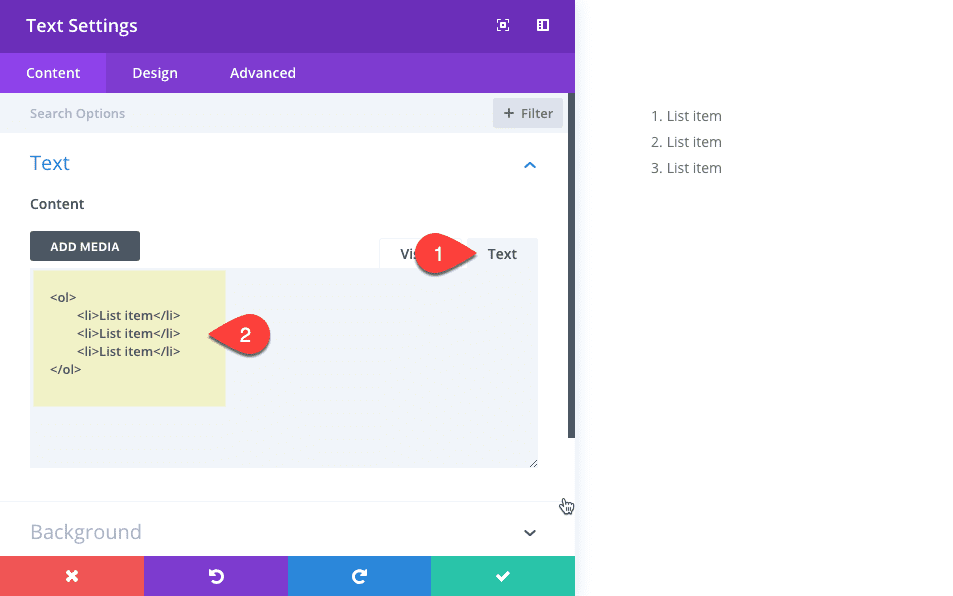
Here is the basic structure of an ordered list:
<ol>
     <li>List Item</li>
     <li>List Item</li>
     <li>List Item</li>
</ol>
Which by default will look like the following:
- List Item
- List Item
- List Item
You can actually create an HTML list using the wysiwyg editor within a Divi Text Module. Make sure you are editing in the visual tab and simply type out your list items making sure there is a line break (press enter) after each one. Then highlight the content and click one of the list icons at the top of the editor.
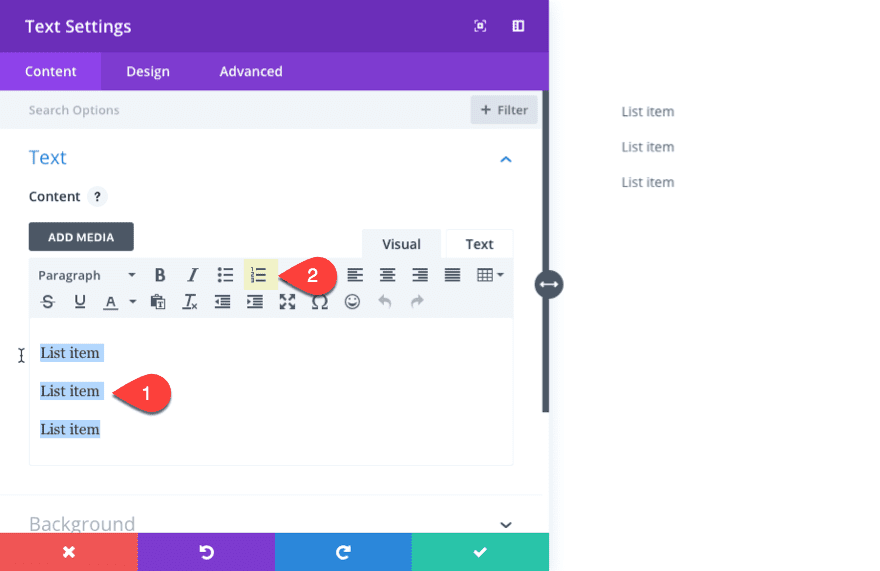
Now go over to the text tab to see what the HTML looks like:
This works fine for simple lists, but if you want to create nested lists (a list within a list), you are better off of creating them using HTML (using the text tab) to avoid the headache of trying to do it in the wysiwyg editor (visual tab).
Here is the basic structure of a nested list which has an ordered list with each list item having a nested unordered list.
<ol>
  <ol>
  <li>Ordered List Item
    <ul>
      <li>Unordered List Item</li>
    </ul>
  </li>
  <li>Ordered List Item
    <ul>
      <li>Unordered List Item</li>
    </ul>
  </li>
  <li>Ordered List Item
    <ul>
      <li>Unordered List Item</li>
    </ul>
  </li>
</ol>
By default, this nested html list will look like this:
- Ordered List Item
- Unordered List Item
- Ordered List Item
- Unordered List Item
- Ordered List Item
- Unordered List Item
You can also add other html tags in the list as well. For example, we can wrap the ordered list item in an h5 tag. The result will look like this:
<ol>
  <li><h5>Ordered List Item</h5>
    <ul>
      <li>Unordered List Item</li>
    </ul>
  </li>
  <li><h5>Ordered List Item</h5>
    <ul>
      <li>Unordered List Item</li>
    </ul>
  </li>
  <li><h5>Ordered List Item</h5>
    <ul>
      <li>Unordered List Item</li>
    </ul>
  </li>
</ol>
Don’t worry, this is as complicated as I’m going to get for this tutorial. But what you need to realize is that this structure has three different tags (ol, ul, and h5) that can be styled independently from one another with Divi’s powerful design settings in a text module.
We will be needing this structure a little later, but for now, let’s get our page up and running to start our design in the visual builder.
Creating the Section and Row for the Lists
Create a new page and deploy the Visual Builder. Then select the option to Create Page from Scratch. Then create a regular section with a two column row.
Creating the HTML List in a Text Module
In the first column of your row, add a new text module. In the content box in the text settings, enter the following HTML List:
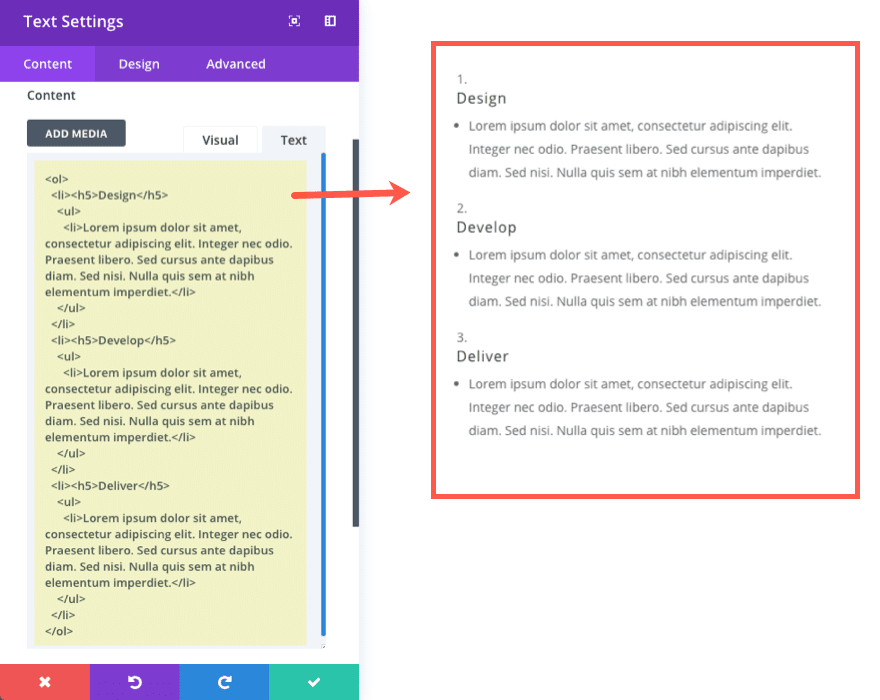
<ol>
 	<li>
<h5>Design</h5>
<ul>
 	<li>Lorem ipsum dolor sit amet, consectetur adipiscing elit. Integer nec odio. Praesent libero. Sed cursus ante dapibus diam. Sed nisi. Nulla quis sem at nibh elementum imperdiet.</li>
</ul>
</li>
 	<li>
<h5>Develop</h5>
<ul>
 	<li>Lorem ipsum dolor sit amet, consectetur adipiscing elit. Integer nec odio. Praesent libero. Sed cursus ante dapibus diam. Sed nisi. Nulla quis sem at nibh elementum imperdiet.</li>
</ul>
</li>
 	<li>
<h5>Deliver</h5>
<ul>
 	<li>Lorem ipsum dolor sit amet, consectetur adipiscing elit. Integer nec odio. Praesent libero. Sed cursus ante dapibus diam. Sed nisi. Nulla quis sem at nibh elementum imperdiet.</li>
</ul>
</li>
</ol>
This structure should look familiar from earlier. The h5 header text will be the ordered list items and the “lorem ipsum” dummy text will be the nested unordered list items.
By default it will look something like this:
Not too impressive so far, I know. But with this content in place, now we can begin the fun part of designing our list with Divi!
Important Note: Since each design is a modified version of the first design, it would be best to start with the first design in this tutorial and keep them in order.
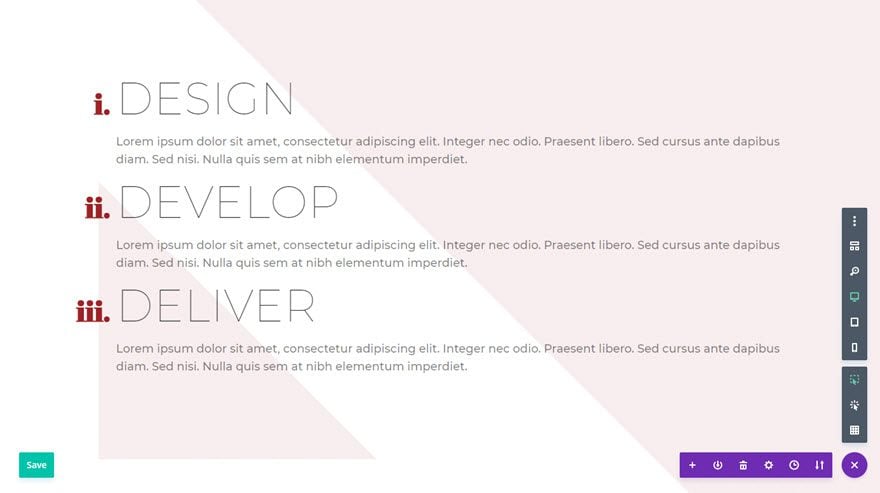
List Design #1
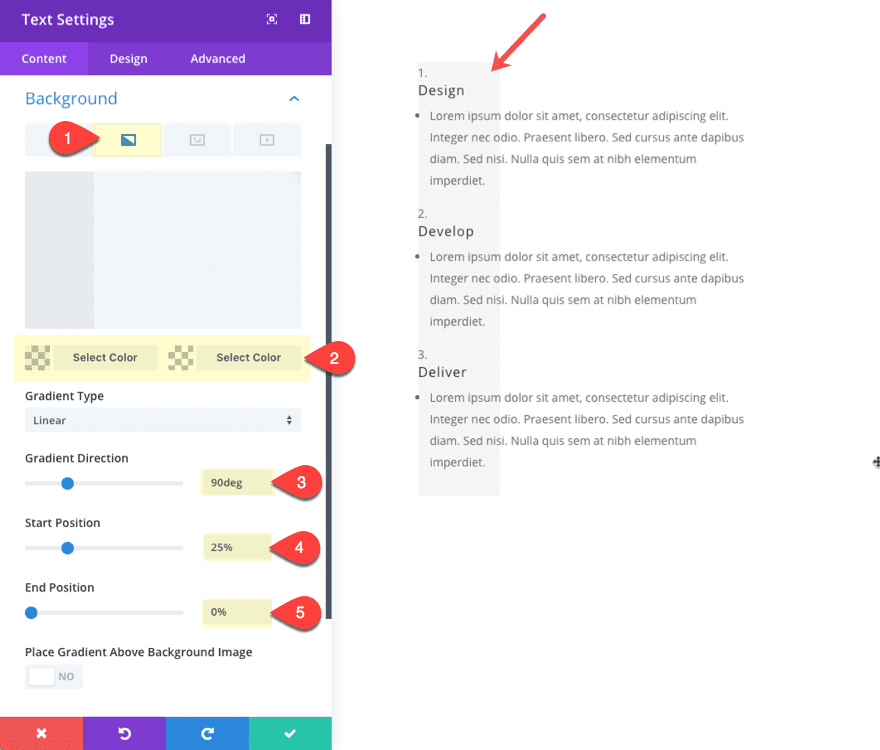
For starters, let’s give our text module a gradient background as follows:
Gradient Background Left Color: rgba(0,0,0,0.04)
Gradient Background Right Color: rgba(255,255,255,0)
Gradient Direction: 90deg
Start Position: 25%
End Position: 0%
Styling the Ordered List Items
Now go over the the design tab and select the ordered list tab under the Text toggle.
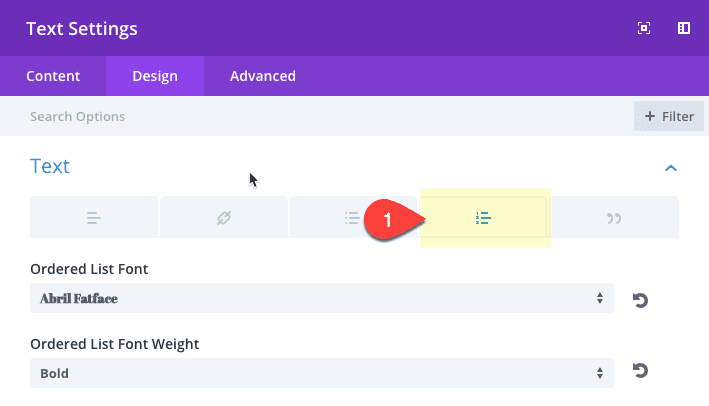
Then update the following:
Ordered List Font: Abril Fatface
Ordered List Font Weight: Bold
Ordered List Text color: #559cad
Ordered List Text Size: 45px
Ordered List Line Height: 1.6em
Ordered List Style Type: decimal-leading-zero
Ordered List Style Position: Outside
Ordered List Item Indent: 2vw
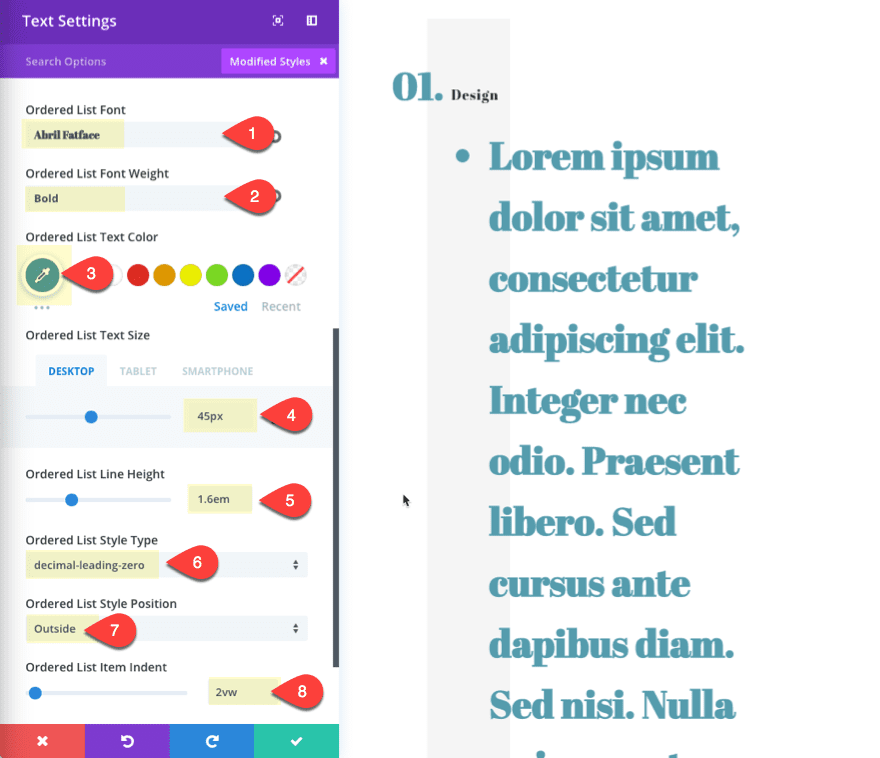
You will notice that the h5 and the nested unordered list will inherit the style of the parent ordered list. Don’t worry, you will be able to override the style of the other items.
Styling the Unordered List Items
Now click the ordered list tab to change the following settings:
Unordered List Font: Montserrat
Unordered List Font Weight: Light
Unordered List Text color:
Unordered List Text Size: 18px
Unordered List Style Type: None
Unordered List Item Indent: 0.01px

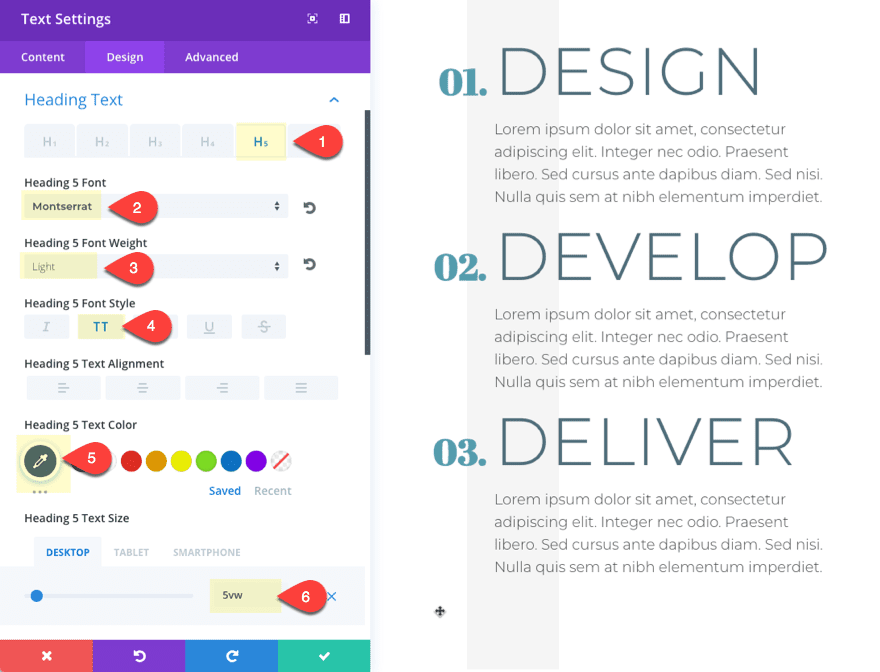
Styling the H5 Header
The last item we need to style is the H5 header. To do that, go the options under Heading Text and click the H5 tab. Then update the following:
Heading 5 Font: Montserrat
Heading 5 Font Weight: Light
Heading 5 Font Style: Uppercase (TT)
Heading 5 Text Color: #4f6d7a
Heading 5 Text Size: 5vw (desktop), 70px (tablet), 40px (smartphone)
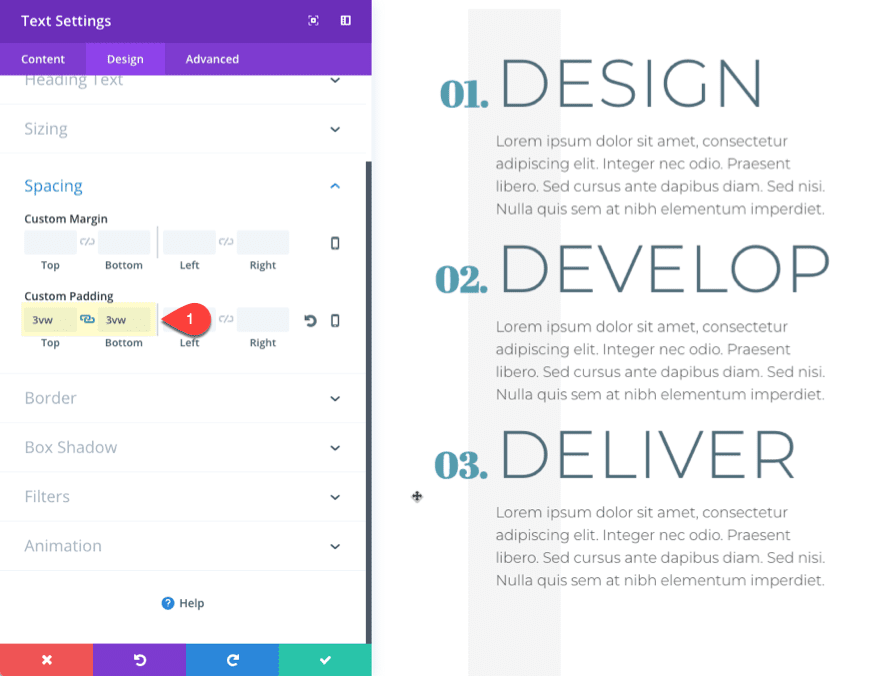
To finish off the design of our text module, add the following custom padding:
Custom Padding (desktop): 3vw Top, 3vw Bottom
Custom Padding (tablet): 2vw Left
Custom Padding (smartphone): 50px Left
Save Settings.
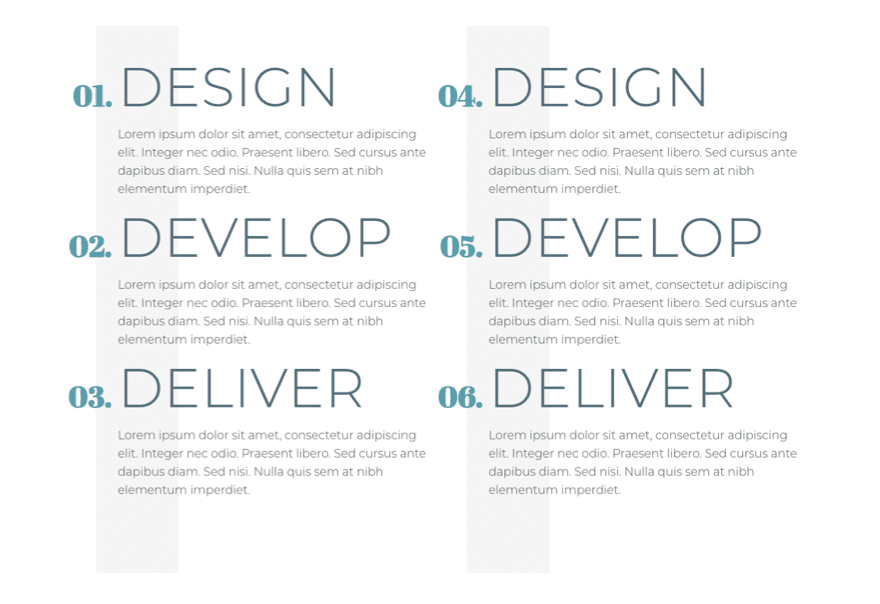
Now copy the text module and paste it into the second column of the row. You may notice that the list numbers need to be adjusted in the duplicated text module so that it continues from the previous list. We want our second text module list to start with the number 4 (instead of 1). To do this we need to add one small change to our html list. Go to the content box in the text module settings and replace the opening “ol” tag with the following:
<ol start="4">

Now let’s check out the final result.
List Design #2
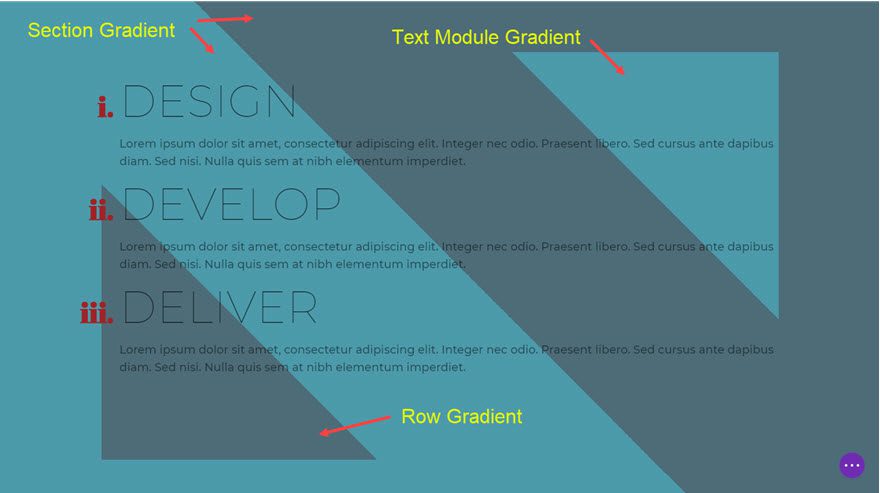
For this second example list design, I’m going to duplicate the first section we created to give us a head start. I’ll also introduce a cool background for the list design using background gradients.
Creating a Custom Background Gradient Design
In the duplicated section, update the section setting with the following gradient background:
Gradient Background Left Color: #ffffff
Gradient Background Right Color: rgba(155,29,32,0.08)
Gradient Direction: 45deg
Start Position: 50%
End Position: 0%
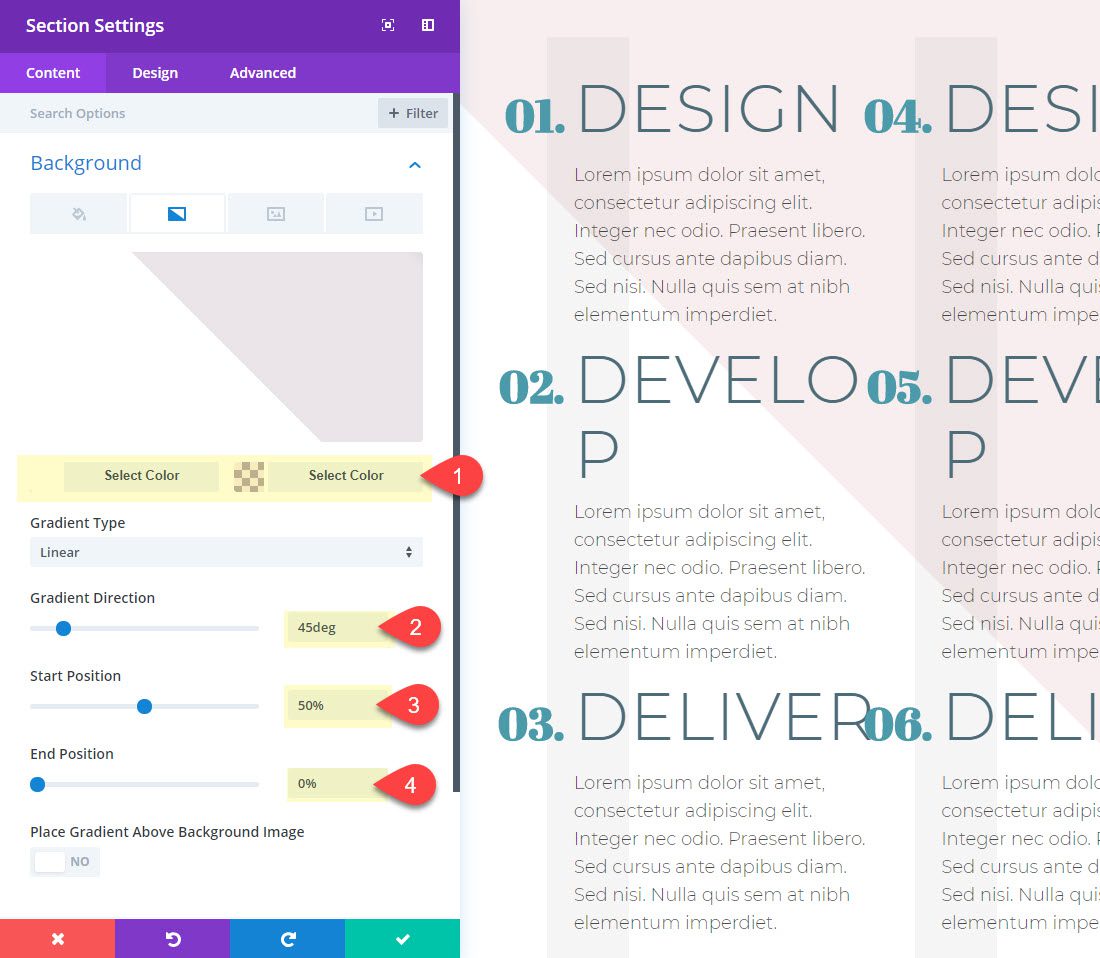
Save Settings.
Now update your Row settings with the following background gradient:
Gradient Background Left Color: rgba(155,29,32,0.08)
Gradient Background Right Color: rgba(255,255,255,0)
Gradient Direction: 45deg
Start Position: 25%
End Position: 0%
Column 2 Gradient Background Left Color: rgba(255,255,255,0)
Column 2 Gradient Background Right Color: #ffffff
Column 2 Gradient Direction: 45deg
Column 2 Start Position: 65%
Column 2 End Position: 0%
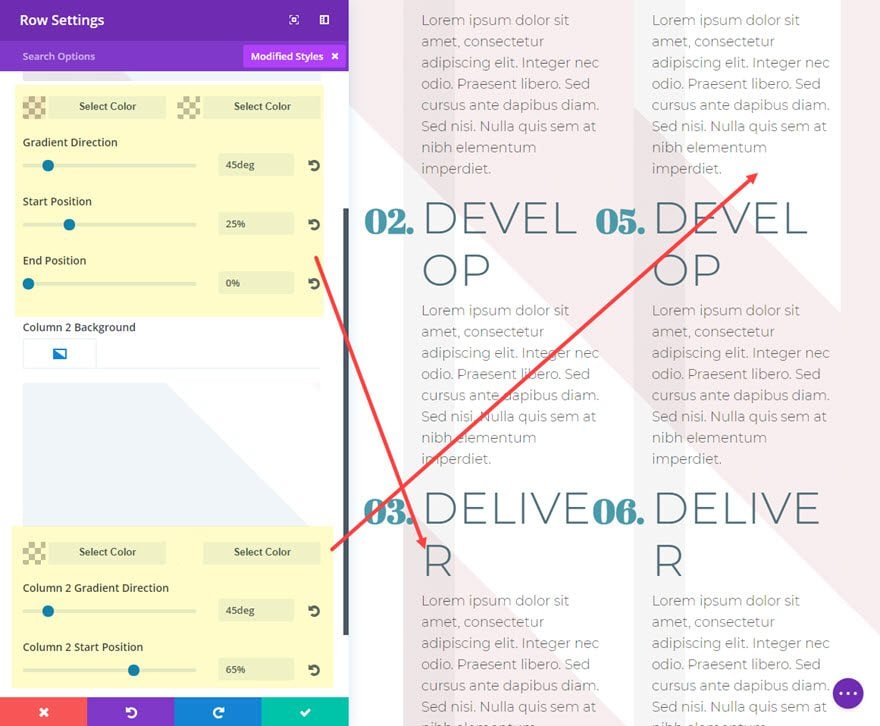
The key to these background gradient designs is that they all have the same gradient direction of 45deg. Then you can use the start position to space out the design evenly.
Style Settings for List Design #2
At this point, we can really have some fun tweaking the designs of our lists in unique ways. For this second example, I’m going to show you how easy it is to transform your design with just a few minor changes. Go to the text module in the first column and update the settings as follows:
First delete the background gradient.
Unordered List Font Weight: Medium
Unordered List Text Color: rgba(0,0,0,0.5)
Ordered List Font Weight: Regular
Ordered List Text Color: #9b1d20
Heading 5 Font Weight: Thin
Heading 5 Text Color: rgba(0,0,0,0.8)
Heading 5 Text Size: 5vw (desktop)
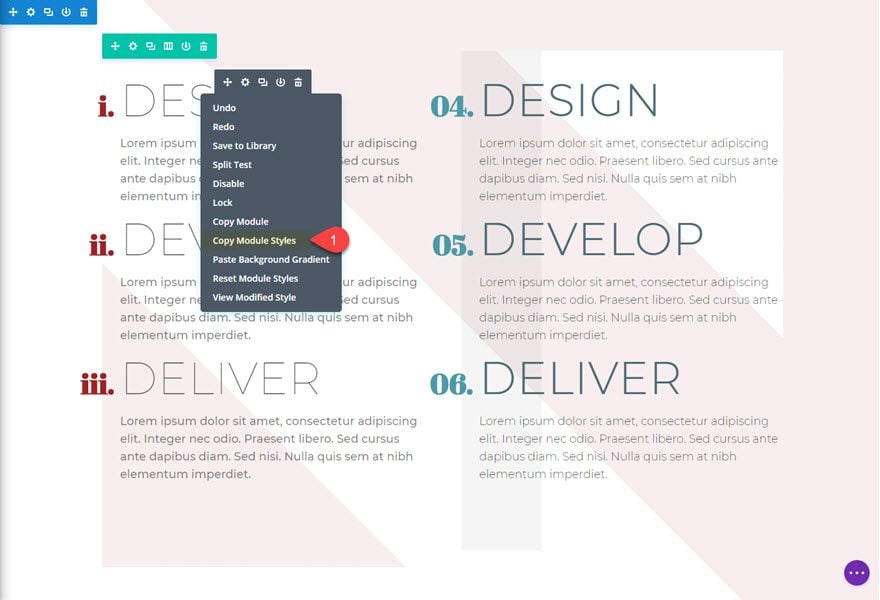
Now copy the module styles over to the text module in the right column.
Here is the final design of our second example.
List Design #3
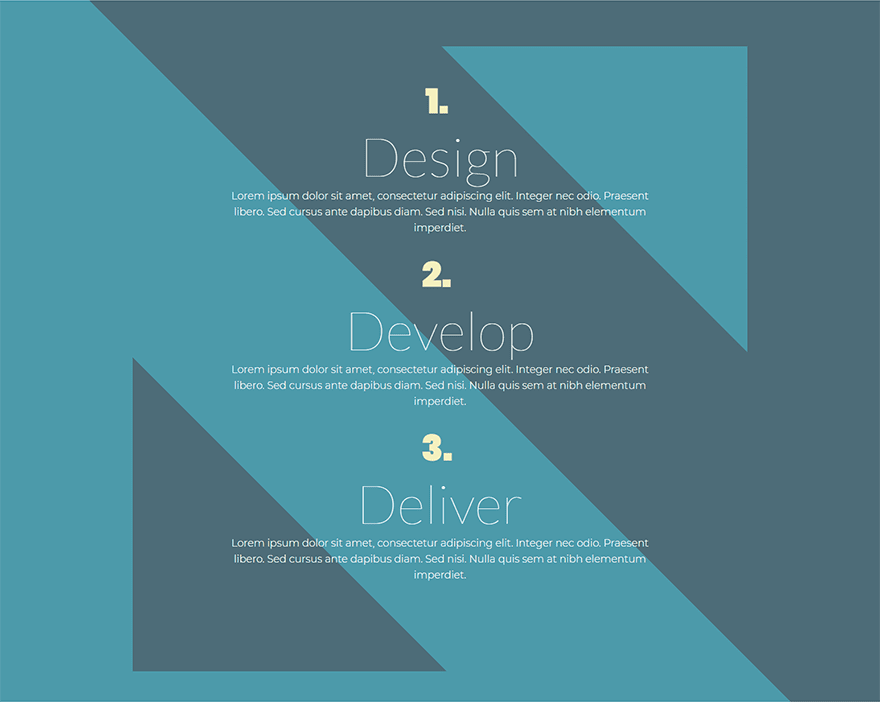
For the third example, I thought it would be good to give an example of a centered one-column list design. To create this design, duplicate the second example section. In the new duplicated section, change the row structure to one column and then delete the second text module.
Now update the section settings with new gradient background colors:
Gradient Background Left Color: #559CAD
Gradient Background Right Color: #4f6d7a
Update the Row settings with a new left gradient background color:
Gradient Background Left Color: #4f6d7a
Then add a new background gradient to the text module.
Gradient Background Left Color: rgba(255,255,255,0)
Gradient Background Right Color: #559cad
Gradient Direction: 45deg
Start Position: 75%
End Position: 0%
This creates a darker version of the symmetrical background design in list design #2 for a one column list. The key to this design is to layer background gradients by adding one to the section, the row, and the module.
Style Settings for List Design #3
For this third example, I want to show you what a center aligned list looks like. And for the ordered list item, I’ll use a more traditional decimal/number style.
Go to the text module settings and update the following:
Ordered List Font: Poppins
Ordered List Font Weight: Heavy
Ordered List Text Alignment: Center
Ordered List Text Size: 4vw (desktop), 50px (tablet)
Ordered List Text Color: #f4f1bb
Ordered List Style Type: decimal
Ordered List Style Position: Inside
Ordered List Item Indent: 0vw
(Note: Changing the style position to inside will cause the number to stack above the header text which is convenient for this design.)
Unordered List Font Weight: Light
Unordered List Text Color: #ffffff
Heading 5 Font: Lato
Heading 5 Font Weight: Thin
Heading 5 Letter Spacing: 6vw (desktop), 70px (tablet), 40px (smartphone)
Heading 5 Text Color: #ffffff
Heading 5 Text Size: 6vw
Custom Padding (desktop): 15% Left, 15% Right
Custom Padding (tablet): 5% Left, 5% Right
You should also take out the custom 50px left padding on smartphone for this design.
Here is the final design.
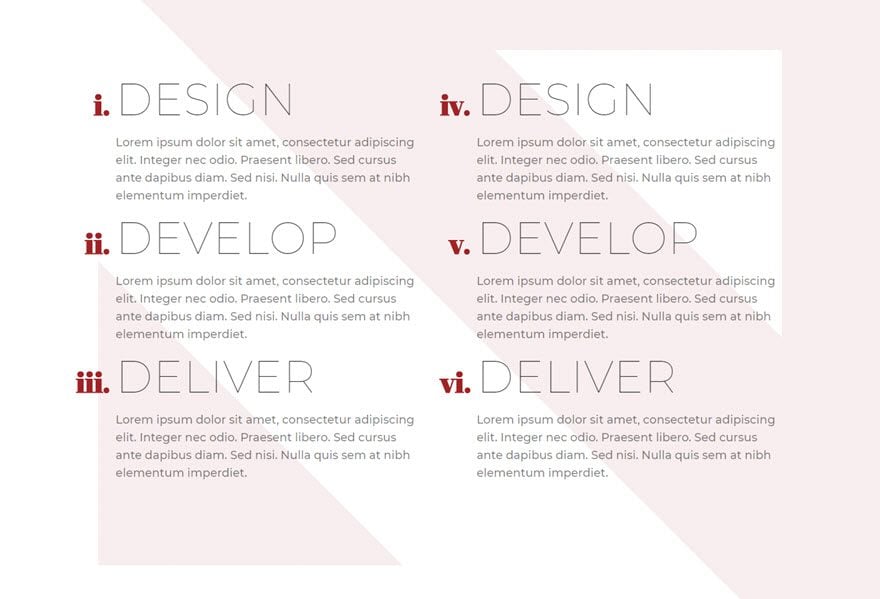
List Design #4
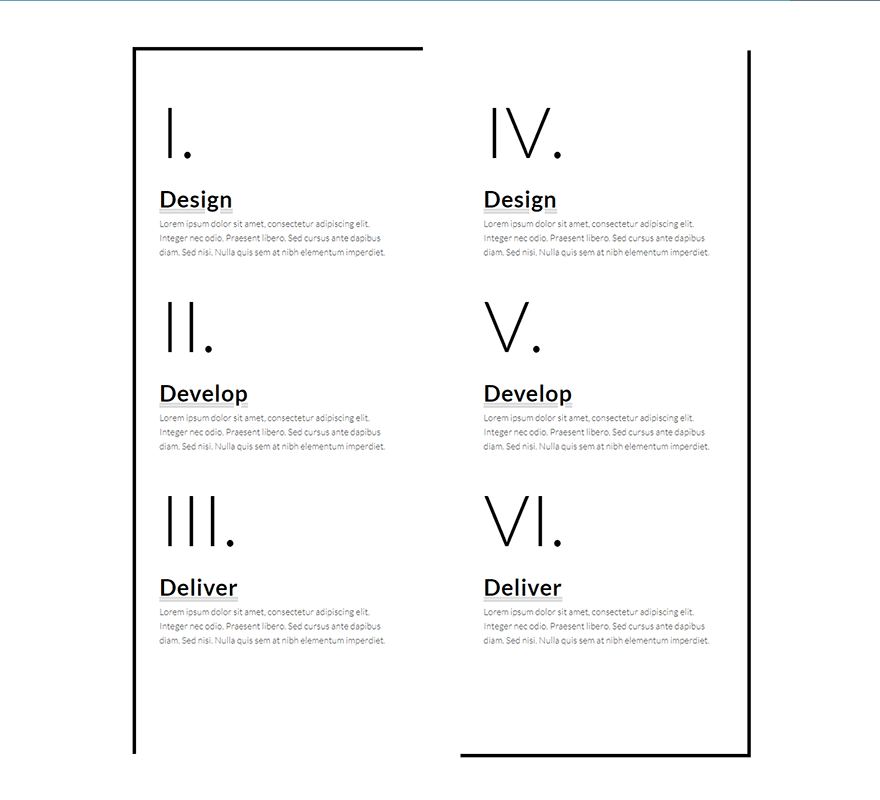
For this fourth example, I’m going to go with a more minima-“list” design (see what I did there?). For the ordered list, I’m going to use large Uppercase Roman Numerals in the Lato Font. I’ll also frame the list by adding a box shadow to each module.
Style Settings for List Design #4
To jumpstart this list design, duplicate the first section with list design #1. Then update the first text module settings in the new section as follows:
Delete Background gradient.
Ordered List Font: Lato
Ordered List Font Weight: Light
Ordered List Text Color: #000000
Ordered List Text Size: 6vw
Ordered List Style Type: upper-roman
Ordered List Item Indent: 0vw
Heading 5 Font: Lato
Heading 5 Font Weight: Bold
Heading Font Style: Underline
Heading 5 Underline Color: rgba(0,0,0,0.14)
Heading 5 Underline Style: double
Heading 5 Text Color: #000000
Heading 5 Text Size: 40px
Custom Padding: 3vw Left, 3vw Right
Delete the custom left padding for tablet and smartphone carried over from the previous design.
Box Shadow Horizontal Position: 6px
Box Shadow Vertical Position: 6px
Box Shadow Spread Strength: 0px
Box Shadow Blur Strength: 0px
Shadow Color: #000000
Box Shadow Position: Inner Shadow
Copy Module Styles over to the second column. Then update the box shadow position to outer shadow.
Here is the final result.
That’s it!
Final Thoughts
After building and tweaking your html lists in the above examples, you should have a better understanding of how to harness the power of the text module settings like a Divi expert. No longer will you have to settle for boring list designs in your content. I hope these techniques will inspire you to create amazing list designs for your next project.
I would love to see some examples from you, so please feel free to share in the comments.
Cheers!


Sound’s good, doesn’t work.
The ordered list font size overrides the unordered list font size (inheritance). You can’t reduce the text size, so it’s unusable. Either I miss something, or it’s no longer working.
It looks great on desktop but changing a view of tablet or mobile phone looks horrible. How can we configure it so that it works the same on any device?
Same problem every time I follow a tutorial that I like about you, it looks incredible at first sight on a computer but on tablet or mobile phone it just does not make sense. That’s why I have to decide on keeping designs simpler so that it looks uniform on all devices. Hopefully one day we could have something to help in this kind of problems
Or someone has a comment that can help me. Thank you
Nice tutorial. Something very different.
Just what I am about to work on, and now I have some great ideas and easy t follow instructions. Your timing is impeccable! 🙂 Thank you for a great tutorial.
This is great stuff right here, Love it!!!!
Agree with you 🙂
This is awesome.
I want to say that Elementor released Woocommerce builder. When will you guys introduce complete Woocommerce solution in Divi ?
Great tutorial, very powerful!
Thanks Jason,
Fantastic and so useful for me as a “beginner” and private user!!! Much appreciated
Thank you, very good post.
1. I’m missing very much LTR-RTL buttons to appear in every Divi editor, VB on Non-VB. When working on a mixed LTR-RTL site this is essential.
2. your examples are very nice, but in a real site, you most likely not see the same content in each element. Try to use different length content in each element and then you’ll get to see real situation, where you need to work hard to make elements appear nice and organized. Divi unfortunately doesn’t handle such matters easily.
jm2c
Avi,
Thanks for the suggestion. Although I’m not sure what you meant by #1 in your comment. Could you clarify?
This is excellent . I love it!
This tutorial is amazing! Bookmarked!
Wow Gerat.pls update Extra theme also.
Mind blown! This type of design tutorial is just what I need as a newbie to Divi/Extra. Thank you, Jason!
You are very welcome Sandy. I really hope it helps. Thanks
Great tutorial as always sparking my creativity!
Thanks Julio!
Wow, great tutorial, thanks 🙂
Awesome to hear. Thanks Miroslav.
I really appreciate tutorials on creative ways to use Divi. This is great stuff. Thank you.
I appreciate the comment, Jade.
I am going to give that a try!
Let me know how it goes!
Simply amazing. Thank you.
Great to hear, Gene. Glad you liked it.