

Those of you who frequently work with WordPress know that problems can arise. There are a number of ways your site could suddenly decide to stop working. For example, you may have installed new plugins only to find that something went wrong during the installation process. Maybe you’ve tried implementing new code which ended up breaking your site. Whatever the circumstances, WordPress issues can be frustrating. This is where a staging site comes in. As a part of our Cloudways series, we’ll discuss how easy it is to use Cloudways staging management to create staging sites.
With Cloudways, you’re able to undo any errors you’ve made easily. In this article, we’ll focus on creating staging sites with Cloudways Divi Hosting. We’ll also discuss why you should use a staging site. Additionally, we will discuss how to clone a server or site in Cloudways, and why you might want to. First, let’s take a brief look at Divi Hosting with Cloudways.
- 1 What is Cloudways Divi Hosting?
- 2 What is a Staging Site?
- 3 Cloudways Staging Management Tools
- 4 How to Create a Staging Server on Cloudways Divi Hosting
- 5 How to Manage Your Staging Site Using Cloudways
- 6 What is Cloning and Why Would You Use It
- 7 Cloudways Staging and Cloning Tools Make Life Easier for WordPress Users
What is Cloudways Divi Hosting?
We recently partnered with Cloudways to offer Divi users a great option for hosting their sites. Cloudways with Divi Hosting provides a new WordPress install with Divi loaded and ready to go. They offer plans ranging in price from $12 to $321 per month. You can choose your cloud server location, as well as storage capacity. Cloudways has worked with us extensively to ensure that each Divi WordPress site on their platform is optimized for speed, reliability, and security.

With a wealth of options to choose from, Cloudways covers all of the bases. Bot protection, malware scanning, a firewall, and two-factor authentication are all standard. In addition to security, you can have as many sites on one server as you wish. Backups are accomplished easily with the click of a button. Last but not least, you will have staging and cloning tools at your disposal. Before we talk about how to use these features, let’s delve into what a staging site is.
What is a Staging Site?
A staging site is an exact copy of your live site. Many hosting providers offer the option of a staging environment. A few offer this with no added cost, but most charge upgrade fees for this service. With Cloudways, you’ll receive a staging environment with every hosting plan. Staging sites give WordPress users peace of mind. If you make a mistake, you can fix it with the click of a button. Additionally, a staging site is a great tool to use when developing new pages. You can create and tweak your new designs safely without it affecting your live site.
No matter what changes you make – big or small – you can do them safely in a staging site. Let’s move on to the services Cloudways provides for staging.
Cloudways Staging Management Tools
Cloudways offers free staging for its customers. They enable all of their security features on every staging environment. Your staging site has the ability to be password protected, keeping prying eyes from seeing what you’re working on before you’re ready to reveal it. Cloudways enables users to backup sites before deploying staging.
Cloudways provides a hands-on approach with staging. For example, you can copy an entire server, or one application. Also, you’ll have access to an error log in case you have troubles along the way. Finally, every staging environment is protected with a free SSL through Let’s Encrypt. This is especially useful for security.
Let’s dig in and learn how to create staging environments with Cloudways.
How to Create a Staging Server on Cloudways Divi Hosting
To create a staging server with Cloudways follow these simple steps. First, log in to your Cloudways account. Next, click on servers in the top navigation bar. From there, simply choose the server you wish to create staging for.
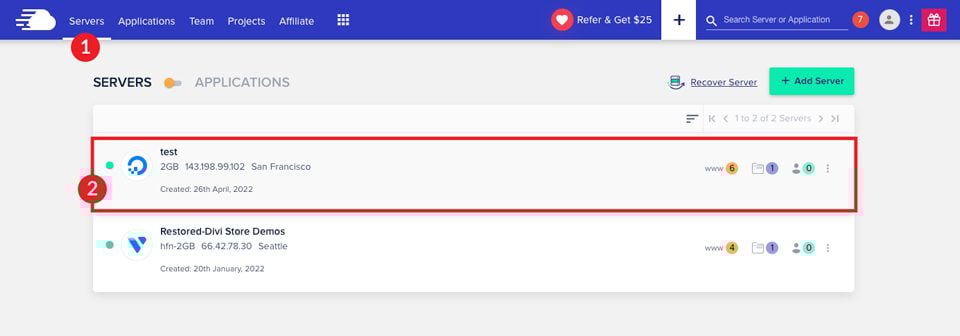
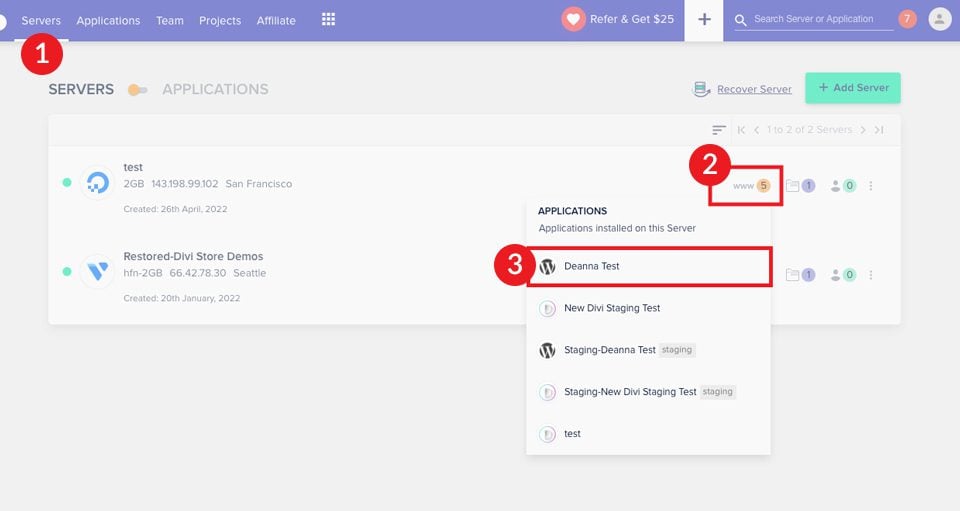
Next, click www.
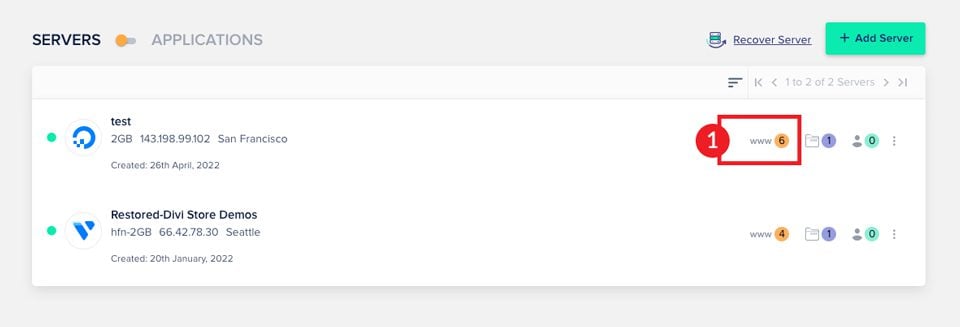
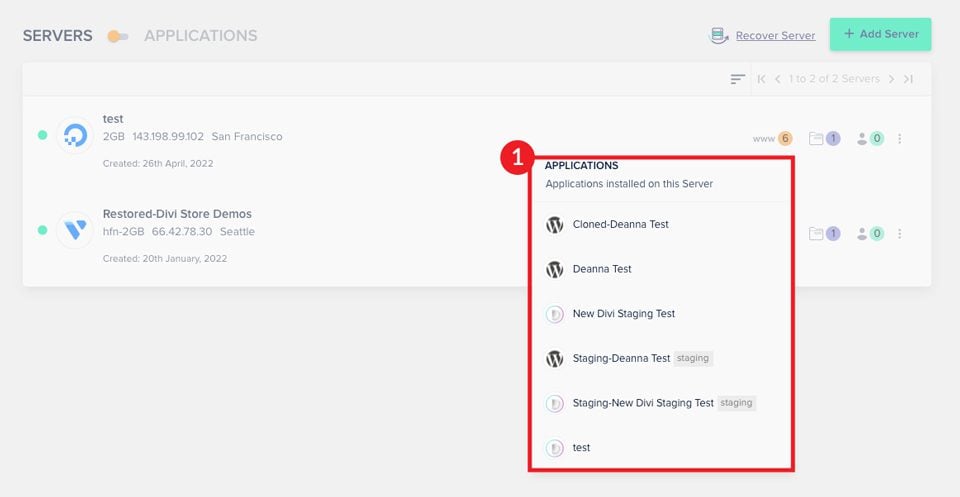
Choose your application.
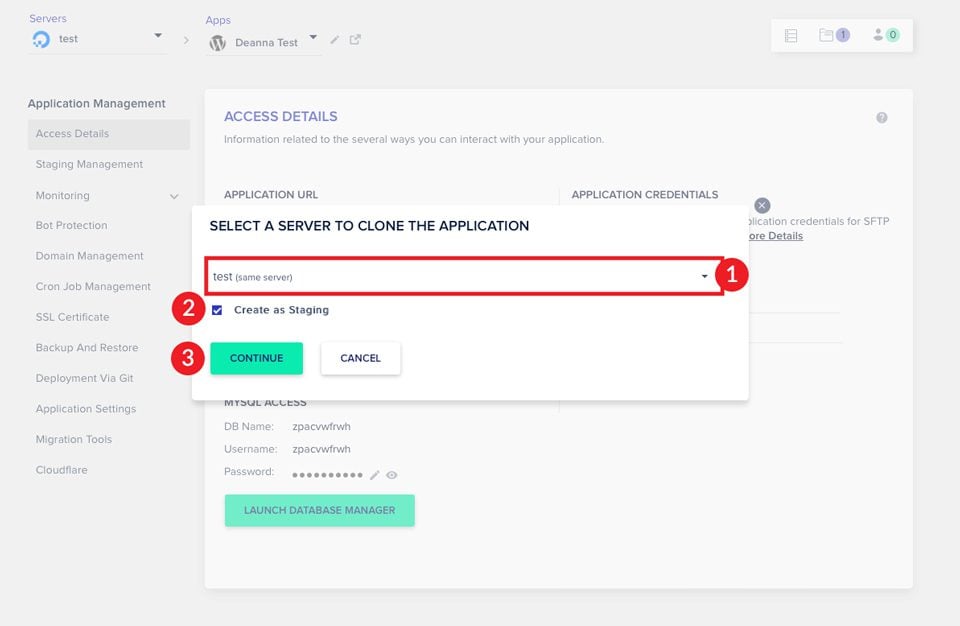
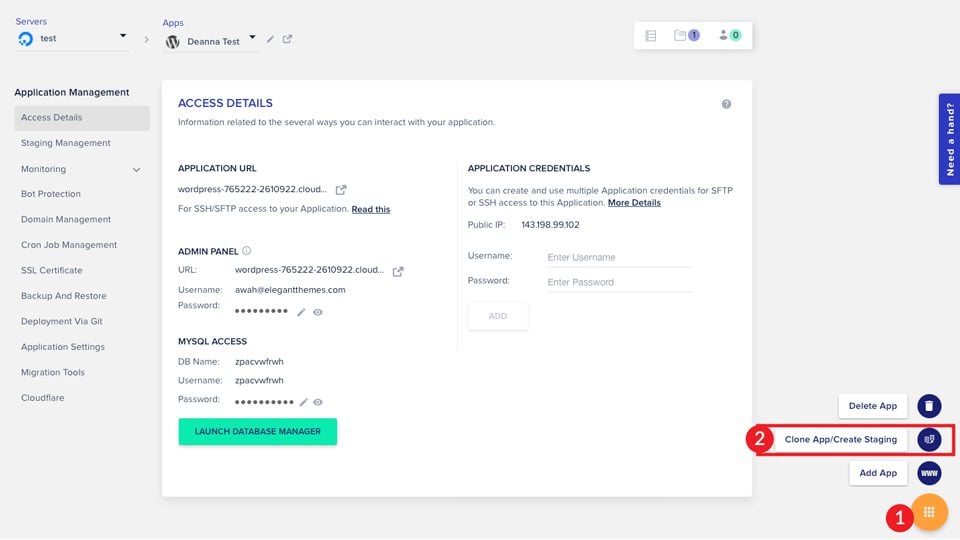
Next, hover over the grid to bring up the options. Then click on Clone App/Create Staging.
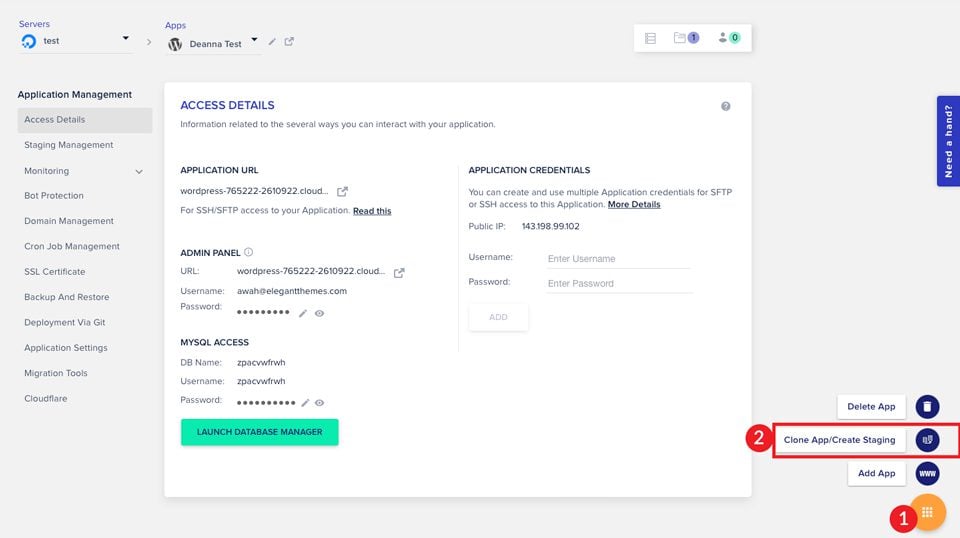
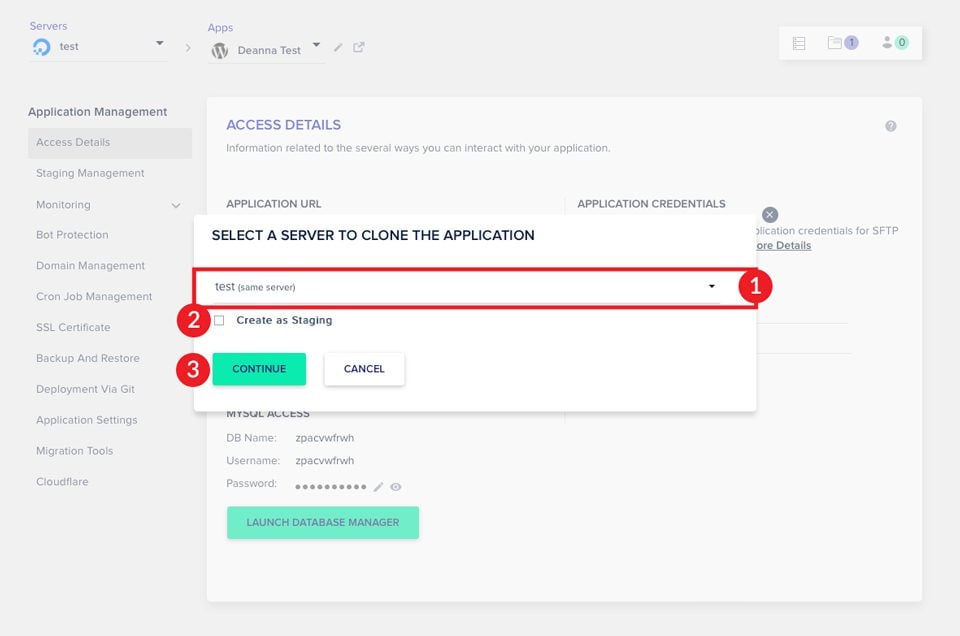
A box will appear that will ask you which server you’d like to create your staging site on. You can choose your current server, or another one. Click to enable the Create as Staging checkbox. Then click Continue.
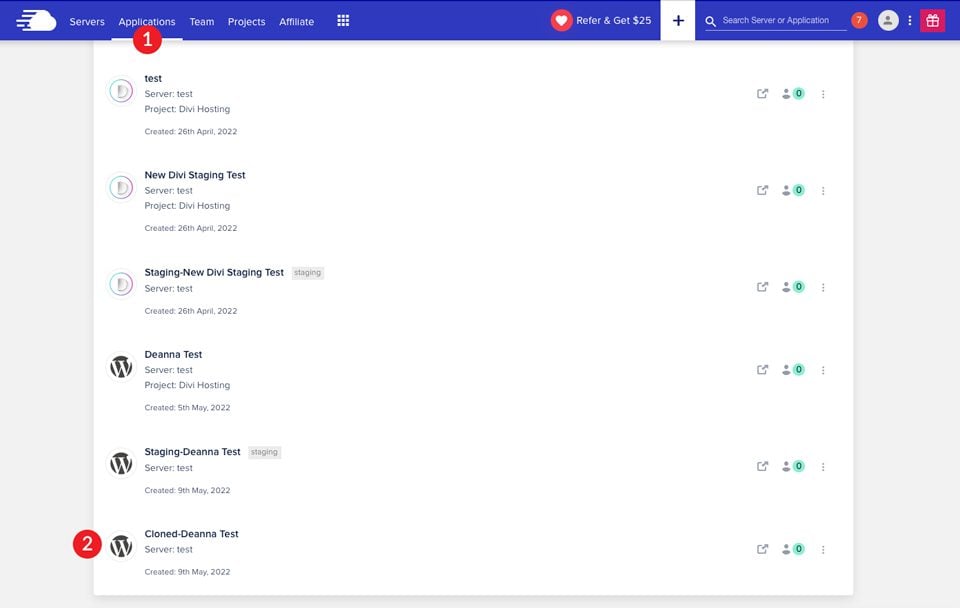
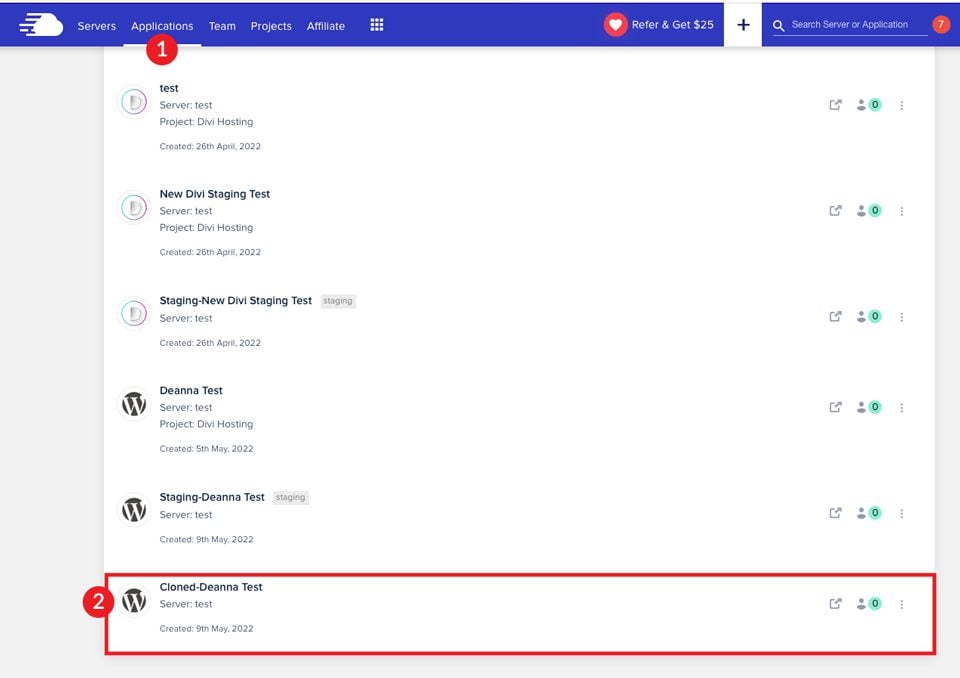
Just like that, you’re done! It’s easy to create a staging application in Cloudways. To locate your new staging site, click on Applications in your main navigation bar. Next, scroll down to locate your staging site.
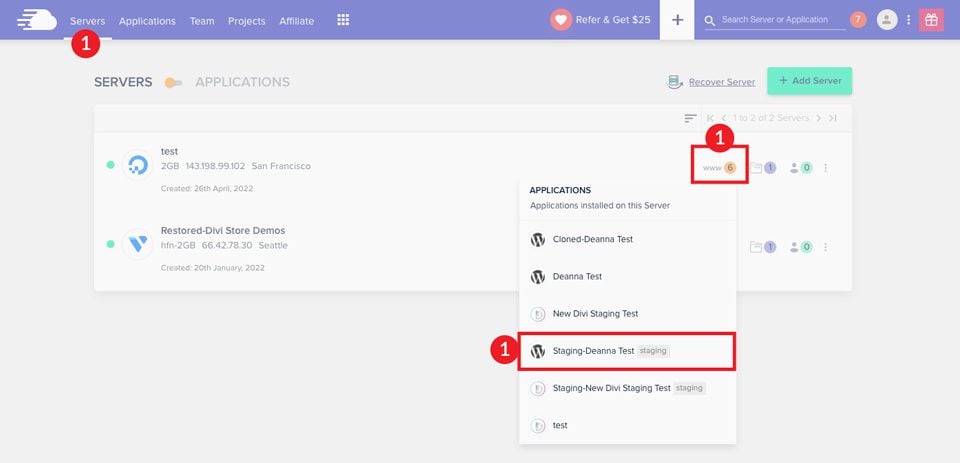
Alternatively, your staging site can be located in your server list. First, navigate to Servers under the main navigation in your account. Next, click on Servers. From there, click www. Finally, locate your staging site in the dropdown menu. Click on it to access it.
Now that we’ve demonstrated how easy it is to create a staging site in Cloudways, let’s talk about pushing your staging site live.
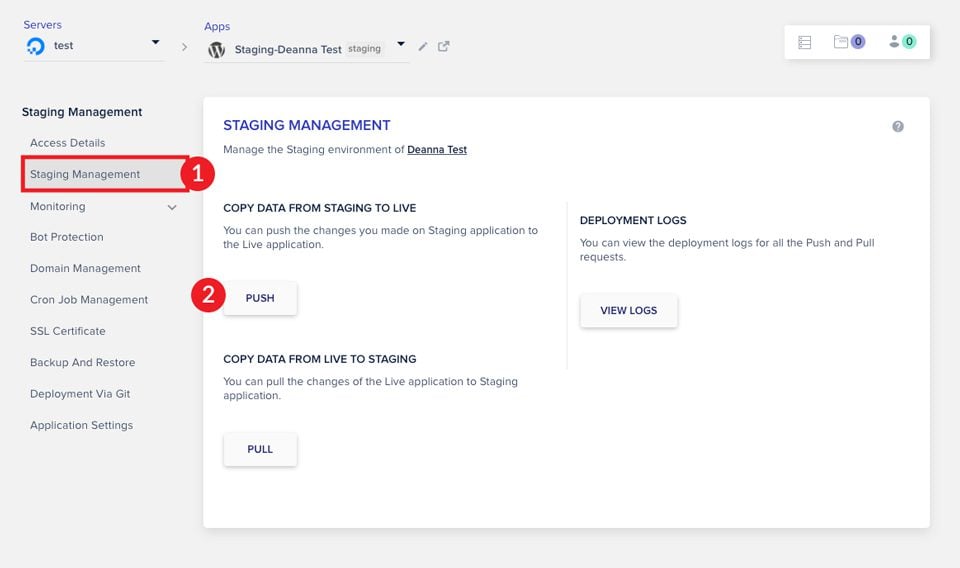
How to Manage Your Staging Site Using Cloudways
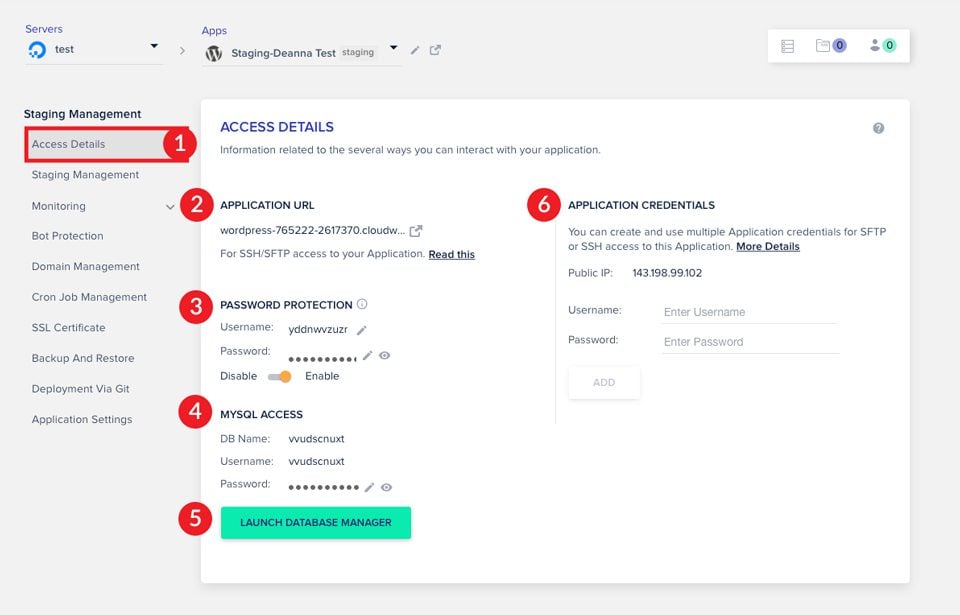
To access the details of your staging site, click on your site in the application list. You’ll see the access screen. Here you’ll find all of the details for your site. Your application URL and WordPress login are here. You can also access MySQL and the database manager. Finally, you can set a SFTP user (or multiple users) for your staging site.
Pushing Your Staging Site Live
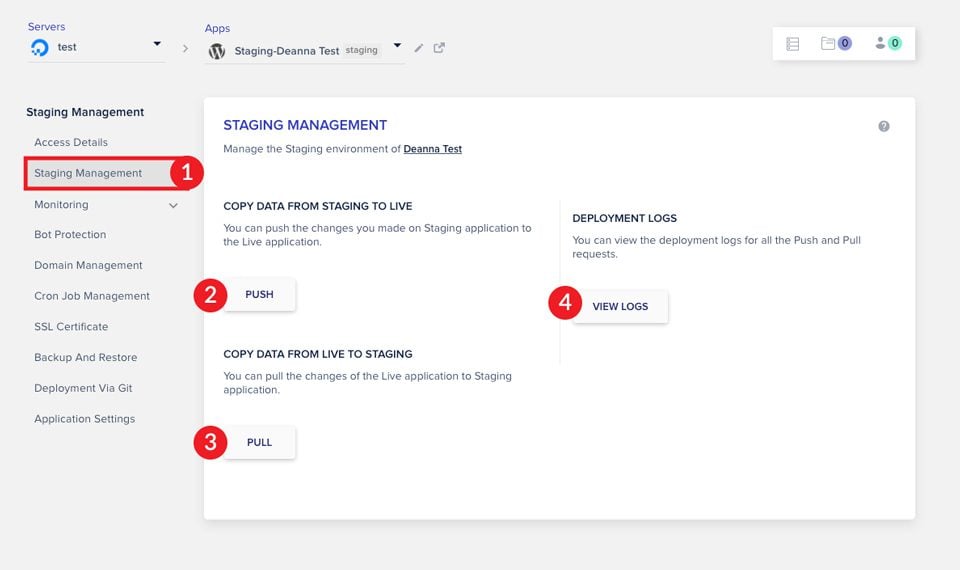
Once you’ve made changes, added pages, or functionality to your site, you can easily push it live. To make your changes live, navigate to staging management. Click the PUSH button to begin the process of pushing your site live.
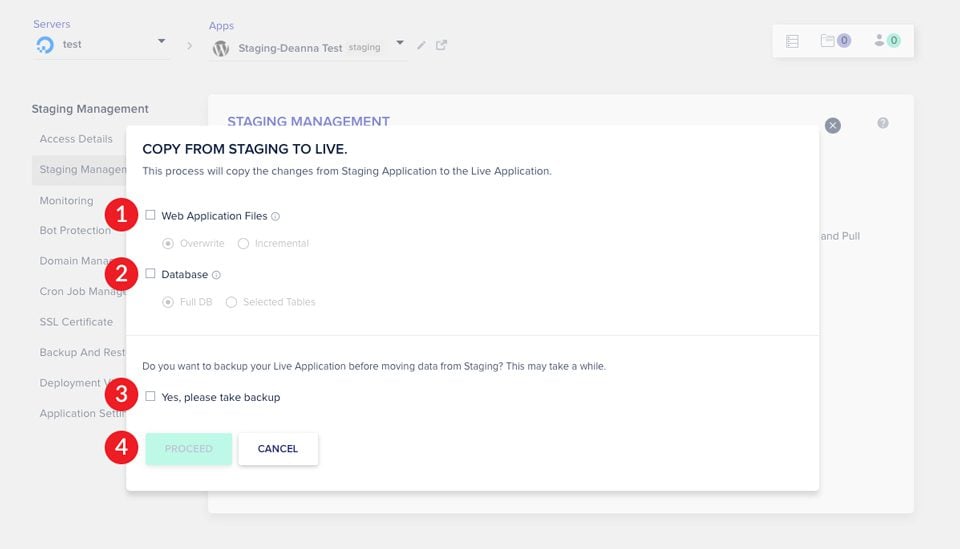
Next, choose whether to include web application files and/or database files. Note: If you choose to “overwrite” your live site’s web application files, EVERYTHING will be overwritten. This means that your .htaccess file will be overwritten too. If you choose “incremental“, only the files you changed in staging will be overwritten. This is a good option if you only made changes to pages or posts – not any of your core WordPress files.
When selecting the database options, keep in mind that you can do either a Full DB transfer or just selected tables. If you choose selected tables, you’ll get a popup to view your optional tables that can be selected. Proceed with caution.
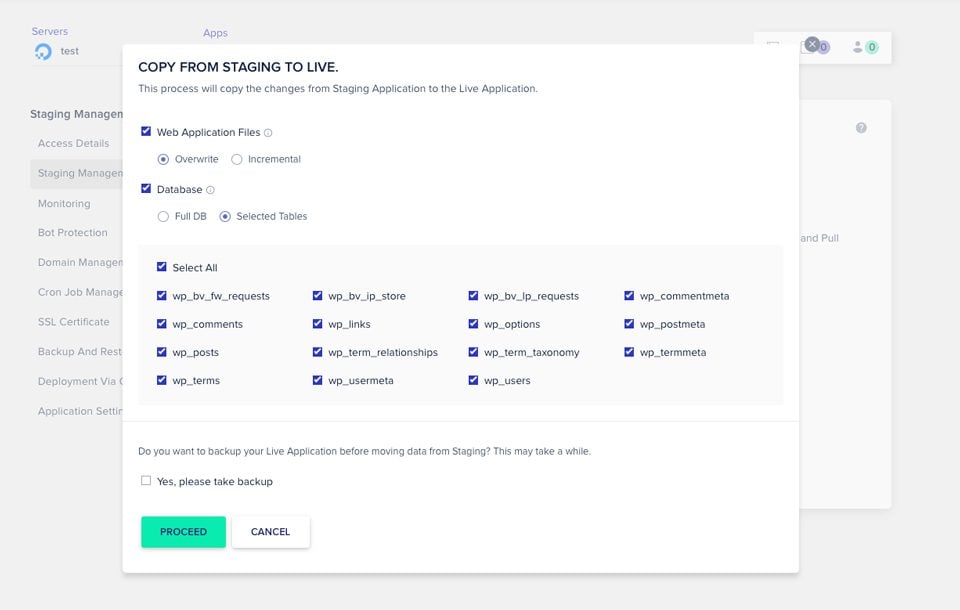
If you’d like to have a backup of your live site, click to enable the “Yes, please take backup” checkbox. Finally, click the PROCEED button.
Pulling Data From Your Live Site
You’ll notice in the screenshot below there are other options highlighted. These are beneficial for managing your live and staging sites. The PULL button is used when you have previously launched a staging site on your server. You can use it to keep the content up to date on your live site. For example, let’s say you previously created a staging site and launched it. You made further text changes a few days later. Rather than scrapping your staging site and creating a new one, you can use the PULL feature to pull the most recent changes you made on your live site.
Deployment logs can be used to view a history of changes made to your sites and when you deployed them. This can be useful if you can’t remember the last time you pushed your site live, or pulled from the live site.
When working with staging sites, it’s good practice to make a backup of your live site before pushing the staging site. We also recommend doing this after peak times or business hours. With any copying operation, there are always risks of error. It’s better to be safe than sorry. In the next section, we’ll go over cloning servers or applications using Cloudways cloning tool.
What is Cloning and Why Would You Use It
Cloning is the process of making a duplicate of your server or application. Cloning is a one-click operation with Cloudways. By using the cloning tool, you eliminate the need to use FTP to duplicate files. Let’s say you want to try a new cloud server. It’s an easy task with the Cloudways cloning tool. You’d simply clone your server, then go through the setup process and choose the cloud server you wish to try. If you aren’t happy with it, you can repeat that process.
Other reasons for cloning your server are:
- Changing your hosting server’s location
- Swapping your server to choose less storage
- Testing (speed, load,etc)
Let’s get into the details of cloning your server using Cloudways.
How to Clone Your Cloudways Server
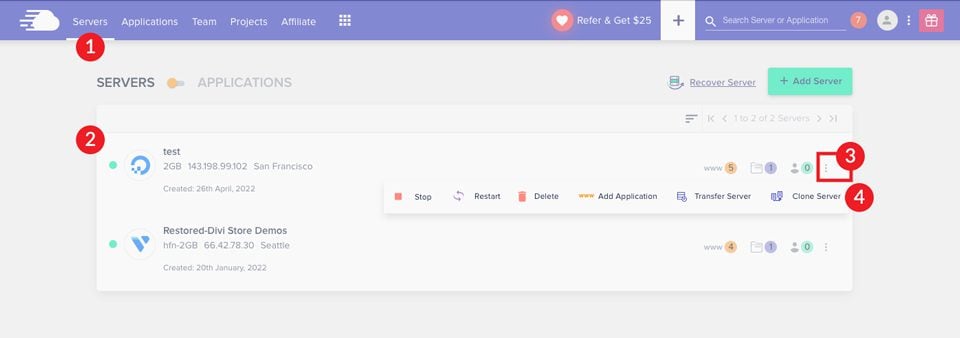
Cloning a server using Cloudways is a simple process. To get started, click on Servers in the main navigation bar. Next, choose the server you wish to clone. Finally, click on the dot menu to the right and choose “Clone Server“.
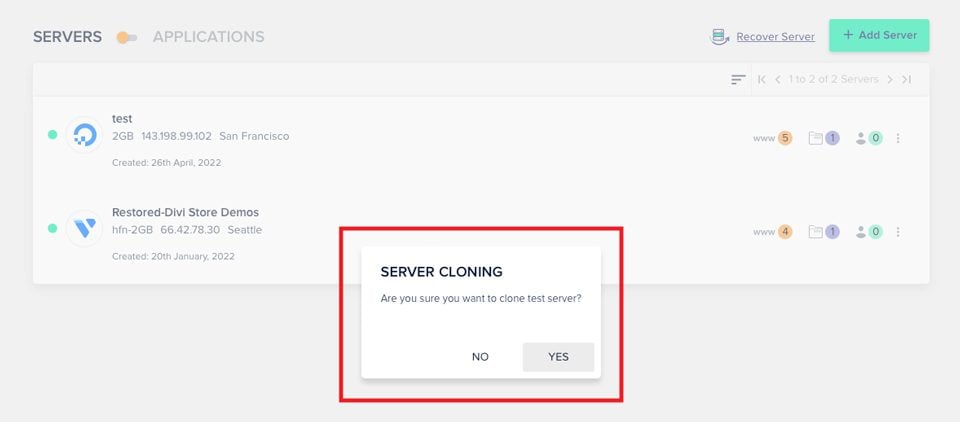
A dialog box will appear asking you to confirm your selection. Cloudways will begin the process of cloning your server. It will take a few minutes to complete.
Once your server is cloned, your screen will refresh allowing you to choose your cloud provider, server size, server location and whether to attach block storage. Finally, click the CLONE SERVER button.
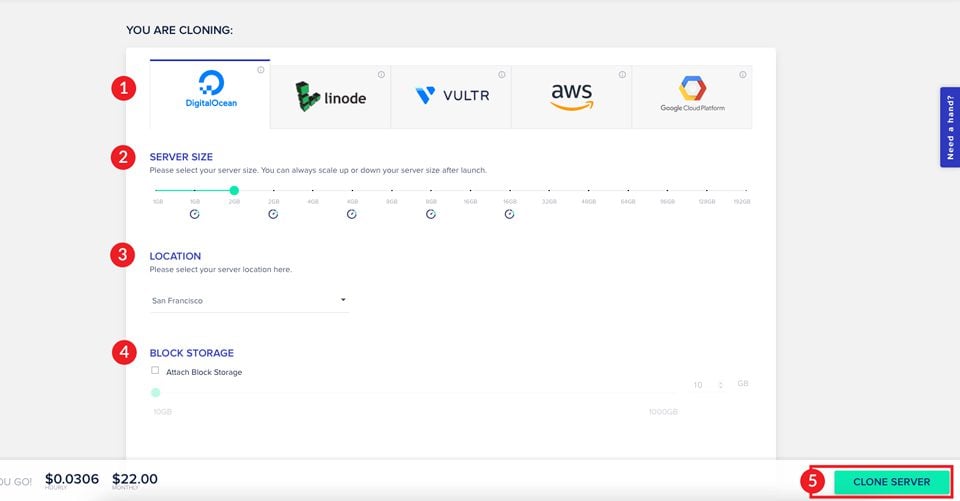
Our server is currently with Digital Ocean. If we were using Amazon Web Services (AWS) or Google Cloud, we’d have an additional option to consider. Through those providers, you’ll need to select the storage size for web application files as well as database size. Monthly and hourly rates will change based on your selections.
Here is something to consider when cloning your server. First, the cloning process creates an identical copy of your server, but does not copy the configurations. Once the cloning is successful, you’ll need to go through and map your domains and DNS records in order for your sites to be live. Once those steps are complete, you can assign the free SSL certificate.
Next, we’ll explain why you might want to use the cloning tool to make a copy of your site.
What’s the Difference Between a Cloudways Staging Site and Cloning an Application?
Cloning a WordPress site is a bit like a staging environment. Both are copies of a site. However, cloning an application is different in that it has its own environment, for instance. With staging, the site lives in the same environment and can be pushed live to replace the live site. With a clone, it exists in a different place on your server. You can attach a domain to it, or add it’s own SSL certificate.
One reason to clone an application is if you have a business that has several locations. You want to have a main site, but have each location on its own site to help boost SEO in different regions. You’d create a main site, then the first location site. Then you would clone your location site to use for a different location. From that point, you’d only need to change the contact information and any relevant pricing or product choices. Cloning would save you a ton of time and effort.
Next, let’s walk through the steps needed to clone an application using Cloudways.
How to Clone an Application Using Cloudways
Cloudways makes the process of cloning and application easy. To get started, navigate to Servers in the main nav bar. Choose the application you wish to clone, then click www.
Next, click the Grid icon near the bottom of the screen and select Clone App/Create Staging.
Select the server where you’d like your cloned site to live, then click CONTINUE. If you’d like your site to be a staging site, enable the Create as Staging checkbox.
To locate your application, navigate to Applications in the main bar, then scroll down to see your newly cloned application.
Cloudways Staging and Cloning Tools Make Life Easier for WordPress Users
We’ve demonstrated how easy it is to work with the staging and cloning tools in Cloudways. Both are simple tasks that require only a few steps to complete. Having a staging site is one of the most fool-proof ways to protect yourself from costly mistakes that could take your site down for extended periods of time. With Cloudways, you’ll get staging and cloning tools included with any plan you choose.
If you’d like to learn more about Cloudways, read our in depth review.
If you have a question or comment, please leave it below.


Wow! Such an easy-to-understand and handy manual!
Thank you Deanna