

Knowing how to make any Divi page element sticky (or fixed) is one of those handy skills that web designers can use in a number of ways. If you’re not familiar with the term “sticky”, it simply refers to an element on a web page that remains “fixed” as the user scrolls down the page. A popular example of a sticky element is a fixed navigation menu. Divi has a fixed (or sticky) navigation functionality available by default. So when the user scrolls down the page, a fixed version of the menu remains stuck at the top of the page as the user scrolls. But sticky elements can be used for just about anything and it’s a great way to call attention to your desired call to action on any given page.
In this tutorial, I’m going to show you an easy way to make any element on your page sticky by using the plugin called Sticky Menu (or Anything!) on Scroll. All it takes is a few moments to configure the plugin settings. Then all you need to do is add a custom CSS ID to your element. It’s that easy.
Let’s get into it!
What You Need for This Tutorial
For this tutorial you will need the following:
- Divi Theme
- The Sticky Menu (or Anything!) on Scroll plugin
- The Accountant Blog Page Layout (available from within the Divi Builder)
How to Make Any Divi Page Element Sticky
Subscribe To Our Youtube Channel
Configuring the Plugin Settings
Once you have the Sticky Menu (or Anything!) on Scroll plugin installed and activated on your Divi theme, make your way to the WordPress dashboard and navigate to Settings > Sticky Menu (or Anything!).
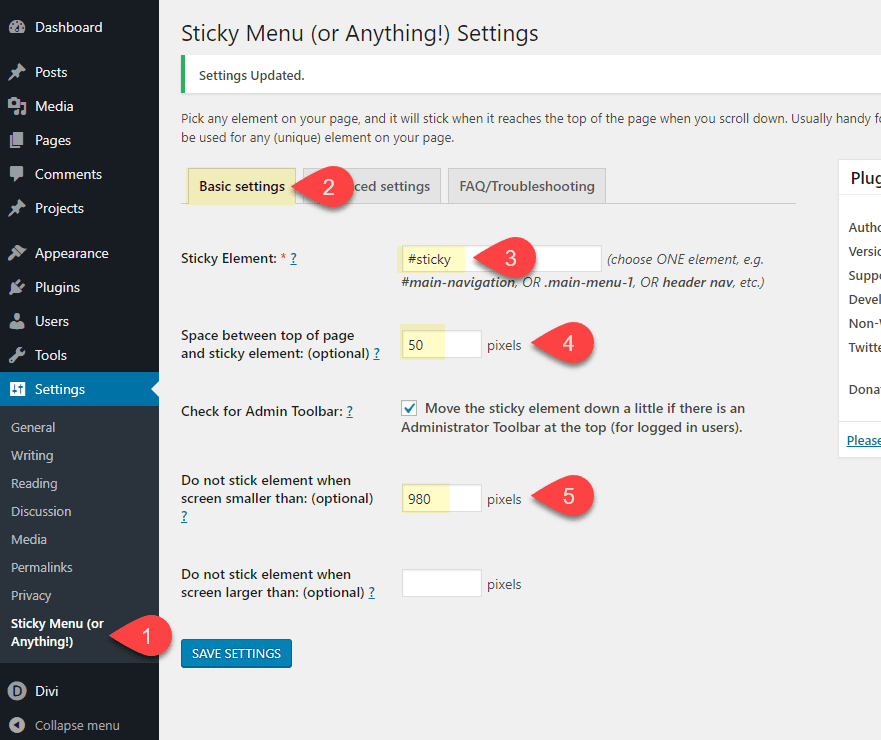
Under the Basic Settings tab, update the options as follows:
First, you will need to add a unique identifier for your sticky element. This can be a CSS ID or Class. We will then add this identifier to our element in Divi later. To make it easy to remember I’m going to add the CSS ID “#sticky”.
Sticky Element: #sticky
Then you need to add the pixel value for the space between the top of the page and the sticky element. Since Divi’s fixed navigation bar is 54px in height by default, we want to add at least 54px for this option so that our sticky element doesn’t overlap the fixed nav.
Space between top of page and sticky element: 54 pixels
It is also a good idea to disable the sticky element on mobile. To do this we need to configure the plugin to not stick the element when the screen is smaller than 980px.
Do not stick element when screen smaller than: 980 pixels
Save your settings and then go over to the Advanced Settings tab and update the following:
For the z-index option, we want to make sure our element is stacked on top of all other elements on the page, especially if we plan on our element overlapping other elements on scroll. To make sure this happens, give set the z-index to 99998.
Z-index: 99998
To give you an idea of how elements are ordered in Divi, sections have a z-index of 2, columns have a z-index of 9, and the header/navigation bar has a z-index of 99999. So basically, we are wanting our sticky element to be 1 number lower than the z-index for the header navigation. This will make sure the sticky element sits above everything else on the page but the nav. This will come in handy whenever you are wanted to stop your element and push it up the page so the sticky element won’t sit on top of the nav as you scroll (looks messy and broken).
Next, we can add a “push up” element identifier. You can think of this as a stopper for our sticky element. This is commonly a footer element. Basically, this identifies the element that will stop the sticky element when scrolling down the page, allowing the sticky element to be pushed up with the rest of the page. For this example, I’m going to set the identifier with the CSS ID “#stop”.
Push-up element: #stop
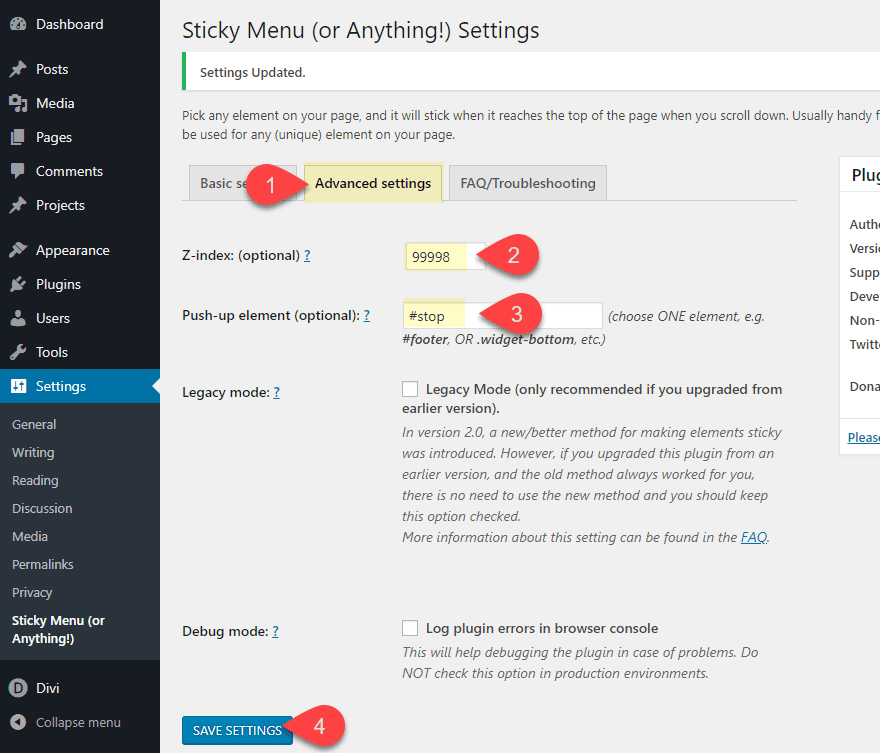
Save settings.
Now we are equipped with the power we need to make a sticky element!
Making a Divi Page Element Sticky
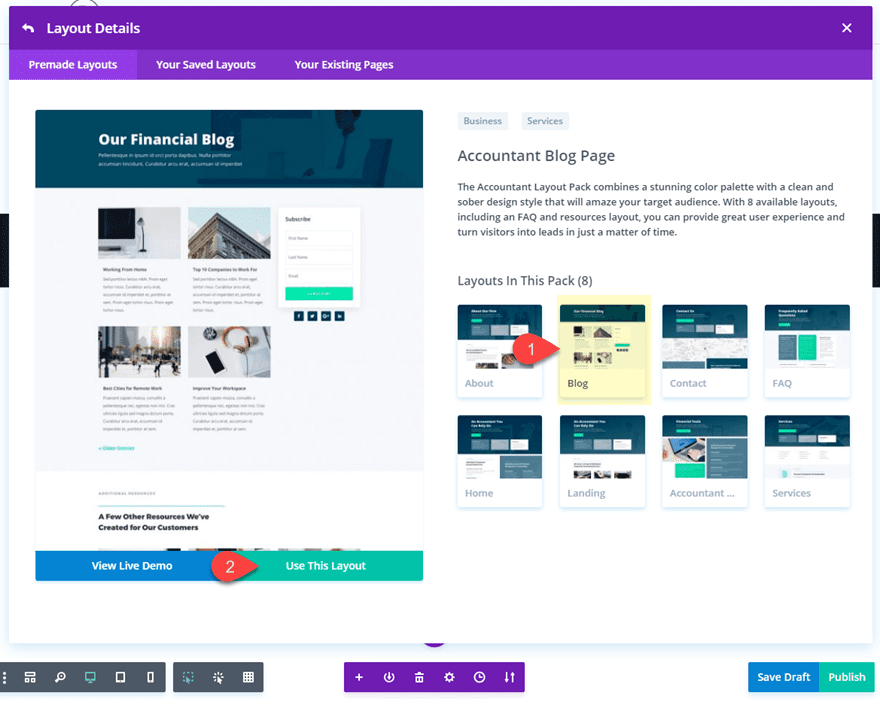
To show you how to make a Divi element sticky, I’m going to use Divi’s Accountant Blog Page from the Accountant Layout Pack. To get started, create a new page, give your page a title, and deploy the Visual Builder. Then select the option “Choose a Premade Layout”. From the load from library popup, select the Accountant Layout Pack and choose the Blog page.
This page features a email subscription optin form in the right sidebar of a specialty section. In an effort to draw more attention to this form, we can cause it to become sticky once the user scrolls down the page. Then we can make the element stop (or push up) whenever it reaches the next section on the page so that it doesn’t overlap.
How to Make a Column Sticky
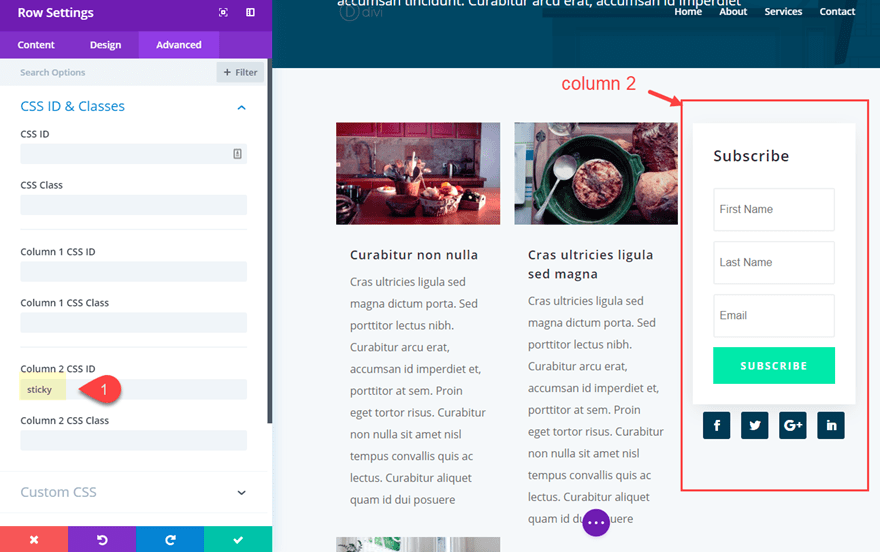
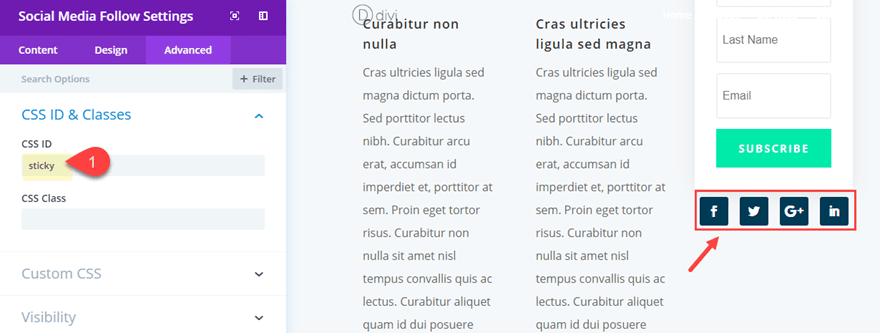
At this point, though, we need to decide what specific element we want to make sticky. We could just make the Email Option module sticky, but that wouldn’t account for the Social Media Follow module directly below the form, which we want to make sticky as well. And, we can give both of those modules the same identifier because they would both become sticky at the same position causing overlap. The best way to do this is to make the entire column(column 2) sticky.
To make column 2 sticky, open the row settings of the row containing the column we want to target. Then, under the Advanced tab, add the CSS ID “sticky”. This corresponds to the sticky element unique identifier we added in our plugin settings.
CSS ID: sticky
(NOTE: Don’t put the hashtag (or pound) symbol before the ID here. Also, make sure you add it to the CSS ID and not the CSS Class)
Save settings and preview the live version of the page. If you scroll down, you will notice that column 2 (with both modules) will become sticky once they become 54px from the top of the window and stay at that position as the you continue to scroll.
Stopping the Sticky Element at a Section
As you can see, the element continues to remain sticky so that it overlaps the content of the other sections below. To stop this from happening, we can use our “push up” identifier (#stop) we added in the plugin settings.
To stop the sticky element on the section below, we need to open the section settings and add the CSS ID “stop”.
CSS ID: stop
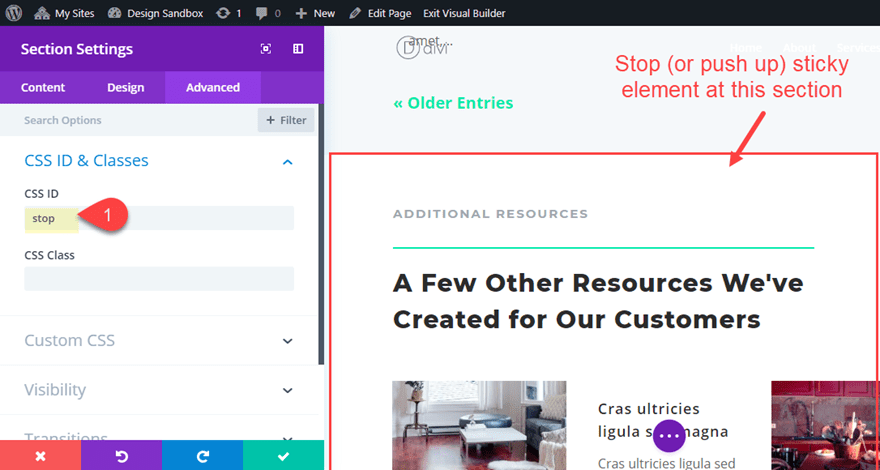
Now go preview the live version of the page. Notice how the sticky element stops at the section you identified.
Pretty cool right?
How to Make a Module Sticky
To make a single module sticky, you will need to make an adjustment in Divi to make sure your element has the correct z-index so that it sits on top of other elements throughout the page when scrolling. As I mentioned earlier, Divi assigns a a z-index of 2 to all sections. And the plugin applies the z-index of 99998 to the sticky element. But since a module cannot be ordered (or indexed) above its parent element (the section), the module will still sit behind other modules on the page. To fix this, we need to make sure and give the section holding our sticky module a z-index of 99998 manually.
To illustrate this, I’m going to use the same Accountant Blog page layout we used earlier. Before we add our CSS ID to a module, first, we need to take out the CSS ID (sticky) we set for column 2. And then take out the CSS ID (stop) we set for the section below it. After that, open the Social Media Follow module settings and add the CSS ID “sticky” to the module.
If you view the live page, you will notice the sticky element is hidden when overlapping the other modules in the sections below as you scroll.
To fix this, open up the section settings for the section containing the social media follow module sticky element. Then add the following custom CSS to the Main Element:
z-index: 99998;
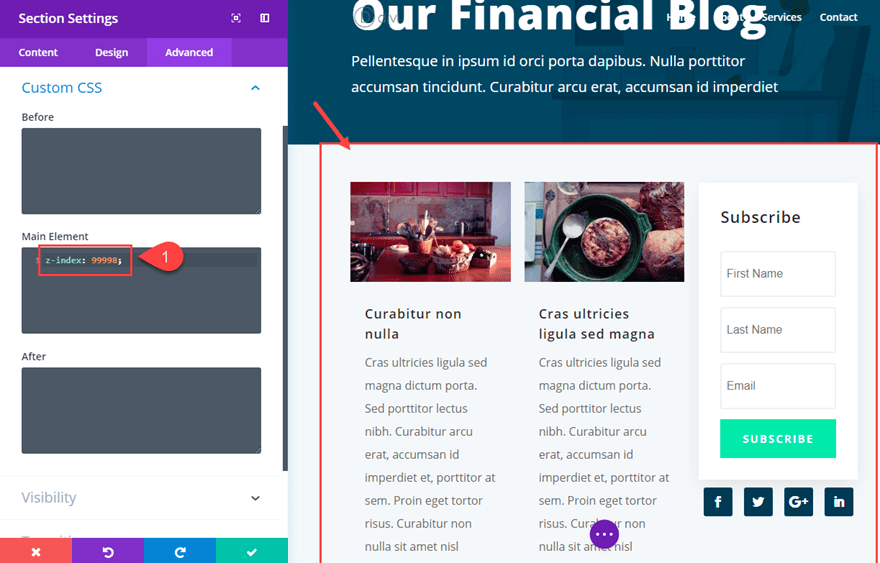
Now check the live page. Notice how the social media icons will stick to the top of the page (54px from the top), just under the fixed nav and then stay above the other modules as you scroll.
Making a Section Sticky
To make an entire section sticky, you would follow the same process of adding the CSS ID “sticky” the section of your choice. No need to update the z-index using custom css since the plugin does it for you automatically.
Hover Effects May Cause Sticky Elements to Glitch
If you have hover effects active throughout your page or on your sticky element, you may encounter some glitches. If this happens, you may need to deactivate the sticky element hover effects.
Only One Sticky Element Per Page
The plugin only allows one sticky element per page so if you are wanted to add multiple sticky elements, you will need a more advanced solution (or another plugin that supports this).
Final Thoughts
I hope this article was helpful in providing a refreshingly simple way to make any Divi page element sticky. Use it for creating sticky sub menus, sticky CTAs, sticky promotional offers, and just about anything else you can think of. Have fun exploring the possibilities!
I look forward to hearing from you in the comments below.
Cheers!


Hi, I want to use a sticky menu (with divi full width menu module) but I have the problem, that the submenu is behind the pictures on the page. The menu is above, I use z-index 99998, but just the submenu is behind. Is there a way to fix this? Many thanks.
I have a small glitch when near the stop section, is that due to hover effect and how can I deactivated it for a specific column ?
Hi:) The menu module gets pushed out at page resize, is there another way?
It seems this does not work with the divi menu module, as it is not adjusting to page resizing.
I seek to create a menu that will appear after the page header.
Have you tried adding the selector to the section that contains the fullwidth menu module?
Hi Mathias, check this one:
https://www.elegantthemes.com/documentation/divi/fullwidth-menu/
The plugin only allows one sticky element per page so if you are wanted to add multiple sticky elements, you will need a more advanced solution (or another plugin that supports this).
Can you suggest any plugin to do this?
Sorry Lucas,
I don’t have a WP plugin to suggest at the moment. However, you could try a more custom route using something like this… http://stickyjs.com/
HI !
Just what I needed right now ! 🙂
But… just one question. I need to “stick” two elements ont the page (two blocks with letf and right arrows. How to do it ? I’ve tired with a CSS class (.sticky), but doesn’t work… I can only stick one, not two.
great post very helpful information
Gr8 tutorial, just what i needed 🙂
Could you shortly explain, how would be the CSS-solution to make an element sticky on the bottom of a page? This could be used to make the same or a similar module sticky on mobile view with a CTR.
Thanks + best regards!
Achim
Awesome plugin. Been using it for good while. Absolutely love it!
Once the Class is applied, the entry animation is no longer working with the element – any way to fix that?
Yeah, I think there is a conflict with having certain animations/transitions on the sticky element. Not sure how to fix this unfortunately.
Great post! I haven’t used this tip in a long while. But this will be perfect for my upcoming blog.
Nice effect. I wonder though is there a simple way to do this with some javascript. Not wanting to bloat my plugins’n’all.
Not seeing any new feature updates in the last number of weeks. A lot of bug fixes. Could this be anything to do with firefighting the roll out of WP 5 with the block editor? No sweat if this is the case.
I was wondering the same about the feature updates.
Iris, why JavaScript? That’s what css “position:sticky” is for.
I think you’re right about the WP 5 rollout. I have been testing WP 5 beta 3 and it’s a mess. Lots of bugs. They (Matt & Gary) have just announced that Classic Editor plugin will probably be included in the official update and will be supported for at least 3 years. That says it all. At this point Divi is unusable without that plugin. Backend doesn’t work at all. Elementor is much better at this point in time. We’ll see shortly if they stick to the schedule of November 19. Ugh!
Hi there, the first instruction is; install the plugin on your Divi theme. can i clarify, because I haven’t built anything in Divi for a while, do I search for the wp folder that has the website name attached to it? And just drag the sticky plug in folder into this folder?
yvonne,
I can see why that is confusing. You install the plugin in WordPress like normal. Sorry.
Hi yvonne,
As far as I know u have to install the plugin the normal way.
That instruction is a bit confusing. There’s no way to install a plugin on a theme. I think what Jason ment was to install the plugin on a WordPress with Divi theme already installed, since the idea of the post is to stick Divi elements.
Hope this helps 😉
Thanks for helping clarify, Enrique.
I use CSS sticky instead of plugin.
Bu always good to have an option 😉
Can you show me how to use CSS to do this?
Awesome tut!