

Every week, we provide you with new and free Divi layout packs which you can use for your next project. For one of the layout packs, we also share a use case that’ll help you take your website to the next level.
This week, as part of our ongoing Divi design initiative, we’re going to show you how to add a fixed contact form corner popup to your page using Divi’s sizing options. This approach will help you set up a contact form that follows visitors through their stay on your website, without the need for an additional plugin!
Let’s get to it.
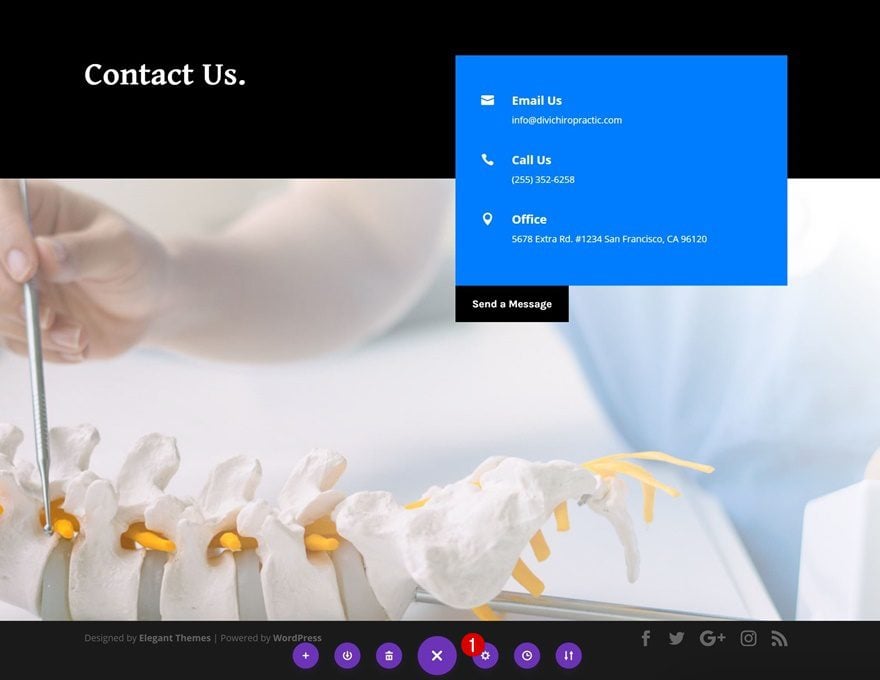
Preview
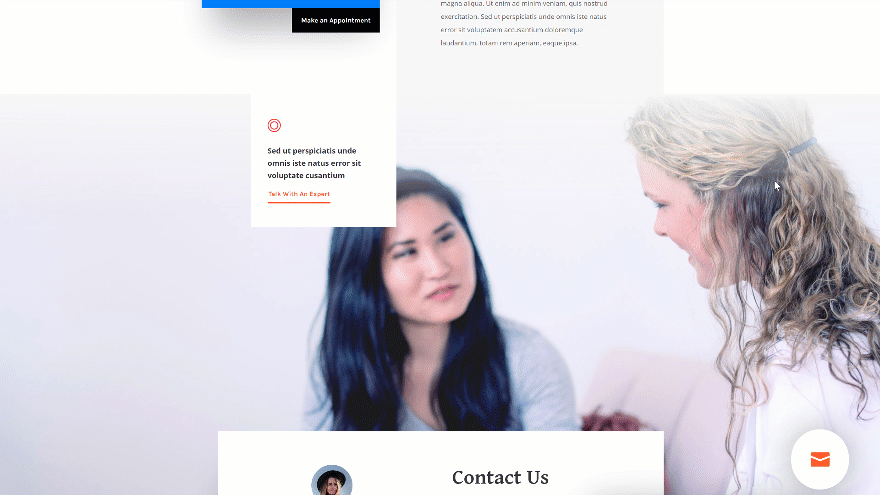
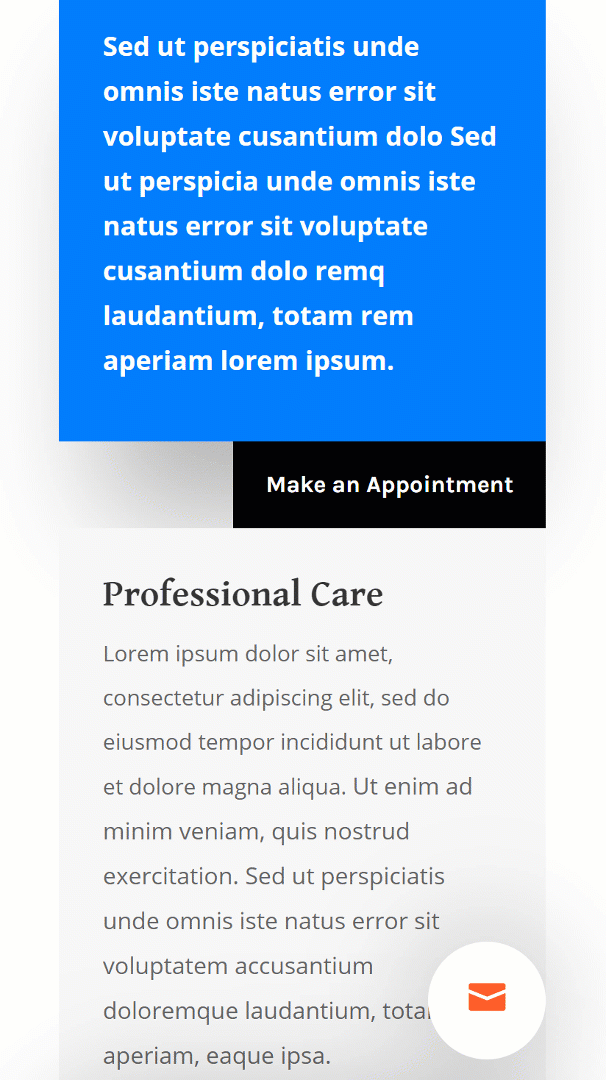
Before we dive into the tutorial, let’s take a quick look at the outcome across different screen sizes.
Desktop
Mobile
1. Upload Chiropractor Layout Pack Landing Page
Add New Page
Start by creating a new page. Once you’ve named the page and published it, switch over to Visual Builder.
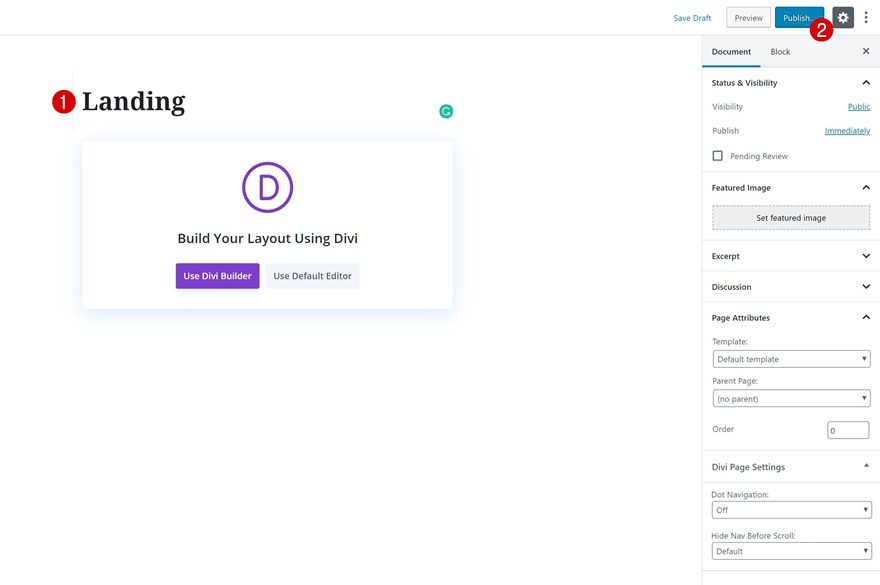
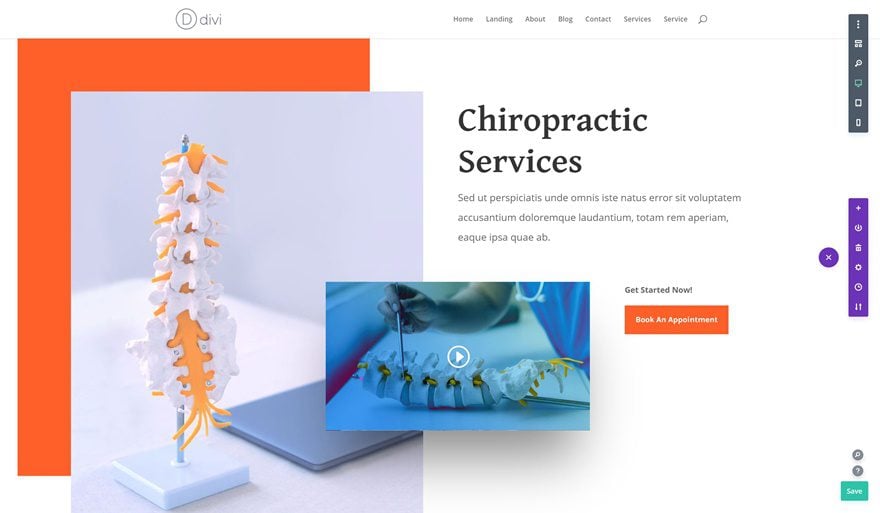
Upload Chiropractor Layout Pack Landing Page
Upload the Chiropractor Layout Pack landing page next. Although we’ll use this specific layout, you can make the technique work on any page you’re working on.
2. Let’s Start Recreating!
Add New Section to Bottom of Page
We’re going to dedicate an entirely new section to the fixed contact form pop up on click. Add this section to the bottom of your page.

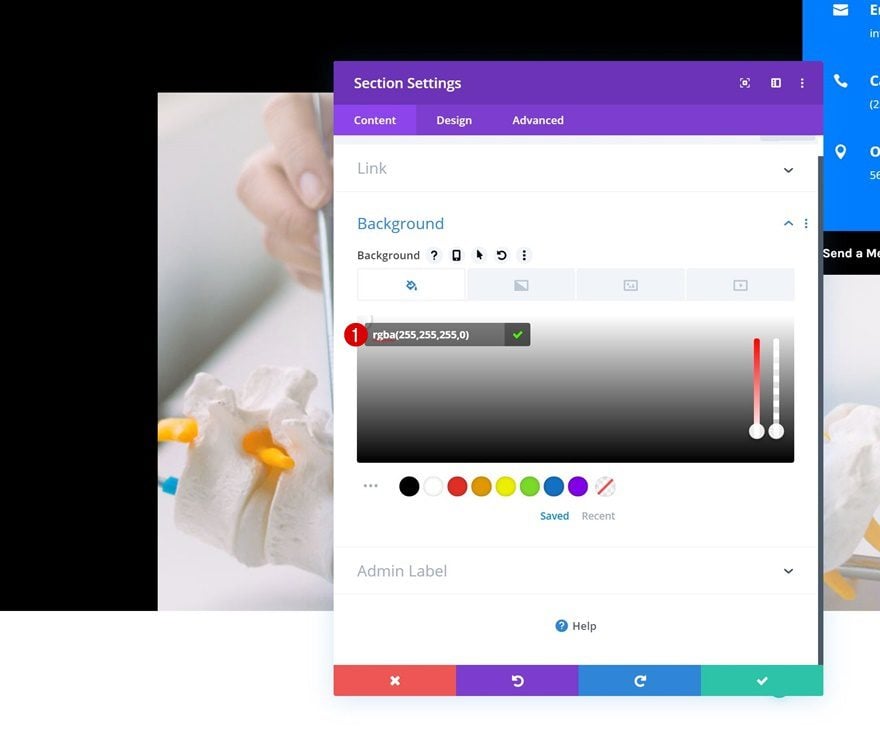
Background Color
Open the section settings and use an entirely transparent background color. Later on this post, we’ll make the entire section fixed. Using a transparent background color will make sure everything that appears below the section container shows through.
- Background Color: rgba(255,255,255,0)
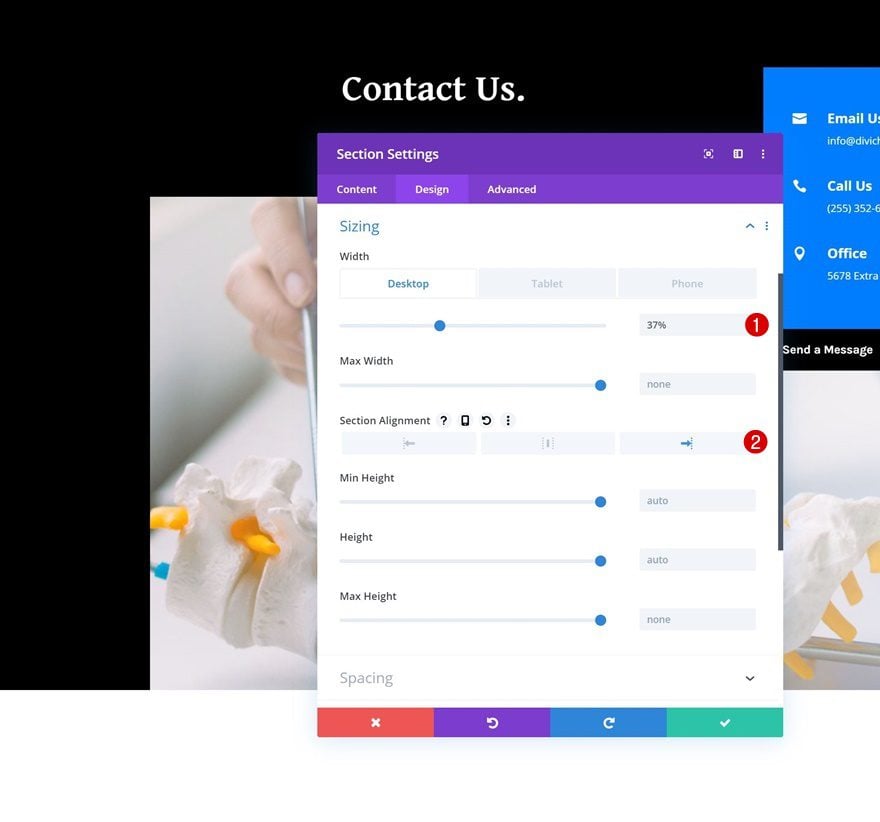
Sizing
Move on to the design tab and change the width of the section across different screen sizes.
- Width: 37% (Desktop), 95% (Tablet), 100% (Phone)
- Section Alignment: Right
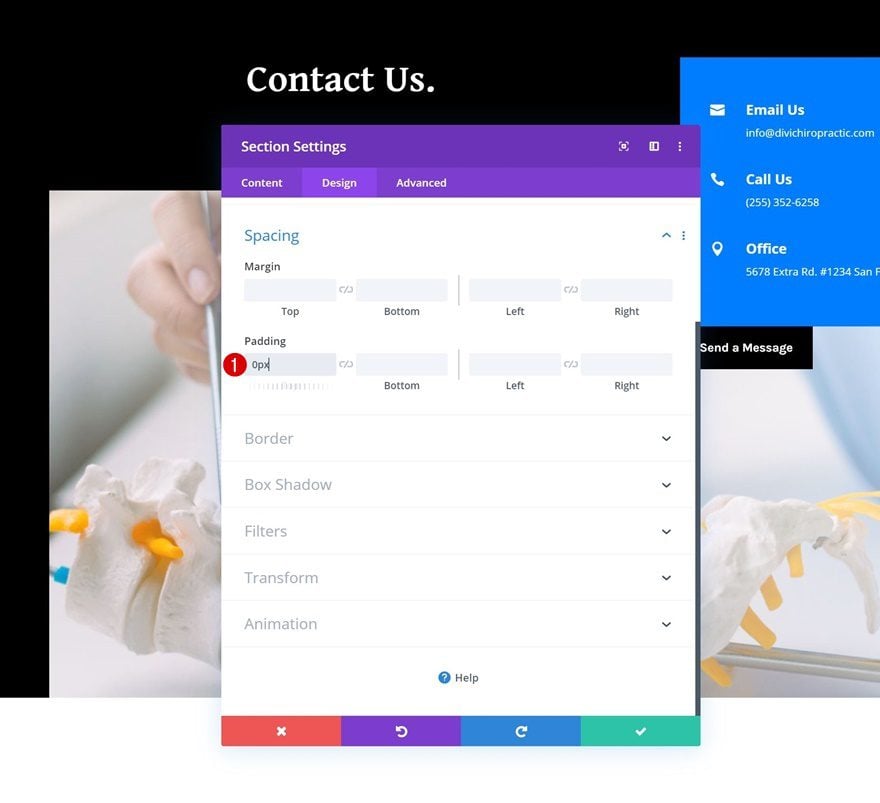
Spacing
Remove the default top padding next.
- Top Padding: 0px
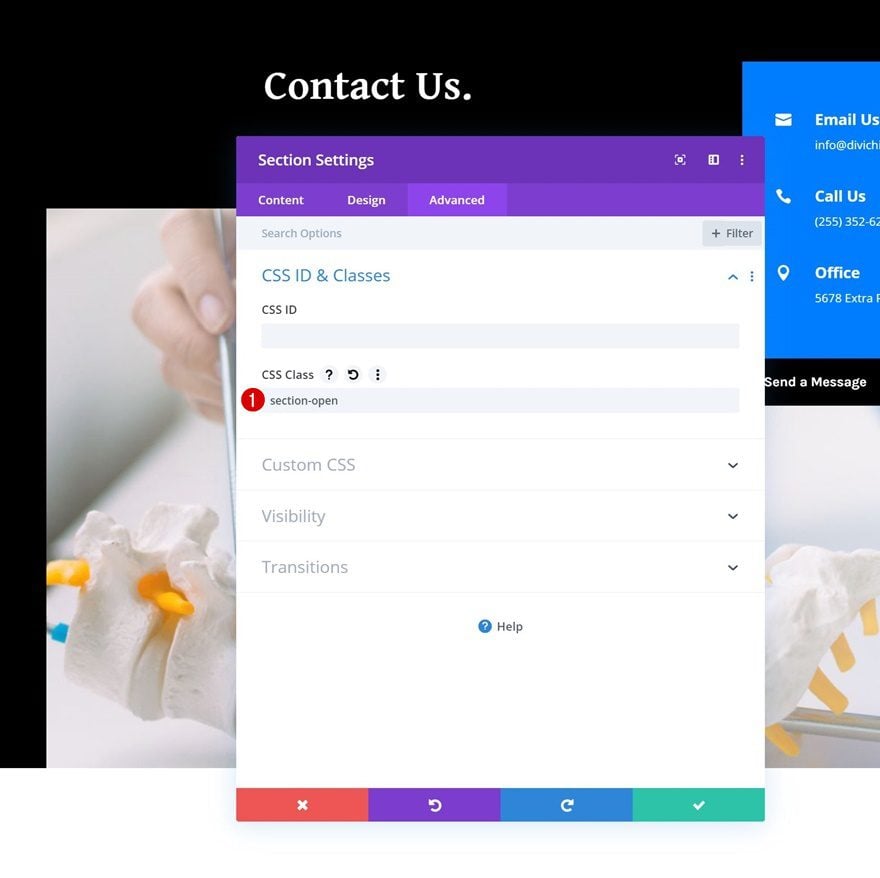
CSS Class
We’ll need to give our new section a custom CSS class as well. Later on the post, we’ll use this CSS class to add some JQuery and CSS code.
- CSS Class: section-open
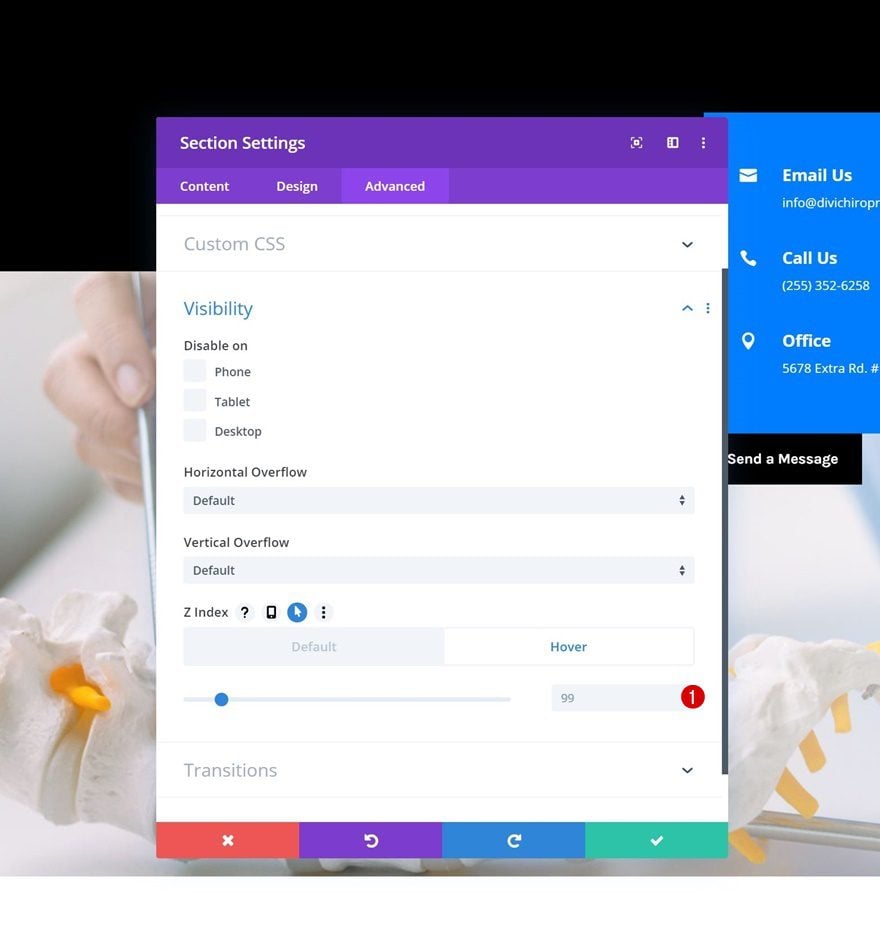
Default Z Index
To make sure the section appears on top of all page content, we’ll increase the section z index in the visibility settings.
- Z Index: 99
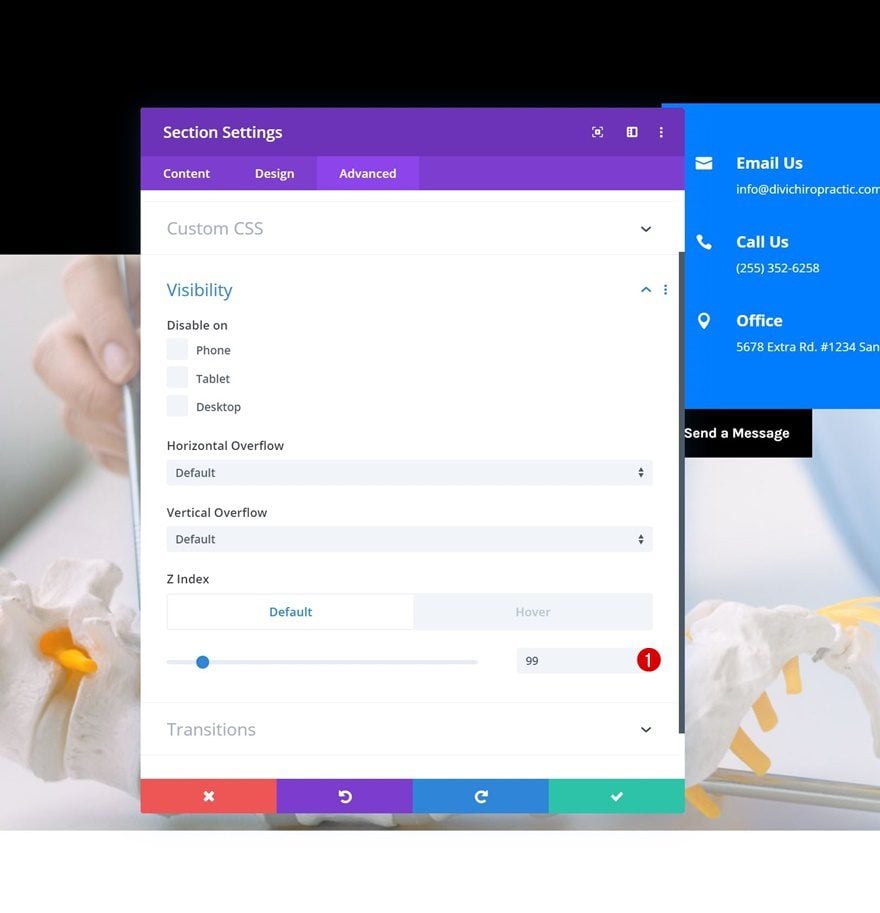
Hover Z Index
Add the same z index value on hover as well.
- Z Index: 99
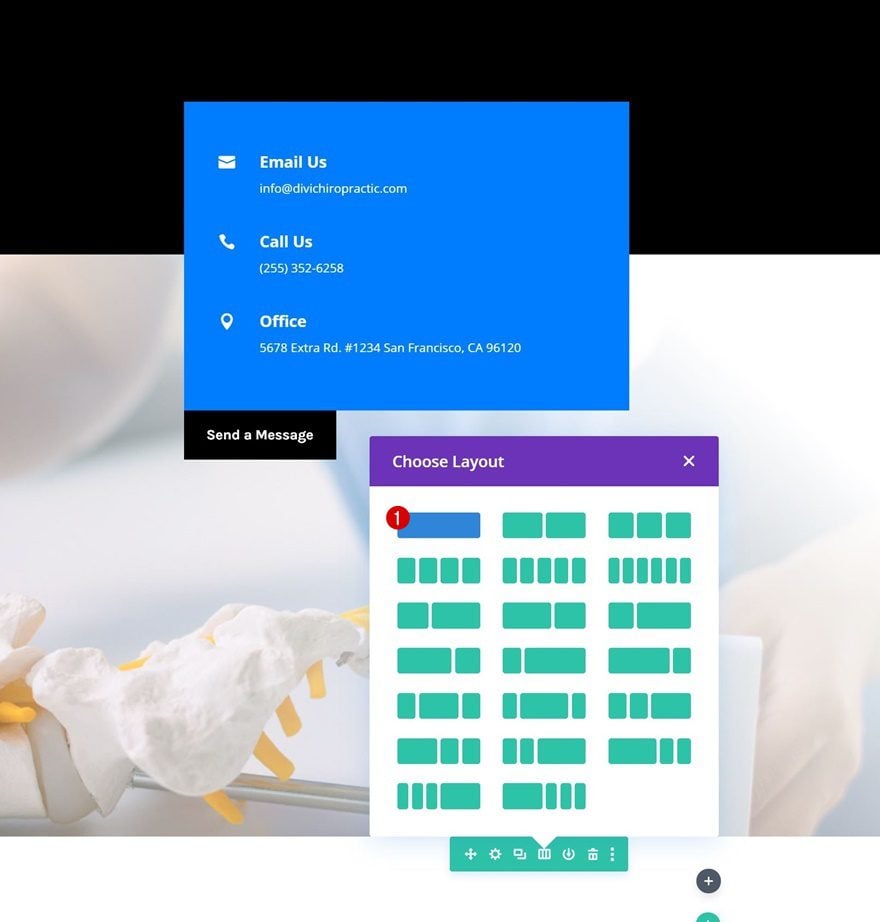
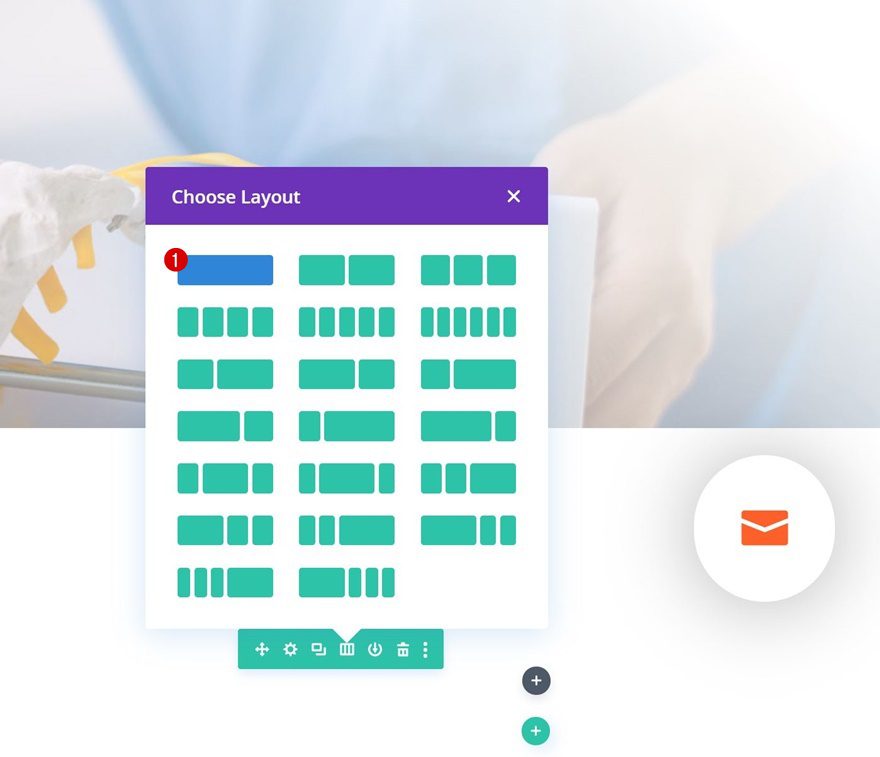
Add Row #1
Column Structure
Continue by adding a new row to the section using the following column structure:
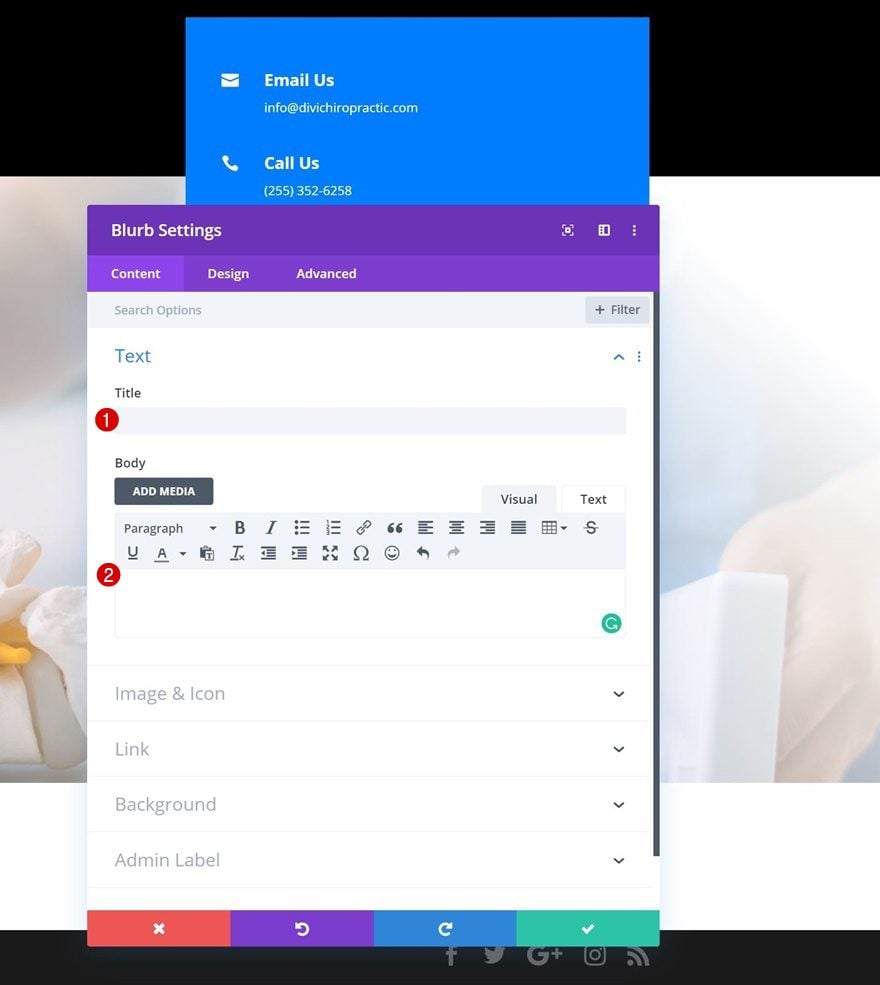
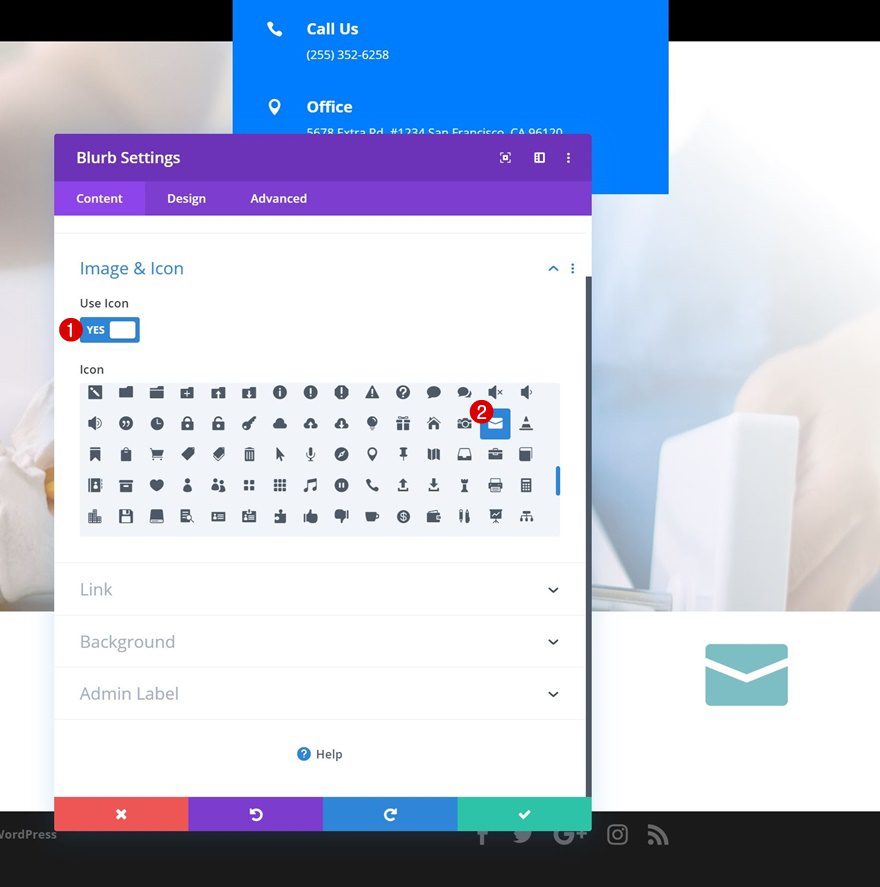
Add Blurb Module
Leave Content Boxes Empty
The first and only module we need in this row is a Blurb Module. Make sure you leave the title and content boxes empty.
Select Icon
Select an icon next.
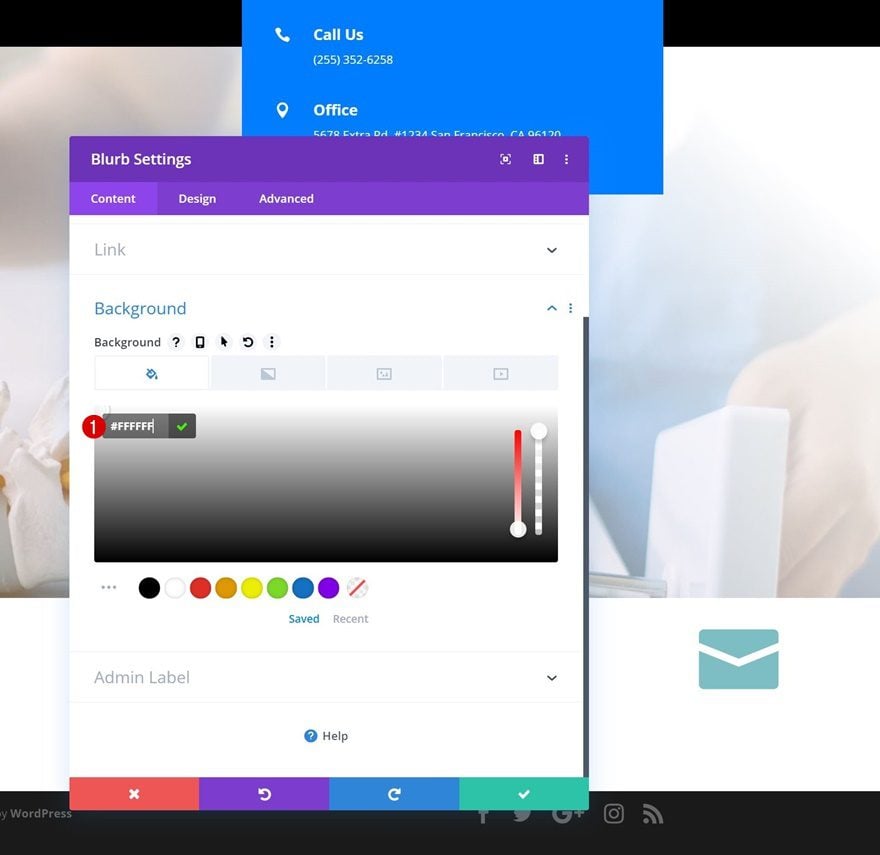
Background Color
Change the blurb background color too.
- Background Color: #FFFFFF
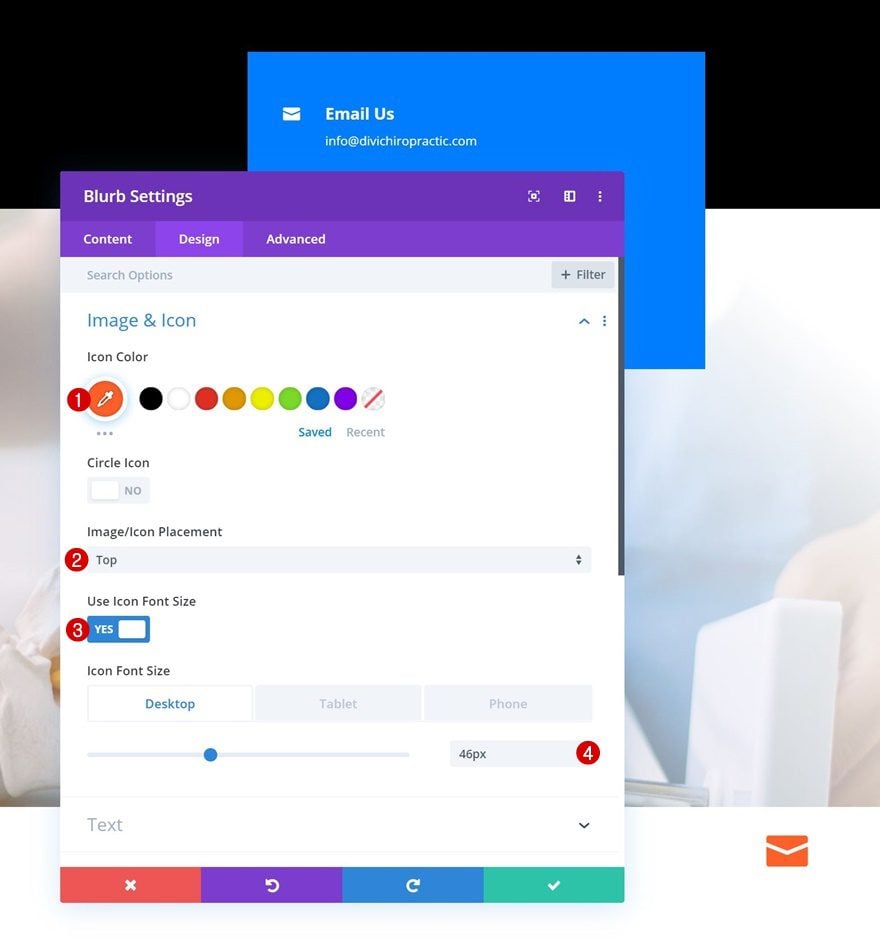
Icon Settings
Move on to the design tab and apply the following icon settings:
- Icon Color: #ff5f24
- Icon Placement: Top
- Use Icon Font Size: Yes
- Icon Font Size: 46px (Desktop), 30px (Tablet), 25px (Phone)
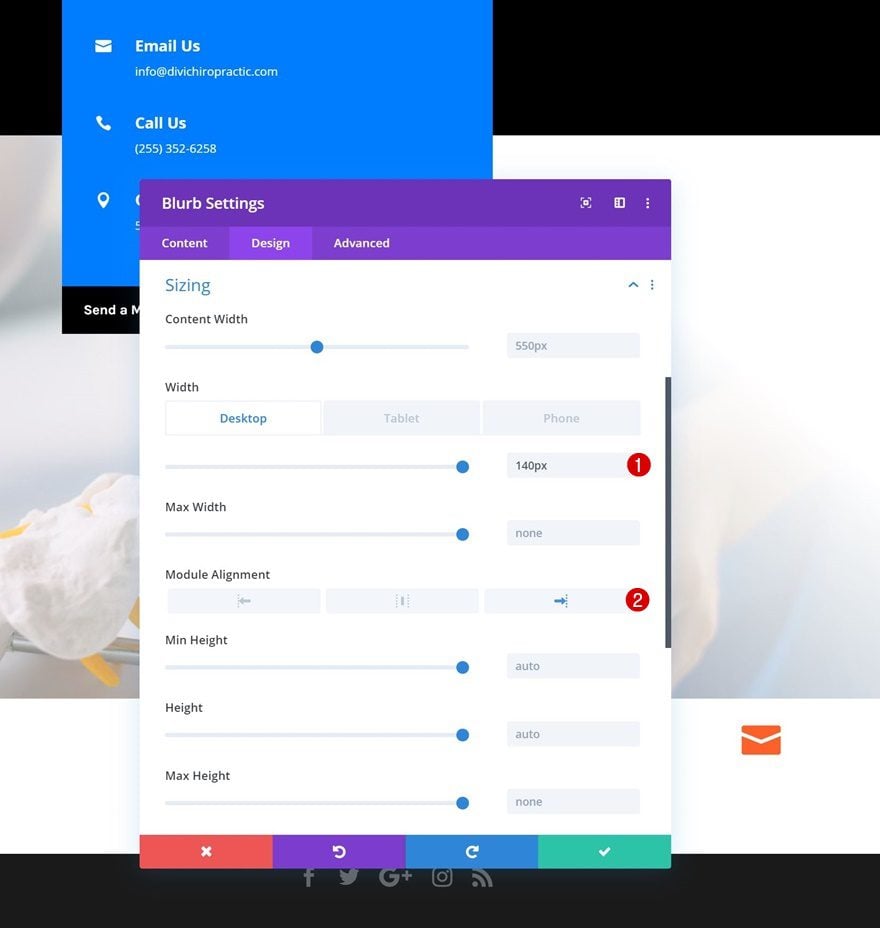
Sizing
Modify the sizing settings across different screen sizes next.
- Width: 140px (Desktop), 105px (Tablet), 80px (Phone)
- Module Alignment: Right
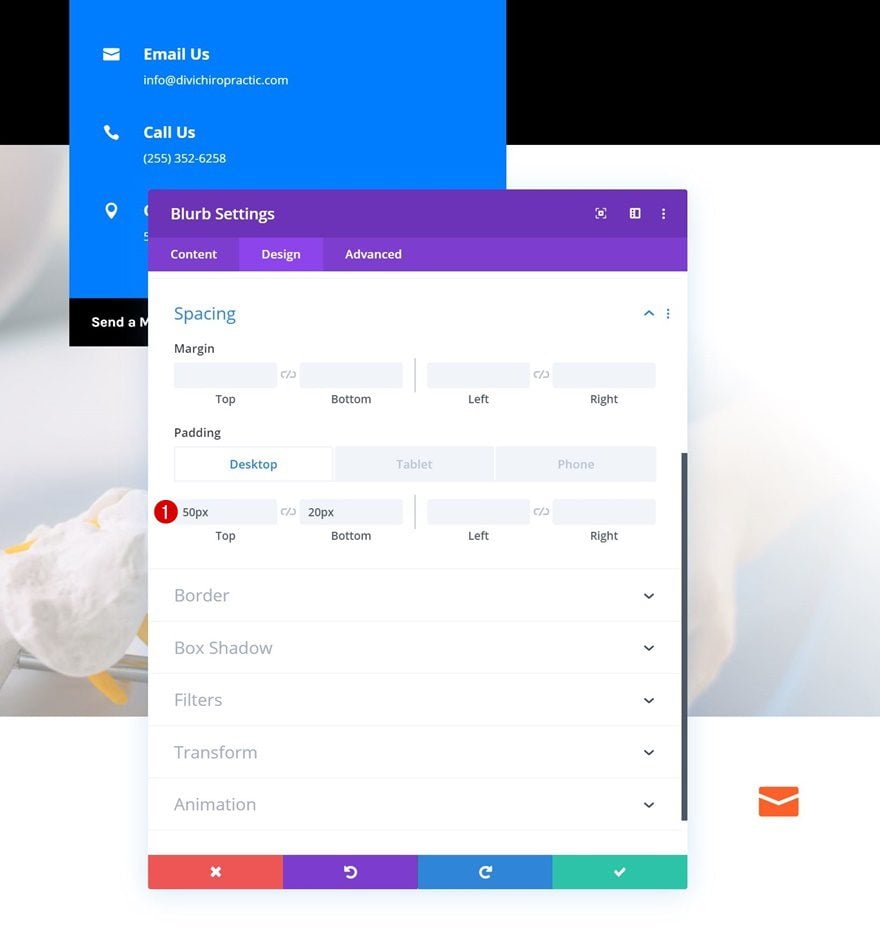
Spacing
We’ll also add some custom top and bottom padding values across different screen sizes.
- Top Padding: 50px (Desktop), 35px (Tablet), 25px (Phone)
- Bottom Padding: 20px (Desktop), 10px (Tablet), 0px (Phone)
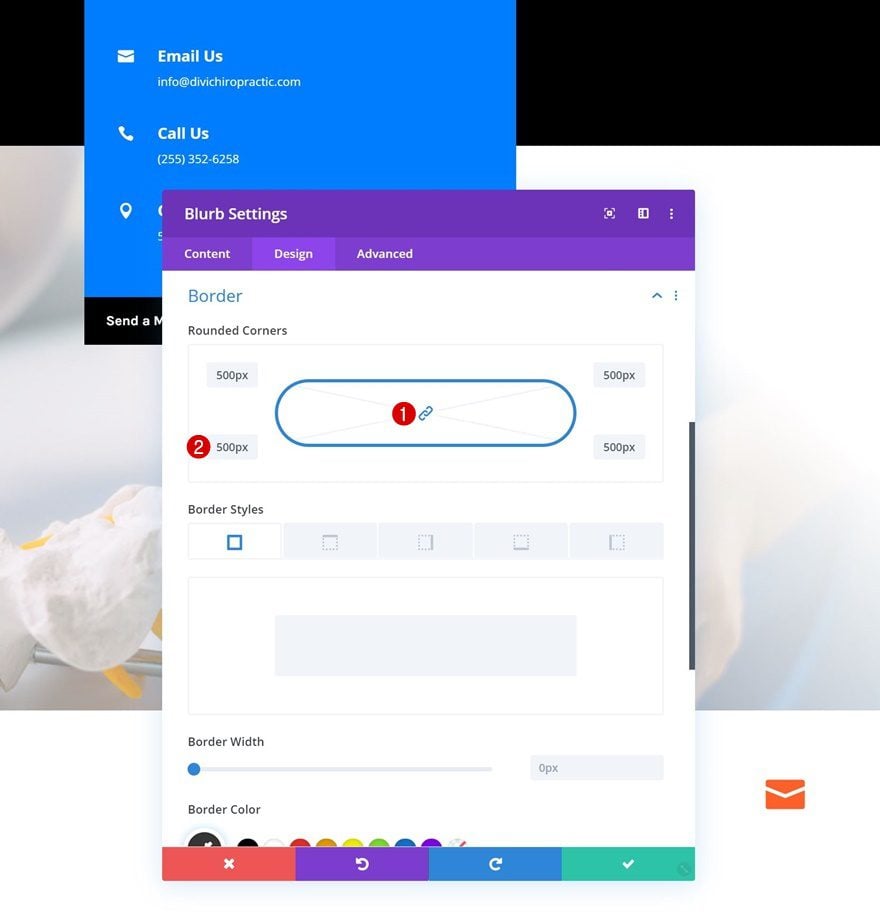
Border
To create a circular shape, we’ll need to add a high value to each one the corners in the border settings. We’re using ‘500px’.
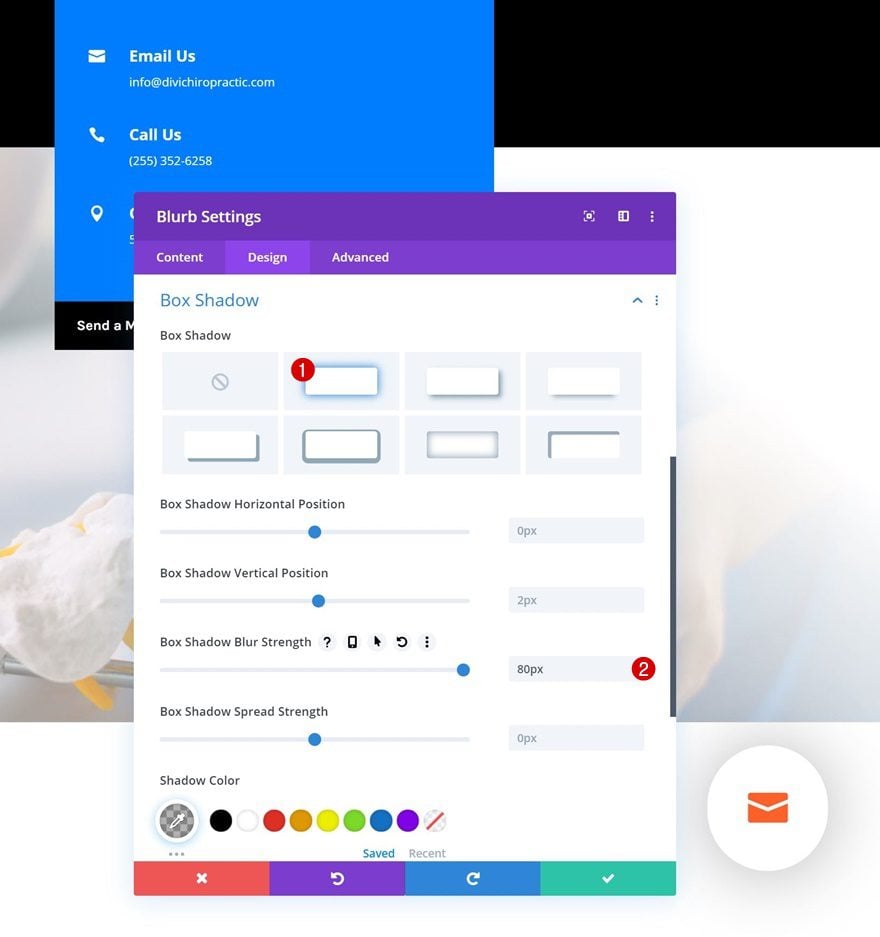
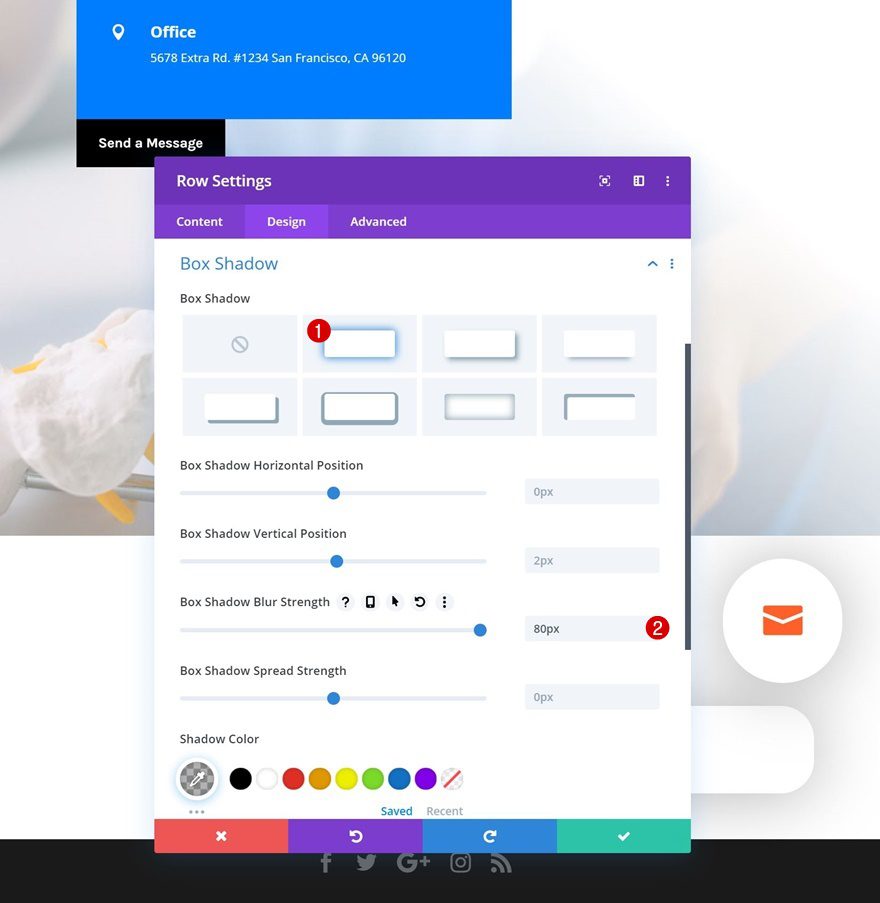
Box Shadow
We’ll also add a subtle box shadow to allow the circular shape to show up.
- Box Shadow Blur Strength: 80px
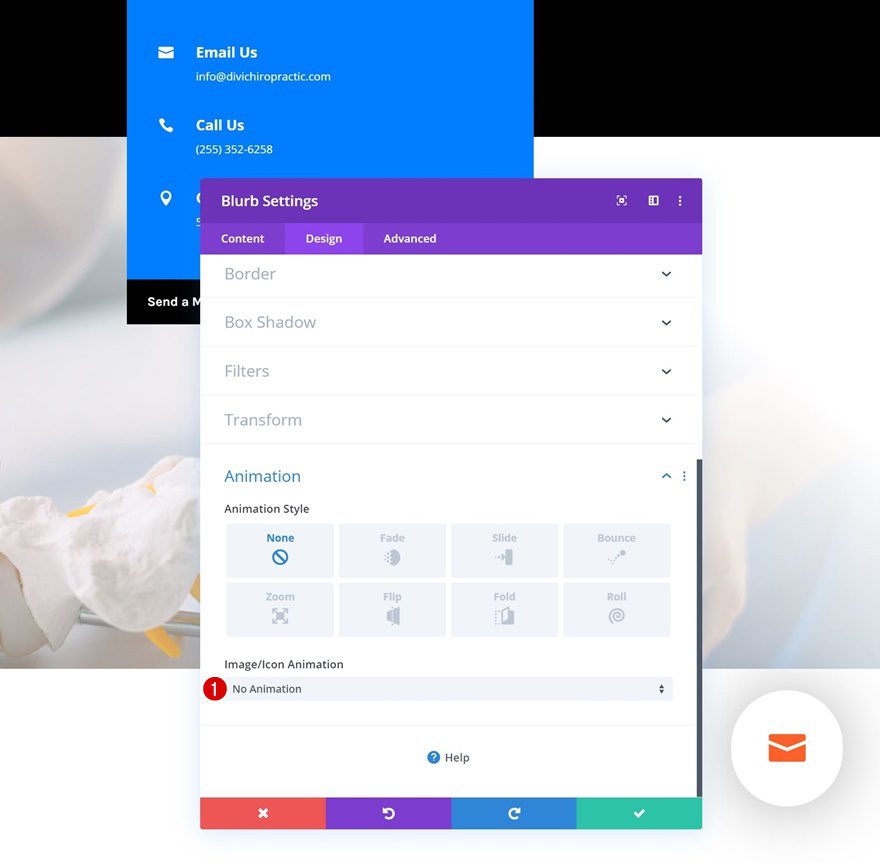
Animation
Open the animation settings next and remove the icon animation.
- Icon Animation: No Animation
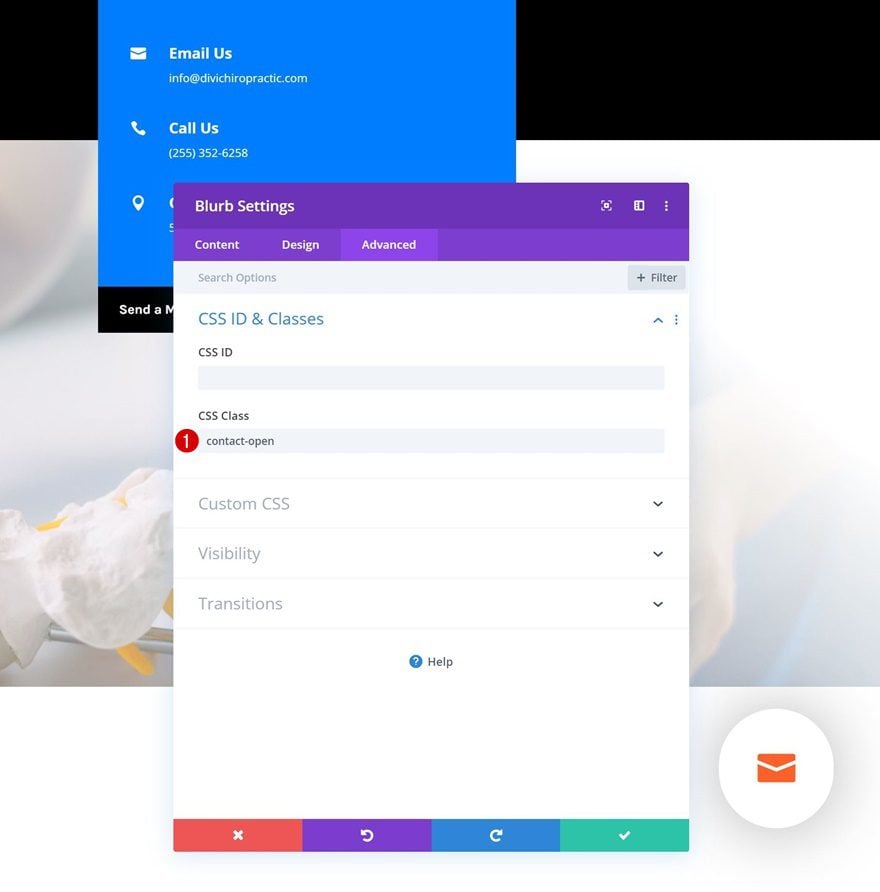
CSS Class
Last but not least, add a CSS class to the Blurb Module. Later on this post, we’ll use this CSS class to make the click function work.
- CSS Class: contact-open
Add Row #2
Column Structure
On to the second row! Use the following column structure:
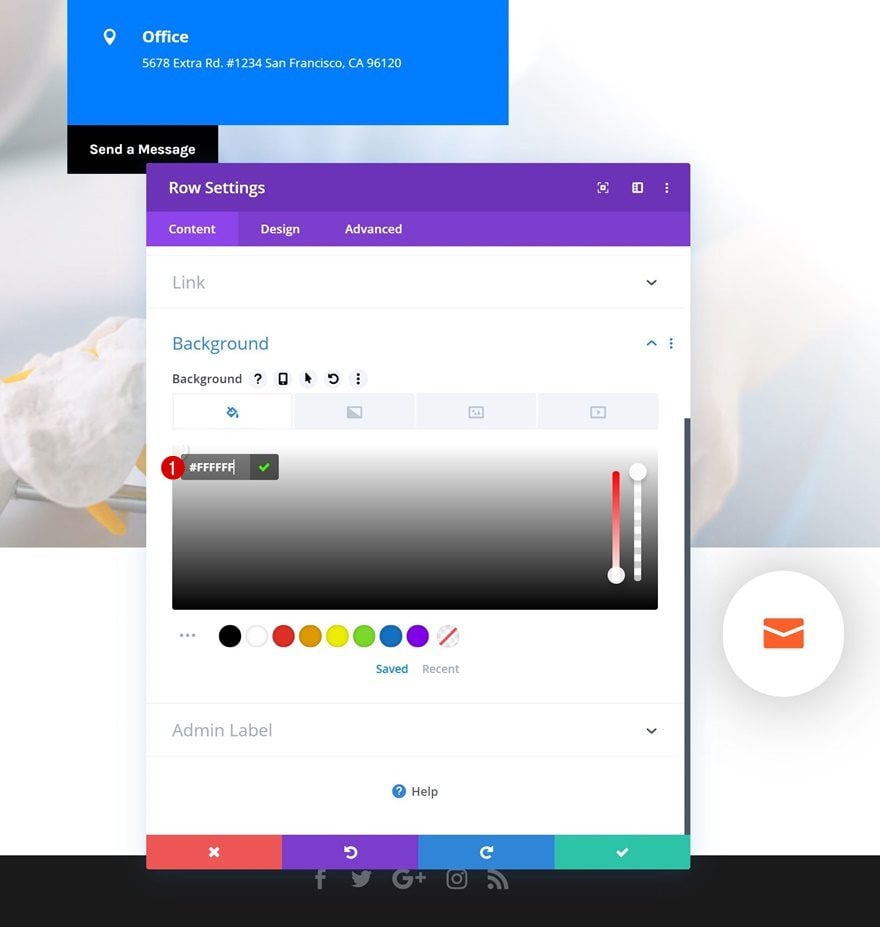
Background Color
Without adding any modules yet, open the row settings and add a white background color.
- Background Color: #FFFFFF
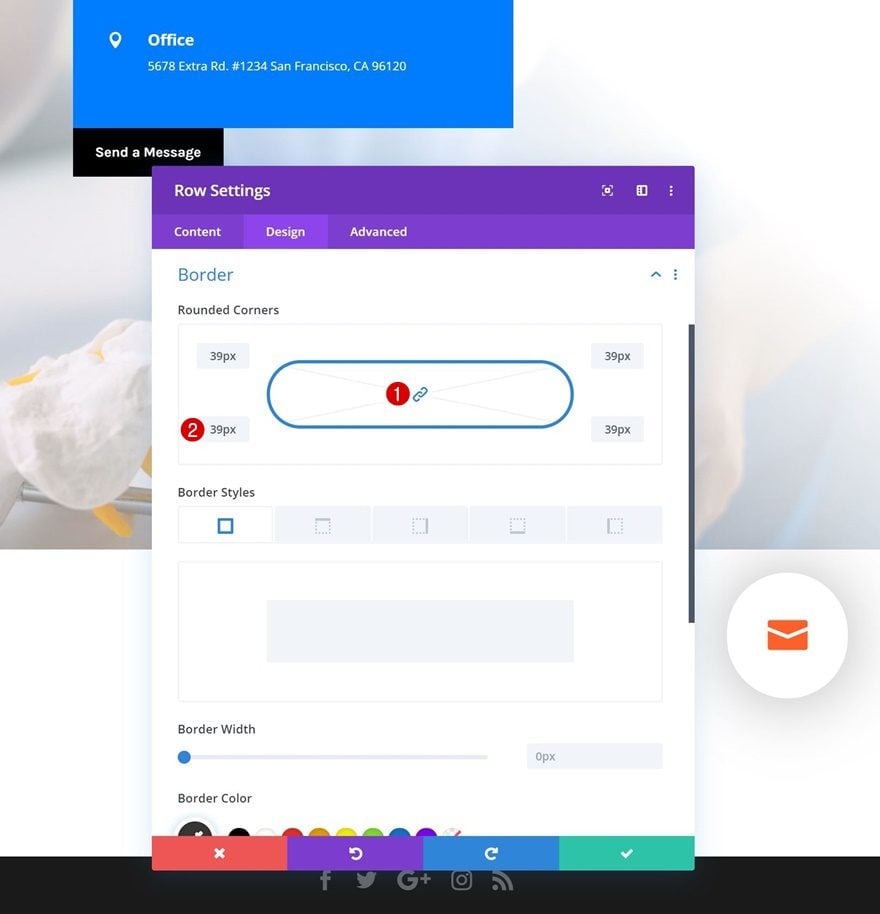
Border
Add ’39px’ border radius to each one of the corners next.
Box Shadow
And complete the row settings by adding a subtle box shadow.
- Box Shadow Blur Strength: 80px
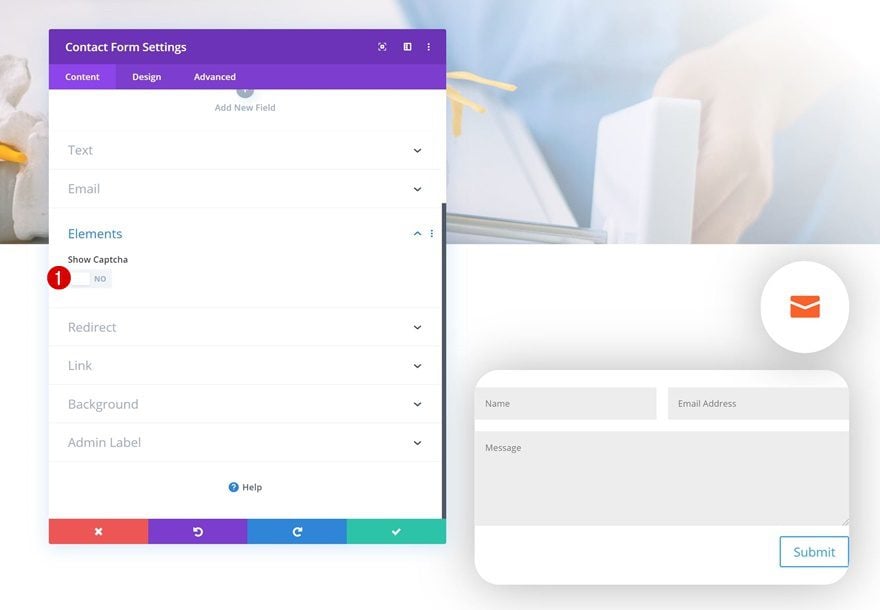
Add Contact Form
Elements
The only module we need in this row is a Contact Form Module. Once you’ve added the module, disable the captcha in the elements settings.
- Show Captcha: No
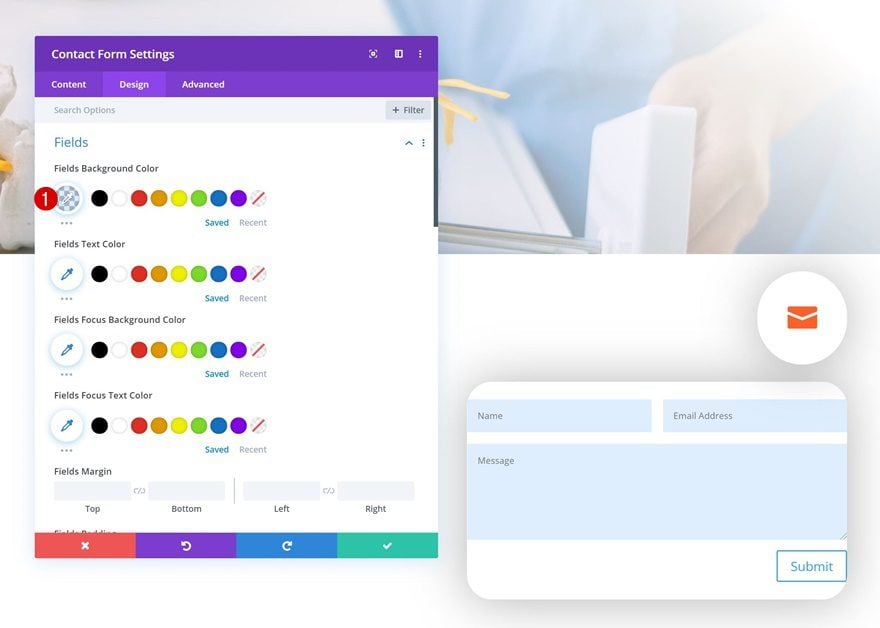
Fields
Move on to the design tab and change the fields background color in the fields settings.
- Fields Background Color: rgba(0,126,255,0.13)
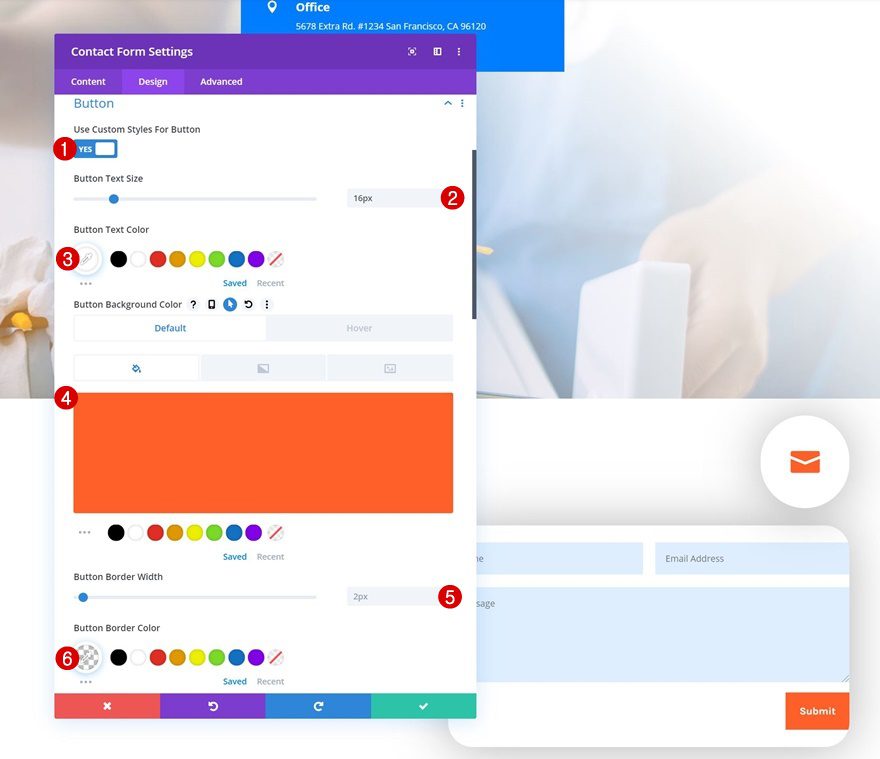
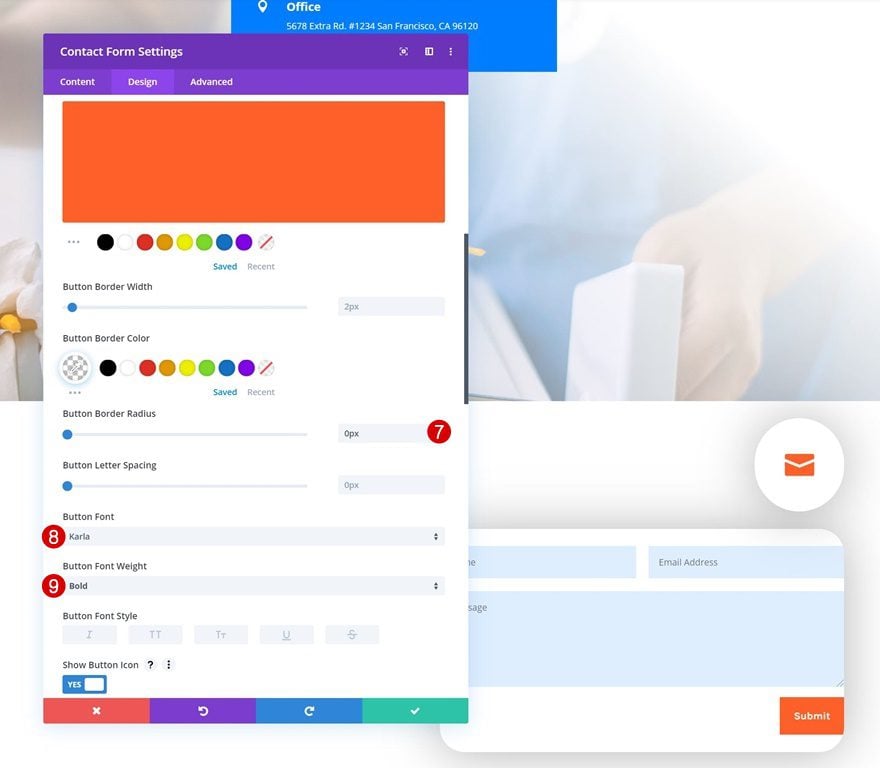
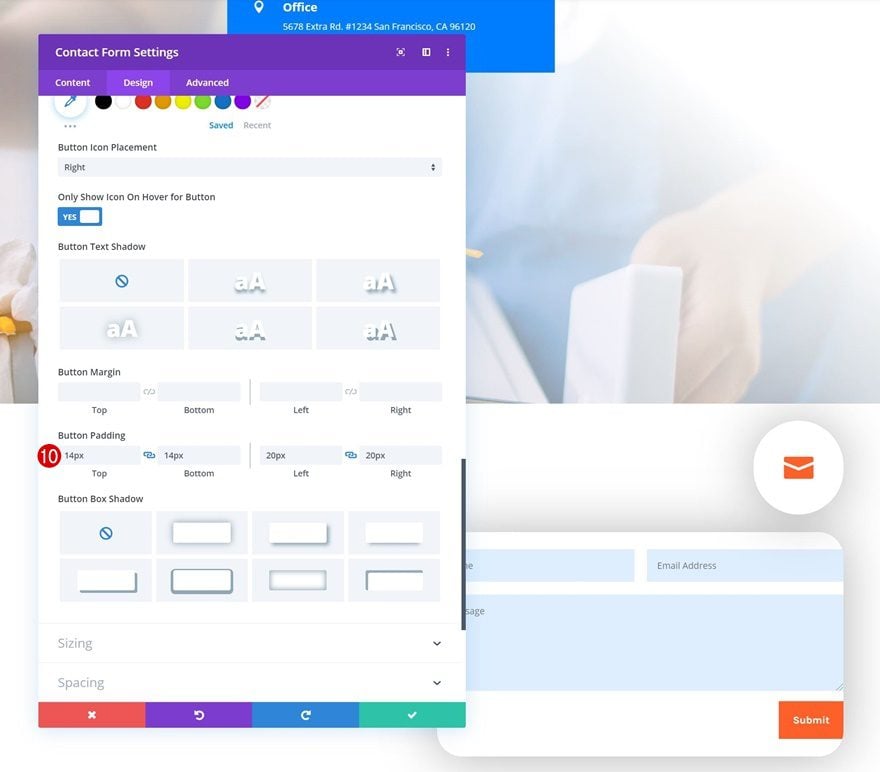
Button
Continue by styling the button.
- Use Custom Styles for Button: Yes
- Button Text Size: 16px
- Button Text Color: #FFFFFF
- Button Background Color: #ff5f24
- Button Border Width: 2px
- Button Border Color: rgba(0,0,0,0)
- Button Border Radius: 0px
- Button Font: Karla
- Button Font Weight: Bold
- Button Top Padding: 14px
- Button Bottom Padding: 14px
- Button Left Padding: 20px
- Button Right Padding: 20px
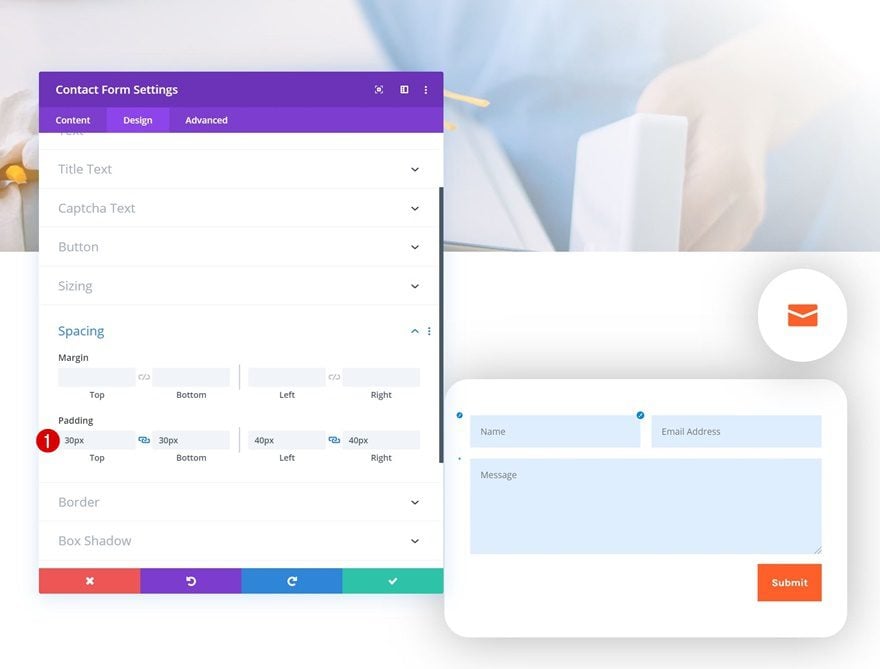
Spacing
And add some custom padding values.
- Top Padding: 30px
- Bottom Padding: 30px
- Left Padding: 40px
- Right Padding: 40px
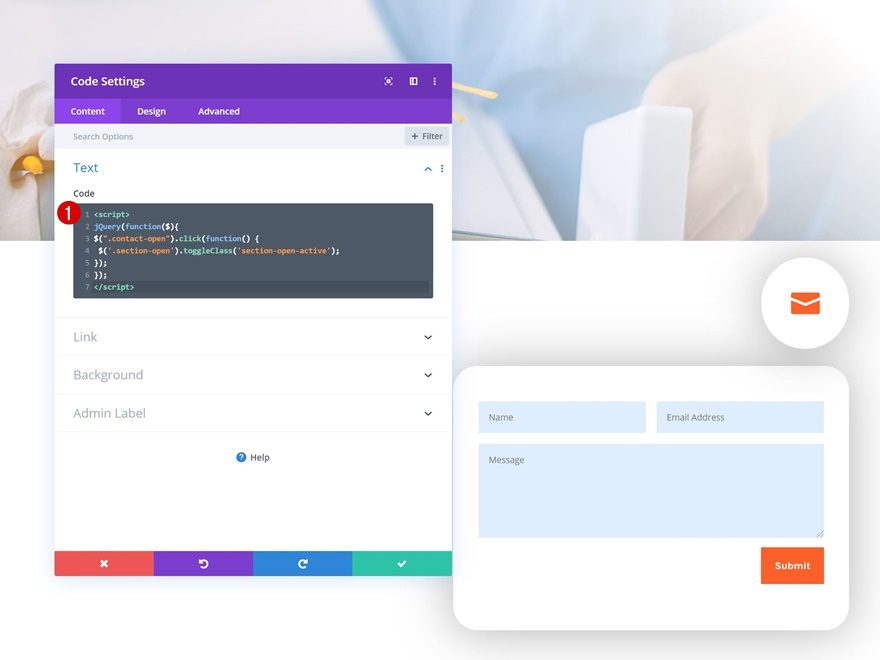
Add Code Module
Insert JQuery Code
Once you’ve completed the Contact Form Module, it’s time to make the click function work! Add a Code Module to the second row in the section and insert the following lines of JQuery code between script tags as you can see in the print screen below:
jQuery(function($){
$(".contact-open").click(function() {
 $('.section-open').toggleClass('section-open-active');
});
});
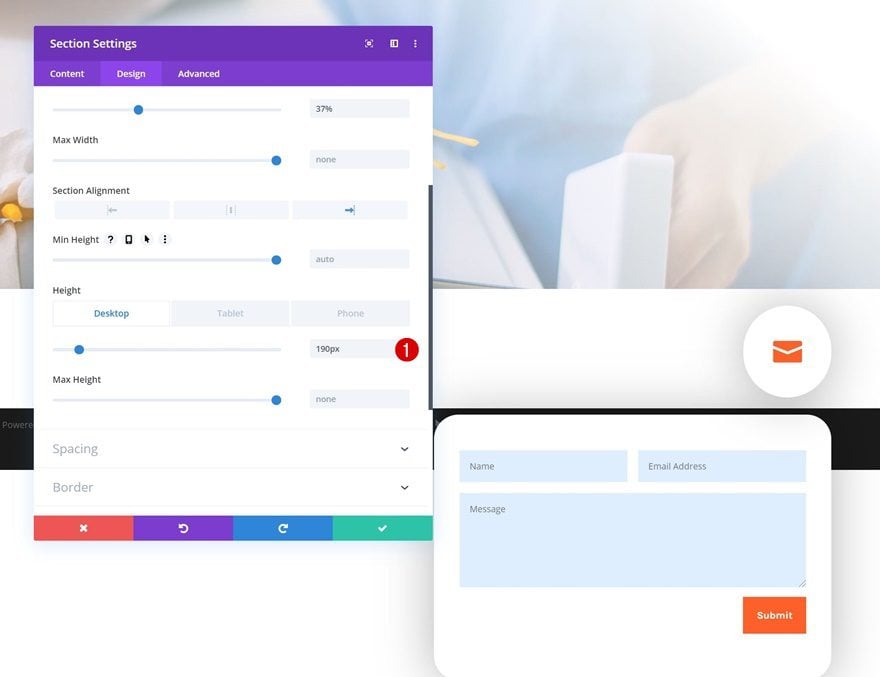
Change Section Settings
Height
Continue by opening the section settings. Change the height across different screen sizes.
- Height: 190px (Desktop), 140px (Tablet), 125px (Phone)
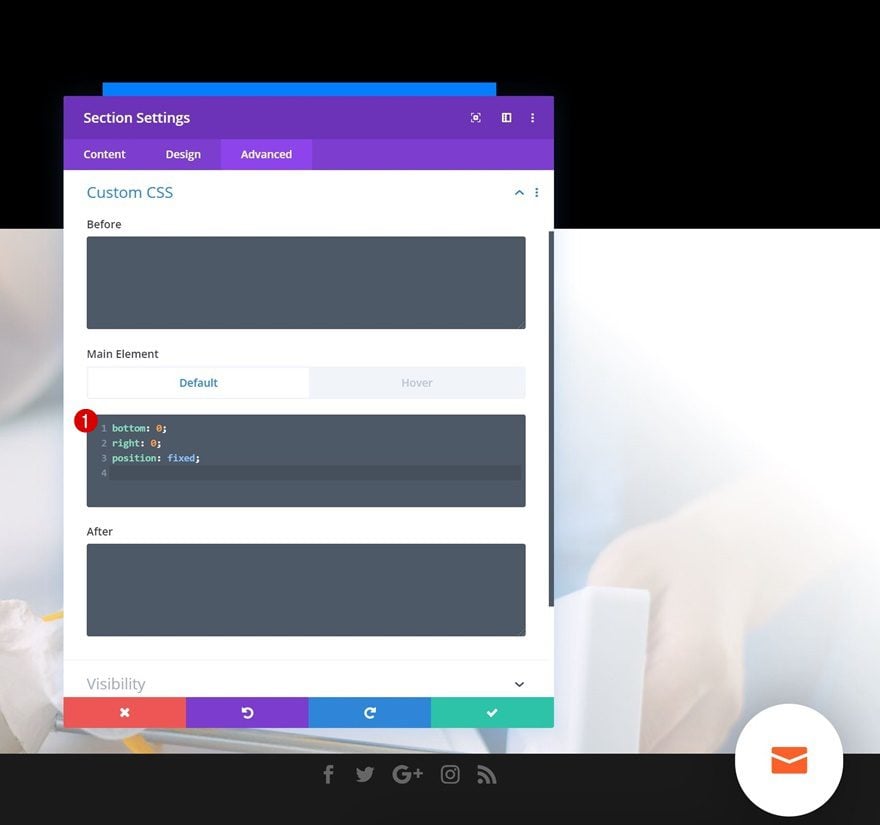
Default Main Element
Add some custom CSS code to the main element of the section next to make it fixed to the bottom right corner.
bottom: 0;
right: 0;
position: fixed;
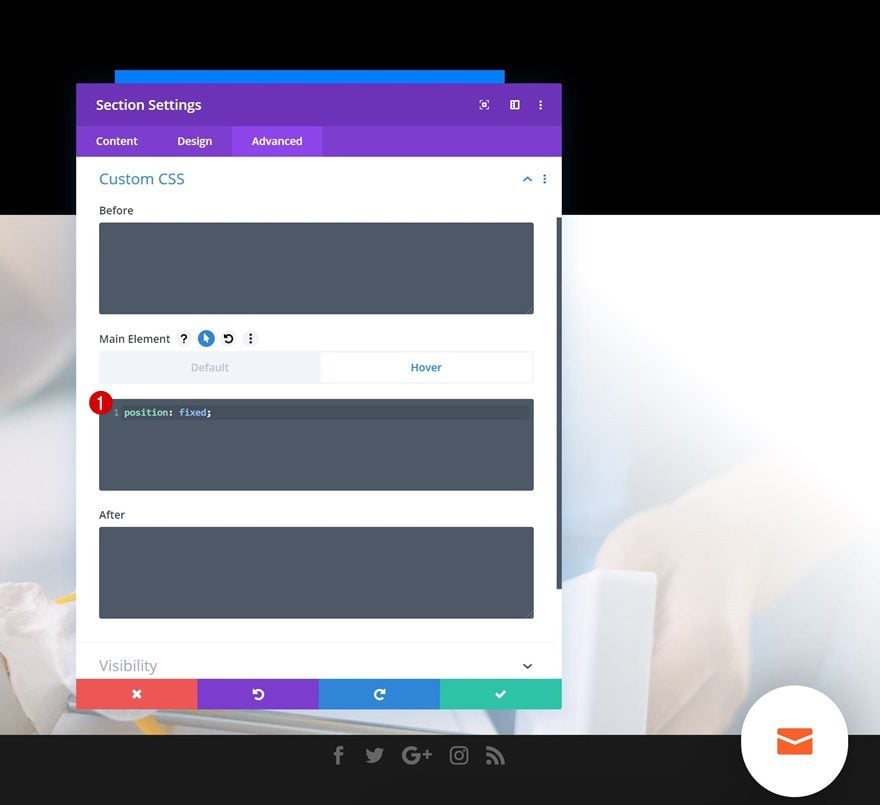
Hover Main Element
Make sure you add the fixed position to the hover main element as well.
position: fixed;
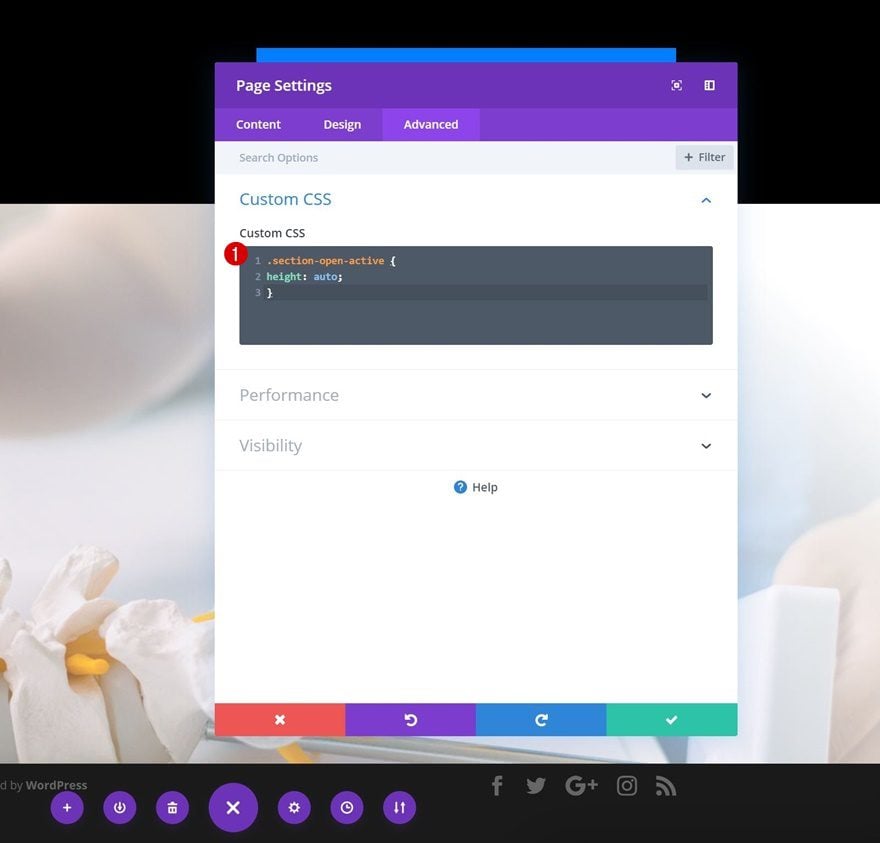
Add Custom CSS Code to Page
Open Page Settings
To complete the toggling effect, we’ll need to add a bit of CSS code to the page as well. Open the page settings.
Add Custom CSS
Go to the advanced tab and add the following lines of CSS code:
.section-open-active {
height: auto !important;
}
Preview
Now that we’ve gone through all the steps, let’s take a final look at the outcome across different screen sizes.
Desktop
Mobile
Final Thoughts
In this post, we’ve shown you how to add a fixed contact form to your pages using Divi’s sizing settings. You can make this approach work on any kind of website you’re building. This tutorial is part of our ongoing Divi design initiative, where we try to put something extra into your design toolbox each and every week. If you have any questions or suggestions, make sure you leave a comment in the comment section below.
If you’re eager to learn more about Divi and get more Divi freebies, make sure you subscribe to our email newsletter and YouTube channel so you’ll always be one of the first people to know and get benefits from this free content.


Hi I followed the blog and created fixed contact form.But now the form is not functioning. i.e it’s not sending information to email id. Is there any code conflict. I am confused what to do now.There is another contact form on page but it is functioning properly.
Wow! this is really simple than I thought.
I have a web development agency and many of my customers asked me for this feature. I kept denying they saying it is tough, require more coding blah…blah….blah…
Now I am excited to use this feature in my clients websites.
Thank you!
A very versatile and useful ‘how to’ – thanks
You’re very welcome, Paul! 🙂
Great tutorial!
As an extra, I would love to see that on opening the contact form, the envelope-icon will change to an X-icon to show the user it can close the contact form by pressing that blurb. Or having a script that clicking outside the hovering contact form will close it.
Thanks for the suggestion, Michiel! I might take you up on that idea in a future tutorial.
Great job. Works awesome.
1 critic, once clicked it’s always open. Might need a function to close it when clicked out side the box, or if a x is placed in a corner.
Happy you like it, Paully! The blurb icon serves as a trigger that goes both ways, if the contact form is open and your visitor clicks on the icon again, it’ll close. But the ideas you suggested make sense, might take you up on them in a future tutorial!
Hi, thanks for the great tutorial!
I have implemented this on this staging domain: https://gat.createdbycarla.co.uk/ but as Paully mentioned, it stays open by default and the blurb disappears so it can’t then be closed. Can you tell me how I can offer users the option to close the contact form?
Many thanks
A great little gem, very adaptable for other things – thanks.
Btw – copy paste the code in this tutorial into a text editor and follow the screencast on ETs Facebook page. It’s actually a lot simpler and quicker than it looks here and there’s also an explanation why there isn’t a JSON file. Leave the transparent section background until near the end as you can better see what’s going on.
Donjete it’s really a great option thanks for explaining in such a great way thank you so much.
Good to hear, you’re very welcome! 🙂
That’s ok now, I made a mistake on CSS ID instead of CSS Class for the section 😉
Thank’s
Yup, the CSS classes are essential for making this tutorial work! 🙂
Please, can you provide JSON files?
Th instructions you have provided is clear and i followed the same to create contact form for my page but facing syntax error. Do you provide up documentation for this one ?
I’m sorry to hear that, there’s also a live stream tutorial available that guides you through all the steps: https://www.youtube.com/watch?v=b-88_kjfXls
Hope it’ll help!
This didn’t work for me :/ I’m not sure why
Hey Livia, sorry to hear that! You can check the live stream video as well, maybe that’ll help: https://www.youtube.com/watch?v=b-88_kjfXls
It didn’t work for me either until I modified the page CSS.
Under the page settings CSS use this code :
.section-open-active {
height: auto !important;
}
See if that works.
Could you please provide JSON files please ?
Great tutorial. JSON would be awesome please. Save 20 mins. Thanks
Great! Looks nice and smooth!
Thank you!
Happy you like it, Joost! 🙂