

Adding dynamic content to your blog post template is essential for providing things like the post title, metadata, featured image, etc. Normally, these dynamic elements are placed as normal static elements within the design of the layout. However, it may be helpful to keep some of these dynamic elements at the forefront for your readers. This is where a dynamic post info bar comes in handy. A dynamic post info bar remains fixed at the top of the browser (like a fixed header would) and includes helpful pieces of dynamic content and other CTAs. For example, you could use this bar to remind readers of the post they are currently reading, a link to leave a comment or a link to a related category.
In this tutorial, we are going to show you how to create a dynamic post info bar and add it to your blog post template using the Divi Theme Builder. Once done, this bar will function seamlessly for all of the blog posts sitewide.
Let’s get started!
- 1 Sneak Peek
- 2 Download the Layout for FREE
- 3 Download For Free
- 4 You have successfully subscribed. Please check your email address to confirm your subscription and get access to free weekly Divi layout packs!
- 5 Part 1: Importing the Premade Templates
-
6
Building the Dynamic Post Info Bar
- 6.1 Adding the Section and Row
- 6.2 Section Settings
- 6.3 Row Settings
- 6.4 Add Post Title Dynamic Content
- 6.5 Add Dynamic Post Categories Info
- 6.6 Adding the Dynamic Comment Count Info
- 6.7 Adding the “Leave a Comment” Call to Action
- 6.8 Adding the Subscribe Button
- 6.9 Disable Column 1 on Mobile
- 6.10 Giving the Section a Fixed Position and a High Z Index
- 6.11 Update Section Header Z Index
- 7 Final Result
- 8 Final Thoughts
Sneak Peek
Here is a quick look at the design we’ll build in this tutorial. Notice how the anchor links (“Leave a comment” and “Subscribe”) send the users to the corresponding area on the post.
Download the Layout for FREE
To lay your hands on the designs from this tutorial, you will first need to download it using the button below. To gain access to the download you will need to subscribe to our newsletter by using the form below. As a new subscriber, you will receive even more Divi goodness and a free Divi Layout pack every Monday! If you’re already on the list, simply enter your email address below and click download. You will not be “resubscribed” or receive extra emails.

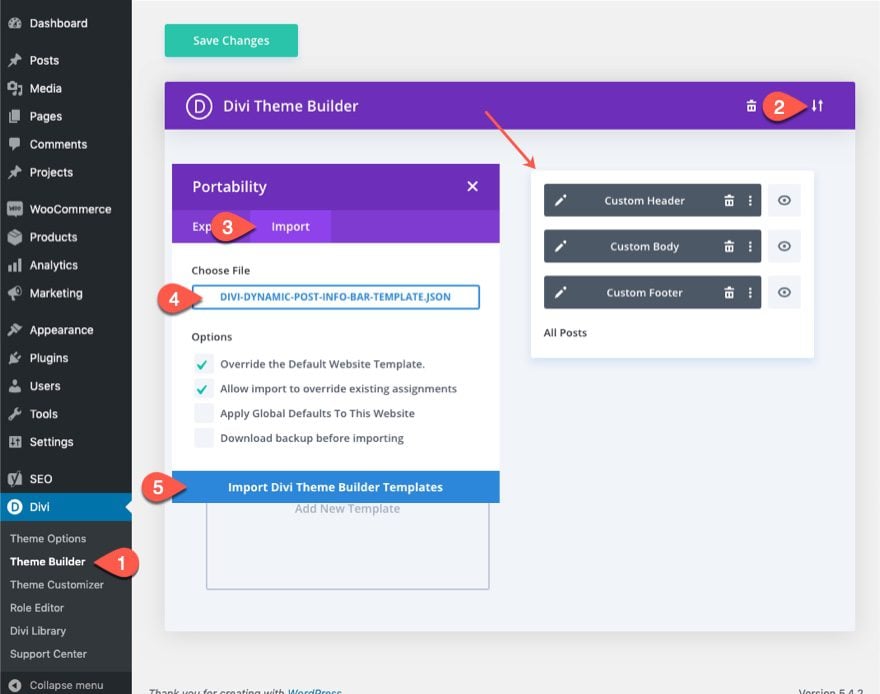
To import the section layout to your Divi Theme Builder, navigate to the Divi Theme Builder.
Click the portability icon.
In the portability popup, select the import tab and choose the download file from your computer.
Then click the import button.
Once done, the section template will appear in the Divi Theme Builder.
Let’s get to the tutorial, shall we?
Part 1: Importing the Premade Templates
For this tutorial, we are going to use a couple of premade templates from our sixth theme builder pack. We are going to import the default website template which will give us a working global header where we will add the post info bar. And we are going to import the blog post template to test out our results on a live post.
IMPORTANT: It would be best to import these templates on a test site so that you won’t mess up a live site.
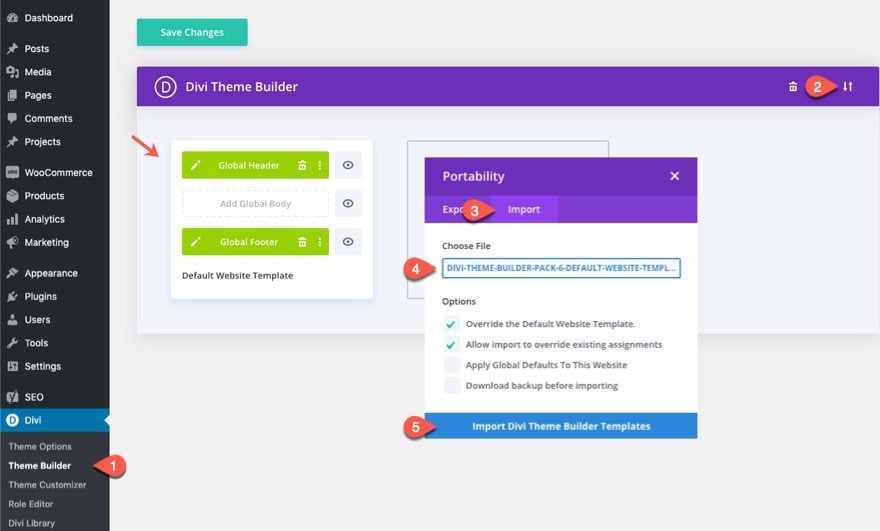
Import the Default Website Template
First, you will need to download the Sixth FREE Theme Builder Pack for Divi. Then unzip the file.
From the WordPress Dashboard, navigate to Divi > Theme Builder. Then click the portability icon at the top right. In the portability popup, select the import tab. Then choose the default website template json file from the downloaded folder and click the import button. This will import a new default website template with a global header and footer.
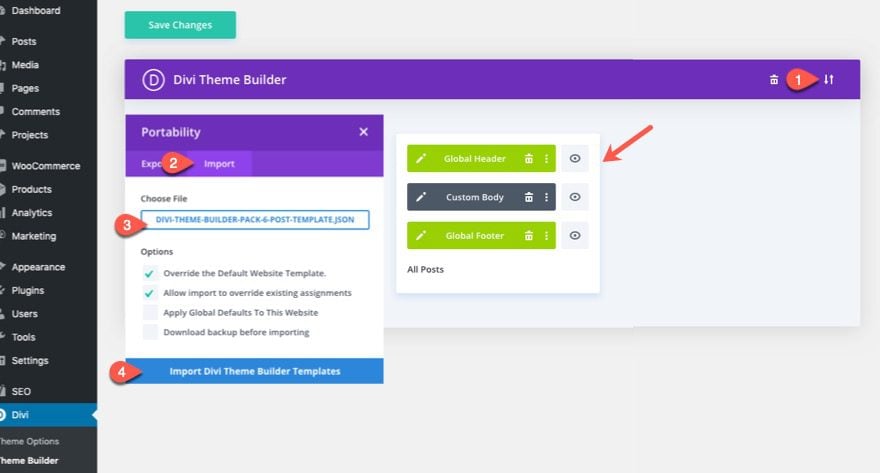
Import the Post Template
Repeat this process to import the post template from the same downloaded folder. Open the portability popup, choose the post template json file, and click the import button. This will give you a post template assigned to all posts throughout your site, along with the default header a footer.
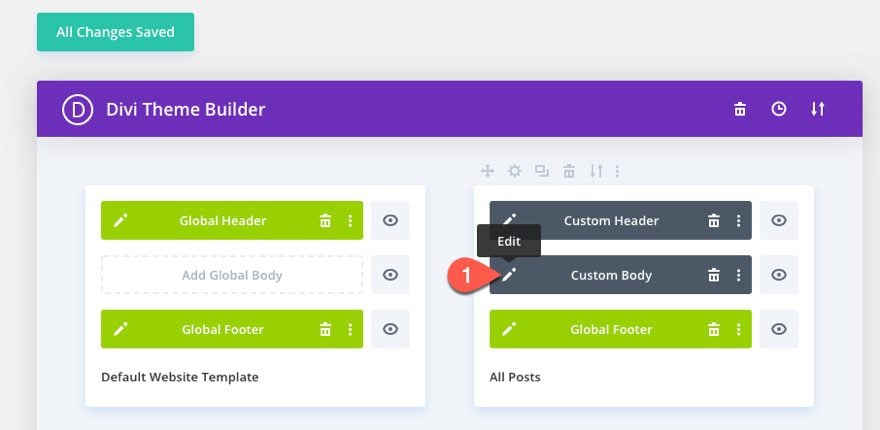
Disable Global on the Post Template Header
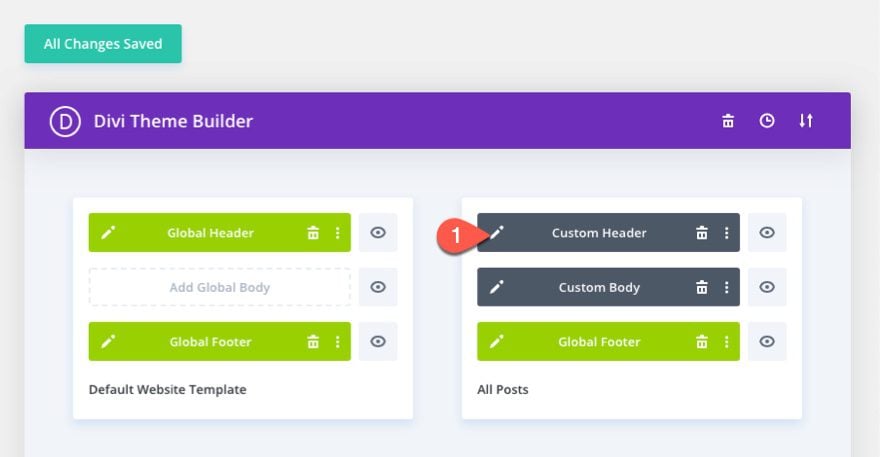
We are going to add our dynamic post info bar to the header of the post template. However, because we want the post info bar only on the post template, we need to disable global on the header so that our bar isn’t added to all headers site-wide. To disable global on the global header, open the setting menu on the global header and select “Disable Global”.
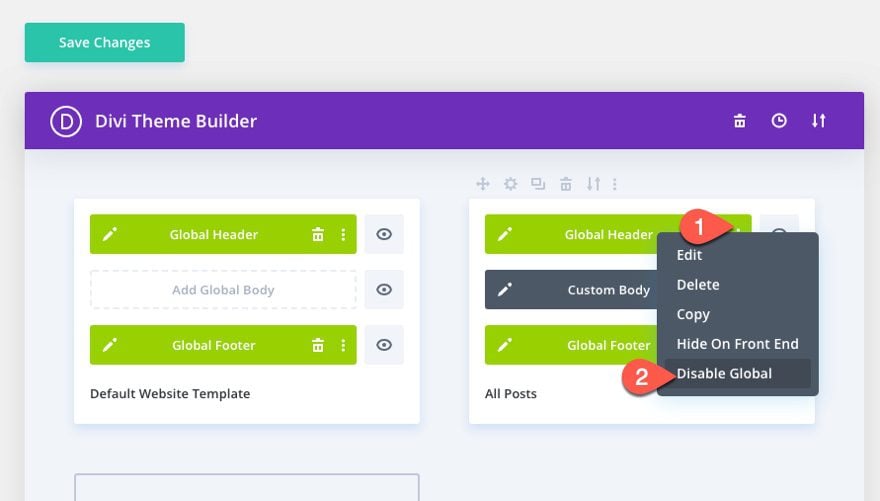
Now the header should be gray with the label “Custom Header”. Once ready, click the edit icon to edit the header layout template.
Building the Dynamic Post Info Bar
Adding the Section and Row
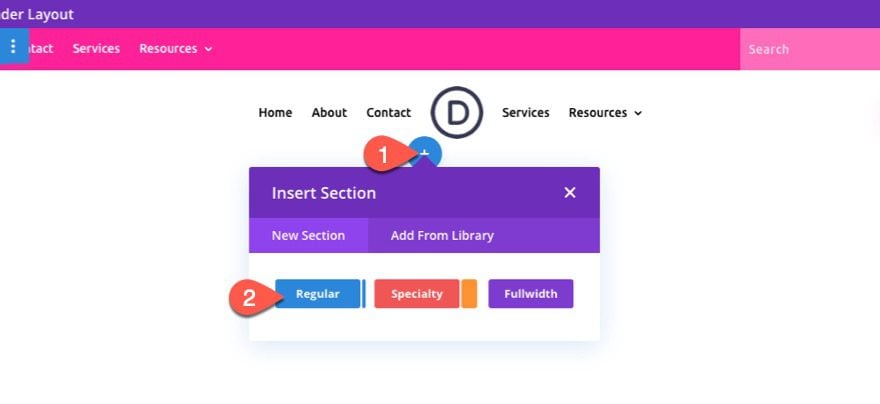
Inside the header layout editor, create a new regular section under the current section holding the header.
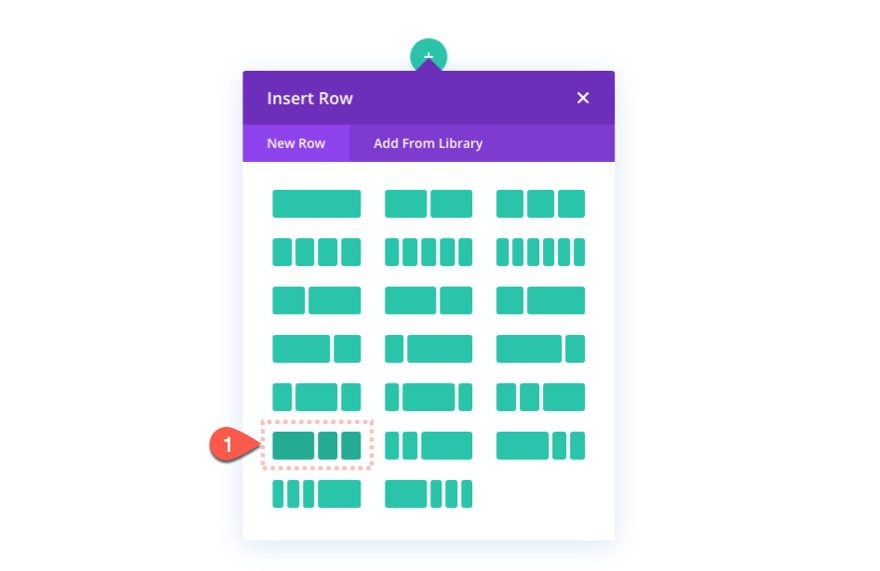
Then add a one-half one-fourth one-fourth column row to the section.
Section Settings
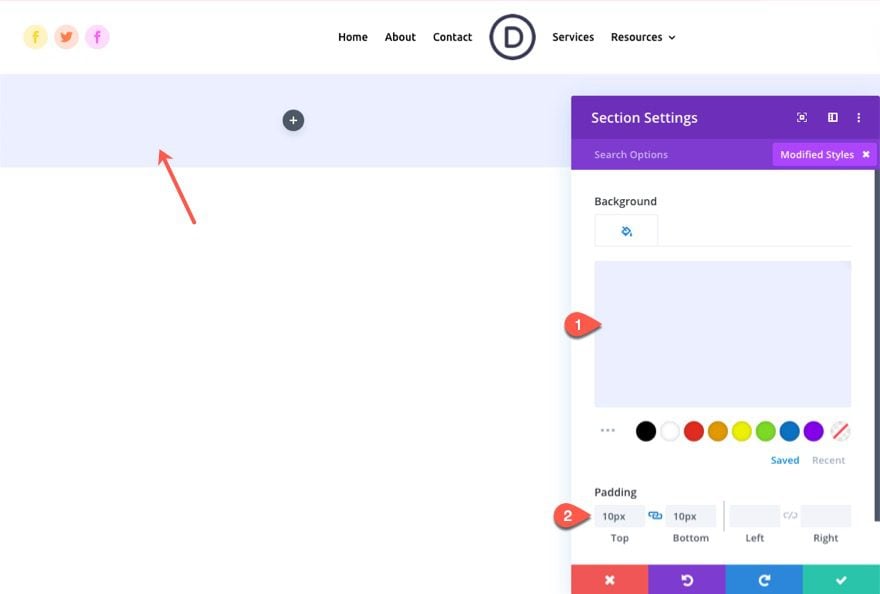
Open the section settings and update the following:
- Background Color: #eceffe
- Padding: 10px top, 10px bottom
Row Settings
After the section settings are added, open the settings for the row and update the following:
- Gutter Width: 1
- Padding: 0px top, 0px bottom
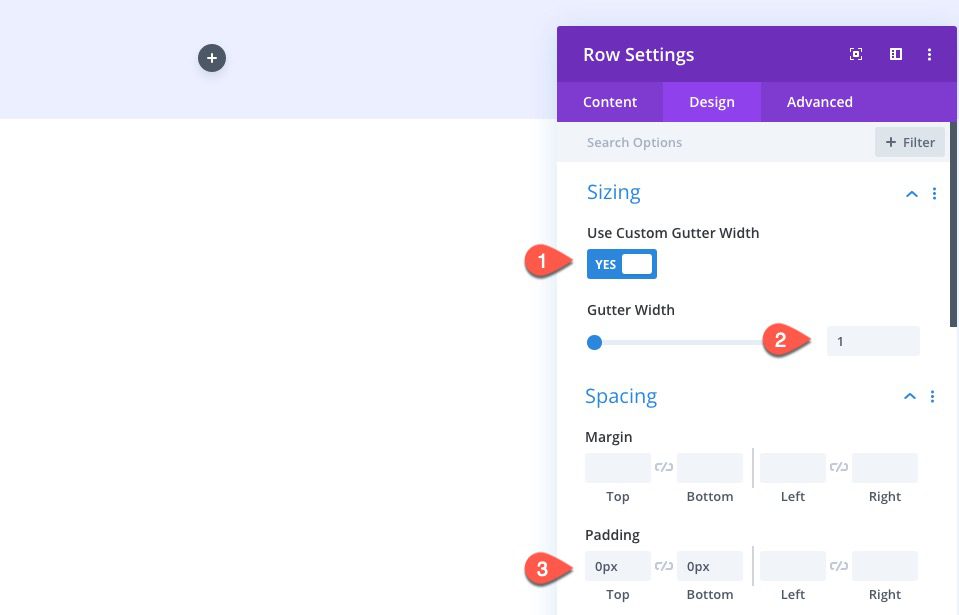
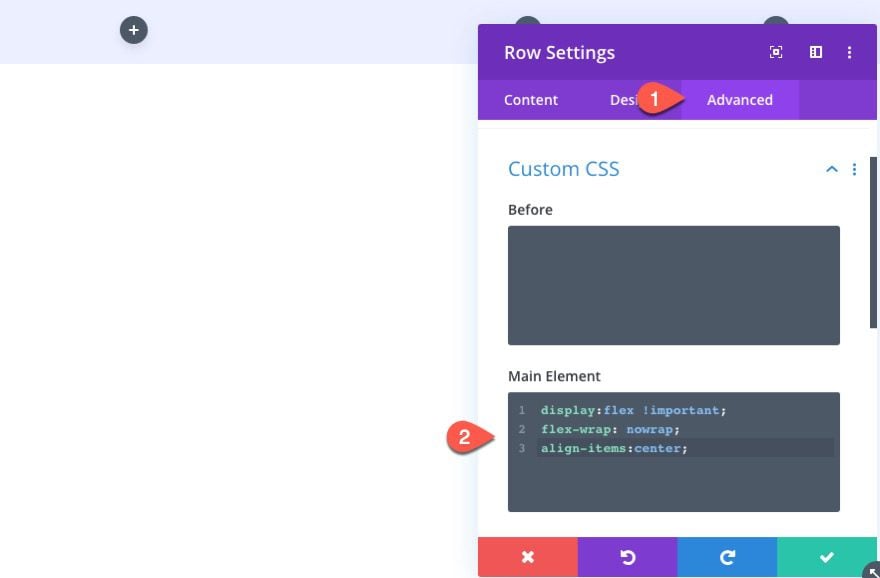
Under the advanced tab, add the following custom CSS to the Main Element:
display:flex !important;
flex-wrap: nowrap;
align-items: center;
This will make sure the columns down stack on mobile.
Add Post Title Dynamic Content
The first piece of dynamic content we are going to add to the bar is the post title. This will serve as a helpful reminder to the reader of what post title they are currently reading.
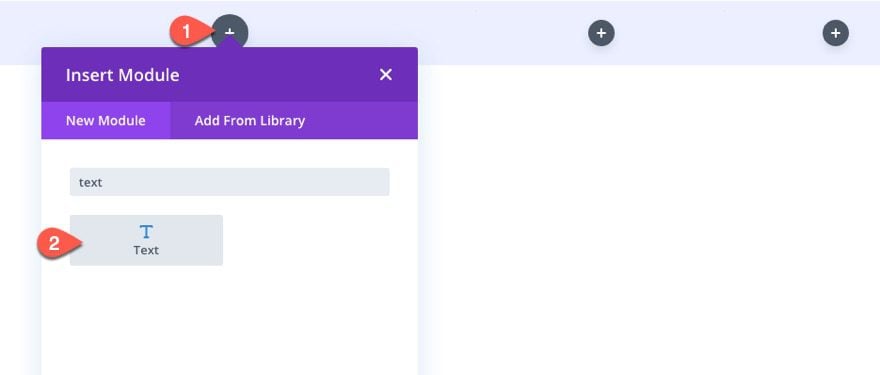
Add Text Module
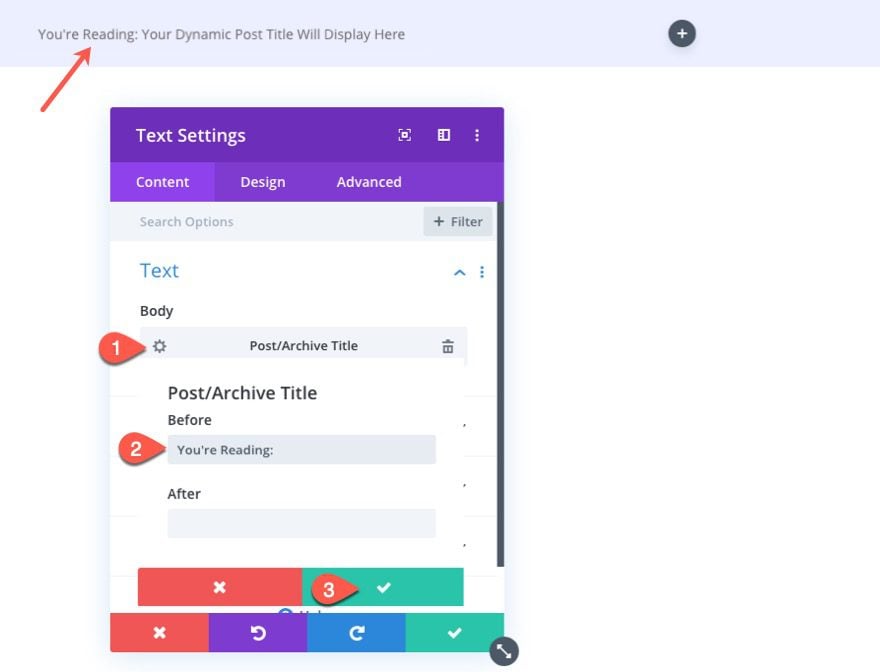
To create the post title as dynamic content, create a new text module inside the far left column.
Add Post/Archive Title as Dynamic Content
Next, click the “Use Dynamic Content” icon while hovering over the body area of the text settings. Select “Post/Archive Title” from the list.
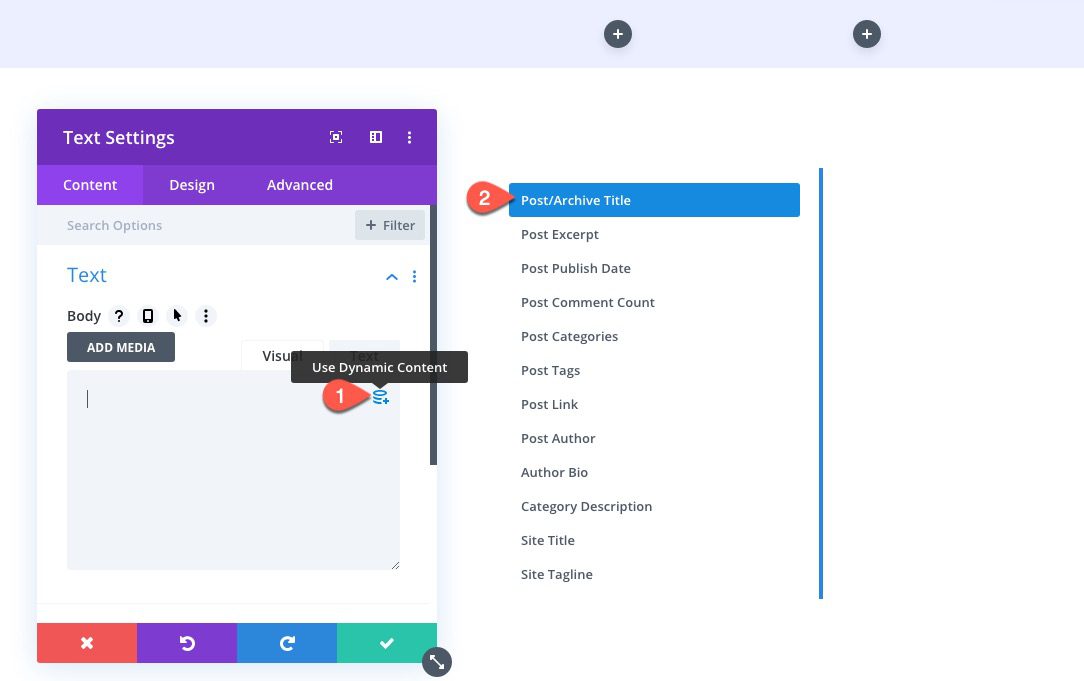
Open the dynamic content settings for the post/archive title and add the following in the before input box:
You're Reading:
Then save changes.
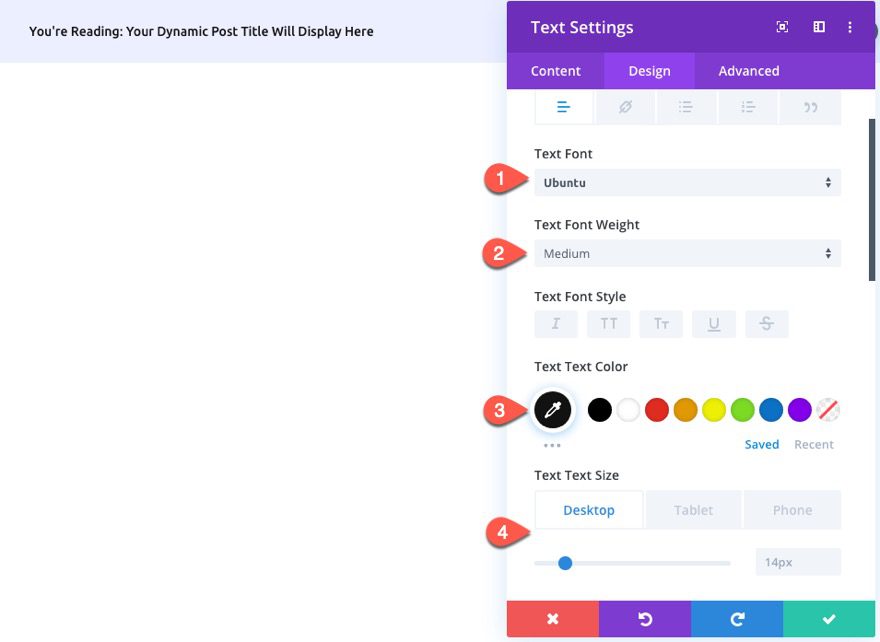
Design Settings
Under the design tab, customize the style of the dynamic title as follows:
- Text Font: Ubuntu
- Text Font Weight: Medium
- Text Text Color: #121212
- Text Text Size: 14px (desktop), 12px (tablet), 11px (phone)
Add Dynamic Post Categories Info
To create the post categories info, duplicate the text module holding the post title.
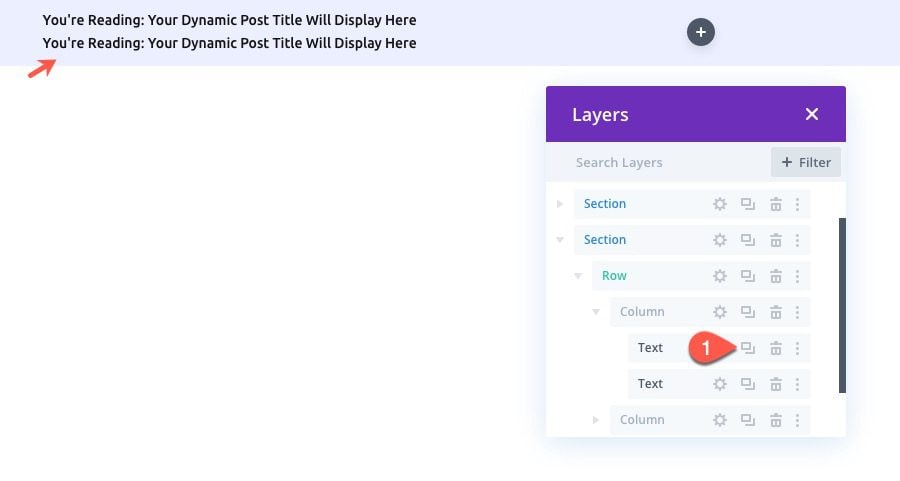
Then open the settings of the duplicate text module and add the post categories as dynamic content to the body.
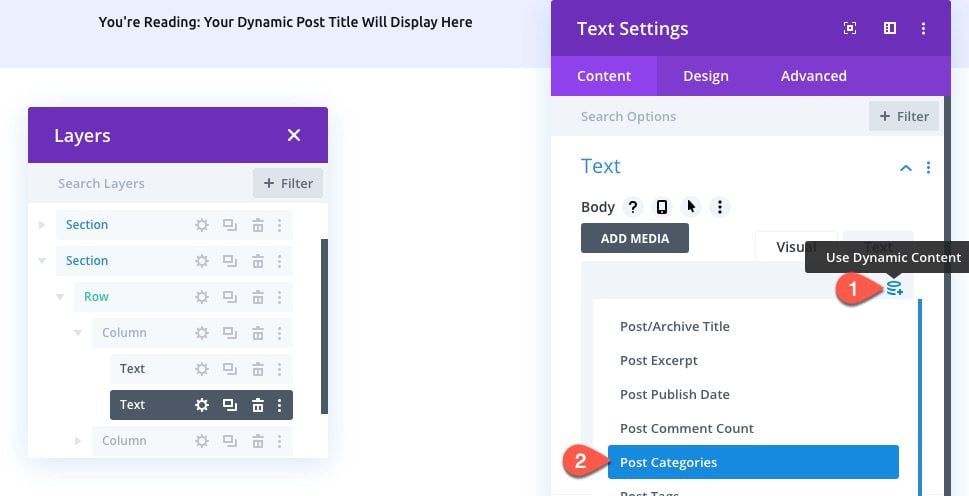
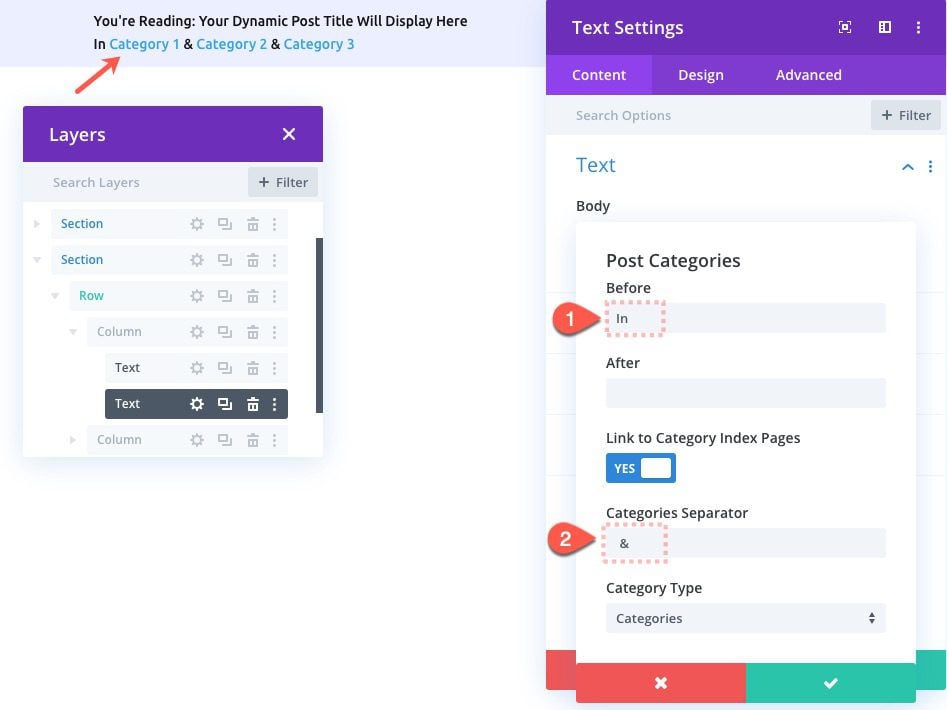
Open the Post Categories Dynamic Content Settings and update the following:
- Before: In
- Categories Separator: &
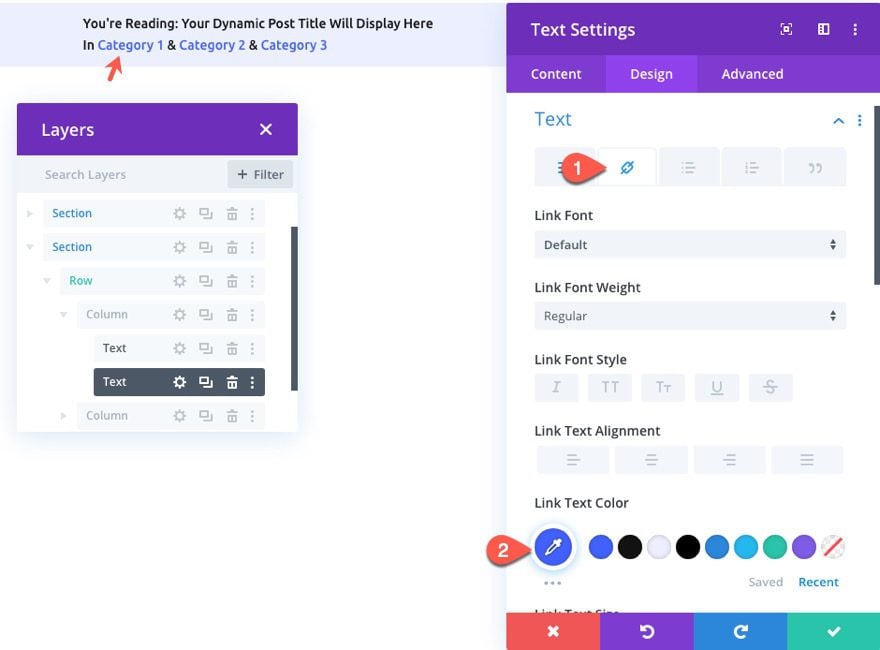
Update link color
Under the design tab, update the link color as follows:
- Link Text Color: #4160fd
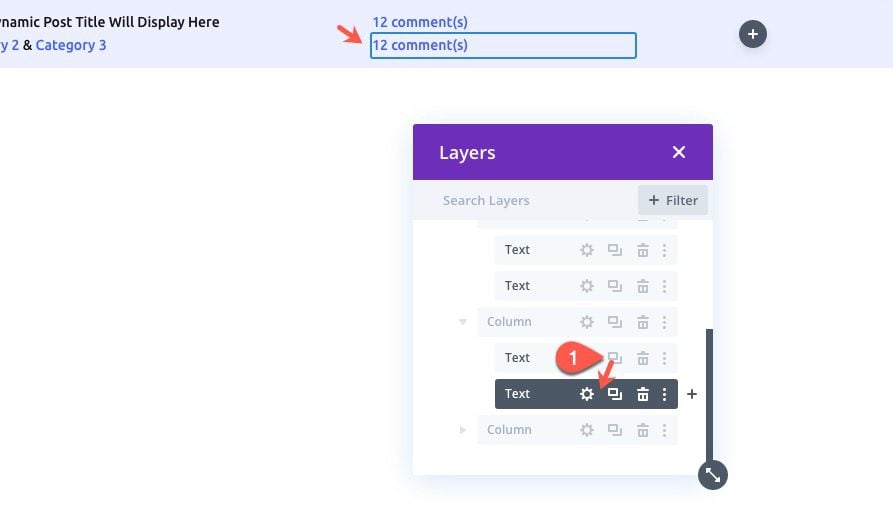
Adding the Dynamic Comment Count Info
Another helpful piece of info we are going to add to the post info bar is the comment count which reminds the user to engage with their own comments if they want. The comment count will include a link to the comments of the post as well.
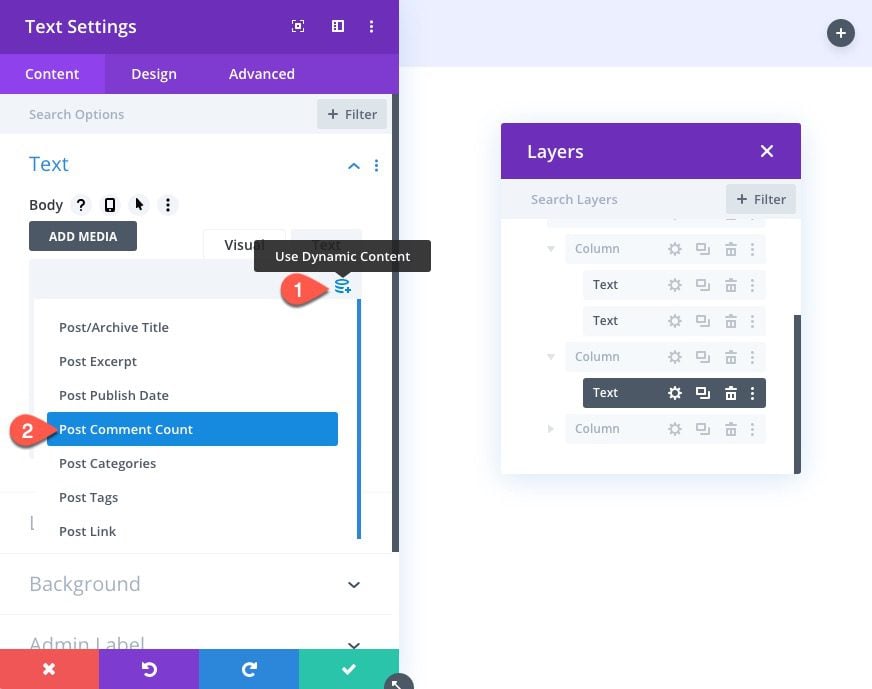
To create the dynamic comment count info, duplicate the text module with the categories and drag it into the middle column.

Then add the post comment count as dynamic content to the text body.
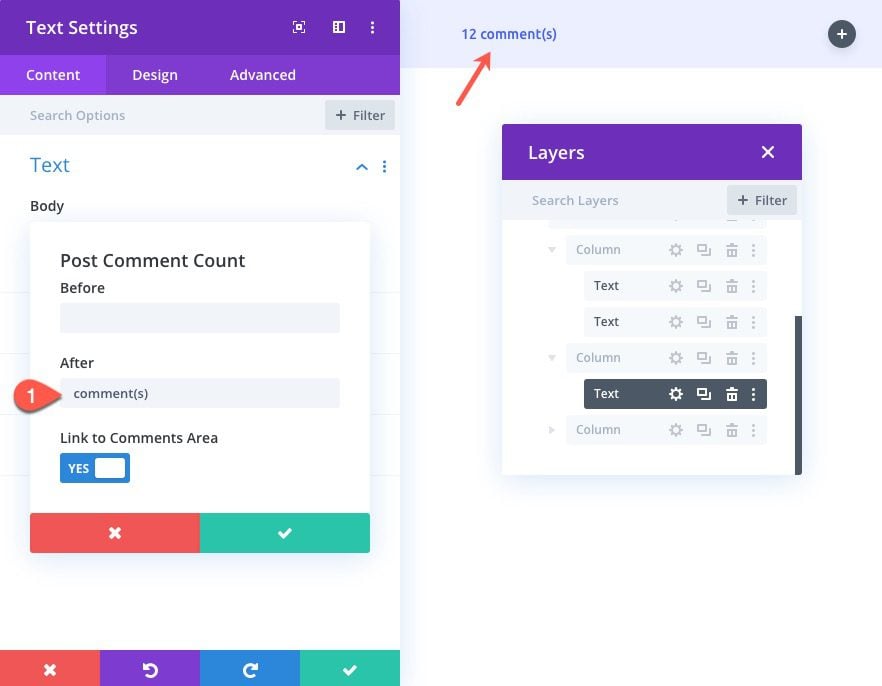
Open the Post Comment Count Settings and add the following:
- After: comment(s)
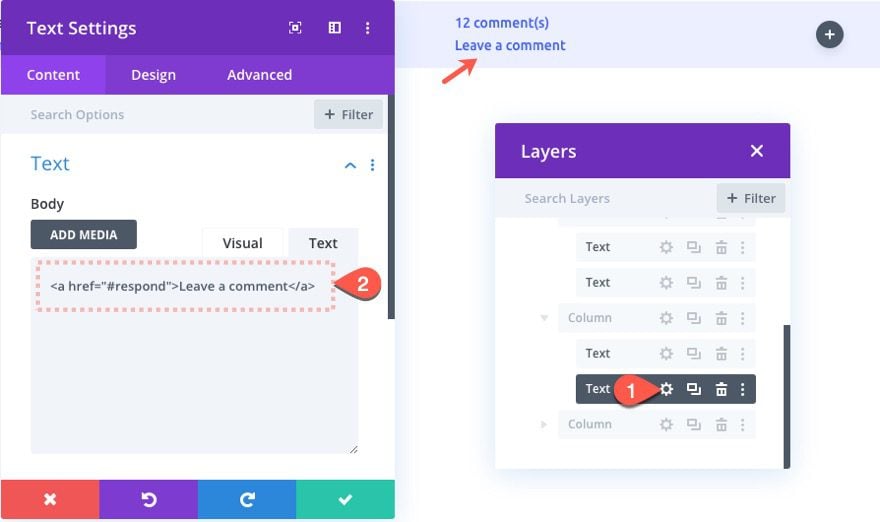
Adding the “Leave a Comment” Call to Action
In addition to the comment count, we are going to add a simple call to action to leave a comment. The link will be an anchor link that scrolls to the comment section at the bottom of the post.
To create the CTA, duplicate the Text module in column 2 holding the comment count.
Then open the text settings for the duplicate and add the following link html to the body:
<a href="#respond">Leave a Comment</a>
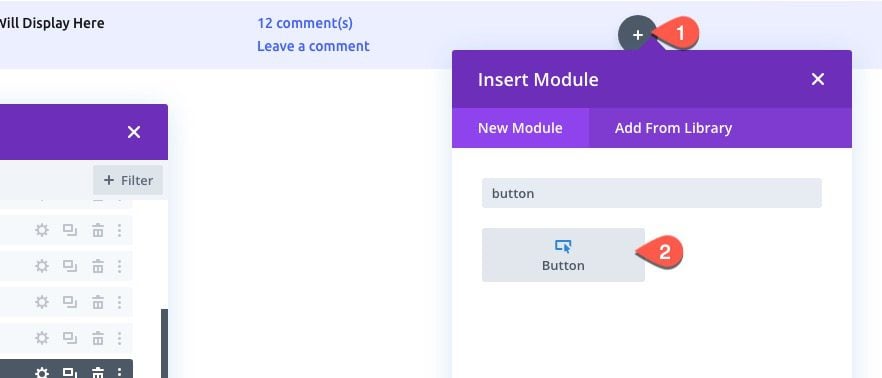
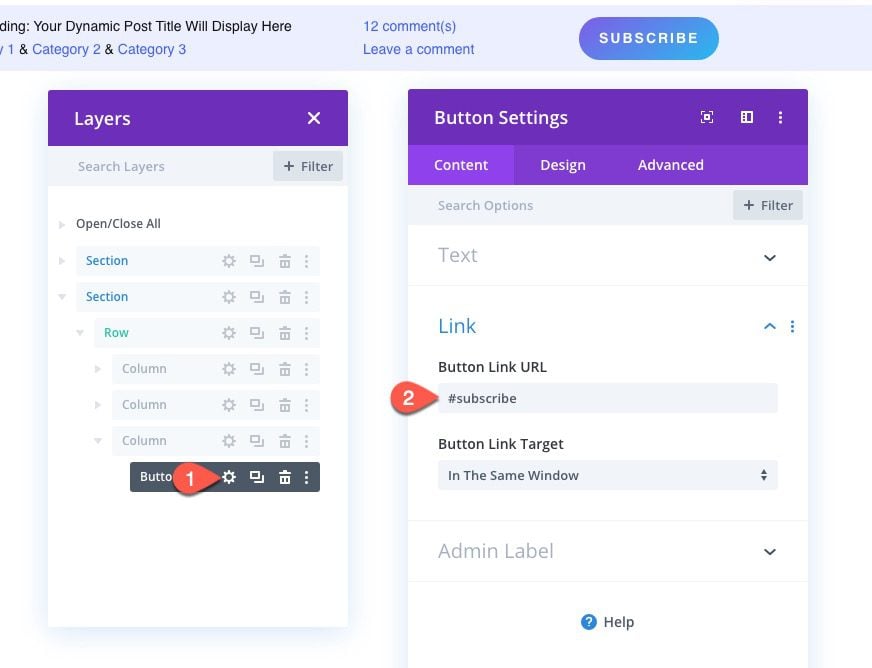
The last thing we are going to add to the post info bar is a subscribe button. This will also be a anchor link that brings the user to the section of the post template that includes an email opt-in form.
To do this, add a button module in the far right column.
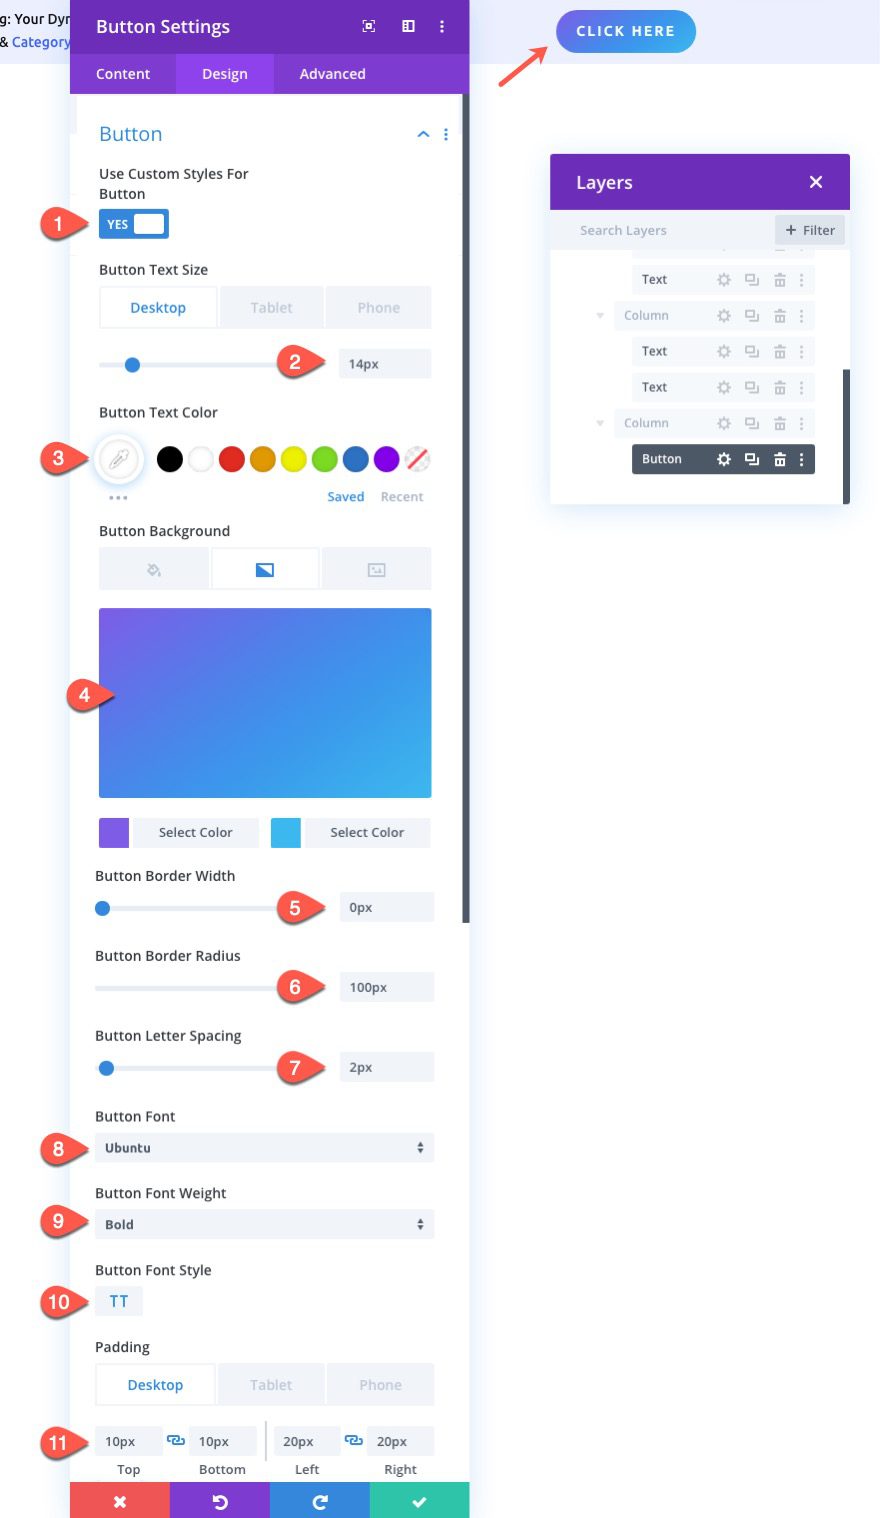
Under the design tab, update the button styles as follows:
- Button Text Size: 14px (desktop), 12px (tablet), 11px (phone)
- Button Text color: #ffffff
- Button Background Gradient Left Color: #7e5ce6
- Button Background Gradient Right Color: #25b8ee
- Button Border Width: 0px
- Button Border Radius: 100px
- Button Letter Spacing : 2px
- Button Font: Ubuntu
- Button Font Weight: Bold
- Button Font Style: TT
- Padding (desktop): 10px top, 10px bottom, 20px left, 20px right
- Padding (tablet): 6px top, 6px bottom, 14px left, 14px right
To add the anchor link to the button, go to the content tab and add the following Button Link URL:
- Button Link URL: #subscribe
This link won’t work until we add a corresponding CSS ID to the section holding the email opt-in form on the body of the post template.
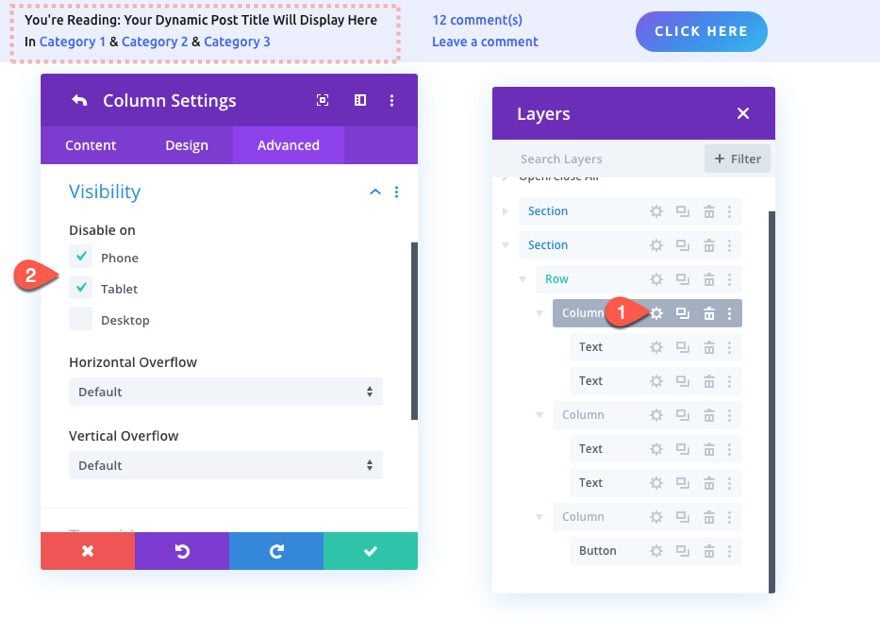
Disable Column 1 on Mobile
There is only so much room on mobile for a fixed bar. That’s why we will need to make decisions on what info to include. For this example, we are going to leave the two columns with the CTAs on mobile and disable the column with the post title and categories.
To do this, open the settings for column 1. Under the advanced tab, disable the visibility on phone and tablet.
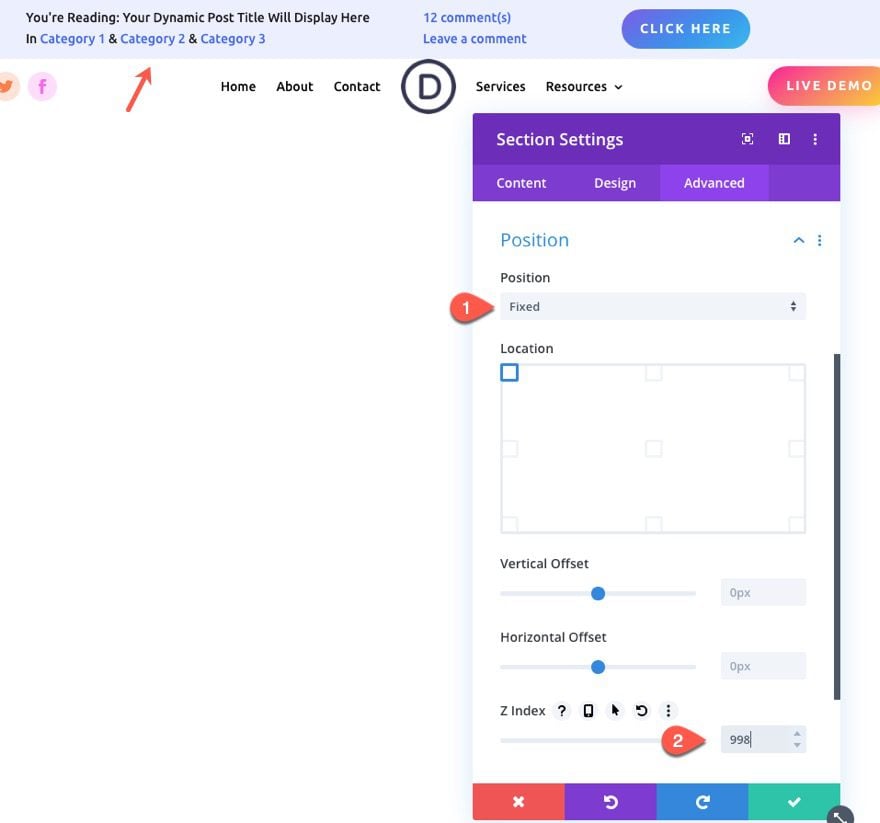
Giving the Section a Fixed Position and a High Z Index
Once the design is finished, we can now give the section a fixed position. The idea is to hide the bar behind the section with the header initially. Then as the user scrolls the fixed post info bar will be revealed from under the header.
Open the section settings and update the following:
- Position: Fixed
- Z Index: 998
Notice the z index is 998 because I want the fixed bar to sit above the rest of the content on the post.
Update Section Header Z Index
Since the post info bar section has a higher z index, it will show above the section with the header. To fixe this, open the section settings for the section with the header and add the following:
- Z Index: 999 (one more than the section with the bar)
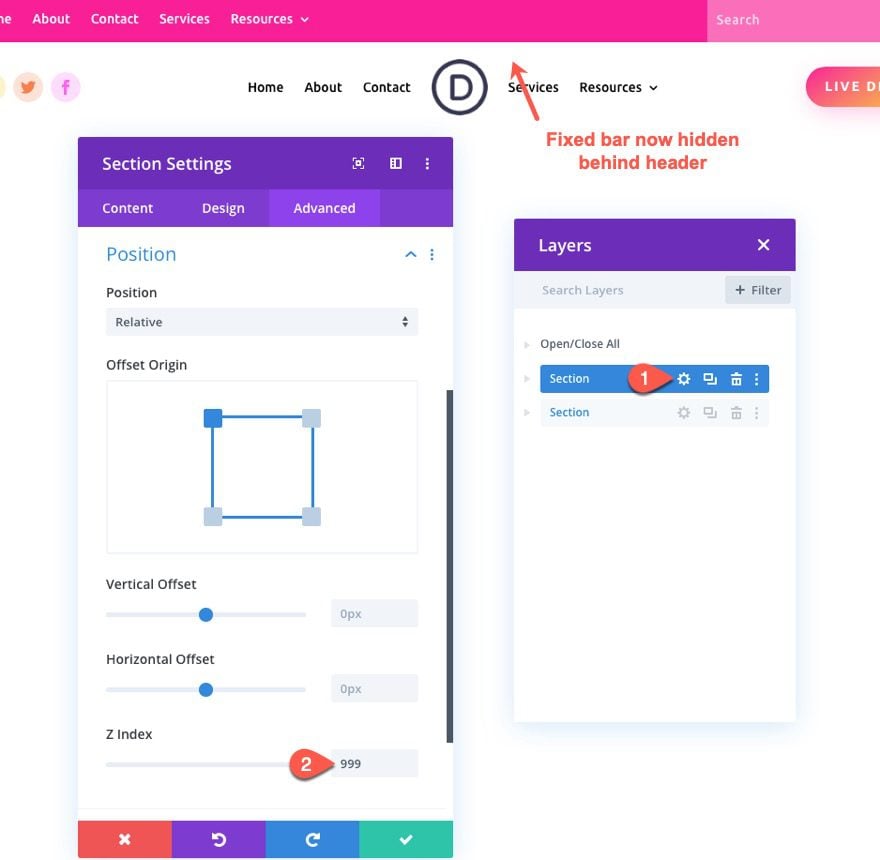
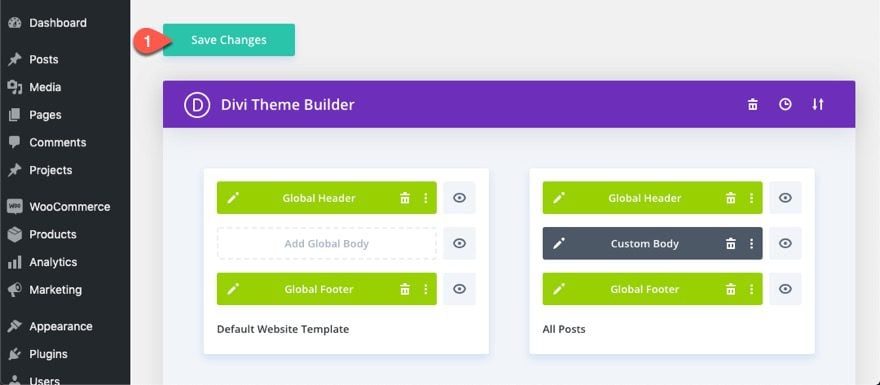
Save the changes in the layout editor.

Add CSS ID to Email Opt-in Row on the Body Template
The subscribe button CTA we adding to the bar still needs an anchor, or a place to “jump” to, on the post template. Since the CTA is to “subscribe” we need it to jump to the email opi-in form.
To do this, open the “custom body” area of the post template in the theme builder.
Find the row with the email opt-in form at the bottom of the layout and add the following CSS ID:
- CSS ID: subscribe
This will allow the subscribe button anchor link to scroll to this specific area of the template.

Once done save the changes to the layout and to the theme builder.
Final Result
To see the final result, simply open up and view a live post on the site. Notice how the anchor links (“Leave a comment” and “Subscribe”) send the users to the corresponding area on the post.
Final Thoughts
Hopefully, this dynamic post info bar will come in handy for boosting the UX of your Divi blog posts. Feel free to experiment with other pieces of info as well. I’m sure there is a way to feature a related post in there with a blog module.
I look forward to hearing from you in the comments.
Cheers!


really explains everything in detail, the article is very interesting and effective. Thank you and good luck for the upcoming articles.
Thank you for sharing this wonderful post.This divi plugin information is very useful for me.I have learned more things about divi. Thanks a lot.Keep sharing.
I Like the wordpress theme ..Like to try once :0
Good wok and is there any major feature release with Divi we are expecting some thing big to come please like slider animation, elements pre design blocks like Elementor tool etc. Expecting our own contact form with file attachments and auto reply mail to the end users etc. 😉
Great content, ET!