
")
Bold product pages have a special way of drawing your visitors’ attention. And with Divi and its new WooCommerce Modules update, you can quickly turn your old product page into a clean and bold one that both you and your visitors are going to love. In today’s tutorial, we’ll recreate a bold product page from scratch and you’ll be able to download the JSON file for free as well! This tutorial goes to show how versatile Divi’s new WooCommerce Modules are and how you can create a highly-professional eCommerce website in no time.
Let’s get to it!
- 1 Preview
- 2 Download The Clean & Bold Product Page Layout for FREE
- 3 Download For Free
- 4 You have successfully subscribed. Please check your email address to confirm your subscription and get access to free weekly Divi layout packs!
- 5 1. Add/Open WooCommerce Product
-
6
2. Create Clean & Bold Product Page Using Divi’s Visual Builder
- 6.1 Add Regular Section #1
- 6.2 Add Row
- 6.3 Add Woo Breadcrumb Module to Column
- 6.4 Add Woo Title Module to Column
- 6.5 Add Regular Section #2
- 6.6 Add Row
- 6.7 Column 1 Settings
- 6.8 Add Text Module to Column 1
- 6.9 Add Text Module to Column 2
- 6.10 Add Woo Description Module to Column 2
- 6.11 Add Woo Price Module to Column 2
- 6.12 Add Woo Add to Cart Module to Column 2
- 7 Preview
- 8 Final Thoughts
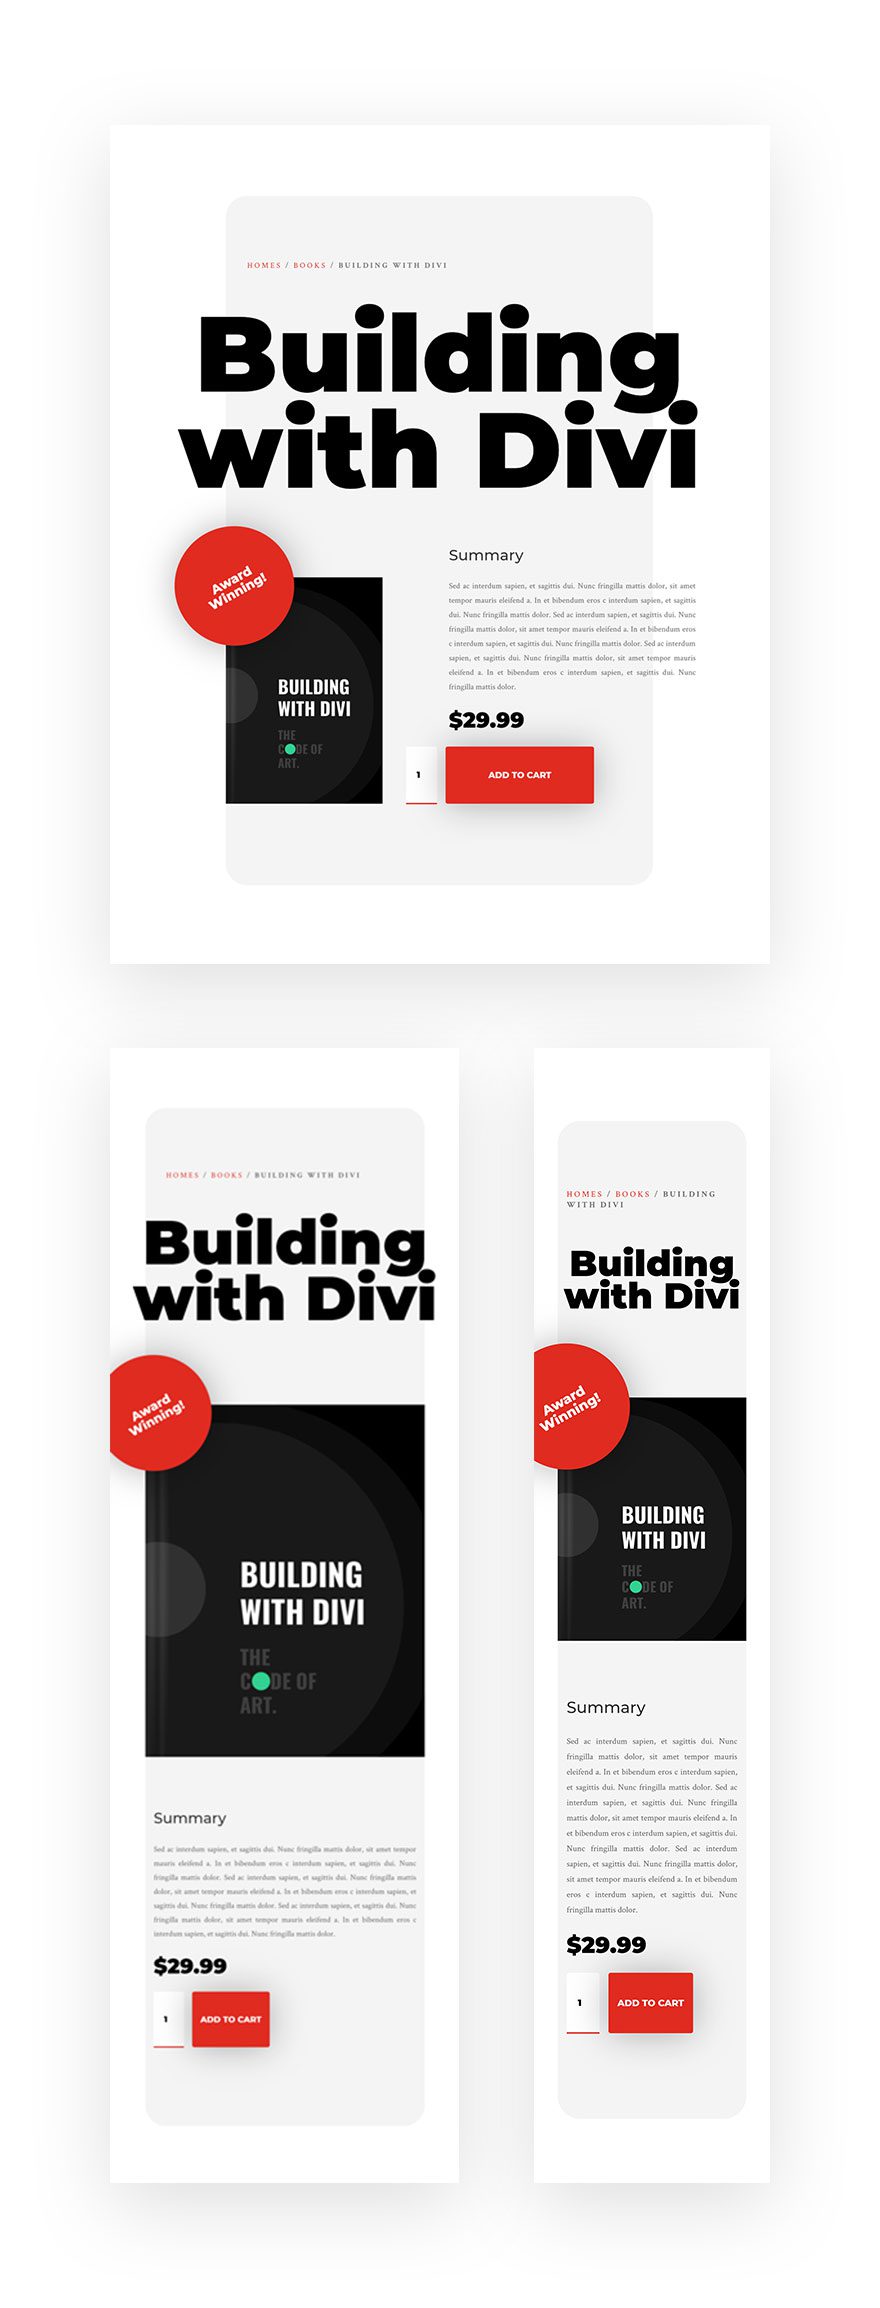
Preview
Before we dive into the tutorial, let’s take a quick look at the outcome across different screen sizes.
Download The Clean & Bold Product Page Layout for FREE
To lay your hands on the free hero clean & bold product page layout, you will first need to download it using the button below. To gain access to the download you will need to subscribe to our newsletter by using the form below. As a new subscriber, you will receive even more Divi goodness and a free Divi Layout pack every Monday! If you’re already on the list, simply enter your email address below and click download. You will not be “resubscribed” or receive extra emails.

Subscribe To Our Youtube Channel
1. Add/Open WooCommerce Product
Product Details
Open an existing product or create a new one. If you want to achieve the exact same outcome as shown in the preview of this post, make sure you add the following product details:
- Title
- Short Description
- Long Description
- Category
- Featured Image
- Price

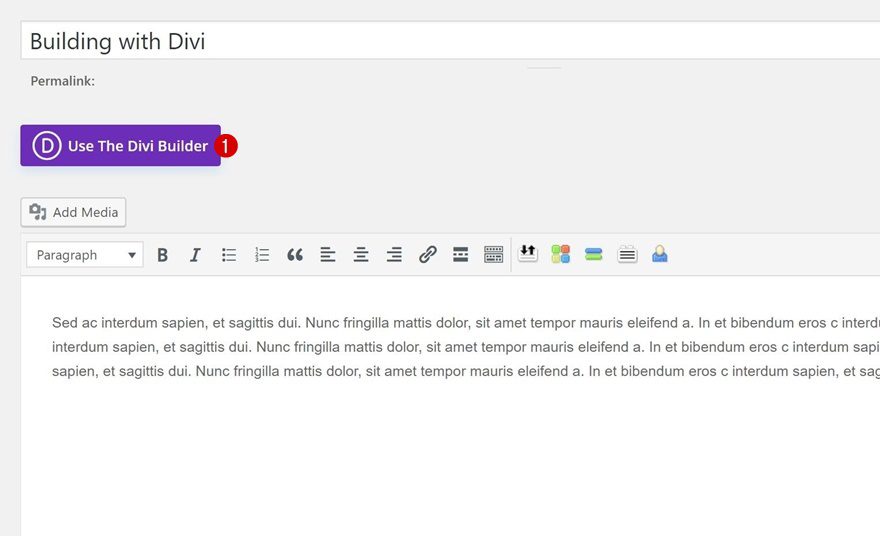
Enable Divi Builder & Modify Product Page Settings
Once you’ve completed the product details, enable Divi and change the page layout to ‘Fullwidth’.
Switch Over to Visual Builder
Continue by switching over to the Visual Builder.
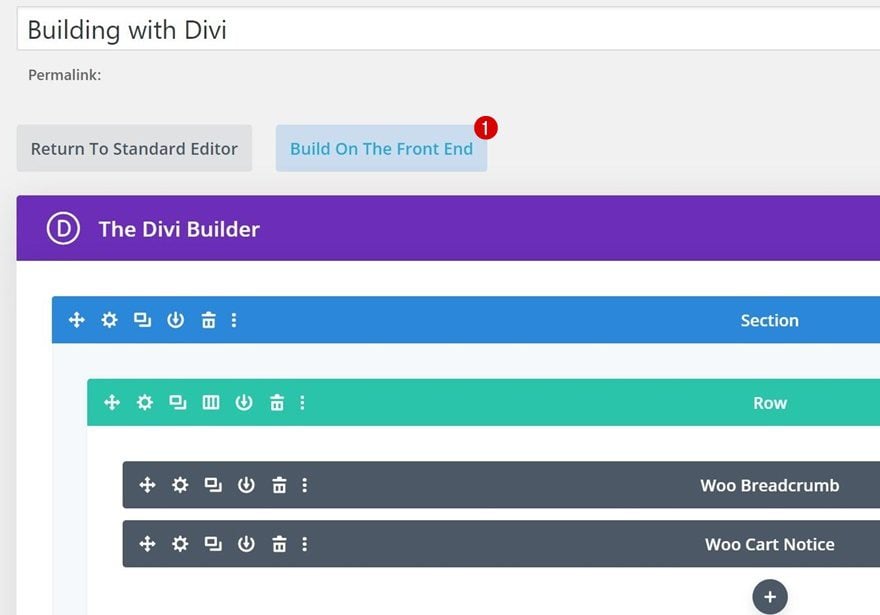
Remove Original Product Section on Page
There, you’ll see the original product page info put together into one single section. We’ll recreate our clean & bold design from scratch so feel free to delete this section.
2. Create Clean & Bold Product Page Using Divi’s Visual Builder
Add Regular Section #1
Spacing
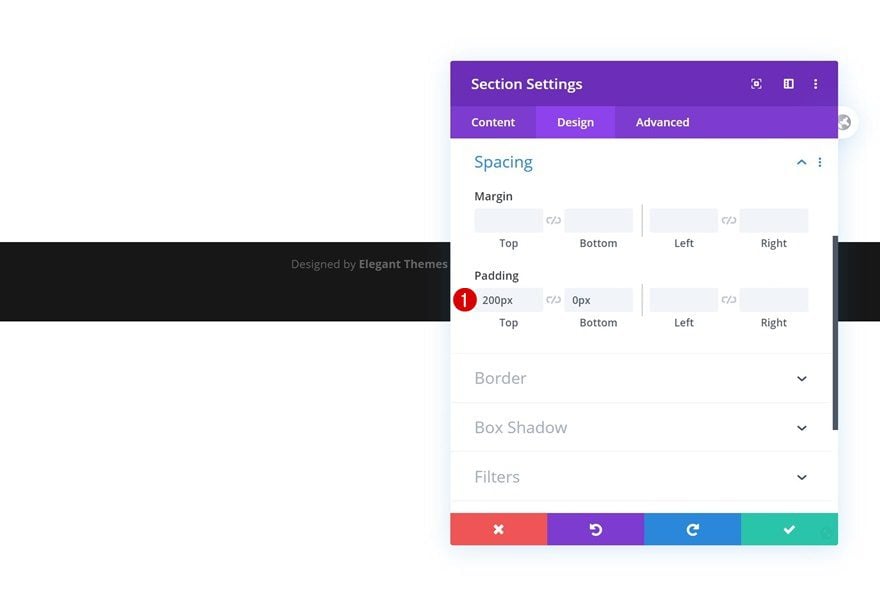
Time to start creating our bold product page! Add a new regular section and change the section’s spacing settings.
- Top Padding: 200px
- Bottom Padding: 0px
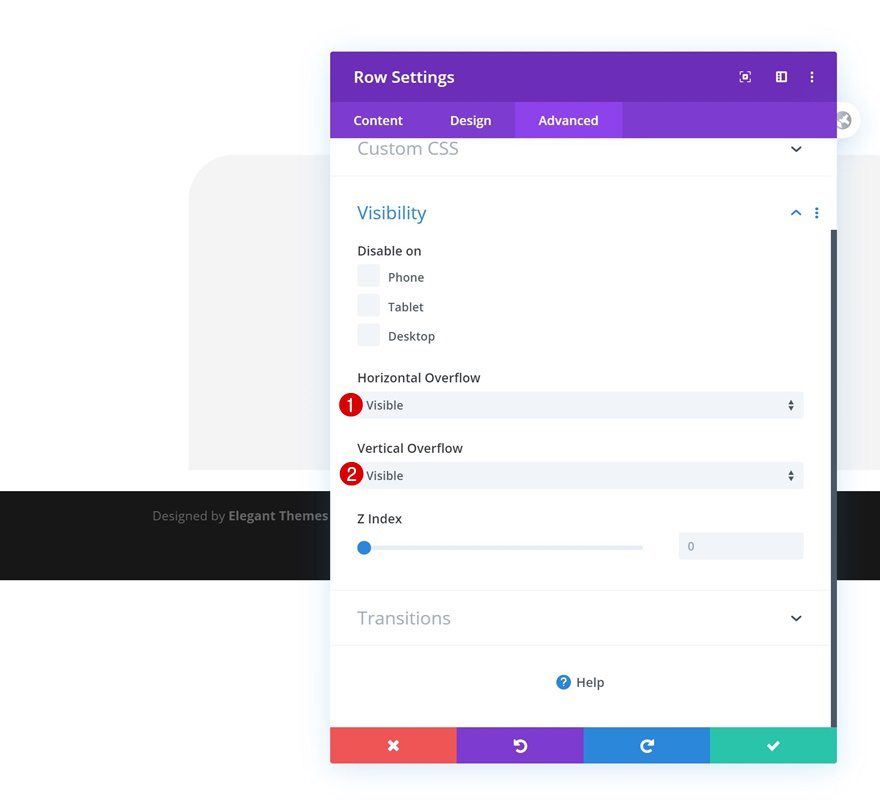
Overflows
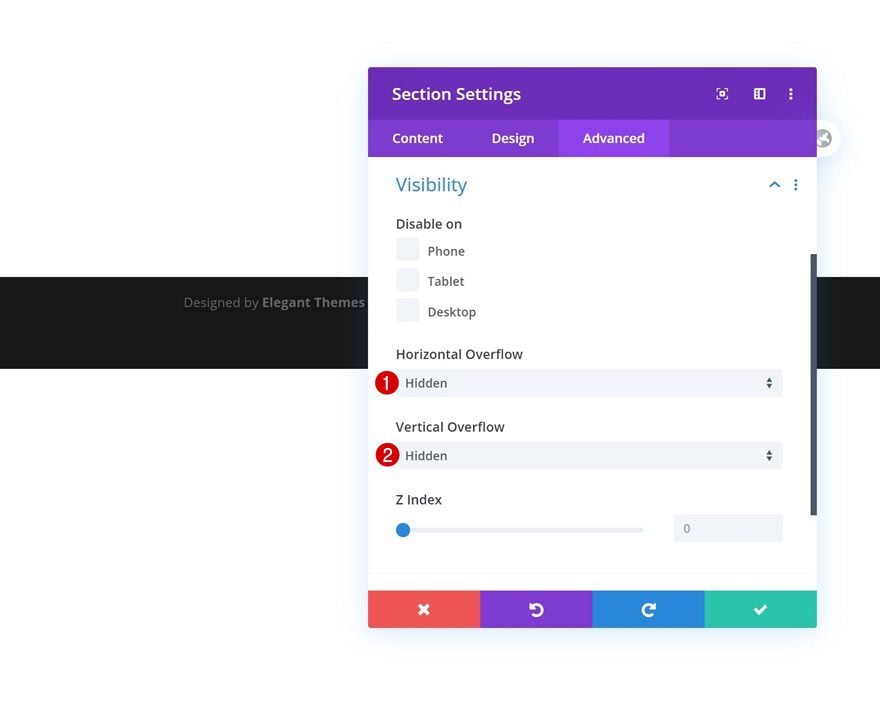
To make sure nothing exceeds the section container, and no horizontal scroll takes place on the page, hide the section’s overflows in the visibility settings.
- Horizontal Overflow: Hidden
- Vertical Overflow: Hidden
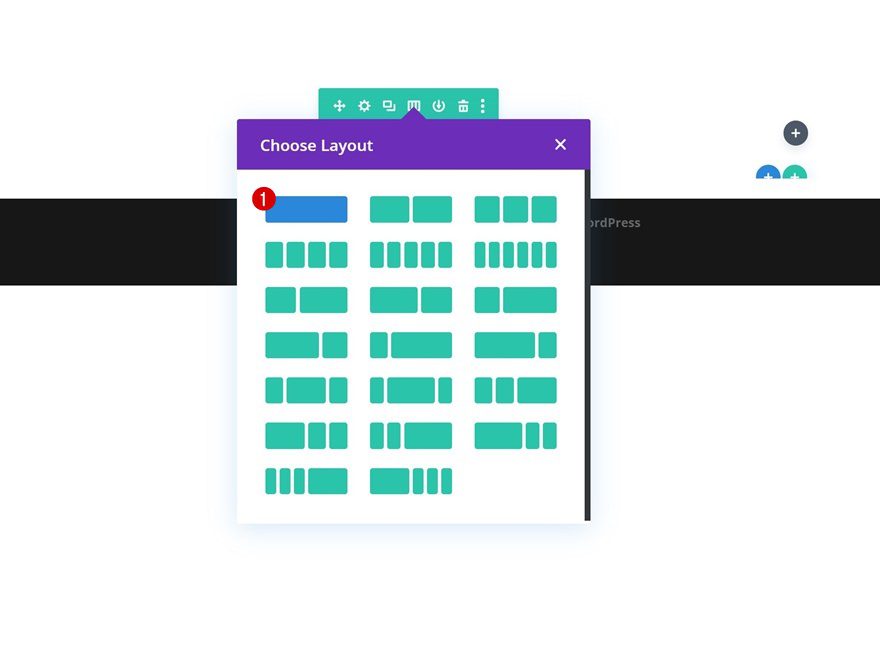
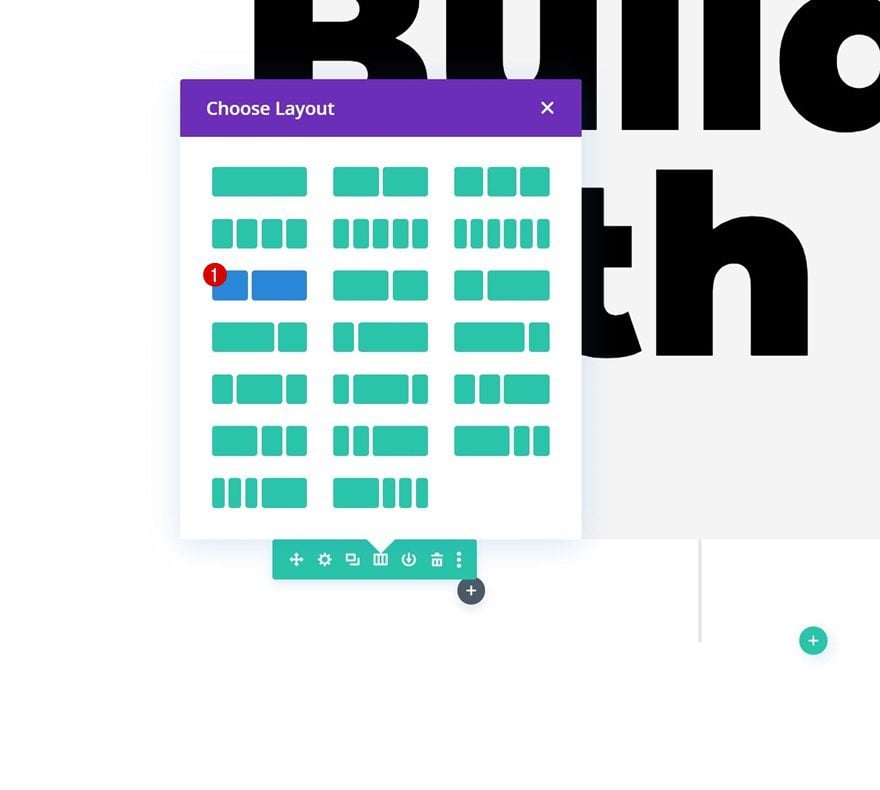
Add Row
Column Structure
Continue by adding a new row using the following column structure:
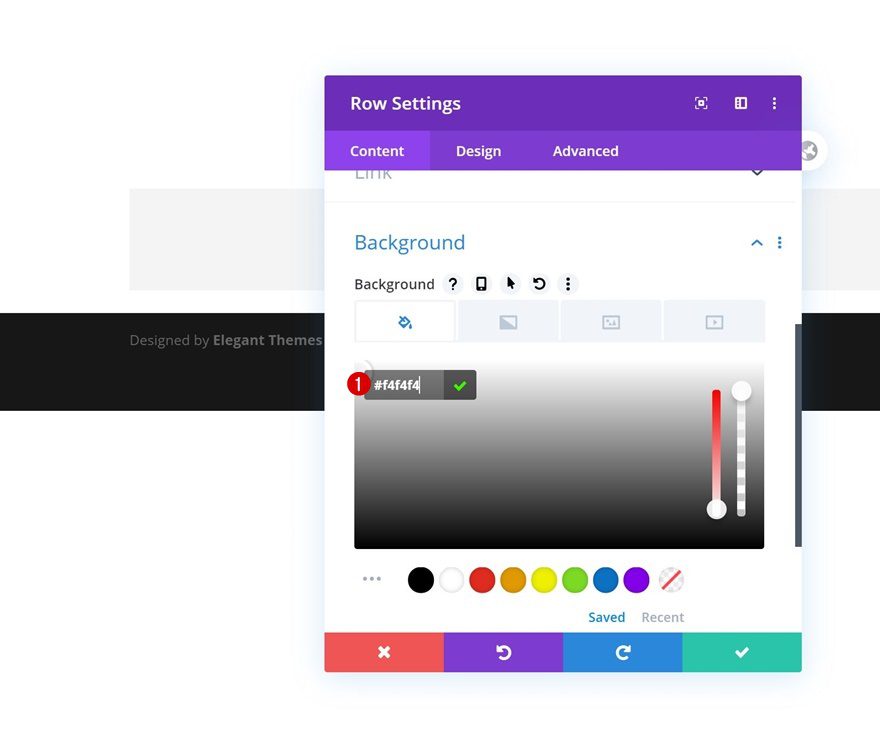
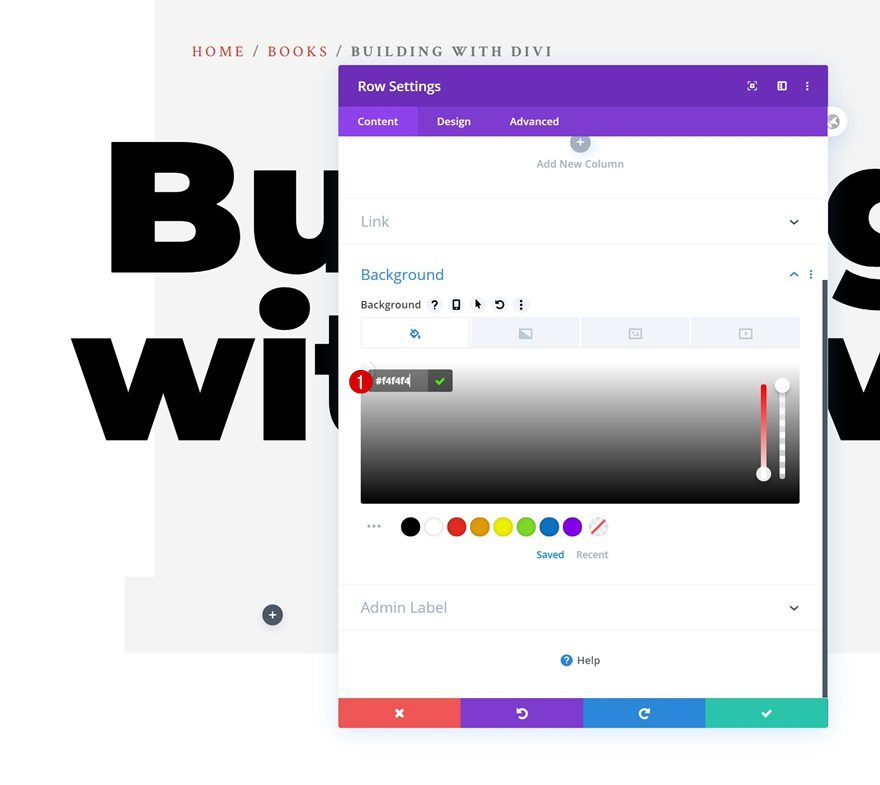
Background Color
Without adding any modules yet, open the row settings and change the row’s background color.
- Background Color: #f4f4f4
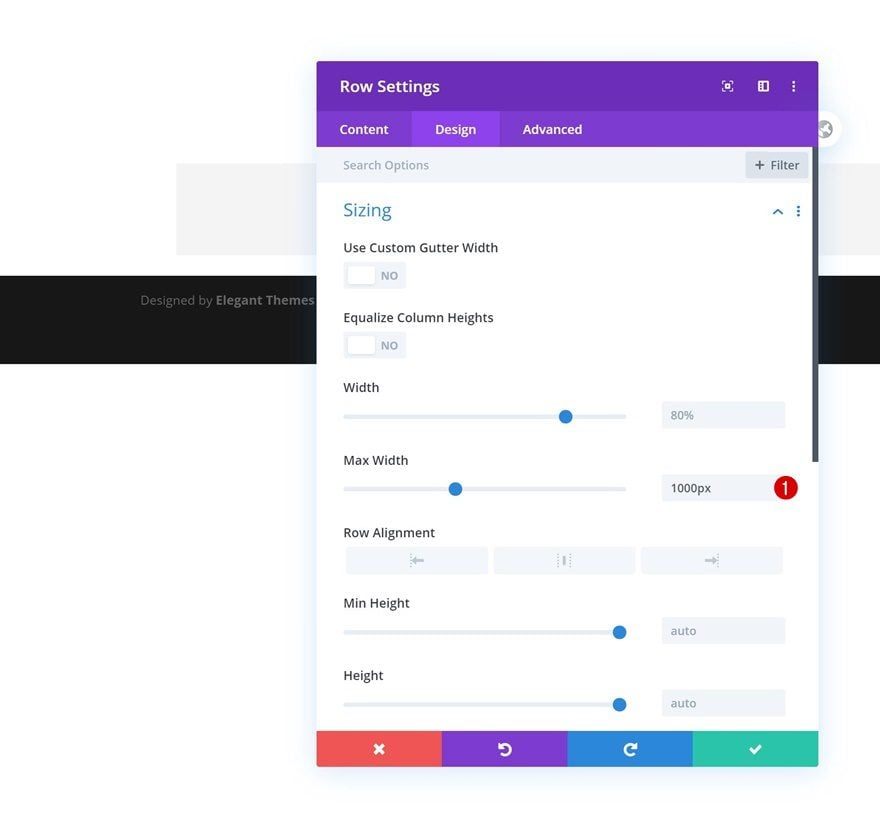
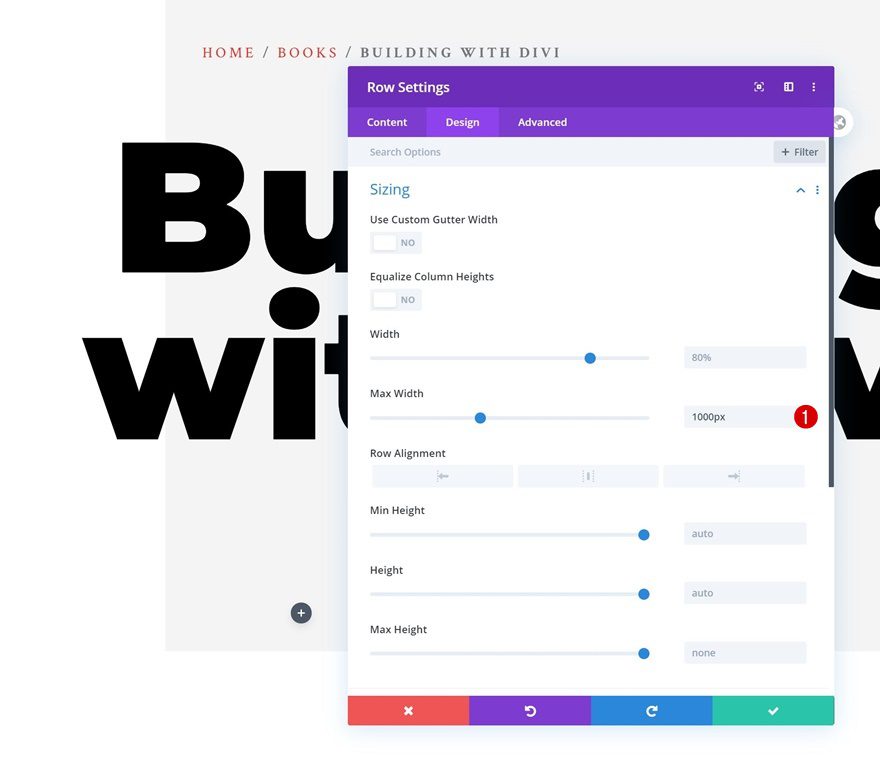
Sizing
Modify the row’s max width too.
- Max Width: 1000px
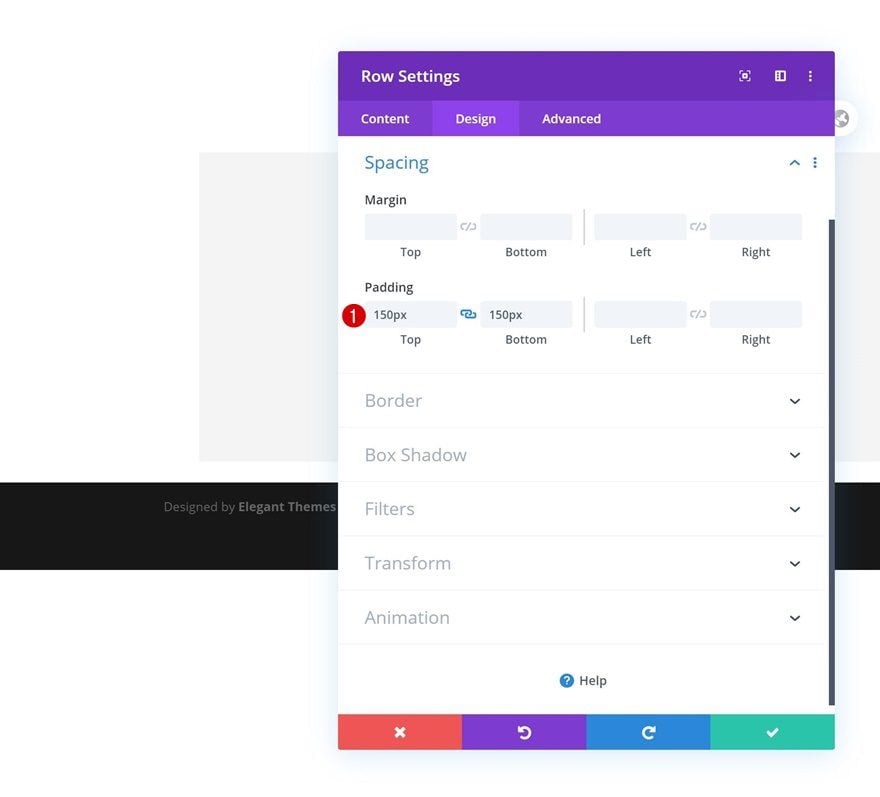
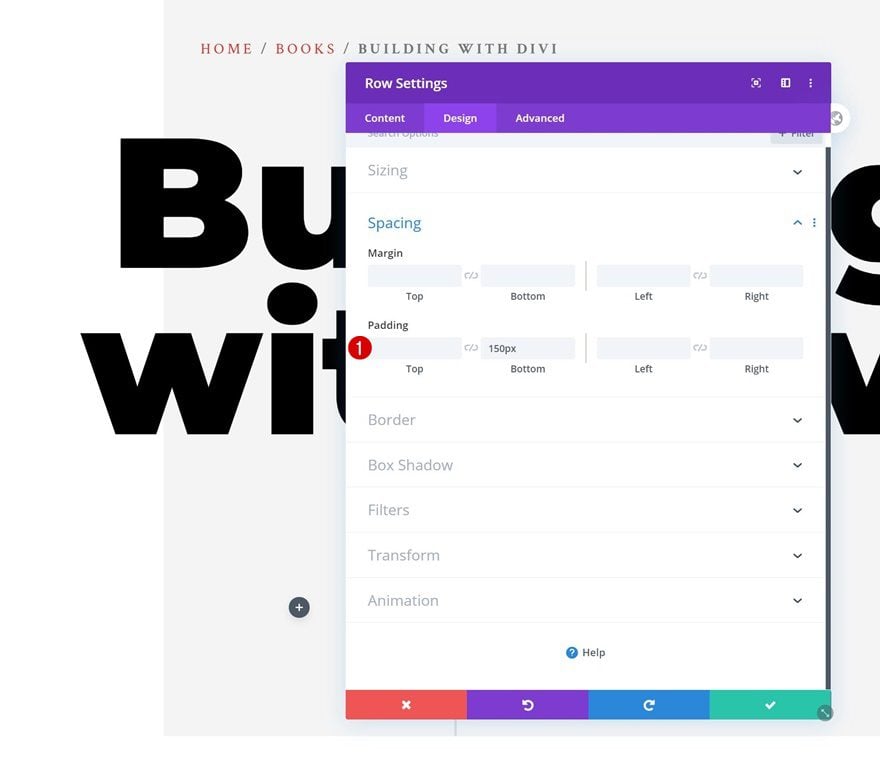
Spacing
Then, go to the spacing settings and add some custom top and bottom padding.
- Top Padding: 150px
- Bottom Padding: 150px
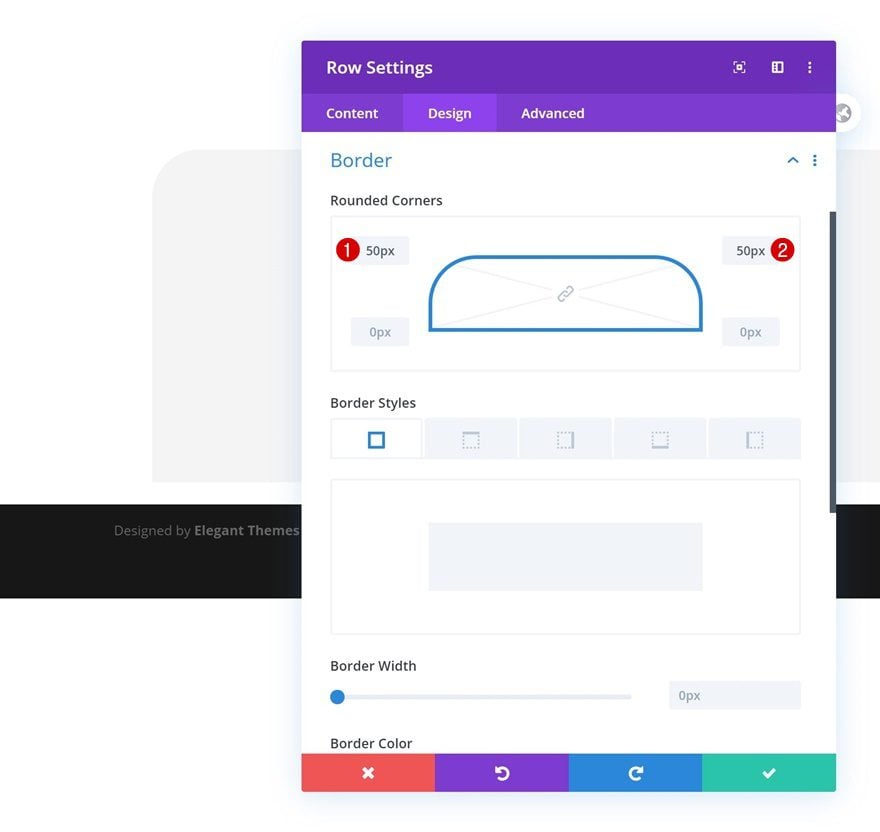
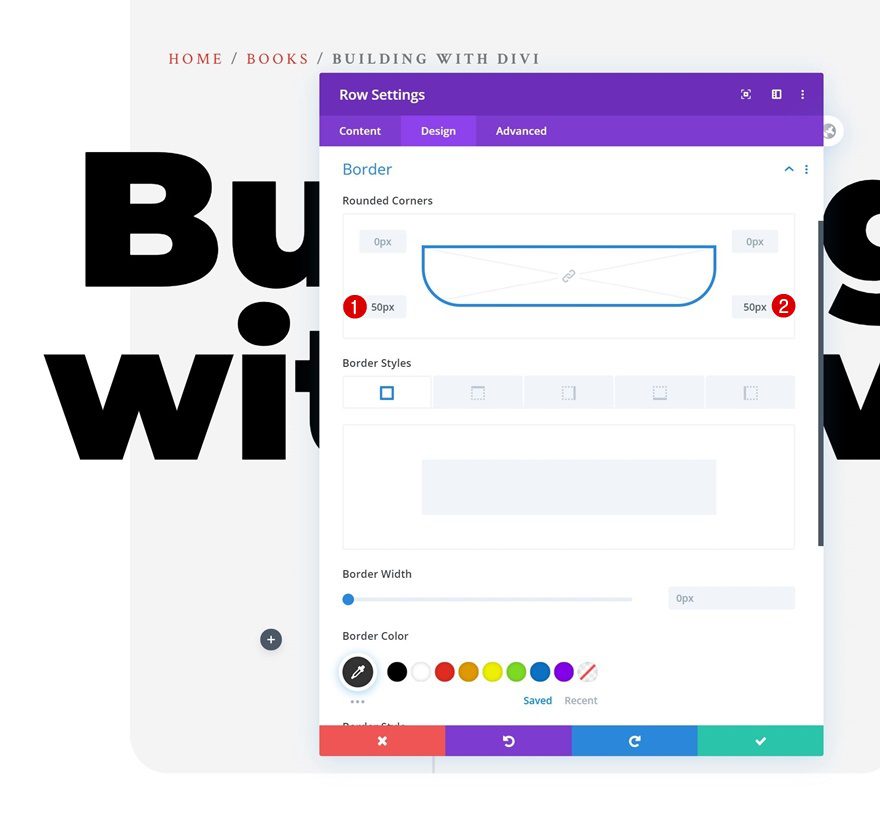
Border
We’re adding ’50px’ border radius to the row’s top left and right corners too.
Overflows
Complete the row’s settings by making the overflows visible.
- Horizontal Overflow: Visible
- Vertical Overflow: Visible
Dynamic Content
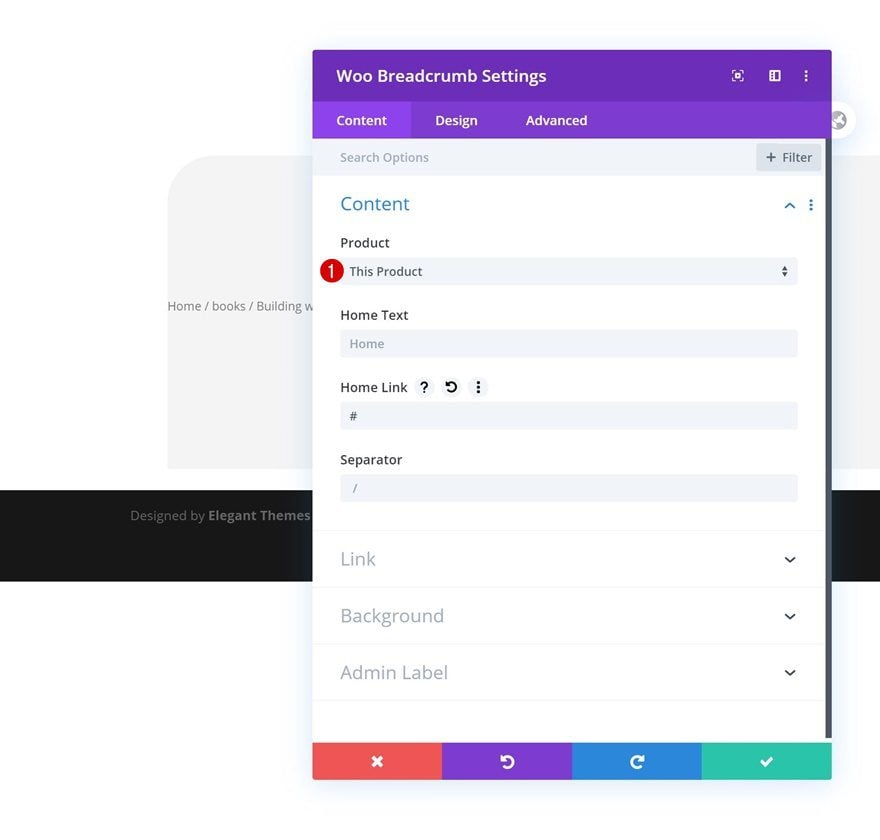
Time to start adding modules! The first module we need it is the Woo Breadcrumb Module.
- Product: This Product
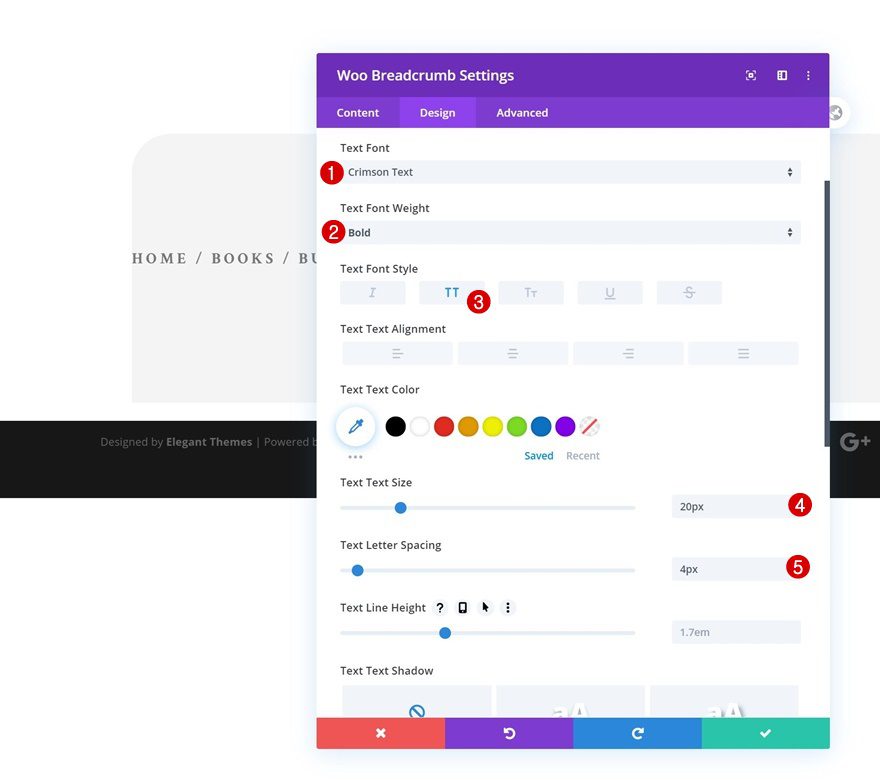
Text Settings
Move on to the module’s design tab and change the text settings accordingly:
- Text Font: Crimson Text
- Text Font Weight: Bold
- Text Font Style: Uppercase
- Text Size: 20px
- Text Letter Spacing: 4px
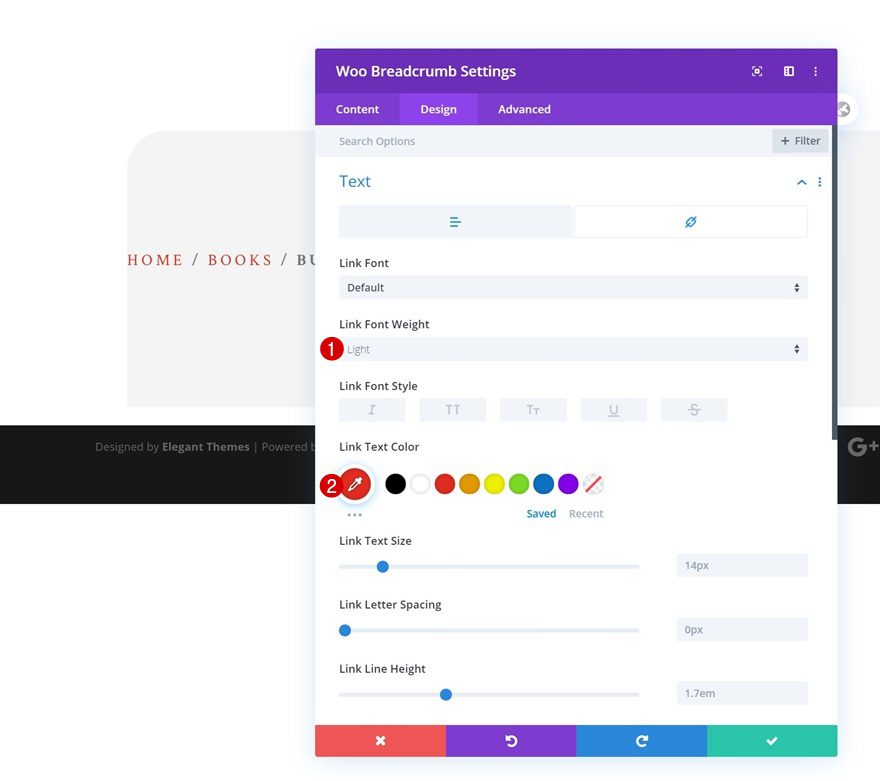
Link Text Settings
Makes some changes to the link text settings too.
- Link Font Weight: Light
- Link Text Color: #e02b20
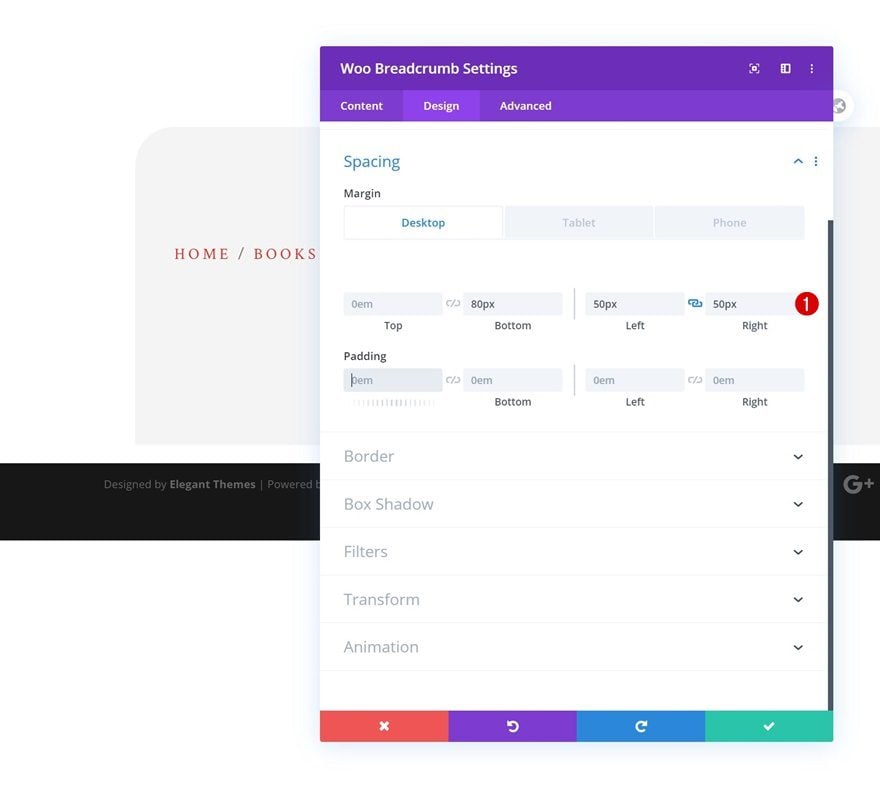
Spacing
Then, go to the spacing settings and add some custom margin values across different screen sizes.
- Bottom Margin: 80px
- Left Margin: 50px (Desktop & Tablet), 20px (Phone)
- Right Margin: 50px (Desktop & Tablet), 20px (Phone)
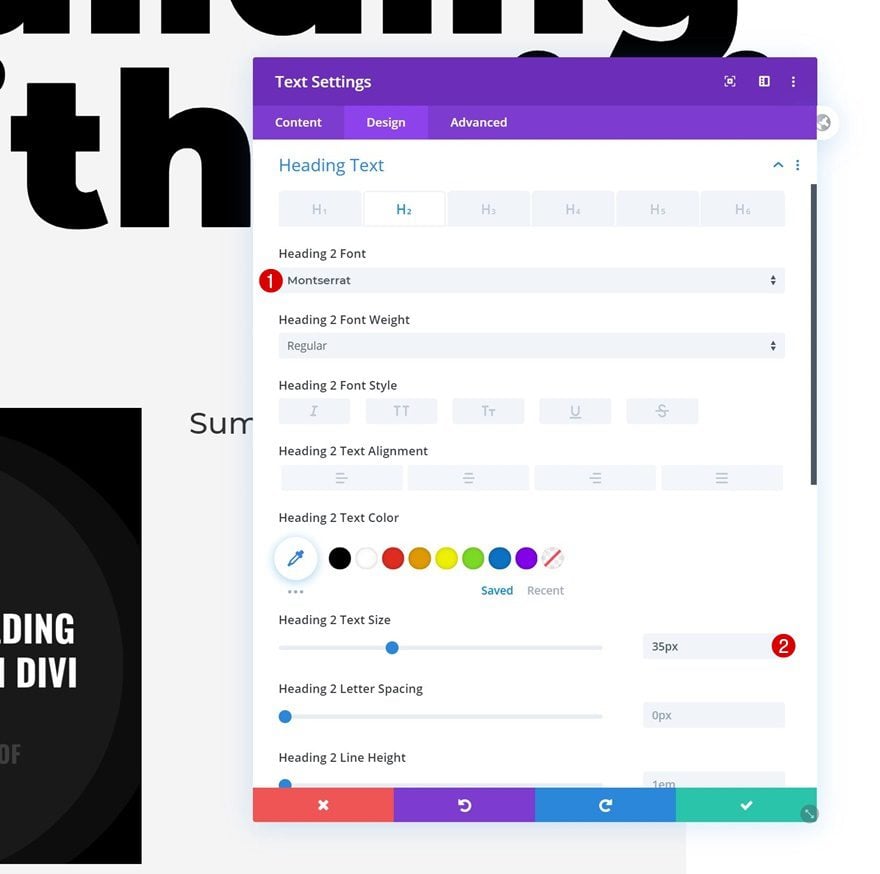
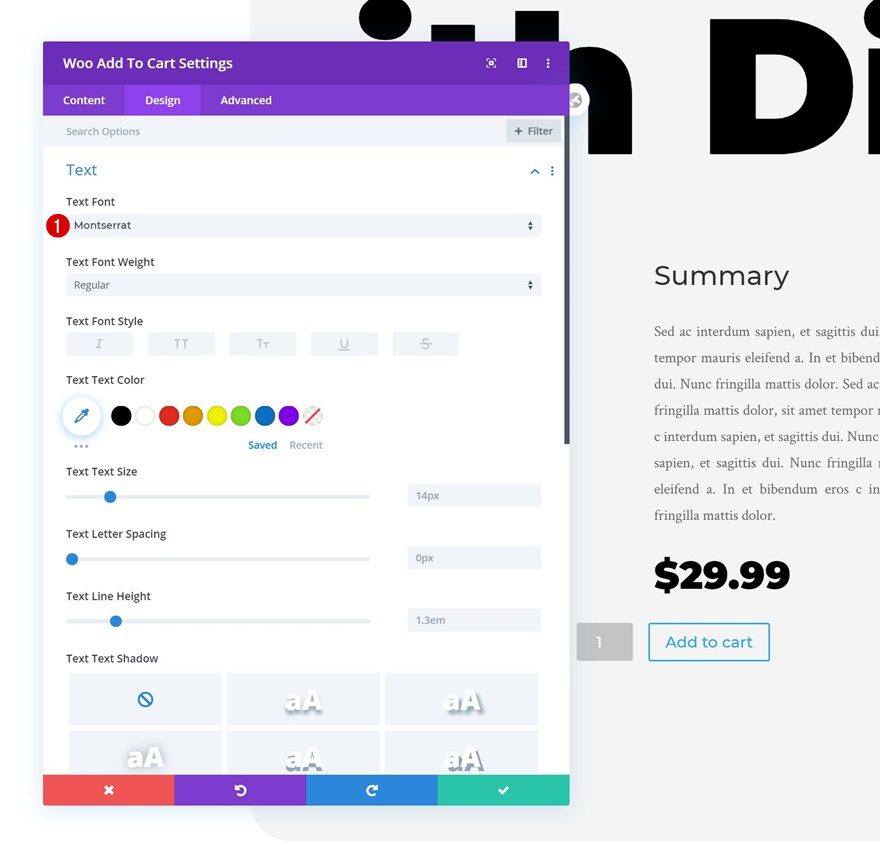
Add Woo Title Module to Column
Dynamic Content
The next and last module we need in this column is the Woo Title Module.
- Product: This Product

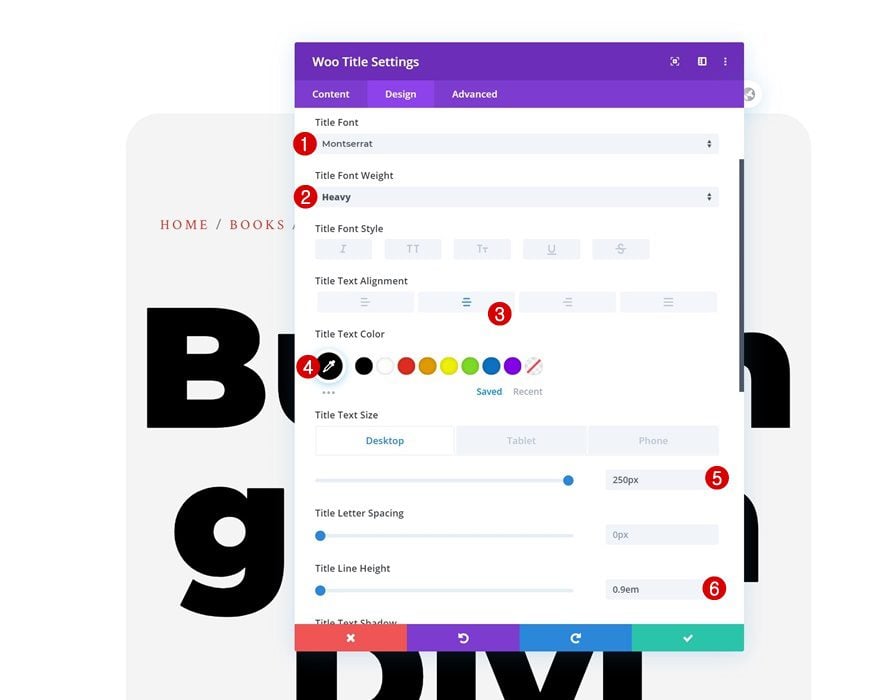
Title Text Settings
Change the module’s title text settings as follows:
- Title Font: Montserrat
- Title Font Weight: Heavy
- Title Text Alignment: Center
- Title Text Color: #000000
- Title Text Size: 250px (Desktop), 150px (Tablet), 80px (Phone)
- Title Line Height: 0.9em
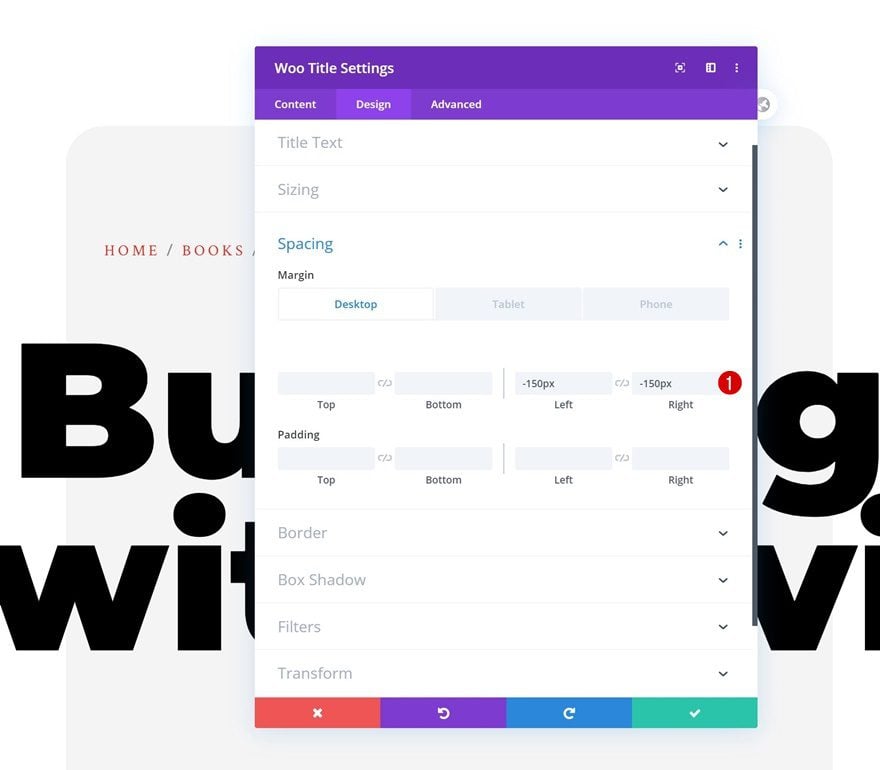
Spacing
Increase the width of the module by adding some negative left and right margin.
- Left Margin: -150px (Desktop), -100px (Tablet), -50px (Phone)
- Right Margin: -150px (Desktop), -100px (Tablet), -50px (Phone)
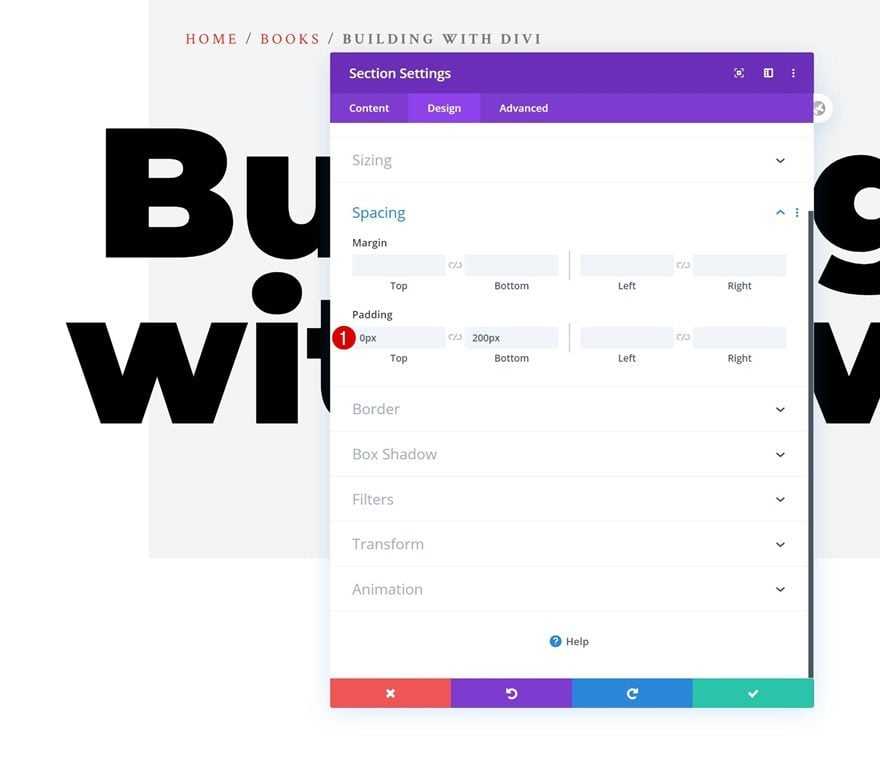
Add Regular Section #2
Spacing
Add another section right below the previous one. Modify the section’s padding values as follows:
- Top Padding: 0px
- Bottom Padding: 200px
Add Row
Column Structure
Continue by adding a new row using the following column structure:
Background Color
Without adding any modules yet, open the row settings and change the row’s background color.
- Background Color: #f4f4f4
Sizing
Increase the row’s max width next.
- Max Width: 1000px
Spacing
Add some custom bottom padding too.
- Bottom Padding: 150px
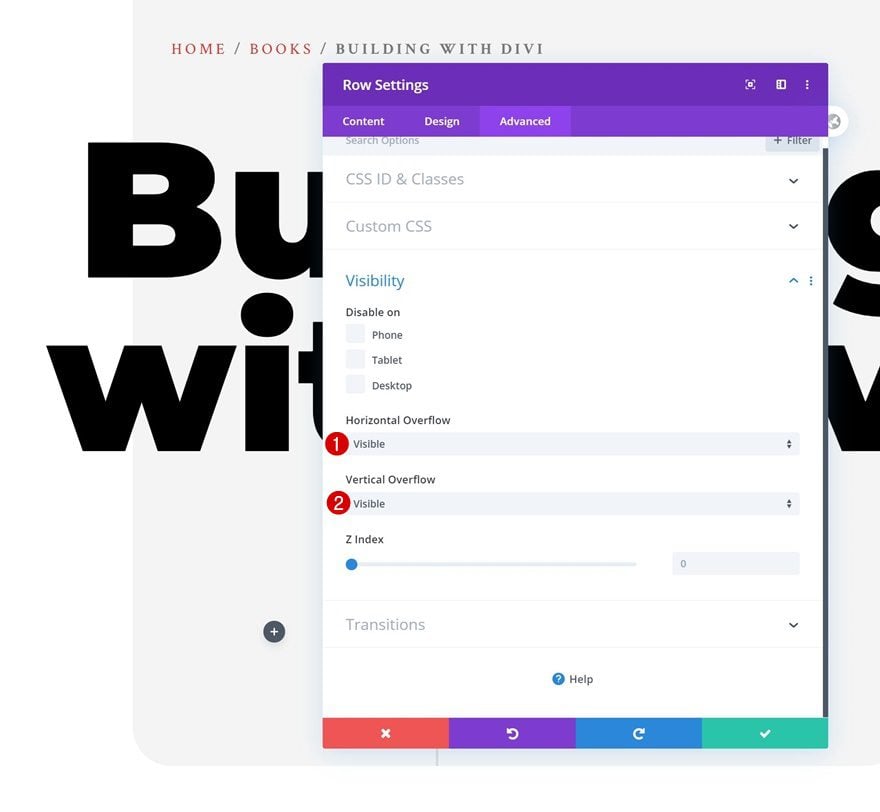
Border
Then, go to the border settings and apply ’50px’ border radius to the bottom left and right corners.
Overflows
Complete the row settings by making sure the overflows are visible.
- Horizontal Overflow: Visible
- Vertical Overflow: Visible
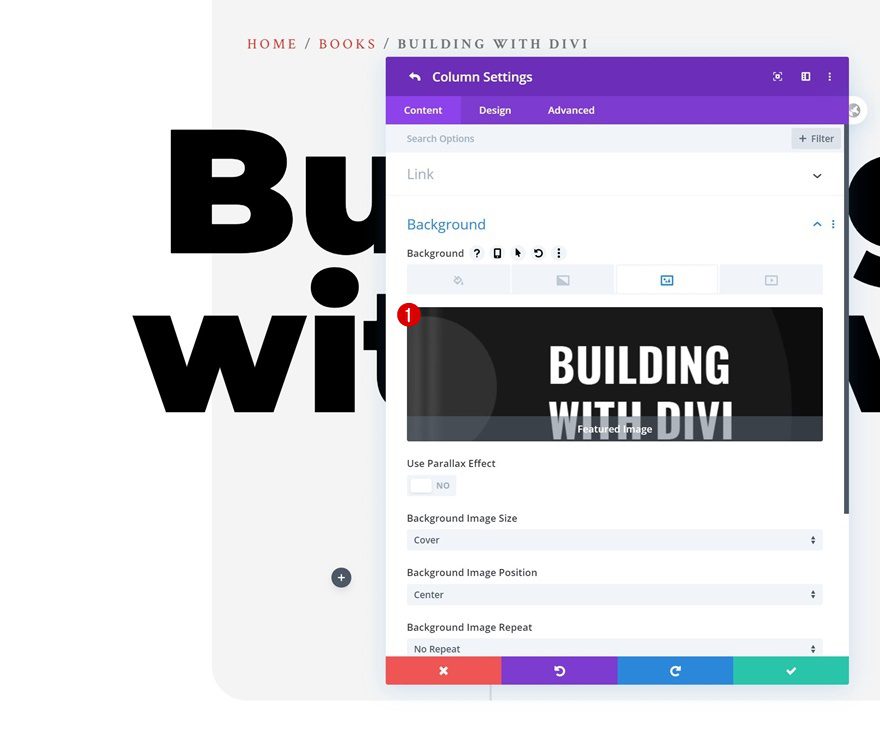
Column 1 Settings
Dynamic Background Image
Once you’ve completed the general row settings, open the column 1 settings and add the product’s featured image to the background using dynamic content.
- Background Image: Featured Image
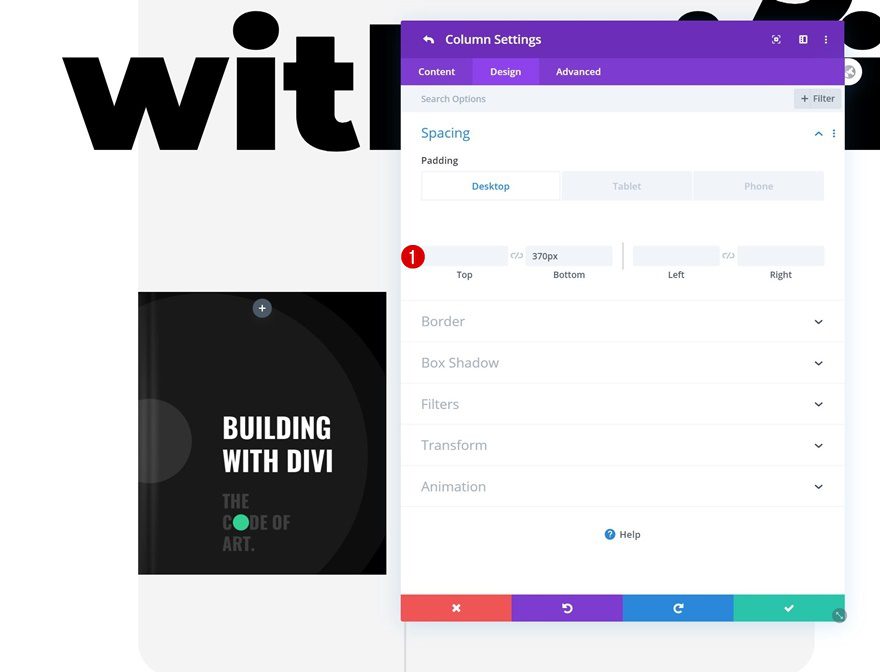
Spacing
Add some bottom padding to the column next. This will allow the background image to show through.
- Bottom Padding: 370px (Desktop), 690px (Tablet), 380px (Phone)
Add Text Module to Column 1
Add Content
Time to start adding modules! In column 1, the only module we need is a Text Module. Add some content of your choice.
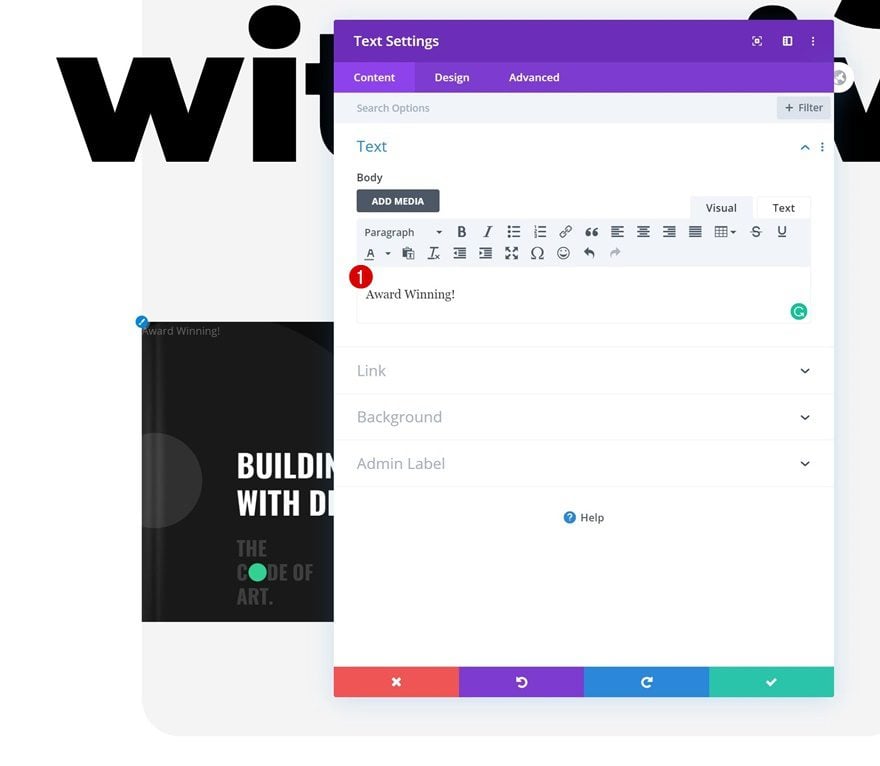
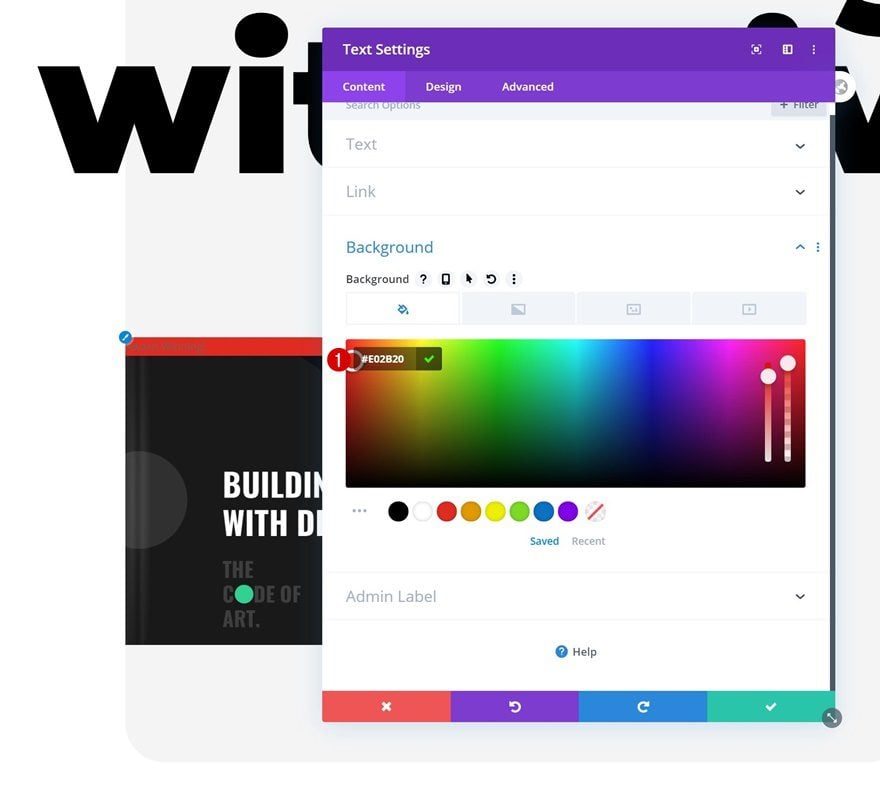
Background Color
Change the module’s background color next.
- Background Color: #E02B20
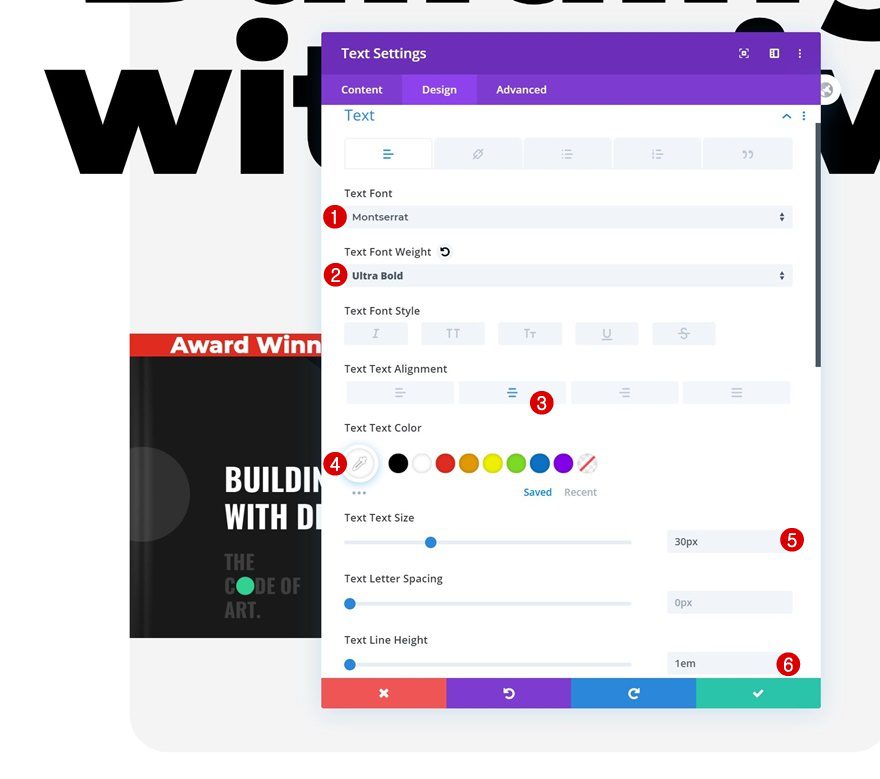
Text Settings
Move on to the design tab and modify the text settings.
- Text Font: Montserrat
- Text Font Weight: Ultra Bold
- Text Alignment: Center
- Text Color: #FFFFFF
- Text Size: 30px
- Text Line Height: 1em
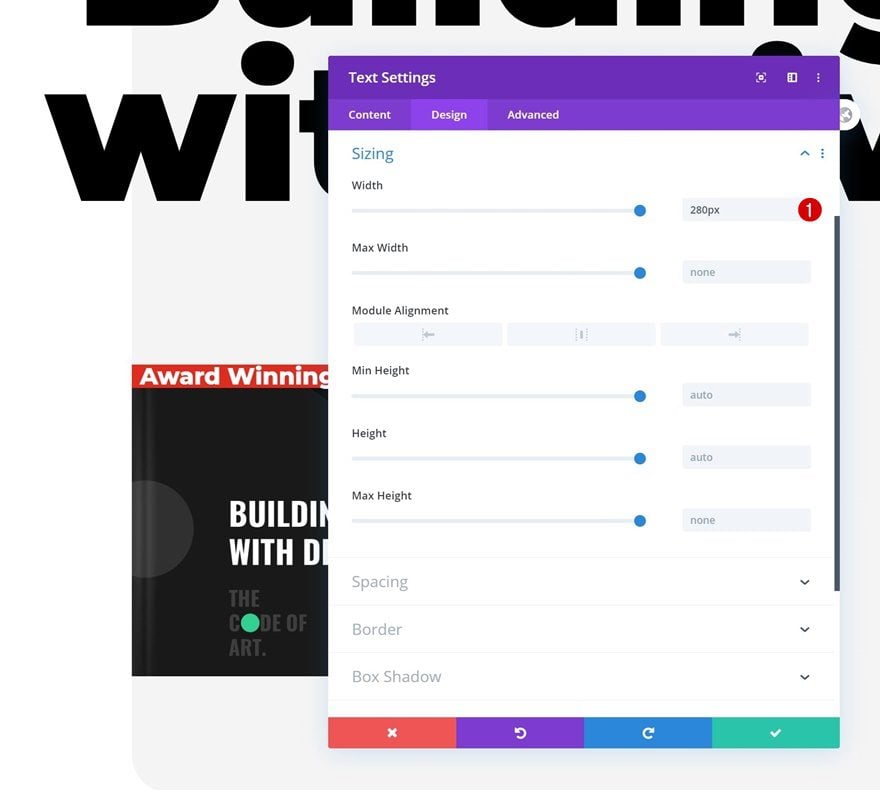
Sizing
Shrink the module’s size in the sizing settings next.
- Width: 280px
Spacing
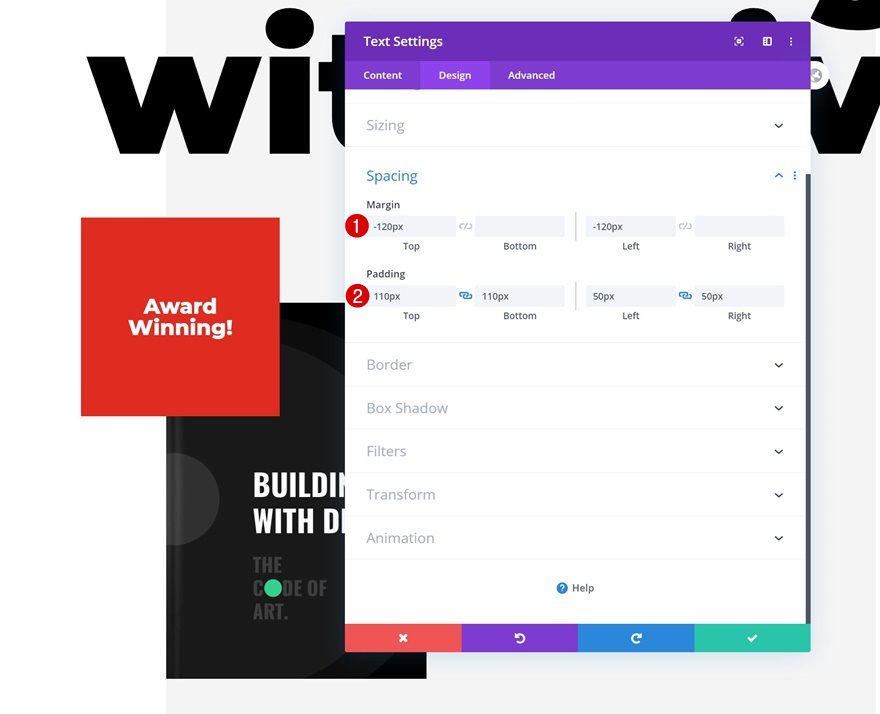
And turn the module into a square by adding some custom padding values. We’re also creating a top and left overlap using negative margin.
- Top Margin: -120px
- Left Margin: -120px
- Top Padding: 110px
- Bottom Padding: 110px
- Left Padding: 50px
- Right Padding: 50px
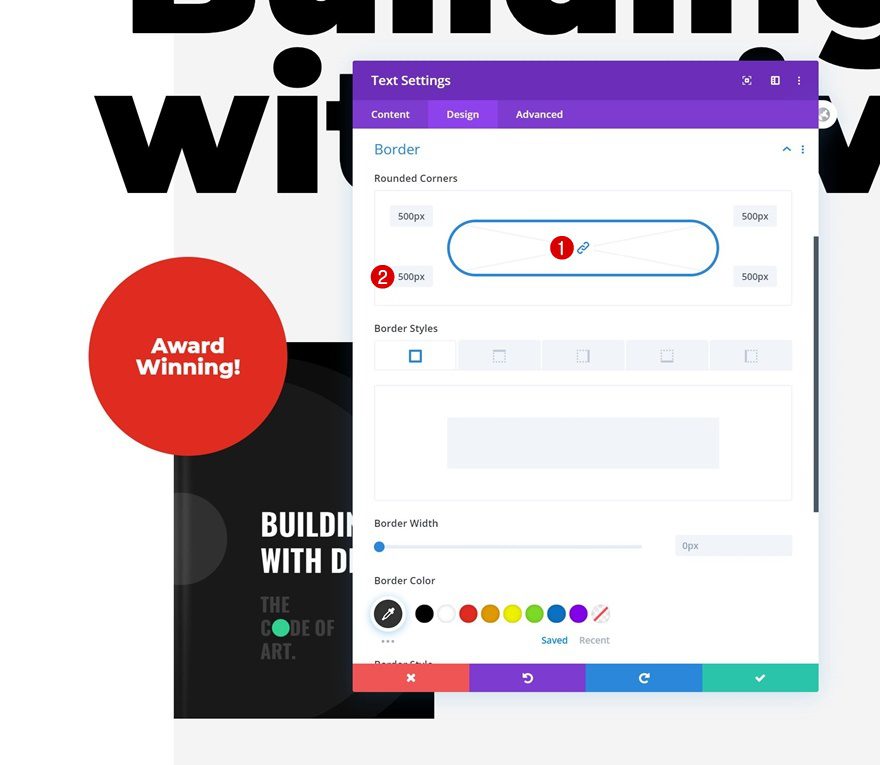
Border
To turn the square into a circle, we’ll add ‘500px’ border radius to each one of the module’s corners.
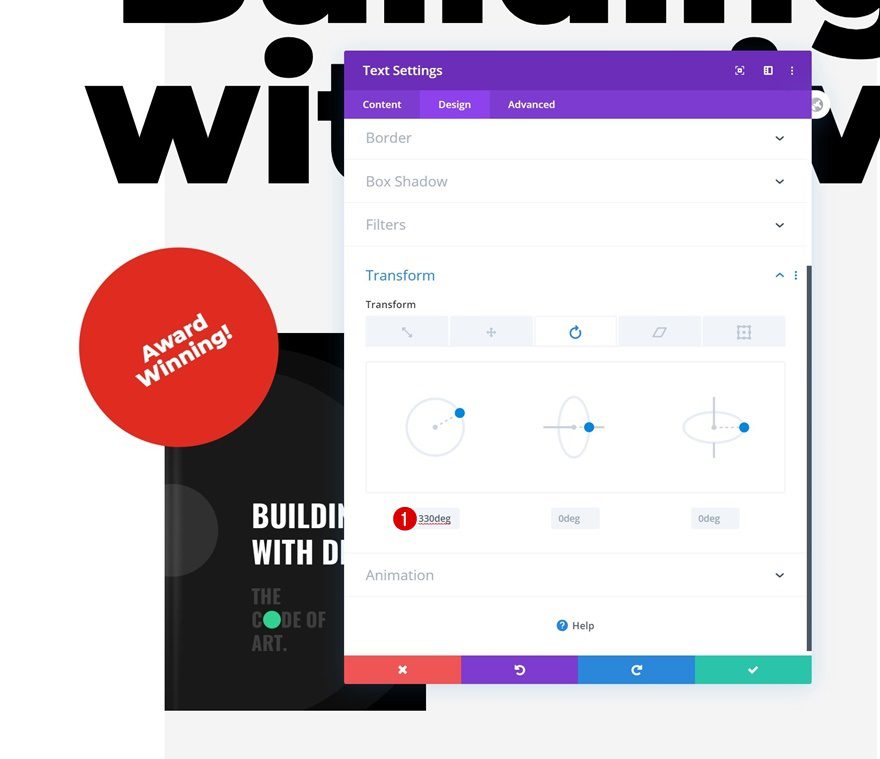
Transform Rotate
We’ll rotate the module too.
- Left: 330deg
Add Text Module to Column 2
Add H2 Content
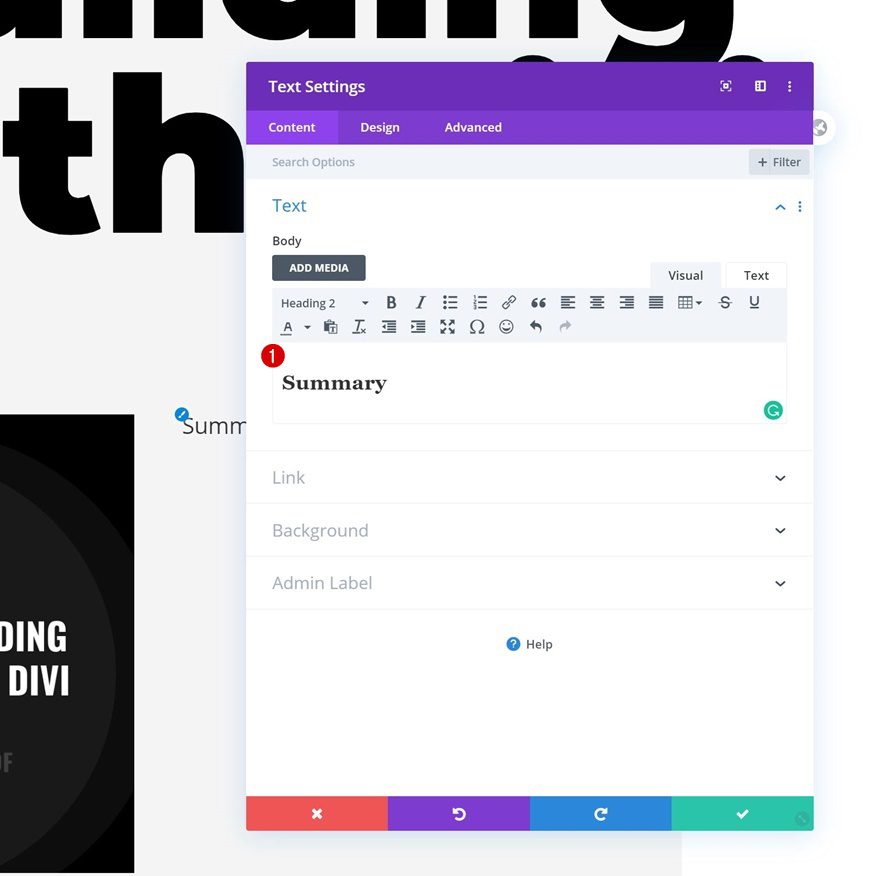
On to the second column! There, the first module we need is a regular Text Module. Enter some H2 content of your choice.
H2 Text Settings
Move on to the design tab and change the H2 text settings as follows:
- Heading 2 Font: Montserrat
- Heading 2 Text Size: 35px
Spacing
Add some custom margin values next.
- Top Margin: -70px (Desktop), 100px (Tablet & Phone)
- Left Margin: 100px (Desktop), 20px (Tablet & Phone)
- Right Margin: 20px (Tablet & Phone)

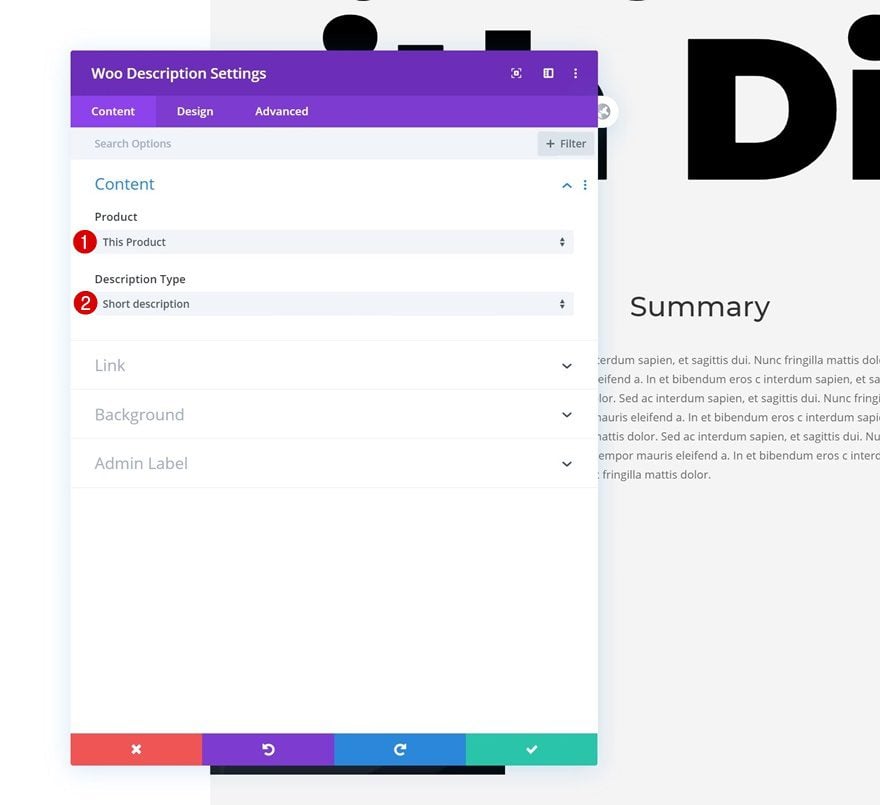
Add Woo Description Module to Column 2
Dynamic Content
The second module we need in column 2 is the Woo Description Module.
- Product: This Product
- Description Type: Short description
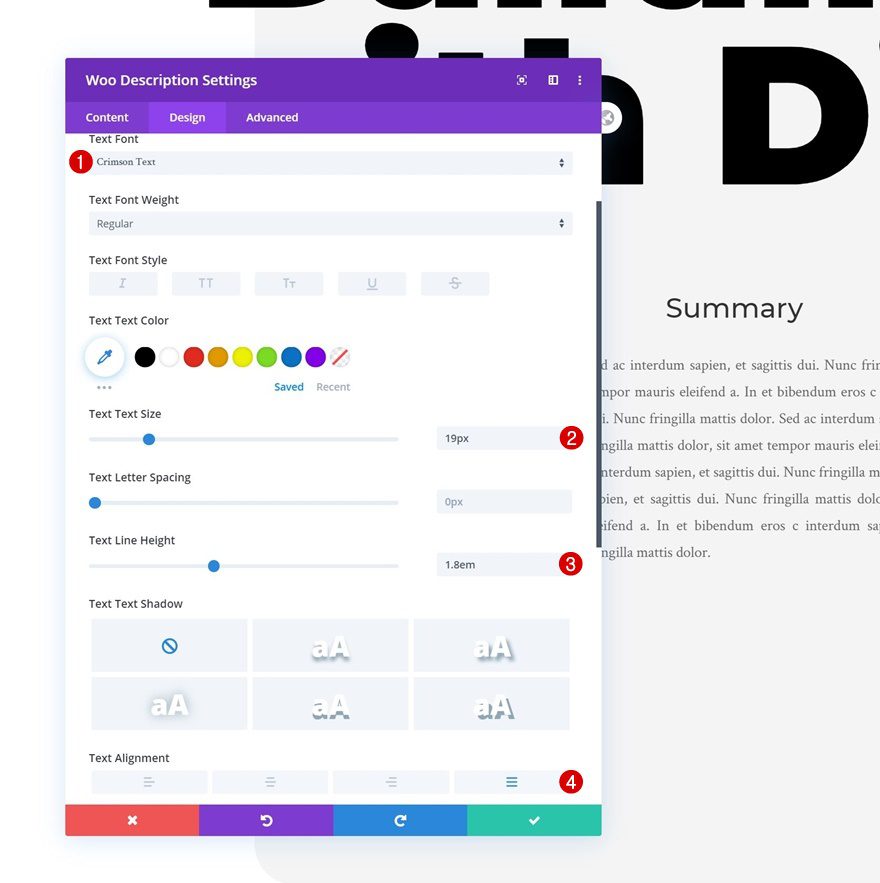
Text Settings
Change the module’s text settings accordingly:
- Text Font: Crimson Text
- Text Size: 19px
- Text Line Height: 1.8em
- Text Alignment: Justify
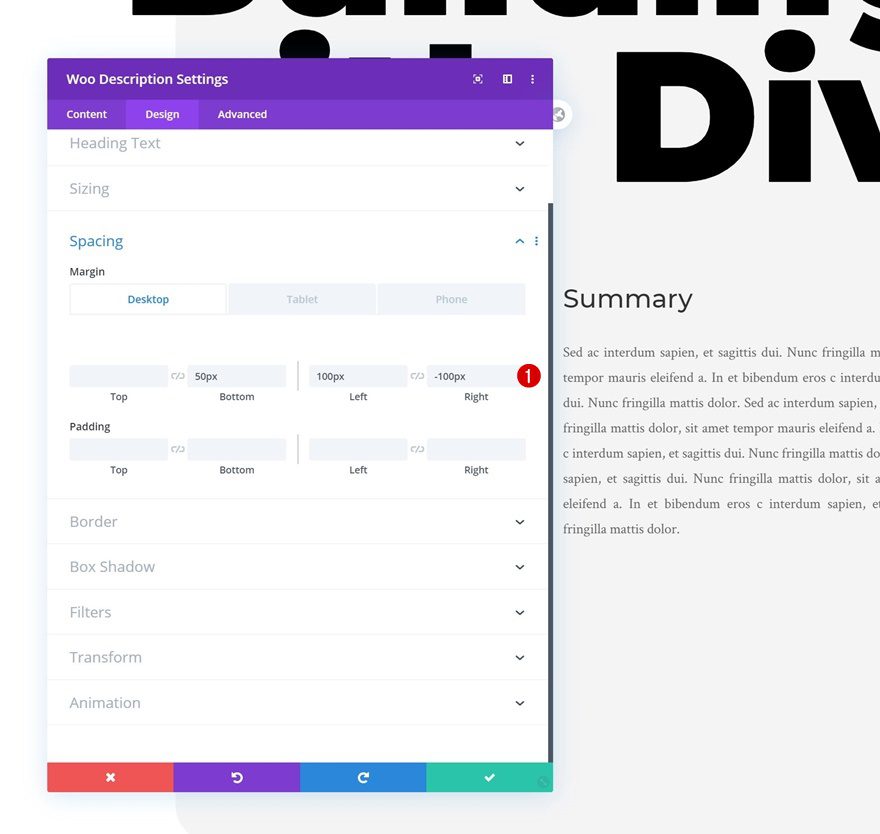
Spacing
Modify the module’s spacing values next.
- Bottom Margin: 50px
- Left Margin: 100px (Desktop), 20px (Tablet & Phone)
- Right Margin: -100px (Desktop), 20px (Tablet & Phone)
Add Woo Price Module to Column 2
Dynamic Content
On to the next module, which is the Woo Price Module.
- Product: This Product
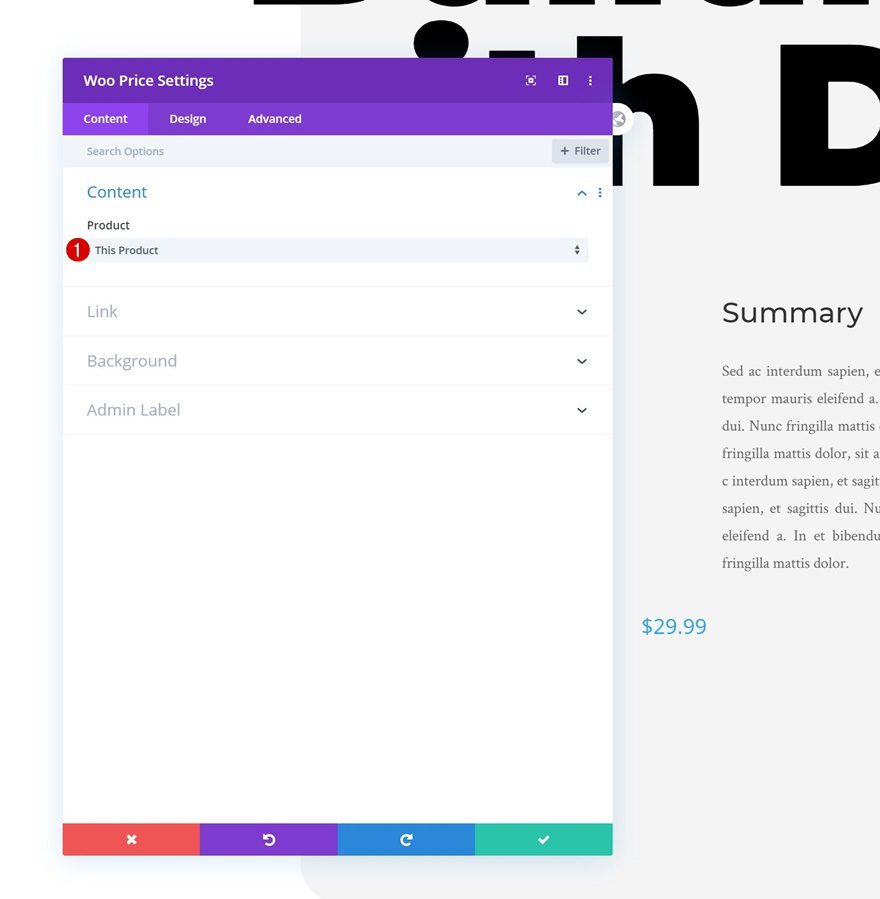
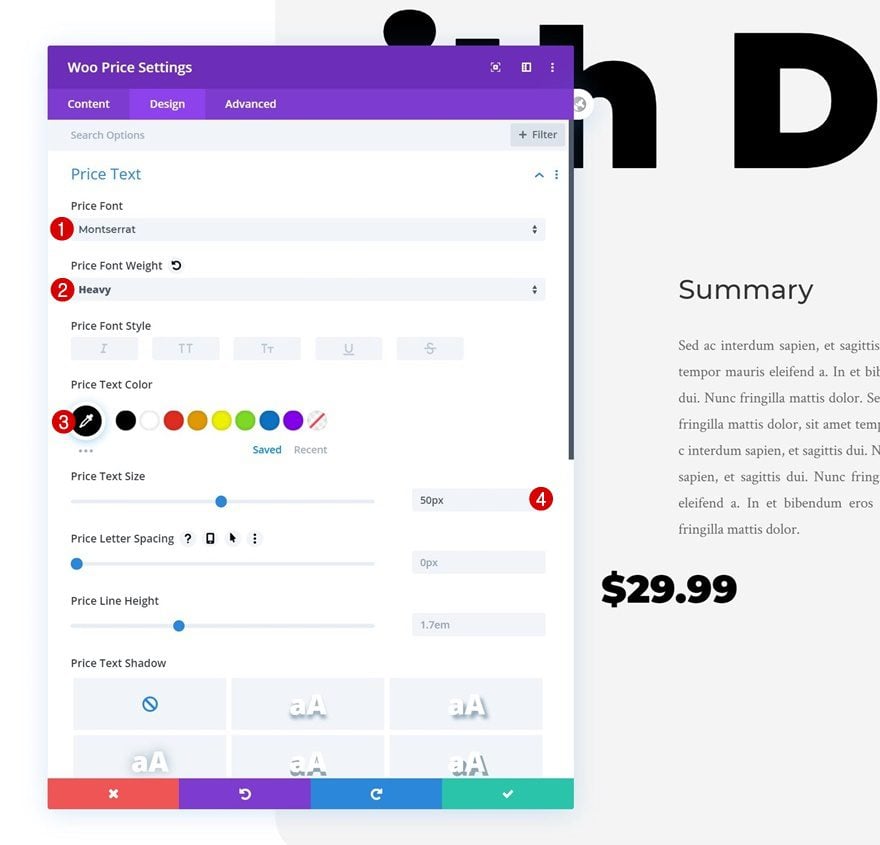
Price Text Settings
Change the price text settings as follows:
- Price Font: Montserrat
- Price Font Weight: Heavy
- Price Text Color: #000000
- Price Text Size: 50px
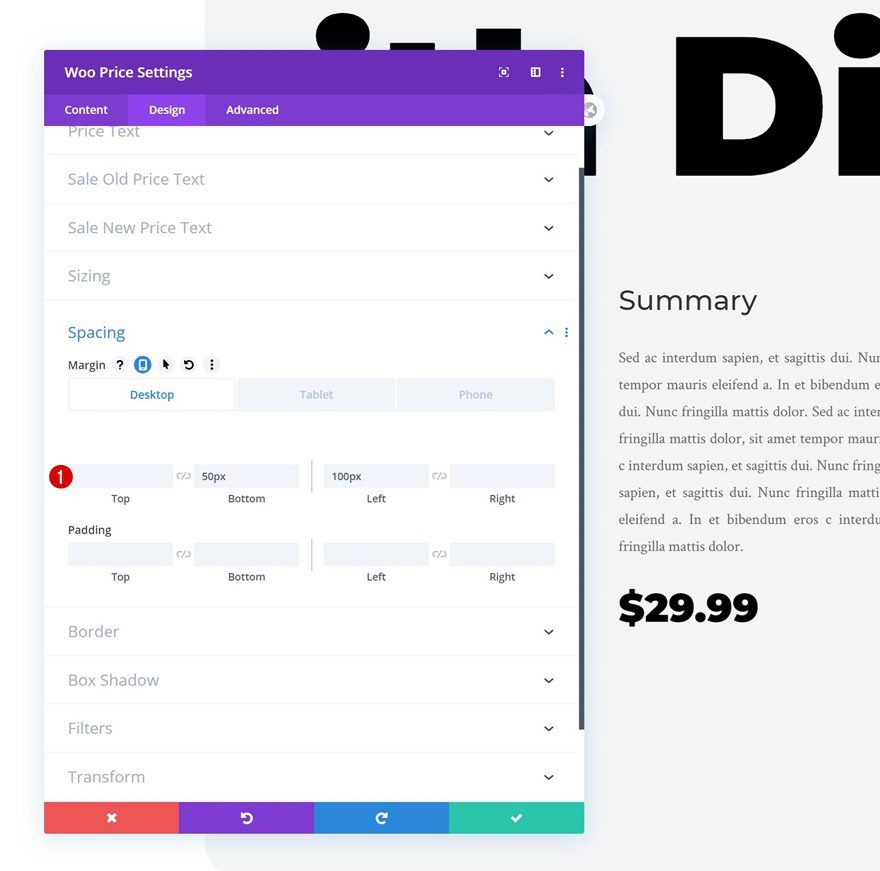
Spacing
Change the spacing settings next.
- Bottom Margin: 50px
- Left Margin: 100px (Desktop), 20px (Tablet & Phone)
- Right Margin: 20px (Tablet & Phone)
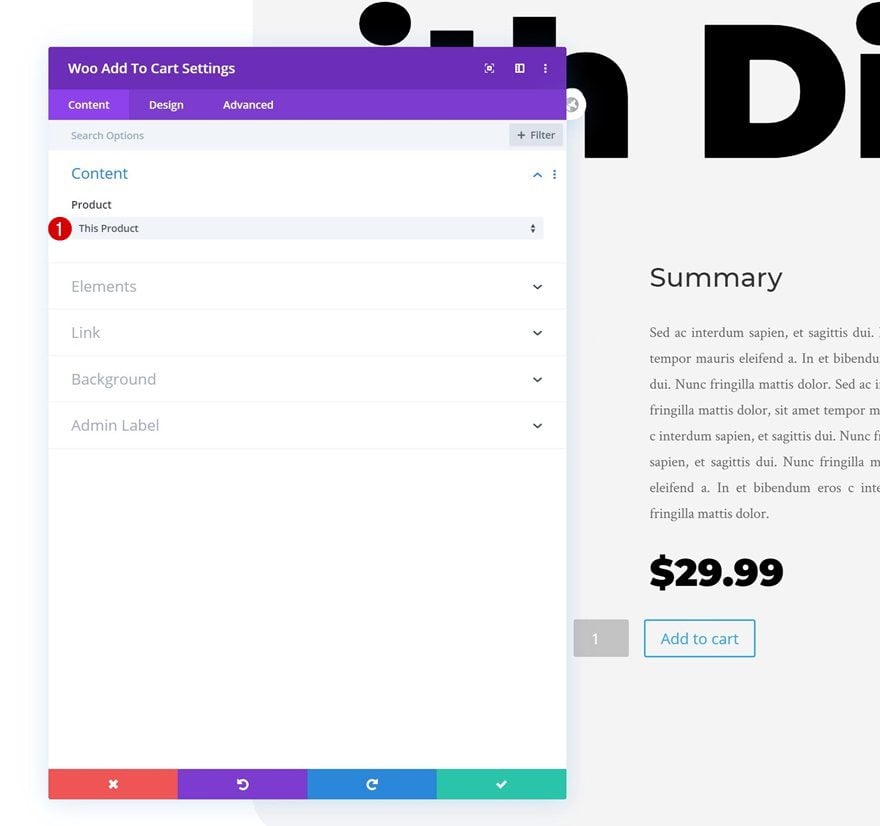
Add Woo Add to Cart Module to Column 2
Dynamic Content
The next and last module we need to complete this design is the Woo Add To Cart Module.
- Product: This Product
Text Settings
Change the text font in the text settings.
- Text Font: Montserrat
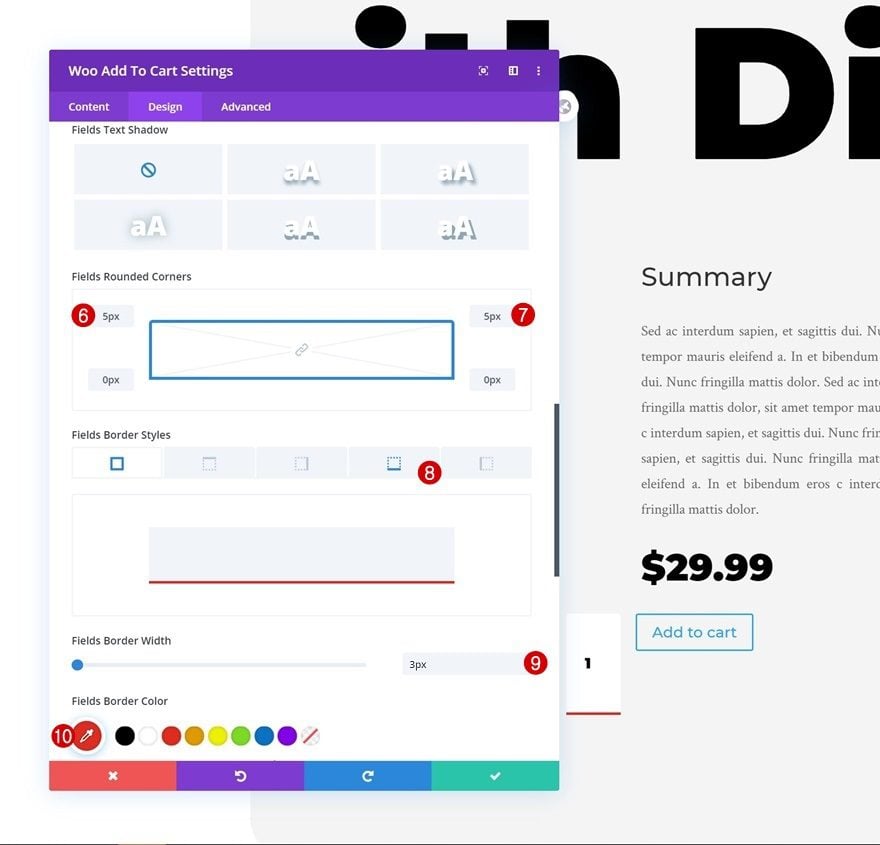
Fields Settings
Modify the fields settings next.
- Field Background Color: #ffffff
- Fields Text Color: #000000
- Top Padding: 66px
- Bottom Padding: 66px
- Fields Font: Montserrat
- Fields Font Weight: Heavy
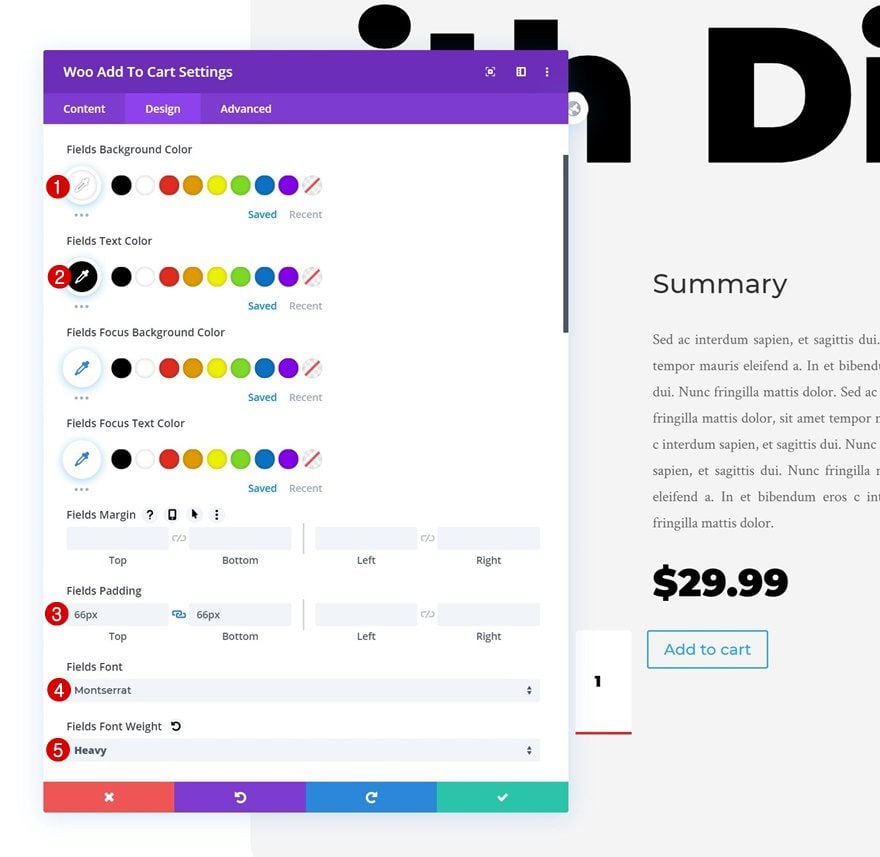
- All Corners: 5px
- Bottom Fields Border Width: 3px
- Fields Border Color: #e02b20
Button Settings
Continue by styling the button.
- Use Custom Styles for Button: Yes
- Button Text Color: #ffffff
- Button Background Color: #E02B20
- Button Border Width: 0px
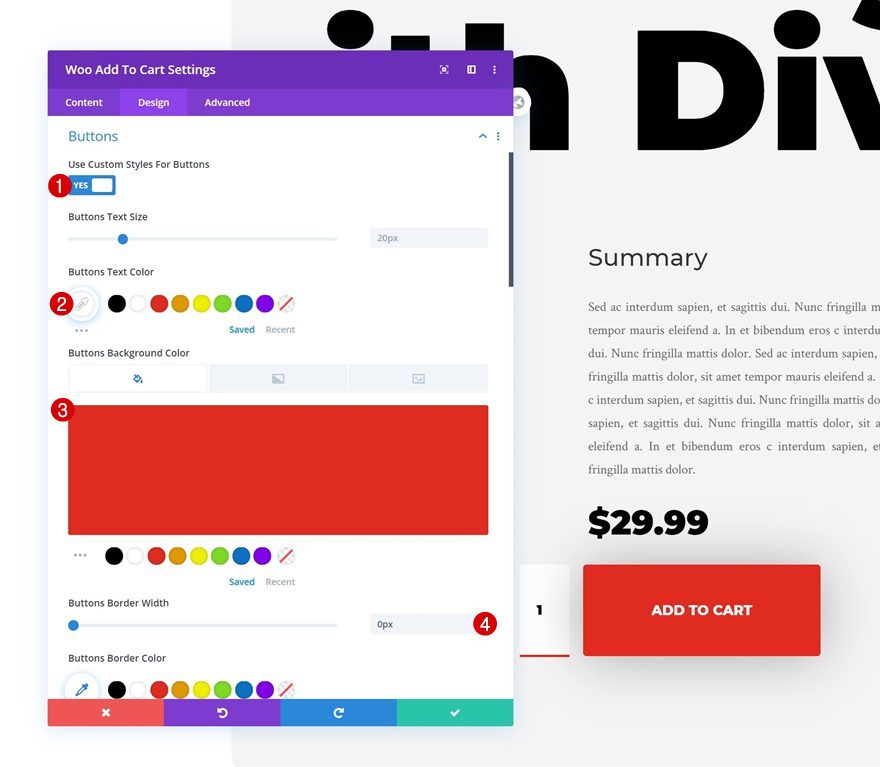
- Button Border Radius: 5px
- Button Font: Montserrat
- Button Font Weight: Ultra Bold
- Button Font Style: Uppercase
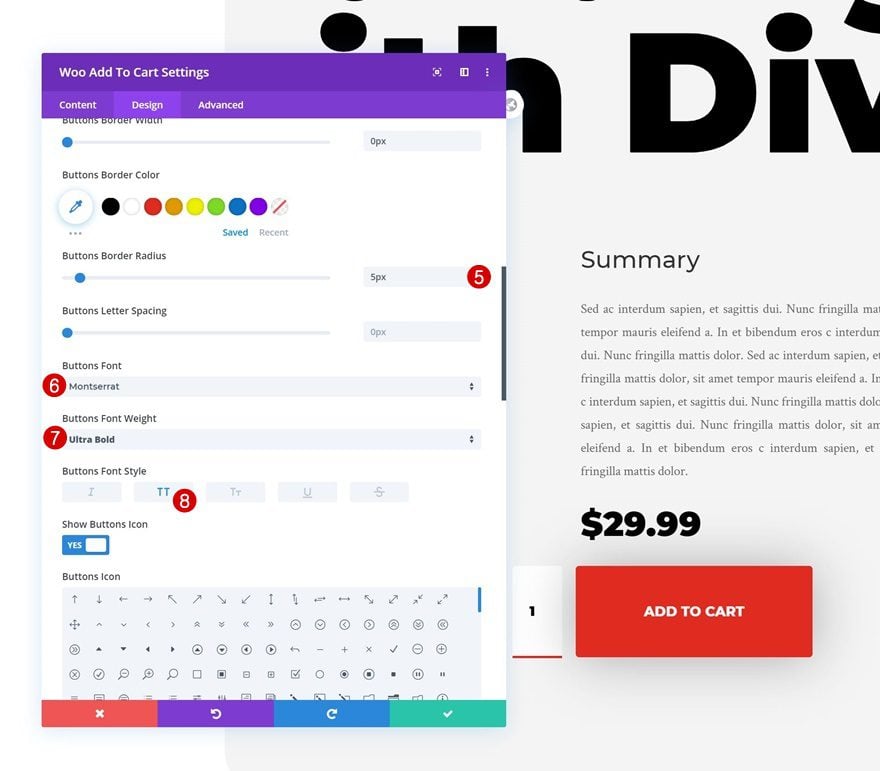
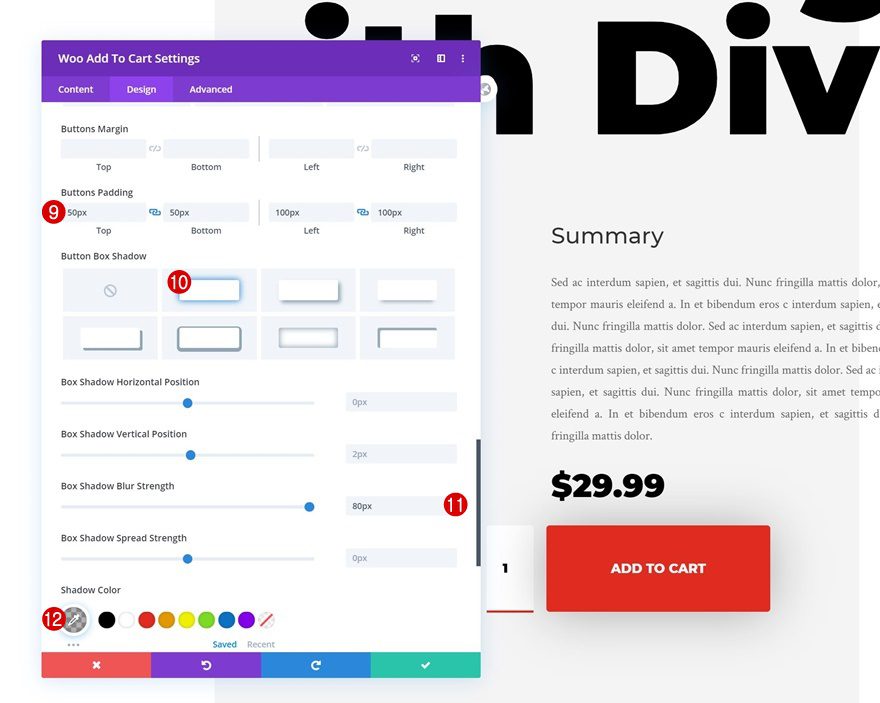
- Top Padding: 50px
- Bottom Padding: 50px
- Left Padding: 100px (Desktop), 50px (Tablet), 20px (Phone)
- Right Padding: 100px (Desktop), 50px (Tablet), 20px (Phone)
- Box Shadow Blur Strength: 80px
- Shadow Color: rgba(0,0,0,0.3)
Spacing
Complete the module’s design by adding some left and right margin values across smaller screen sizes and you’re done!
- Left Margin: 20px (Tablet & Phone)
- Right Margin: 20px (Tablet & Phone)
Preview
Now that we’ve gone through all the steps, let’s take a final look at the outcome across different screen sizes.
Final Thoughts
In this post, we’ve shown you how to create a stunning bold product page with a clean look and feel to it using Divi’s new WooCommerce Modules. Bold product pages have a unique way of putting your product in the spotlight. You were able to download the JSON file for free as well! If you have any questions or suggestions, feel free to leave a comment in the comment section below!
If you’re eager to learn more about Divi and get more Divi freebies, make sure you subscribe to our email newsletter and YouTube channel so you’ll always be one of the first people to know and get benefits from this free content.


Thank you for your tutorial. It gives us some ideas of what can be achieved!
But I was not looking for the details of it. The one thing I was looking for was missing.
How do you apply this to all products as a template? It should not be necessary to do anything of this for the shop manager. We need to be able to add thousands of products and get the same look.
Also, how do we apply it to only one category? Each category should be able to have it’s own look.
Very thorough Donjete! Thank you very much! I may be able to use this tutorial and see if I can adopt the same using the Divi Pricing Tables. Any suggestion? Thanks.
I’m new to this – template downloaded fine it works and I’ve tweaked it a bit to get it to better fit the screen. Now, do I need to do this for each product I add, or is there a way to get this applied to any new product I create automatically?
Thanks!
Great post, loving this new feature 🙂
Really, you explain it very well. Thanks for such a nice piece of information.
Nice! Thank you! Very easy to follow!
Bravo for all things ebooks/books. Thanks for this!
I tried down loading the new Woo Commerace Clean and Bold but the folder is empty and nothing will load up into Divi…