

One of Divi’s main goals is to make sure that every element on your website looks good, and blog posts are no exception. However, there’s always room for improvement, and color coding your blog posts by author offers a way for users to navigate your content more efficiently (as well as identifying their favorite writers!).
In this article, we’re going to talk more about why you may want to color code your Divi blog posts, and how to do it in two simple steps. It’s time for a new coat of paint!
Why You Should Consider Color Coding Your Divi Blog Posts
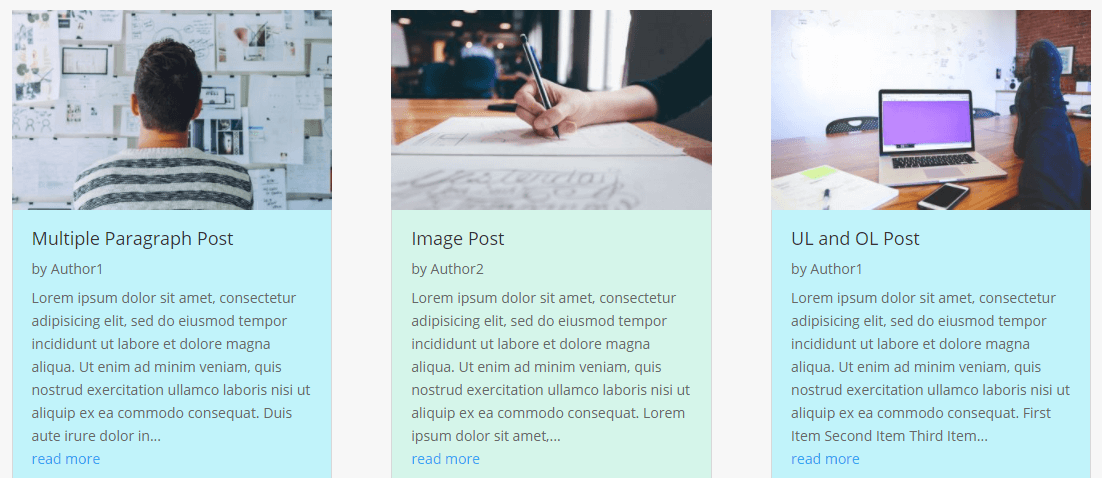
Before we go any further, let’s clear up what we mean by color coding your Divi blog posts. In the next section, we’re going to teach you how to assign each of your writers a color that will appear as the background for their own posts. In this example, I assigned my own posts (as author1) a very fetching light blue:
The effect itself is relatively simple, but it offers an impactful way to differentiate writers. Users can easily recognize new pieces by their favorite writers at a glance. Of course, making the author’s name more prominent may have the same effect, but it may not be as visually striking.
Your only concern with this is your choice of colors. Take the screenshot at the beginning of this section for example – our Divi blog index uses a white background, so we decided to stick with light pastel colors for our authors’ posts. Let’s see what happens if we choose a different color scheme:
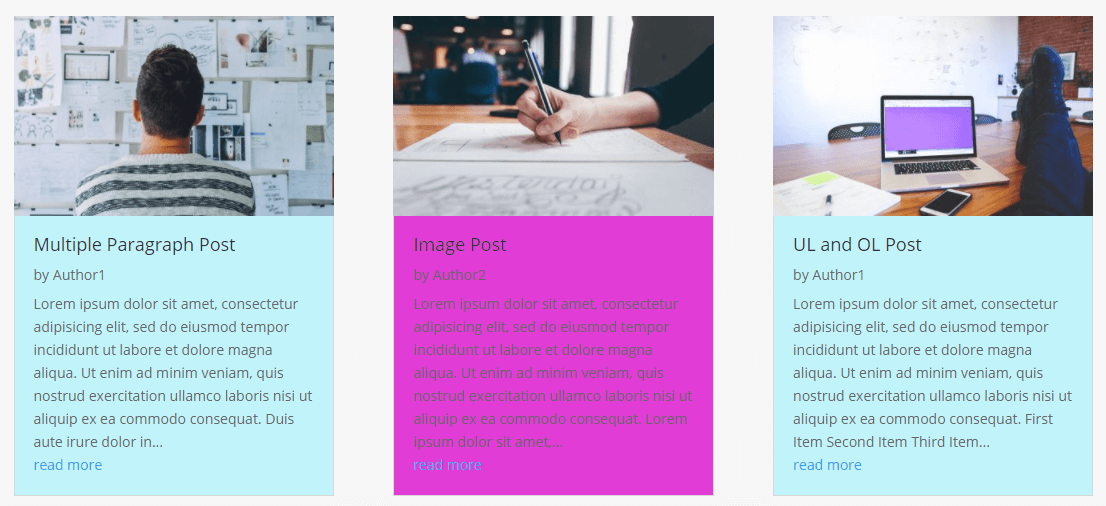
Of course, that’s an extreme example, but it helps us illustrate our point. If you want to color code your posts, you’ll need to consider your palette carefully, using a suitable tool to help if necessary. Using contrasting colors to highlight the difference between each post can help users identify authors quickly, but it can also play havoc with your blog’s style and make it hard to read your content.
Now we’ve covered the theory, it’s time to move onto how to actually color code Divi blog posts. Enabling this feature only takes two steps, but there are some considerations to make before beginning.
For starters, you’ll want to back up your WordPress site, which is always a good idea when making changes. Secondly, you’ll want to create a Divi child theme, so your modifications will remain once the theme is updated.
Finally, you’ll need to use an FTP client for step number one. We’ll be using FileZilla, but if there’s another tool you prefer, go for it.
Step #1: Add a Code Snippet to Your Child Theme’s functions.php file
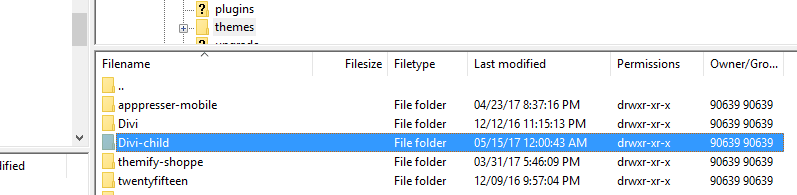
To do this, you’ll need to open your FTP client and log into your site’s server. From there, head to the public_html/wp-content/themes/ directory, then find your child theme’s folder. Keep in mind, the public_html or root folder may be named www or after your site’s domain, depending on your host:
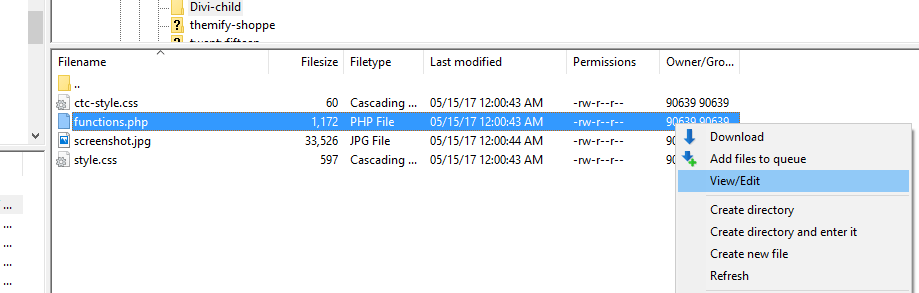
Once you’ve located your child theme’s folder, open it and look for the functions.php file within. Now, right-click on it and hit the option that reads View/Edit:
This will prompt you to open the file with your default text editor. Since we’re dealing with a child theme, your functions.php file should be mostly bare aside from enqueuing its parent’s functions. We’re going to add a snippet that automatically creates a new class for each of your authors with the author- prefix. For example, if you have a WordPress user named John, you could use the author-john class. This will enable us to add some CSS code later on.
Next, add the following PHP snippet after the // END ENQUEUE PARENT ACTION line:
function et_set_author_class( $classes ) {$classes[] = 'author-' . strtolower( str_replace( ' ', '-', get_the_author() ) );

return $classes;}

add_filter( 'post_class', 'et_set_author_class' );
Now save your changes, close the editor, and you’re done! Keep in mind you’ll need to use lowercase characters for your class to work, regardless of which author you’re dealing with. That’s going to be important for step number two.
Now our new function is ready, the next step is to set a color for each of your authors. Divi enables you to do this with its Custom CSS feature, since any code you add there will affect your entire theme. To find it, go to your WordPress dashboard and navigate to the Divi > Theme Options tab, then scroll down to the Custom CSS box at end of the page:

You’ll need to add a new line of CSS within this field for each of your authors. For example, if you have an author with the username author1 here’s how you’d set a particular color for them:
.author-author1 {background-color: #C1F3FA !important;}
Keep in mind you need to add the author- prefix to your class, regardless of your username. After indicating a background color, you also need to make sure to declare the code is !important. Simply put, this gives the code more weight and overrides any conflicts that might arise – without it, this feature won’t work.
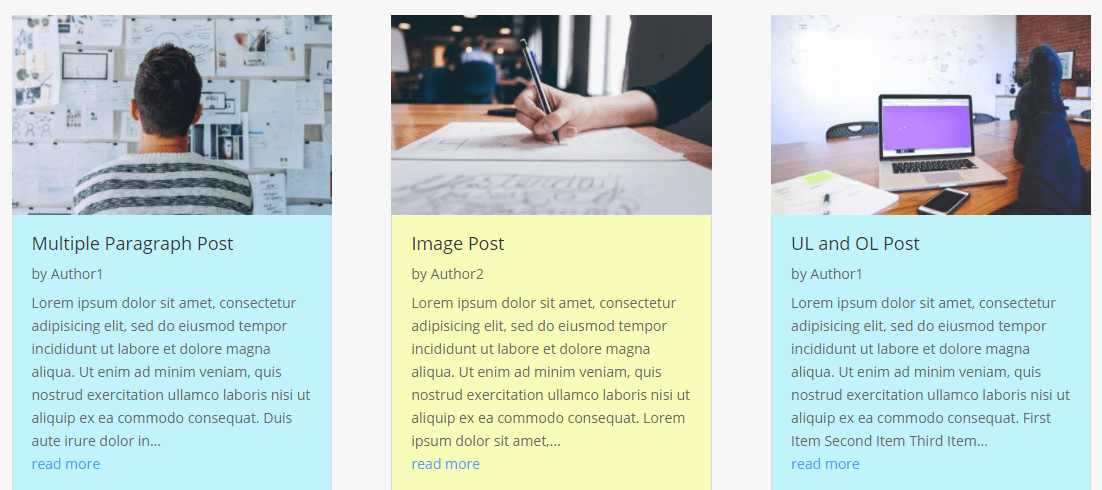
Let’s go over one last example. In this, we’ll assign different colors to two authors. Here’s the code we added to our Divi custom CSS field:
.author-author1 {background-color: #C1F3FA !important;}

.author-author2 {background-color: #F9FCB8 !important;}
Now, here’s what that looks like from the front end:
Putting aside your choice of color, there are other tweaks you can make to your Divi blog posts. For example, you can tweak the length of your blog excerpts or style your post ‘cards’ in multiple ways. Your main goal should be to find the perfect style for your own blog, so don’t be afraid to play around with Divi and see what it can do!
Conclusion
Color coding your blog posts by their author is a simple feature that can help the user navigate your content much more easily (particularly if you have an extensive archive). Plus, a lot of your users will probably appreciate being able to recognize their favorite author’s posts by color alone.
Before you start tweaking files, remember to back up your site and set up a child theme, so your changes will persist in the future. Once that’s done, these are the two steps you need to follow to color code your Divi blog posts by author:
- Modify your child theme’s functions.php file.
- Specify a color for each of your authors using Divi’s custom CSS option.
Do you have any questions about how to color code Divi blog posts by author? Ask away in the comments section below!
Article thumbnail image by RaZZers / shutterstock.com.


Very nice set, thank you!
You’re welcome; thanks for your comment. 🙂
This is great! I was wondering about such a idea for a while! Thank you!
You’re welcome, Jordan! 🙂
Nice! Is this easy to tweak to be used for color coding based on post categories?
Thanks for commenting, Marcel! Check out our response to Eric above. 🙂
Same here: I would very much like to see a tut on how to color code by post category.
Hi Eric; check out our forums (https://www.elegantthemes.com/forum/) to see if any other users have advice on how to do that. 🙂
Thanks – a tutorial on how to color code by post category would be awesome!
If you look at the DOM Structure of the Blog Module you will notice a category-specific css class is already there … use it to style the article elements 🙂
Pascal,
damn, you’re absolutely right! Never checked that, maybe expecting it to be part of some Divi setting. But I can see that categories get the style prefix ‘category-‘ and even tags have a prefix ‘tag-‘.
Gonna use it right away in an upcoming project, was looking for this.
Thanks for your input, very helpful.
How would you do this with categories instead of authors?
Hi Anita! The process would be similar, but would likely require a few tweaks. We’d recommend checking out the forums (https://www.elegantthemes.com/forum/) to see if another user can help out.
+1 Both great ideas!
Yes that would be awesome.