

In this post, we’re going to discuss some tips and tricks for the Bloom opt-in settings on your website. There are various opt-in settings you can assign to the opt-in forms; whatever kind of opt-in form you may be using.
Besides paying attention to finding (and creating) a matching layout, giving your behind-the-scenes opt-in settings some thought should be one of your priorities since it’ll partly determine which results you get. There are different tips that might help you generate a lot of conversions but in the end; remember that every setting depends on the kind of audience you have and its behavior.
No audience acts the same. Therefore, it’s important to take the tips and tricks, put them into practice and see which one works best for both you and your audience by measuring the results that come forth.
Choosing Your Opt-In Type
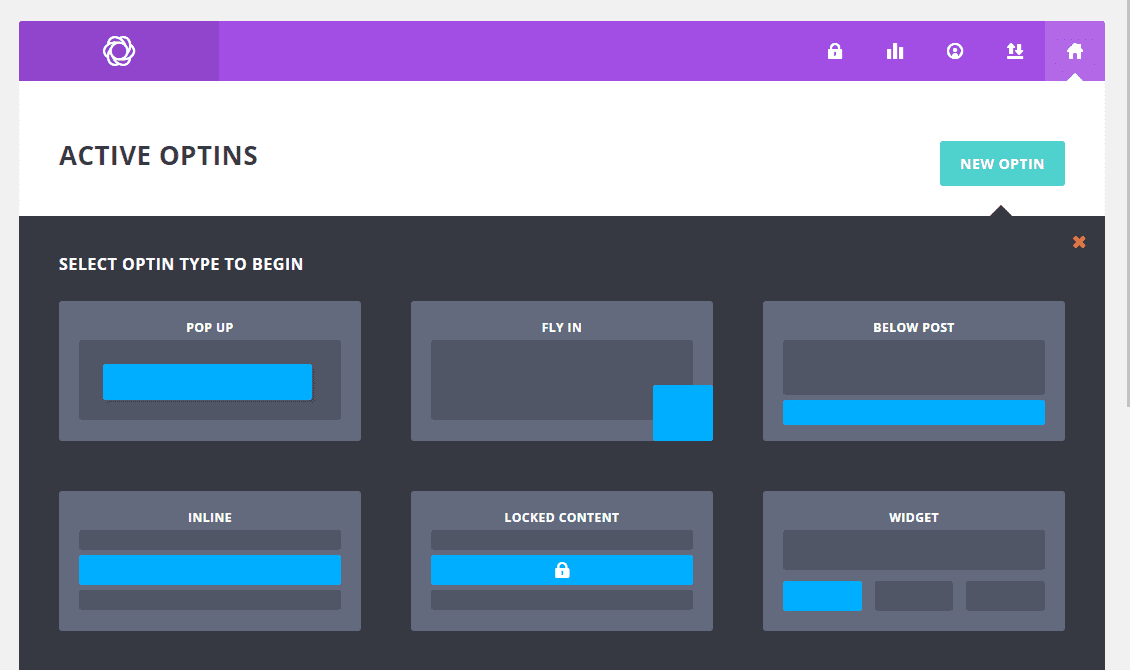
One of the first choices you’re faced with when creating opt-in forms on your website is; what type of opt-in form do I use? The way you design and display your opt-in forms will have an immediate effect on how the visitors feel when they’re on your website. That’s why it’s worth looking into the different pros and cons of different types of opt-in forms to determine which ones would work best for your website.
There are different factors that influence your decision-making process. In the next part of this post, we’ll handle two of them; the level of invasiveness and previous results.
Level of Invasiveness
It’s no secret that some kinds of opt-in forms are more invasive to visitors than others. Take the pop-up opt-in form, for example. Although many websites use them around the web, there are people who deliberately choose not to take advantage of a pop-up opt-in form because of how it invades the internet bubble visitors have.
But there are good things about the pop-up too, such as the visibility. When the opt-in form pops up, 100% of the visitor’s attention is on it and in many cases, the pop-up form increases conversion rates tremendously.
The fly-in opt-in form, on the other hand, is more easily ignored. If you don’t want to approach your target audience as ‘invasive’ as a pop-up form does, but you still want to draw attention through a sudden happening, the fly-in opt-in form is a good alternative.
One of the benefits a fly-in has, in comparison with the inline or below post opt-in form, for example, is that it still has that ‘interrupting’ effect that may stimulate visitors to take certain kind of action but without it taking up the whole screen.
Use of Triggers
If you do prefer using the pop-up opt-in form, one of the things that can make your opt-in forms less invasive is using triggers. With Bloom, you have different triggers in the opt-in display settings which you can use to approach your visitors in a more subtle way. You can trigger:
- after inactivity
- at the bottom of post
- after commenting
- after scrolling
- after purchasing
- on click

By using a trigger, you’re already sure the visitors are interacting with your website and that they’re already interested in the content that you’re providing. The more interested your visitors are, the more likely they are to interact with you and decide to join your email list.
Previous Conversion Results
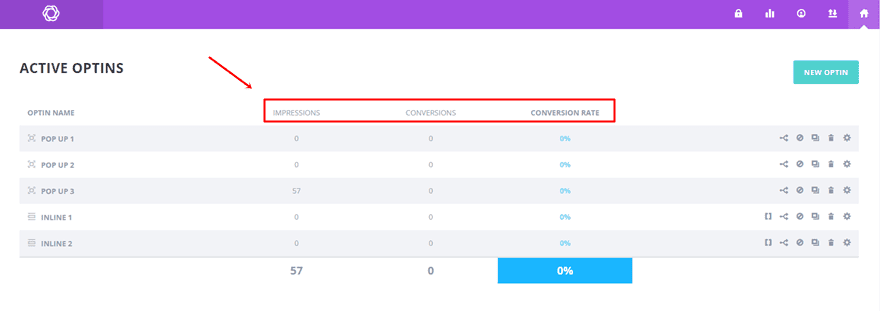
Another thing that hugely influences the decision-making process is previous results. Data doesn’t lie and is usually the best kind of argument when making the decision on which opt-in forms you choose.
Take different factors into account when you review previous results such as impressions, conversions and conversion rates. All of this data gets summoned in the Bloom plugin–making it easy for you to change approaches quickly.
Choosing The Opt-In Delay Time
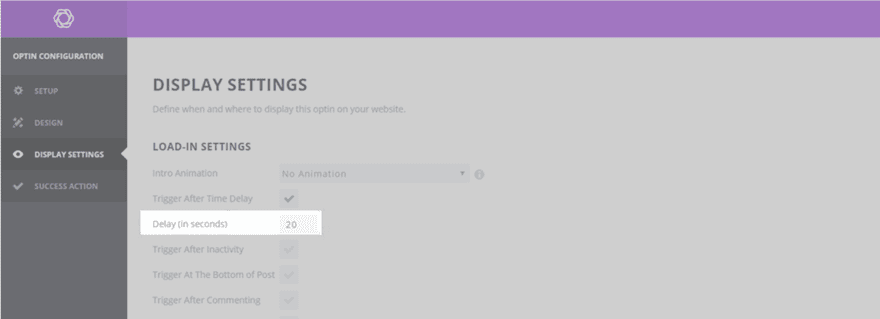
When it comes to the delay time, many website owners/marketers like to let their visitors look around for a while. They wait before they confront them with a pop-up or fly-in opt-in form. The idea behind this delay is that the longer the visitors are staying, the more likely they are to enjoy the provided content. That’s why they’d be more accepting of pop-ups that show up.
Before deciding on the delay time, it’s good to know what the average stay of your visitors on your website is by looking at your website’s Google Analytics. Because there really is no general right delay time, it all depends on what the results are saying. From UX perspective, the right kind of time to have an opt-in form suddenly show up is never at all. But to get the conversion and results you want, you have to find the middle ground.
The key to finding the right delay time for your website will always be testing. Give it a try; the first week you’re testing your opt-In form, give it a delay of 10 seconds. The next week, give it a delay of 15 seconds. The week after, a delay of 30 seconds. Afterwards, you can put those numbers next to one another. Choose the opt-in form with the highest conversion rate.
A/B Testing
Or you can easily do some A/B testing with Bloom. The different kind of opt-in forms will be tested next to one another and will undoubtedly show you the right way to approach your audience.
When you’re A/B testing, make sure the period of time is long enough and that there are enough visitors to measure by. You want the opt-in forms to be representative and deliver the same results all over again.
In a post that shares tips and tricks on how AppSumo collected over 100,000 emails, the following results got shared regarding the pop-up delay time:

According to their data, showing a pop-up after 5 seconds was the obvious winner.
If you don’t have your previous results yet; take a look at what other companies are doing and recommending. Or even better; take a look at your competitors’ websites and see what their approach is. It could be that they already found the right approach to the target audience that both of you share.
Wherever you get the data from, use it to start testing. During that process and with some patience, you’ll find the ideal combination for your website.
Opt-In Design Settings
Another thing that really influences the results your opt-in form brings forth is the design. Let’s take a look at two tips that can make the difference for the conversion rate of your opt-in forms.
Offering Value
Try not to make the opt-in forms all about you. Opt-in forms should be about your users having a certain need. They might be or not be aware of that need. After you spot that need, you can take the opportunity to bring them the thing they’re looking for.
Considering different types of copy can usually do the trick. There are many different ways to say the same sentence but not all of them deliver the same conversion.
The next thing worth mentioning is social proof. Nothing speaks to people like social proof and referrals do. We wonder what other people would do all the time and we find ease in being part of a relatively big group that has good experiences with a certain website/company.
If you have some good numbers that prove your reputation, don’t hesitate to use them.
Minimize Opt-In Form Fields
Choosing the number of fields on your opt-in form is another struggle that might be represented to you. It benefits you to know as much about the subscriber but then again; does it benefit the subscriber?
The more fields are represented to your visitors, the more effort they have to do to actually take the action you’re asking them to take. In an era where our attention span doesn’t last a lot more than 8 seconds, fast content and fast actions are key.
Minimize the amount of info you request from your visitors to lower the barrier. But don’t ask too little as well in cases where you really need the information; there must be a good balance between quantity and quality.
In the graph below, which is a result that comes forth from a survey taken by 50,000 different kinds of professionals, you can notice the average number of required field that’s mostly used is between 2 and 4.

Final Thoughts
In this post, we shared some tips on using opt-in form and more specifically; analyzing the opt-in settings you’re using. We concluded that in the end, it all comes down to how well you know your audience’s preferences. Testing all the opt-in settings, while keeping the tips in mind, and seeing which one work best is the best way to approach this kind of decision-making process. If you have any questions or suggestions, feel free to leave a comment in the comment section below!
Be sure to subscribe to our email newsletter and YouTube channel so that you never miss a big announcement, useful tip, or Divi freebie!
Featured Image by Pretty Vectors / shutterstock.com


Usually, I never comment on blogs but your article is so convincing that I never stop myself to say something about it. You’re doing a great job Man, Keep it up.
Is it possible to use Bloom pop-up without an opt-in ?
Just an image to announce a promotion…
Thanks 🙂
what are your thoughts on Google/SEO impacts of using bloom pop-ups on a site? any tips on still using a pop-up but not getting a Google slap?
A/B testing seems to be the right solution for choosing the best pop-up. It all depends on visitors and design of site!
Is it possible to use Bloom popup for just a simple contact form?
Like: make an appointment. or send us a message?
Not an email newsletter opt-in, just a contact form.
Is it possible to use Bloom popup for just a simple contact form?
Like: make an appointment. or send us a message?
Not an email newsletter opt-in, just a contact form.
Given the number of unresolved recent problems of the ET support forums with this plugin what would be more useful than a guide to the settings would be to make sure it’s compatible and works with DIVI updates. Most people seem to have deleted the plugin and found another product.
+1
Unfortunately a bull’s eye comment, readladyb 🙁
Hi Donjete
Awesome timing on the post.
Would you be able to tell me if I can somehow disable the closing function of the popup?
To make things clearer, I am planning to use this as a lead generation form, with the page locked. It’ll only be visible when the form has been submitted. And the form trigger at 20 percent scroll.