

The ability to access and listen to sermons is a vital part of any church website. And, with the release of Divi’s new Church Layout Pack, I thought it would be useful to show you how you can build a sermon layout using dynamic content. To do this, I’ll be using the Advanced Custom Fields plugin to create a group custom fields that you can update on the backend of your post. And by using Divi’s dynamic content feature, I’ll show you how you can design a layout to pull in those custom fields to populate the content of your post. Once it’s all said and done, you will have a nice sermon layout with dynamic content that can be updated on the backend using an intuitive UI of custom fields without ever having to deploy the visual builder.
Let’s get started.
What you Need
For this tutorial, you will need the following:
- The Divi Theme
- The Advanced Custom Fields plugin
- The Church Blog Layout from the Church Layout Pack (accessible from the Divi Builder)
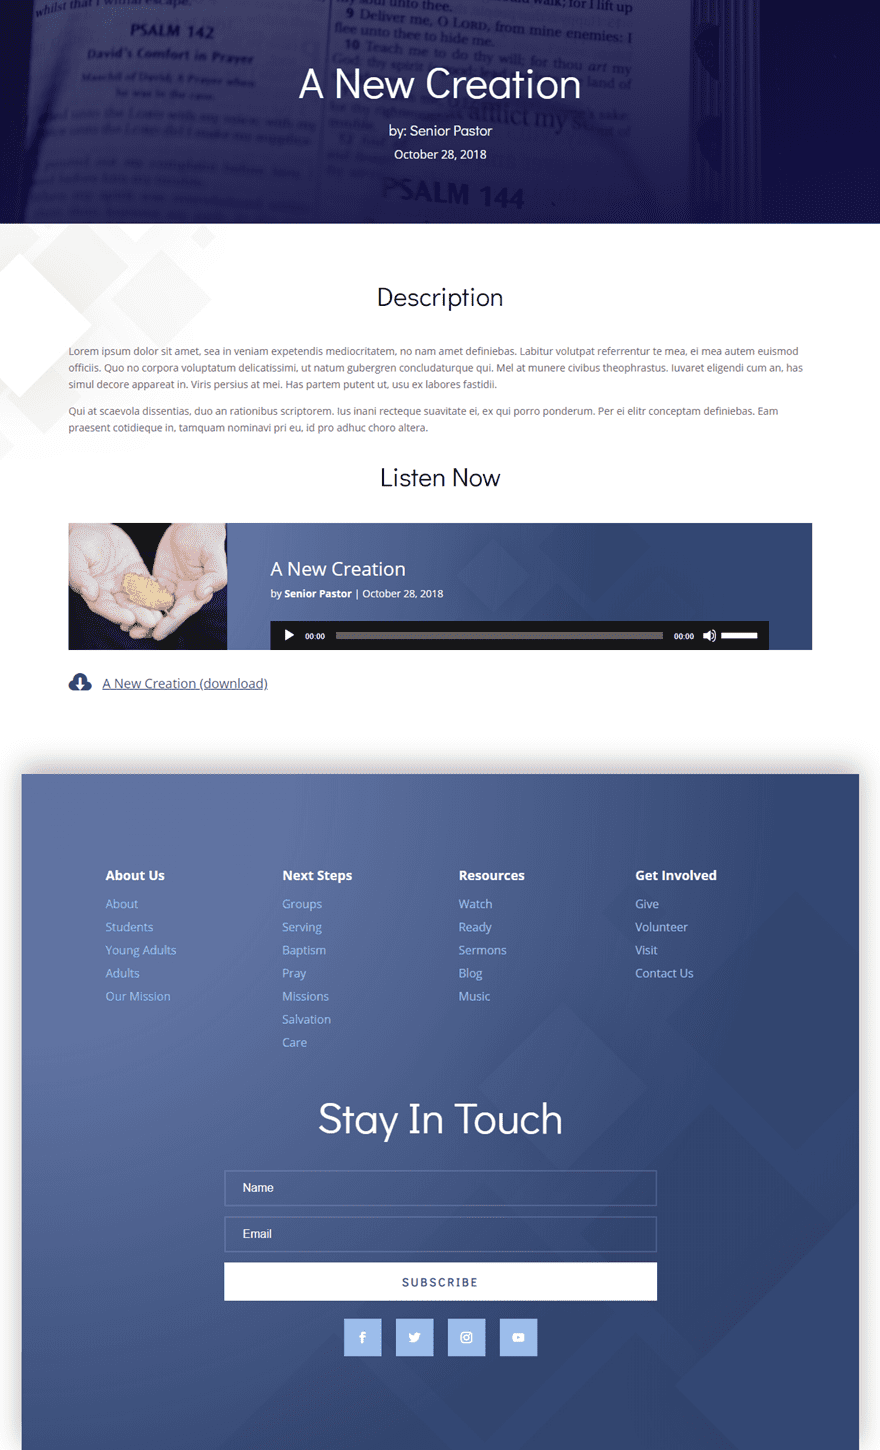
Sermon Layout Sneak Peek
Here is a peek at the layout we will build. The beauty of this layout is that most of the content is being generated from custom fields on the backend using dynamic content.
Creating Custom Fields with the Advanced Custom Fields Plugin
The Advanced Custom Fields (ACF) plugin makes it easy for you to group custom fields together to be used as dynamic content on your posts or pages. It supports a number of field types (like a date picker, a Wysiwyg editor, and oEmbed) that make updating custom fields really easy. This is extremely helpful for providing a more intuitive UI for clients to update their site using custom fields.
Once you have the ACF plugin installed and activated, go to your WordPress Dashboard and Custom Fields > Add New.
Add a new field Group
To setup a new group, give the new field group a title.
Under the location section (or toggle) change the settings so that the Post Type is equal to “Project” instead of Post. This basically tells the plugin to only display this custom field group on the project post type built into Divi (You could leave it as post if you want as well. Your choice.)
Then scroll down to the settings section and update the following:
Position: High (after content)
This position setting determines the location of your custom field group in the backend editor of your post or page.

Add Custom Fields to Field Group
Now that your group has been created and setup, it’s time to start adding custom fields to the group.
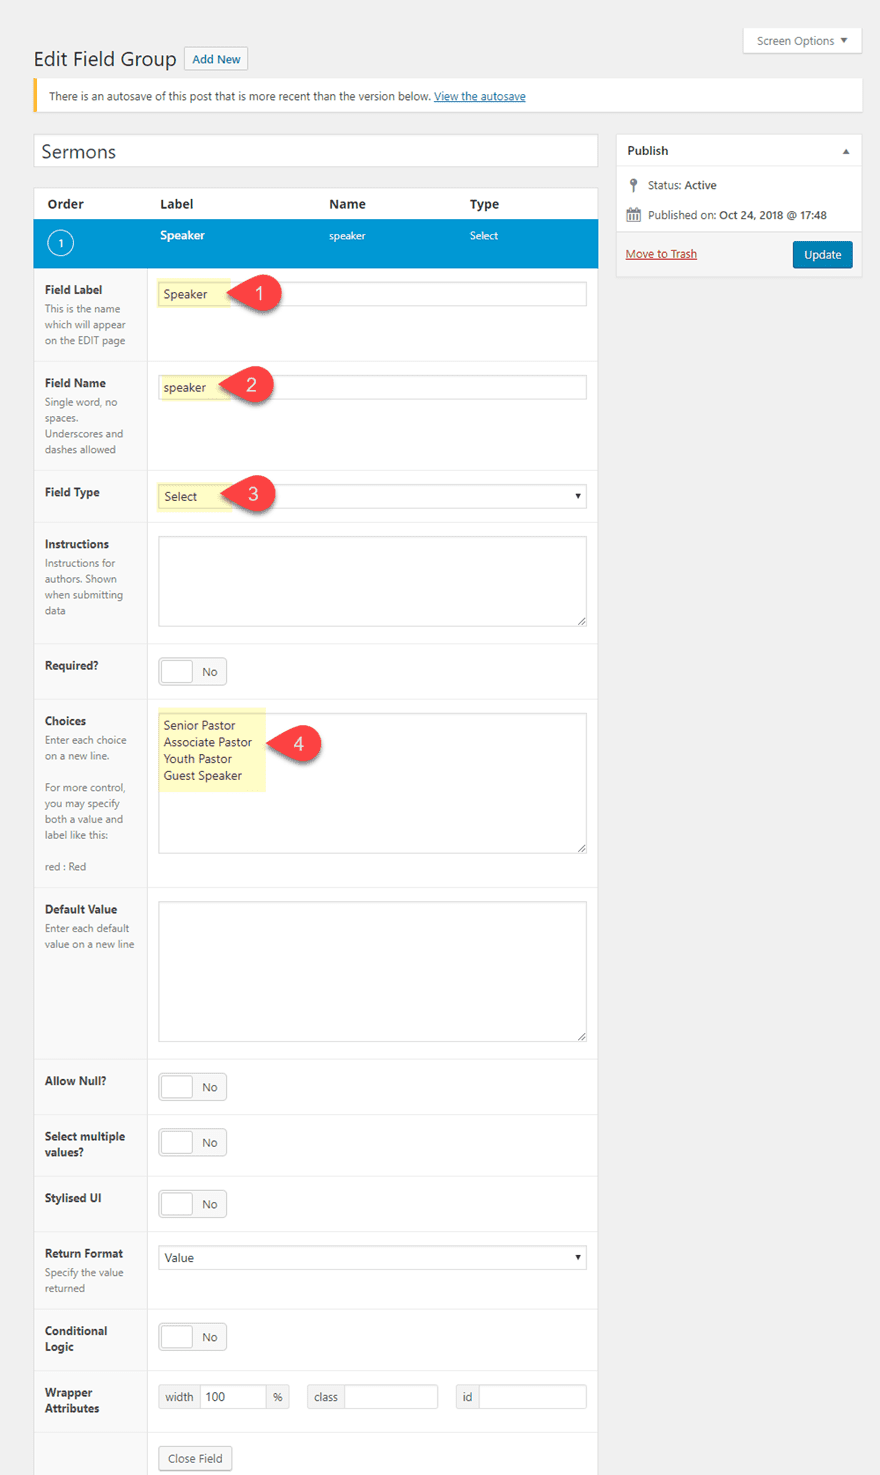
The Speaker Custom Field
For the first custom field, let’s add a place for users to enter a speaker for the sermon. To add a new field, click the “Add Field” button and enter the following:
Field Label: Speaker
Field Name: speaker
Field Type: Select
Choices (enter each on a new line): Senior Pastor, Associate Pastor, Youth Pastor, Guest Speaker
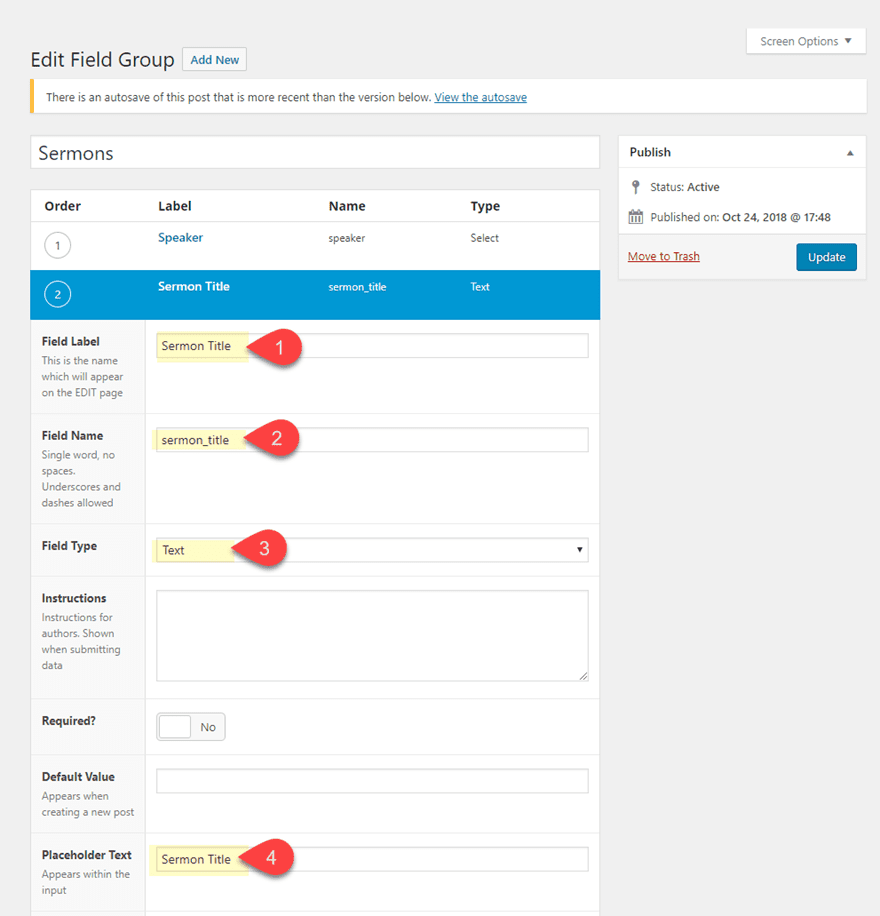
The Sermon Title Custom Field
Next, add a custom field for the sermon title.
Field Label: Sermon Title
Field Name: sermon_title
Field Type: Text
Placeholder Text: Sermon Title
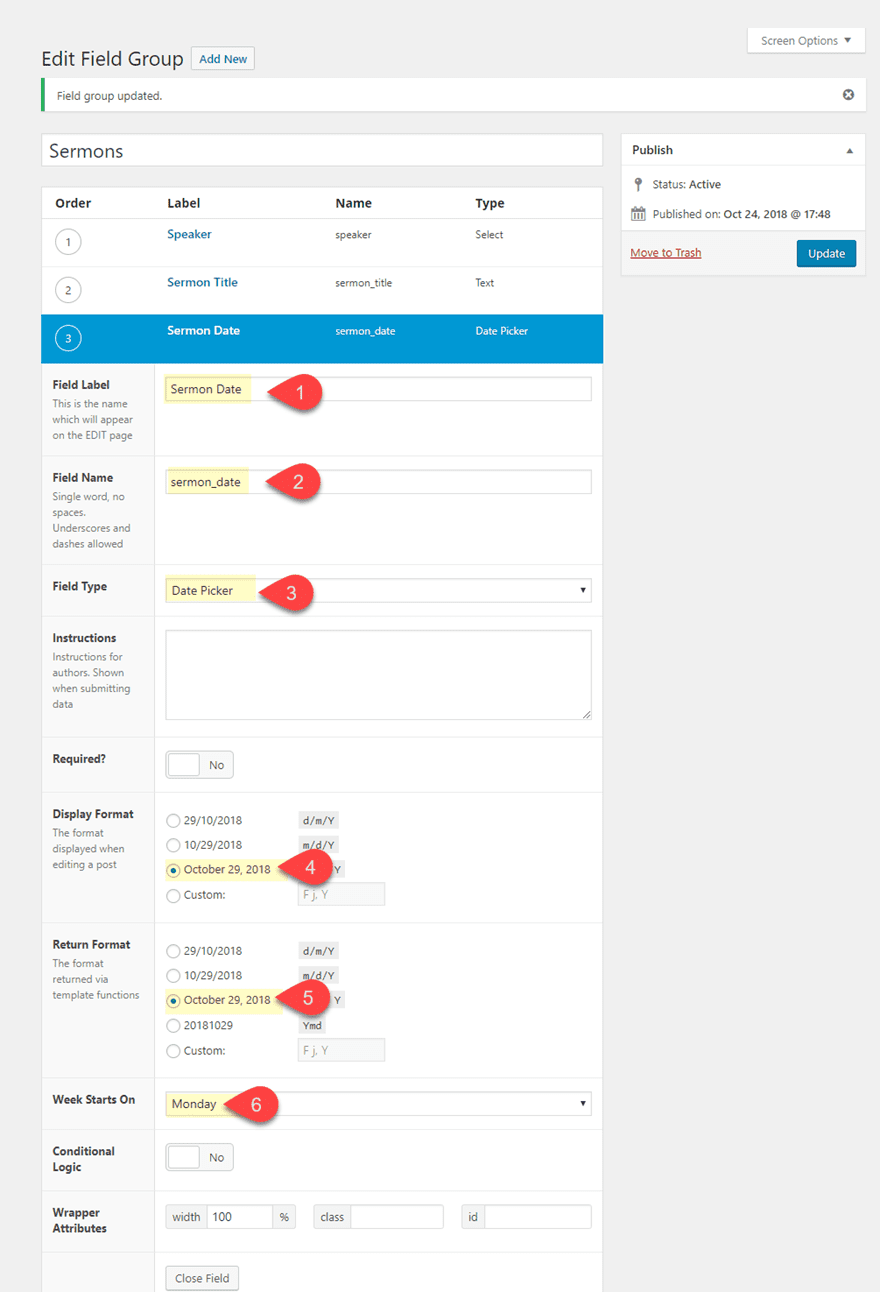
The Sermon Date Custom Field
Then, add a custom field for the sermon date. This one we will set to have a date picker field type so that adding new dates will be a breeze on the backend.
Field Label: Sermon Date
Field Name: sermon_date
Field Type: Date Picker
Display Format: F j, Y
Return Format: F j, Y
Week Starts On: Monday
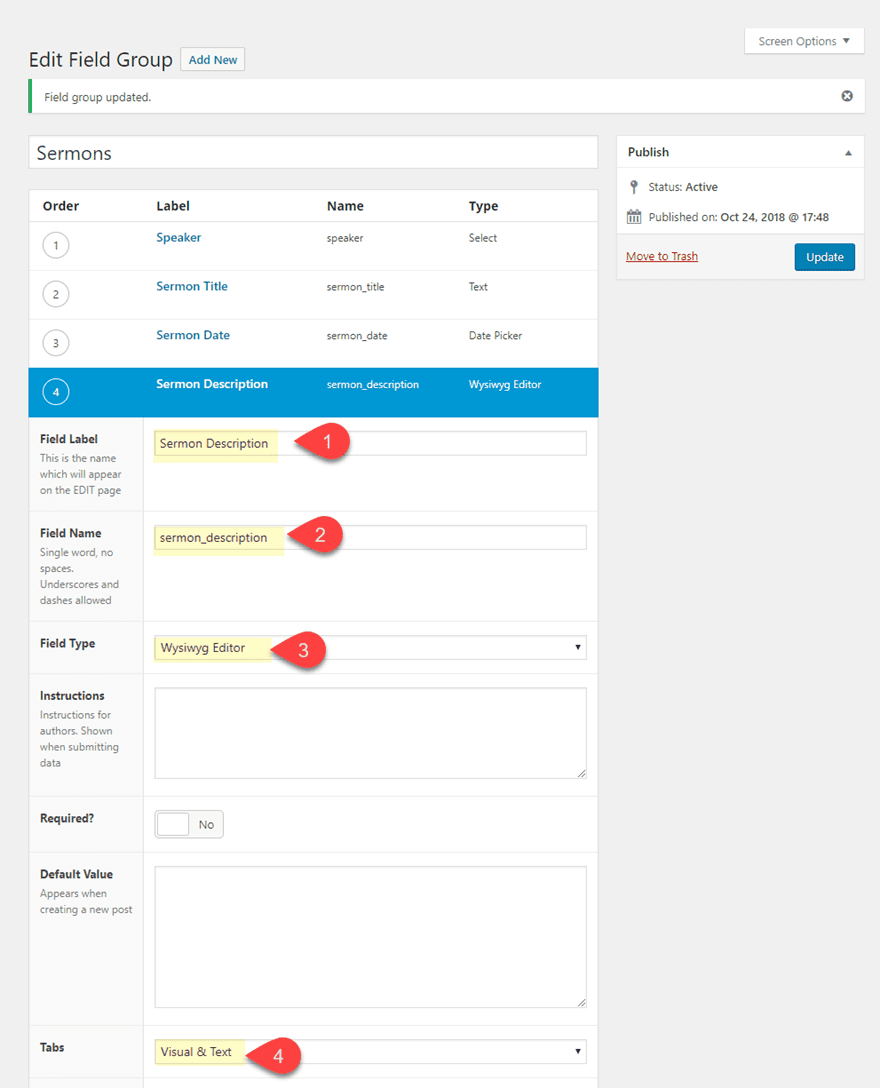
The Sermon Description Custom Field
Next, add a custom field for the sermon description. This will allow users to update the content of the post using a Wysiwyg editor without having to open the visual builder.
Field Label: Sermon Description
Field Name: sermon_description
Field Type: Wysiwyg Editor
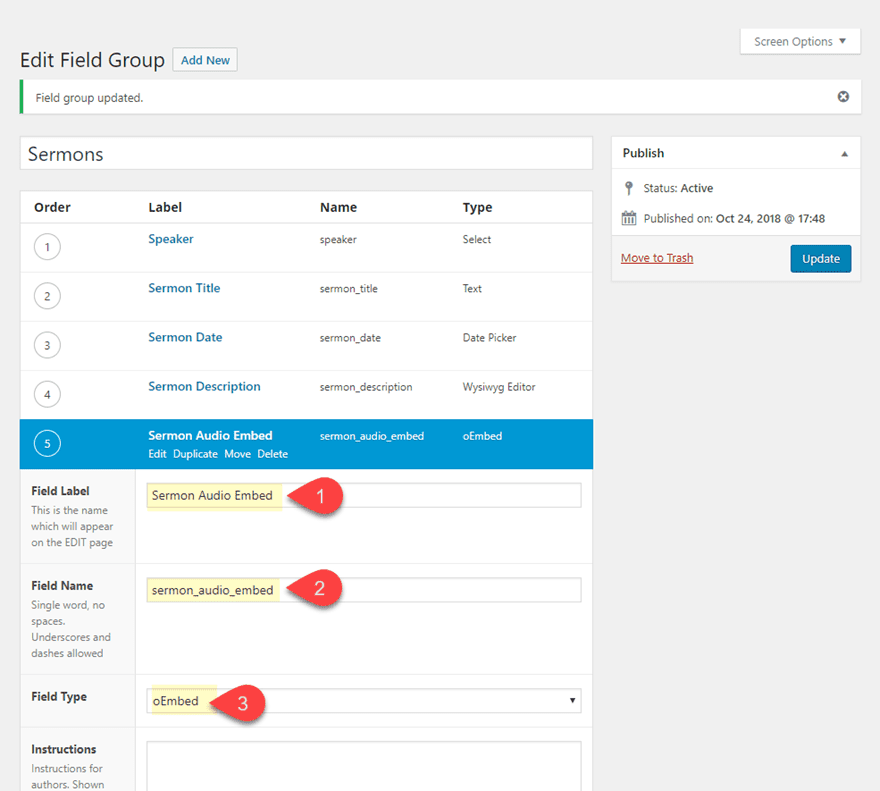
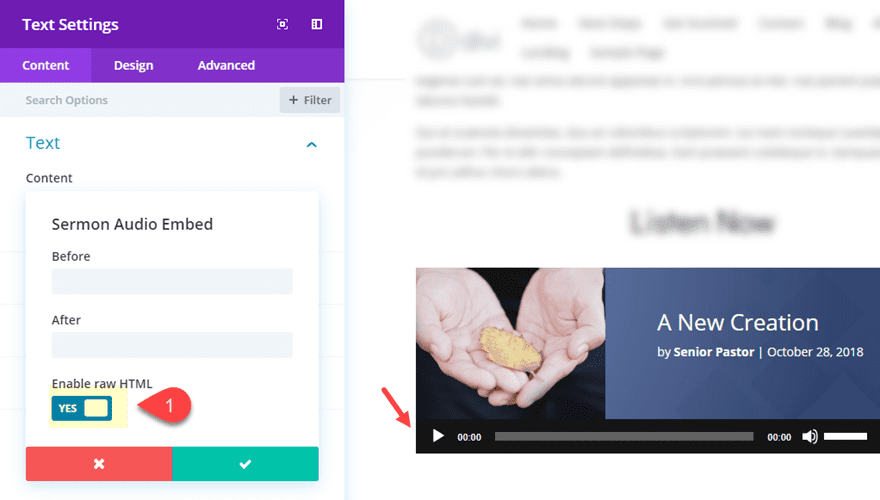
The Sermon Audio Embed Custom Field
Next, add a custom field for the sermon audio embed using the oEmbed field type. This will allow us to embed an audio embed of the sermon by simply updating the audio url for the embed on the backend.
Field Label: Sermon Audio Embed
Field Name: sermon_audio_embed
Field Type: oEmbed
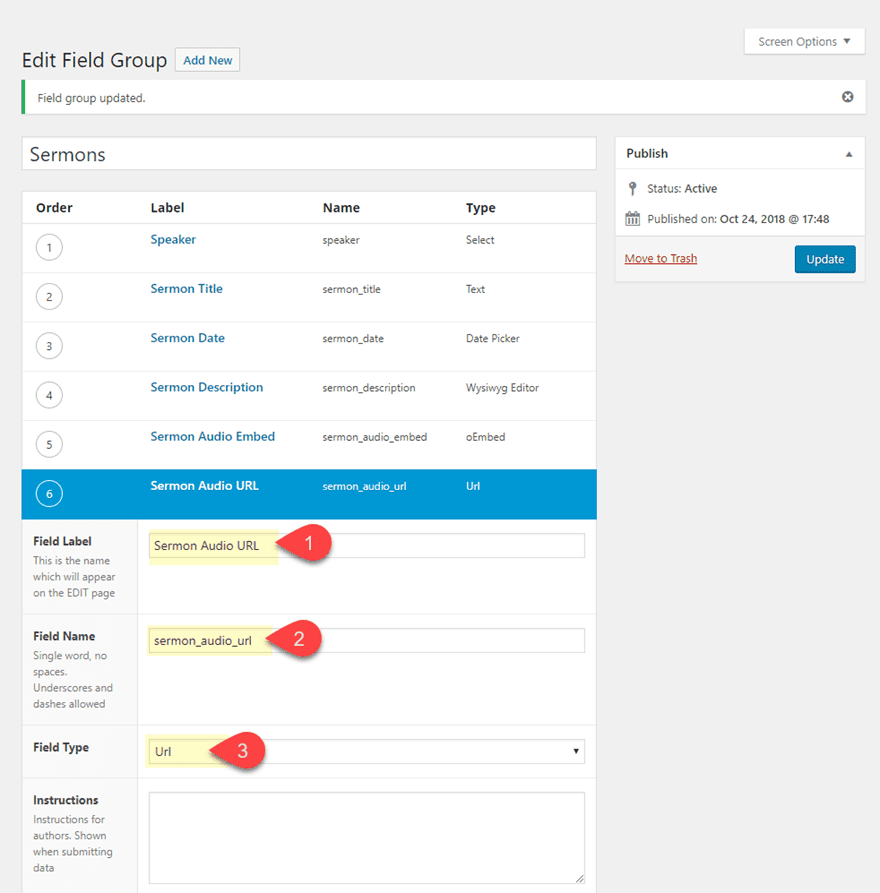
The Sermon Audio URL Custom Field
Next, add a custom field for the sermon audio URL so that we can use the URL to populate a link within a module to create a download link to the file.
Field Label: Sermon Audio URL
Field Name: sermon_audio_url
Field Type: Url
Alright. Once the custom fields have been added to our field group, don’t forget to save your field group. Now we can start creating the sermon layout for our custom field sermon content to be used as dynamic content throughout the post.
Create a New Project
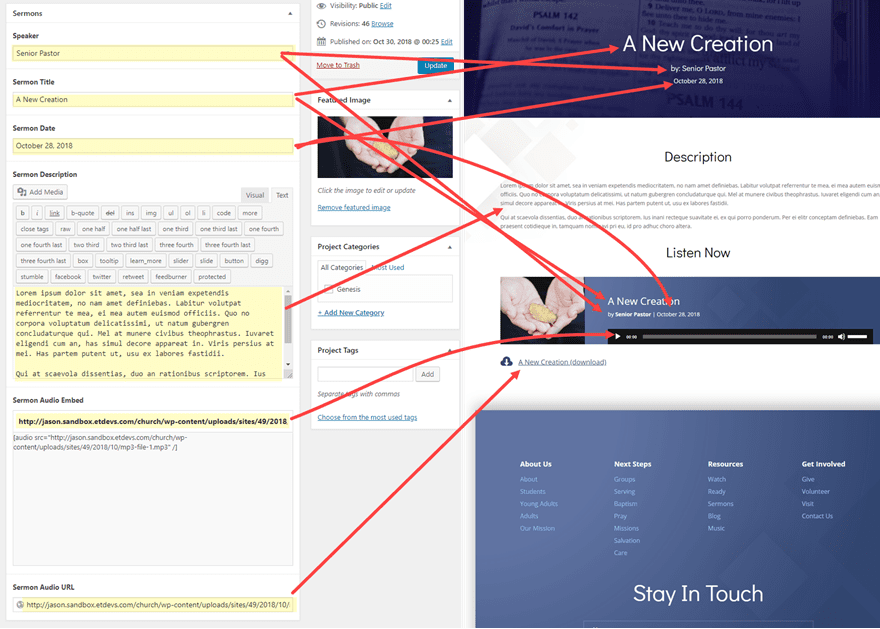
From the WordPress Dashboard, navigation to Projects > Add New. Then enter a title for the Project which should also be the title of the sermon (but that is up to you). Then click to use the Divi Builder. You will see the group of custom fields displayed at the top of the divi builder.
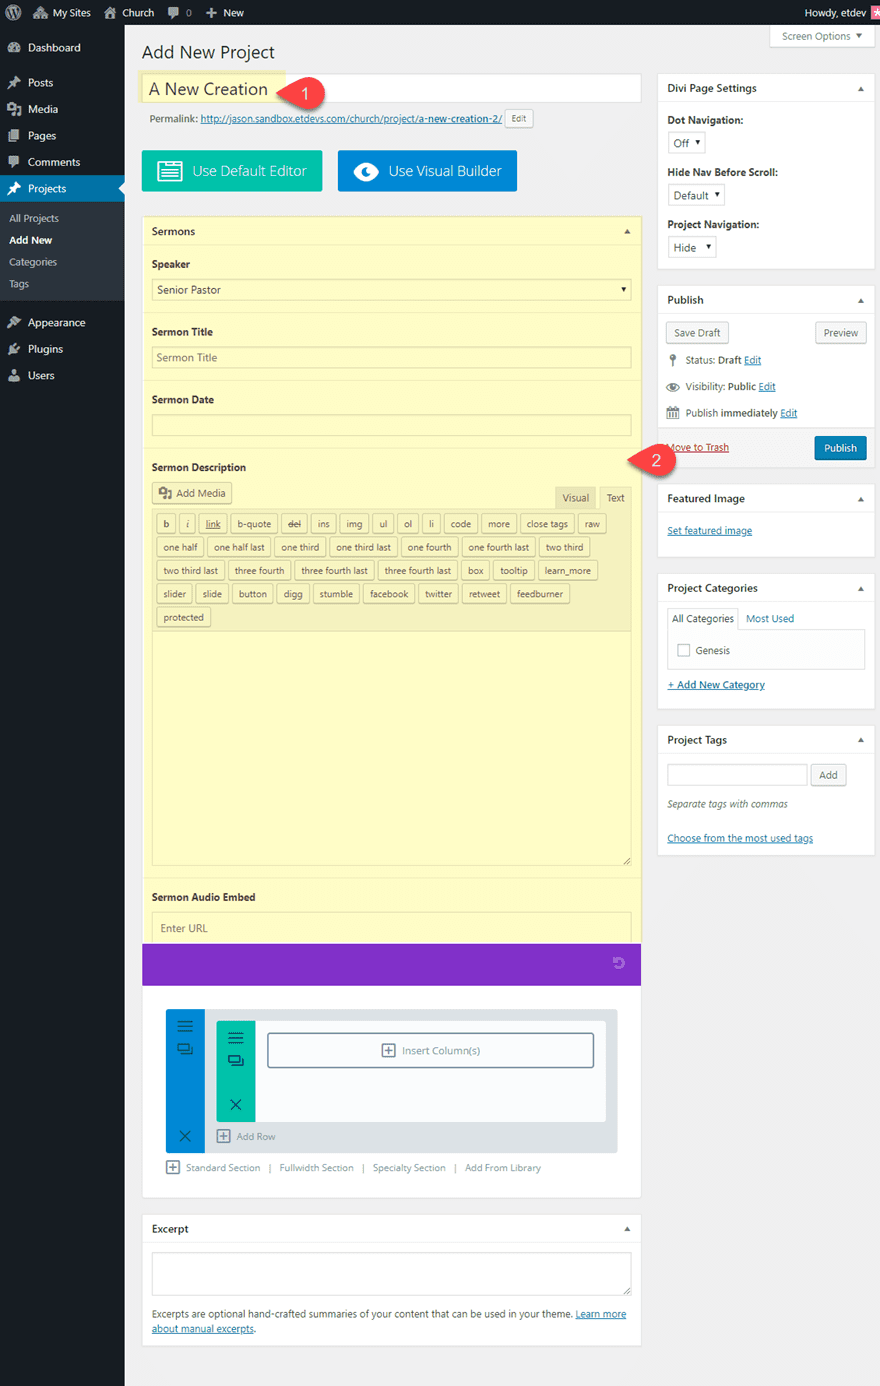
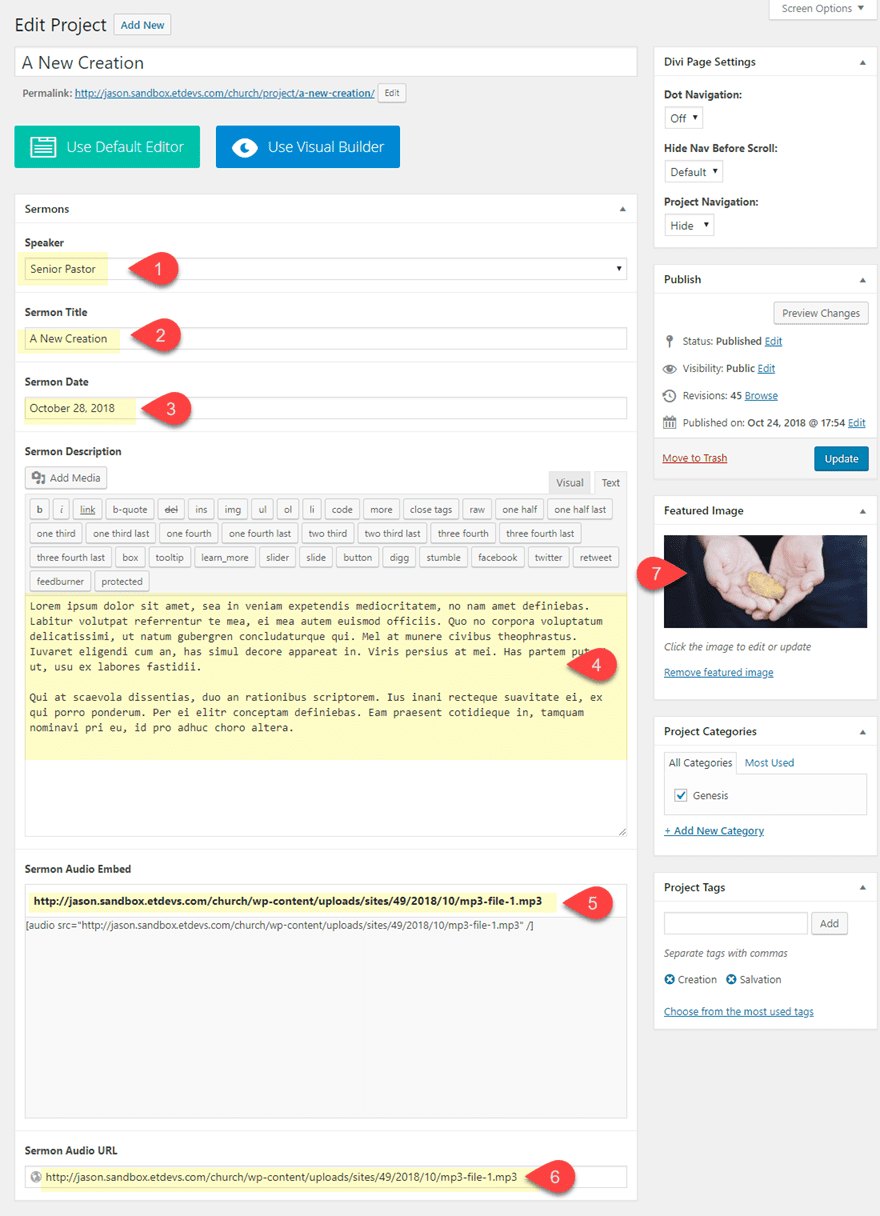
Now fill in the custom fields with sermon information specific to this post.
Speaker: Senior Pastor (selected from a dropdown menu)
Sermon Title: A New Creation (or whatever you want)
Sermon Date: select date from date picker
Sermon Description: use WYSIWYG editor to enter the description for the sermon
Sermon Audio Embed: enter the url to the media file you want to embed into the media player
Sermon Audio URL: enter the url to the media file (should be a zip file if you want this to download immediately on click)
Then add a Featured image for your project. This will serve as the image used for the audio player of the sermon layout.
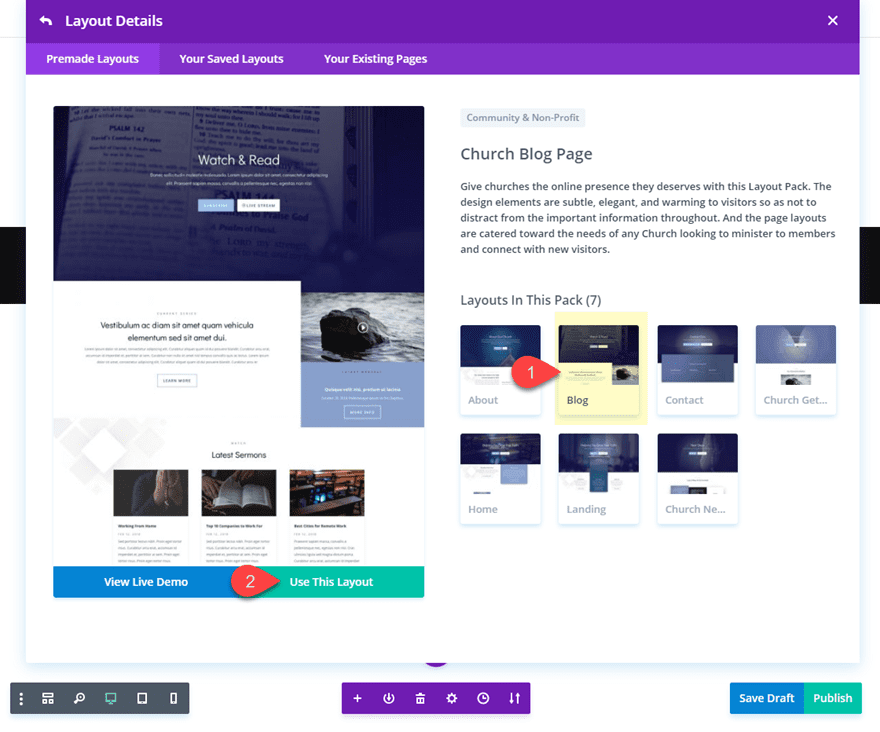
Adding a New Premade Layout for your Project
Now click to use the Visual Builder.
(Note: Currently the backend builder doesn’t support dynamic content so we need to deploy the visual builder. If you would rather customize the layout with a more backend builder functionality, simply deploy the visual builder and click the wireframe mode.)
Then click the option to Choose a Premade Layout. From the load from library popup, select the Church Layout Pack and then click to use the Church Blog Page layout.
Once the layout is loaded to the page, delete the second, fourth, and fifth sections from the layout. Now your layout should only have three sections: the top header section, the “Latest Sermons” section, and the bottom footer section.
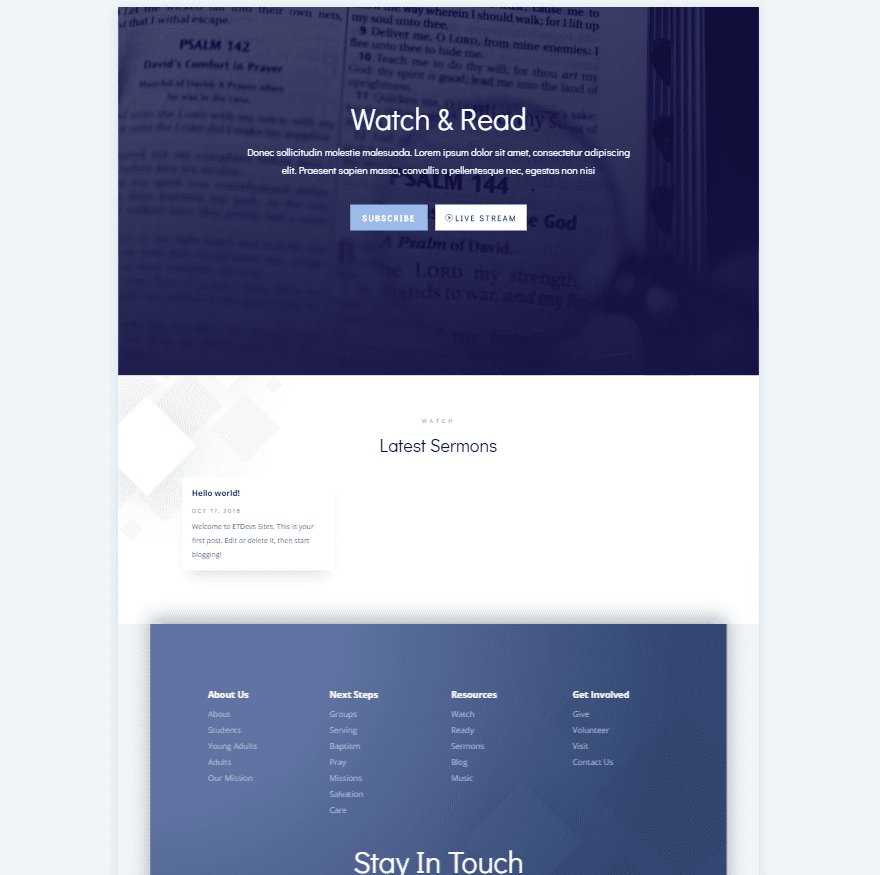
Next delete the blog module in the second section.
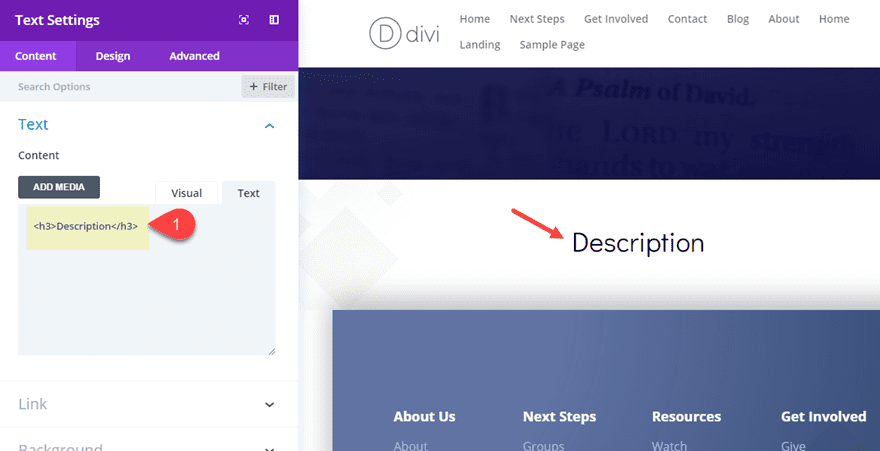
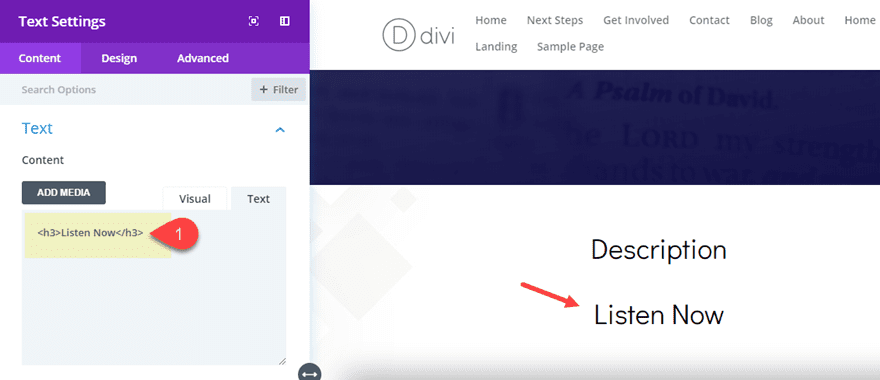
Update the “Latest Sermons” text module so that it has the following content:
<h3>Description</h3>
Then duplicate that text module and update the content to say “Listen Now”.
Adding the Sermon Layout Dynamic Content
The Sermon Description
Now we are ready to start building out the dynamic sermon audio content for our section. For starters we are going to add the sermon description right under the text module with the title “Description”. To do that, add a new text module. Hover over the content input box and click on the dynamic content icon.
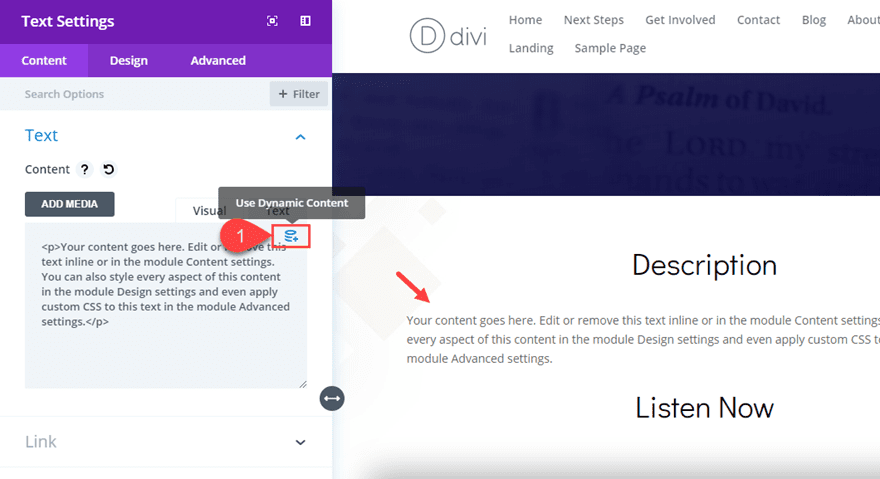
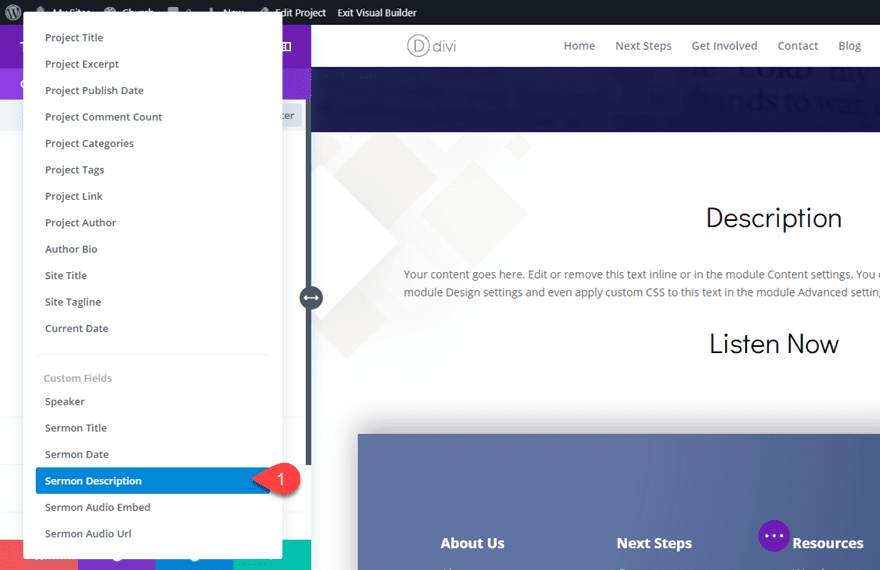
Then select the Sermon Description custom field from the dropdown list.
Save Settings.
Now your sermon description will be displayed as dynamic content. This means that whatever you add to the sermon description input box on the backend editor screen will be updated onto the project page dynamically.
The Audio Module and Audio Embed
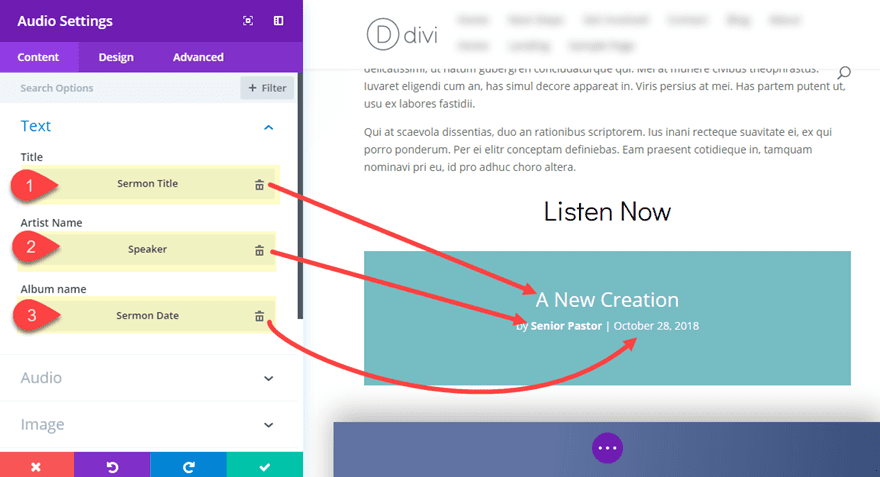
Under the text module with the title “Listen Now”, add a new Audio Module. Then update the text content with the following dynamic content:
Title: Sermon Title (custom field)
Artist Name: Speaker (custom field)
Album Name: Sermon Date (custom field)
The labels don’t really matter since we are mainly concerned with the placement of the dynamic content within the audio module. The Sermon Title, Speaker, and Sermon Date are displayed nicely within the audio module without much work at all.
For the Cover Art Image of the audio module, add dynamic content by clicking the dynamic content icon when hovering over the image preview area and select Featured Image.
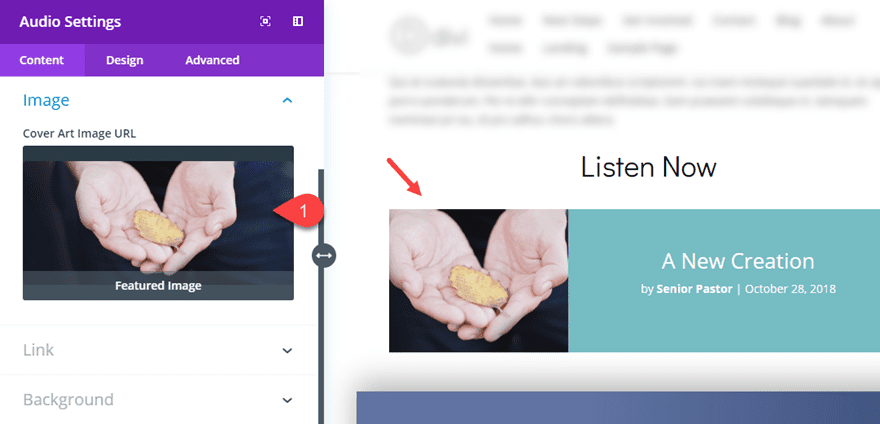
Now whatever you have set as your featured image on the backend will automatically populate the cover art image for your sermon audio.
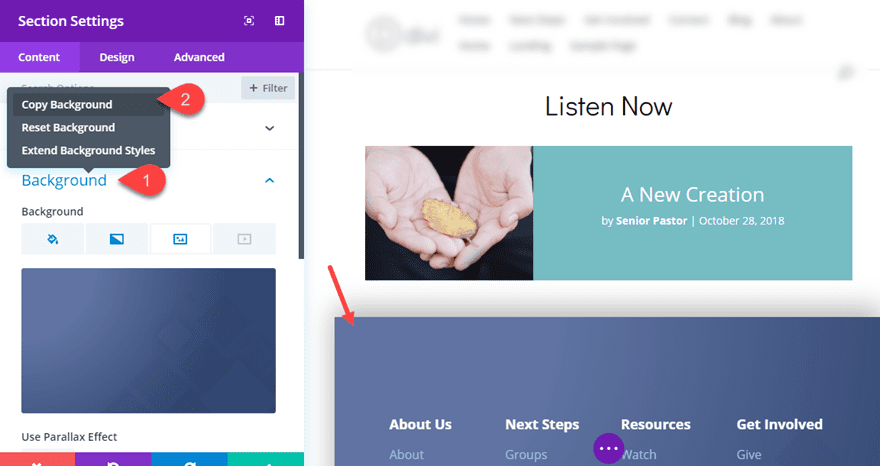
To match the design of the layout better, save your settings and go copy the background of the bottom section by right clicking on the Background category text in the section settings and selecting “Copy Background”.
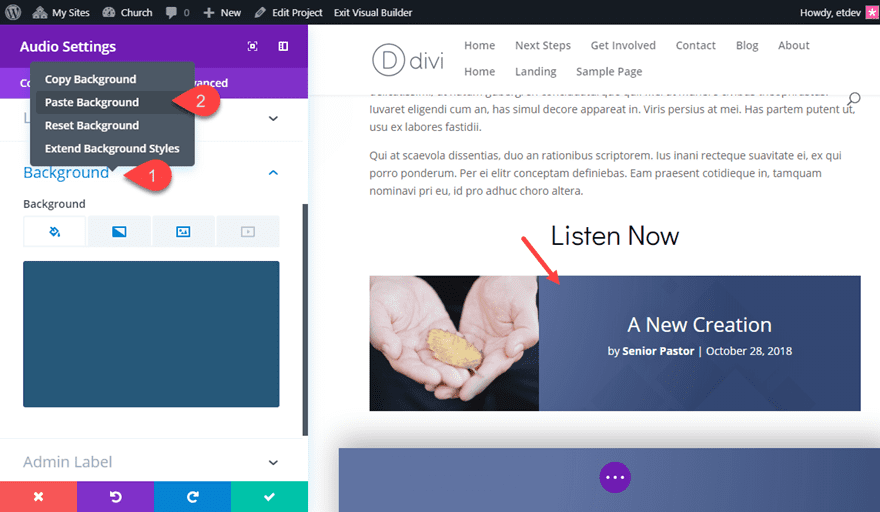
Now paste the background to your audio module background settings by opening the audio module settings, right clicking on the background category text, and clicking the “Paste Background” option.
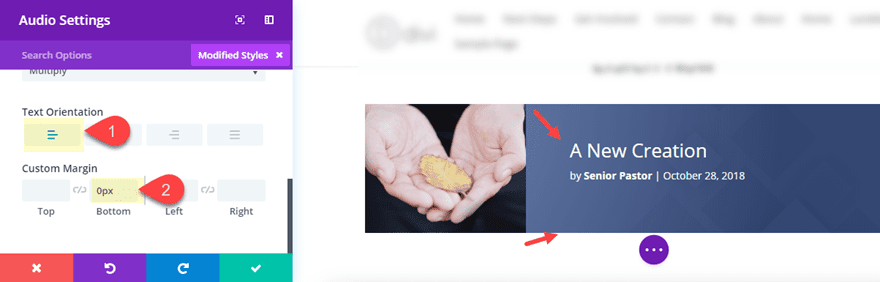
Then jump over to the design settings and update the following:
Text Orientation: Left
Custom Margin: 0px bottom
Now all we have left to complete the sermon audio player is the actual audio player embed. Currently, the audio input box built in to the audio module doesn’t support dynamic content (I’m sure it will in the future), so we are going to do a small workaround. We are going to create a new text module and add the audio file embed using dynamic content. And because of the way WordPress recognizes the shortcode generated by the custom field, it will display the default audio player.
To do this, add a text module under the audio module and then add the custom field “Sermon Audio Embed” as dynamic content. Make sure to Enable Raw HTML so that the shortcode will work.
Now we can position our audio player inside the audio module with some custom margin. Go to the design tab and update the following:
Custom Margin (desktop): -40px Top, 280px Left, 60px Right
Custom Margin (tablet): 0px Left, 0px Right
The Download Link
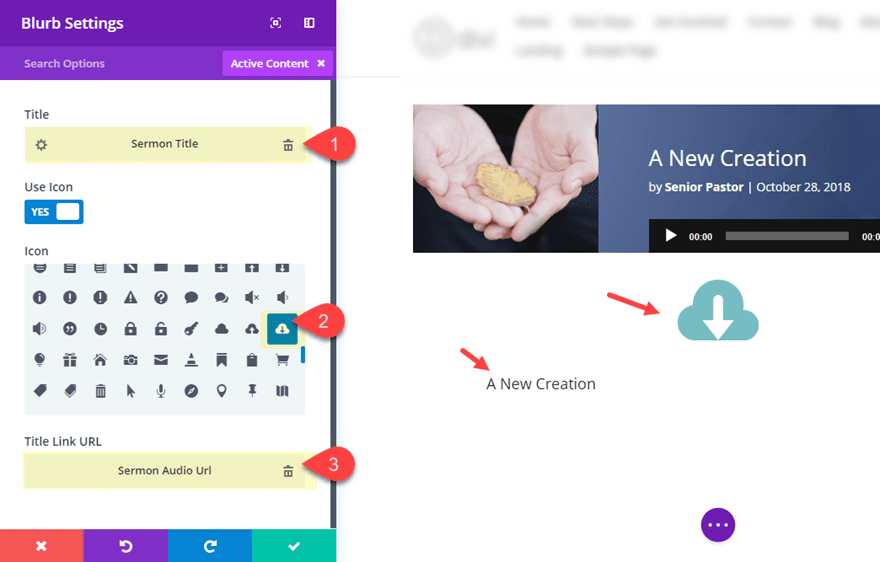
Sometimes, it is helpful for users to download the audio file. To make this easier, you can add a link to the audio file to your post. To do this, we are going to use dynamic content to populate a blurb module with the sermon title and the audio url.
Add a blurb module under the audio module and update the content as follows:
Title: Sermon Title (custom field)
Icon: see screenshot
Title Link URL: Sermon Audio Url (custom field)
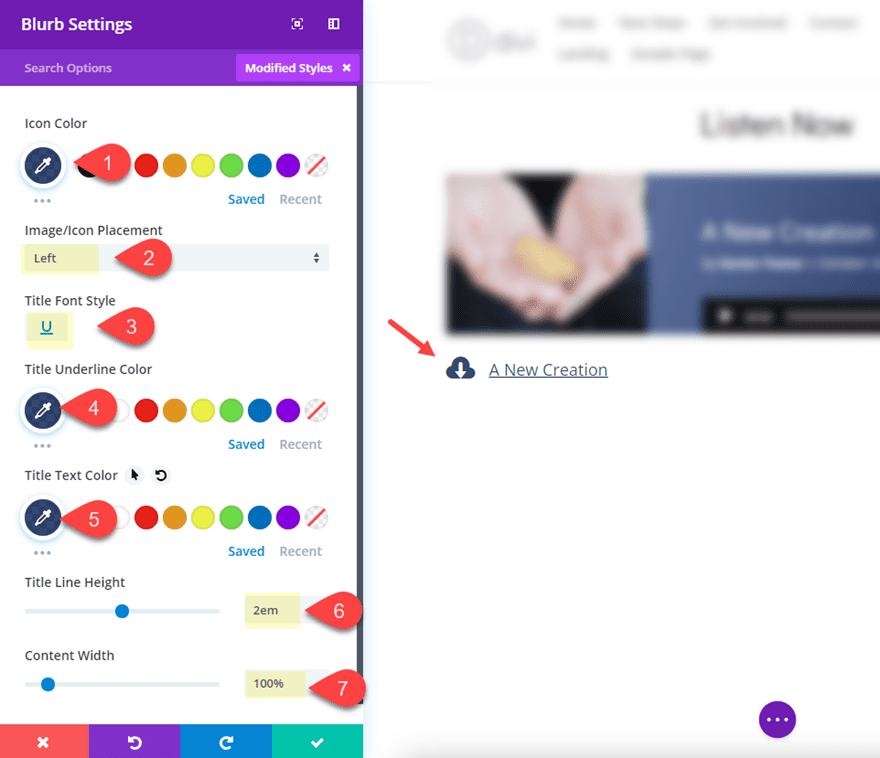
To style the blurb to look more like a clickable link, update the following:
Icon Color: rgba(33,50,94,0.86)
Image/Icon Placement: Left
Title Font Style: U
Title Underline Color: rgba(33,50,94,0.86)
Title Text Color: rgba(33,50,94,0.86)
Title Line Height: 2em
Content Width: 100%
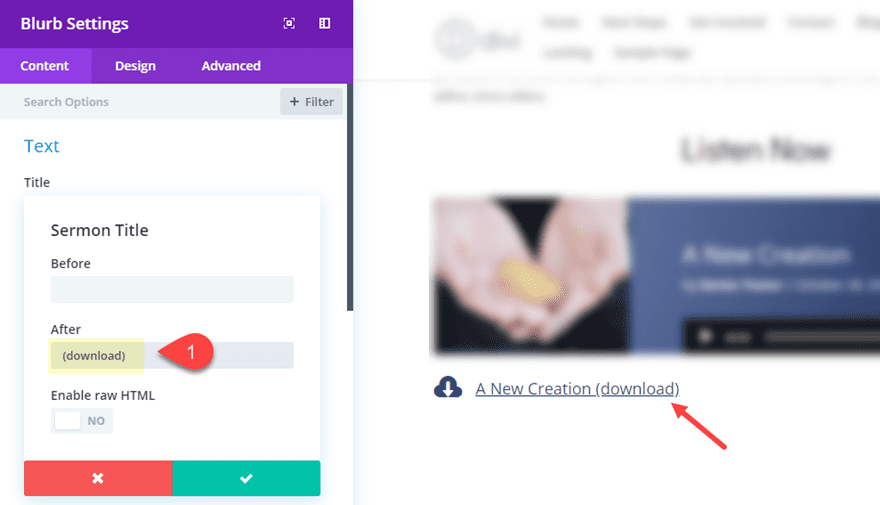
To make the link even more recognizable as a download, you can edit the sermon title dynamic content that is occupying the blurb title with additional text in the after input box that reads “(download)”.
Adding the Sermon Title and Meta to the Heading
For the last step, let’s make sure our project/post heading section is using dynamic content for title of the post along with the speaker name and the sermon date. To do this open the fullwidth header module settings and update the following:
Title: Sermon Title (custom field)
Subheading Text: Speaker (custom field)
(Note: For the Speaker dynamic content, enter “by: ” in the before input)
Button #1 Link Text: delete
Button #2 Link Text: delete
Content: Sermon Date (custom field)
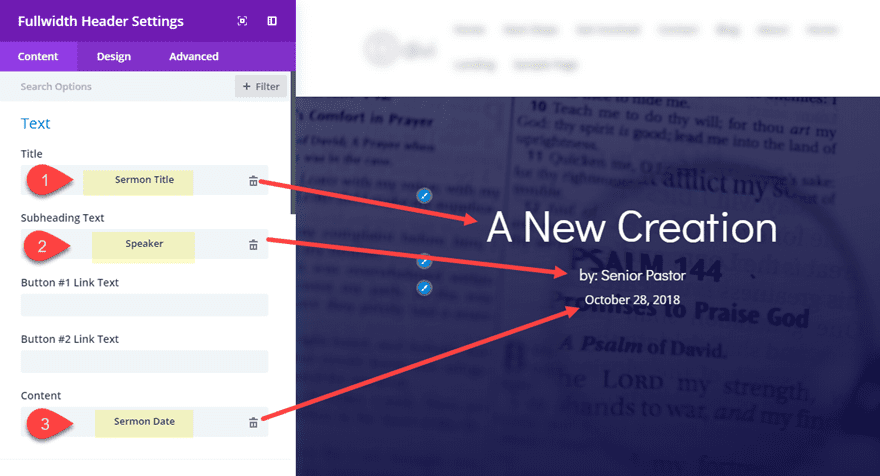
Now go over to the design tab and take out the custom padding being used.
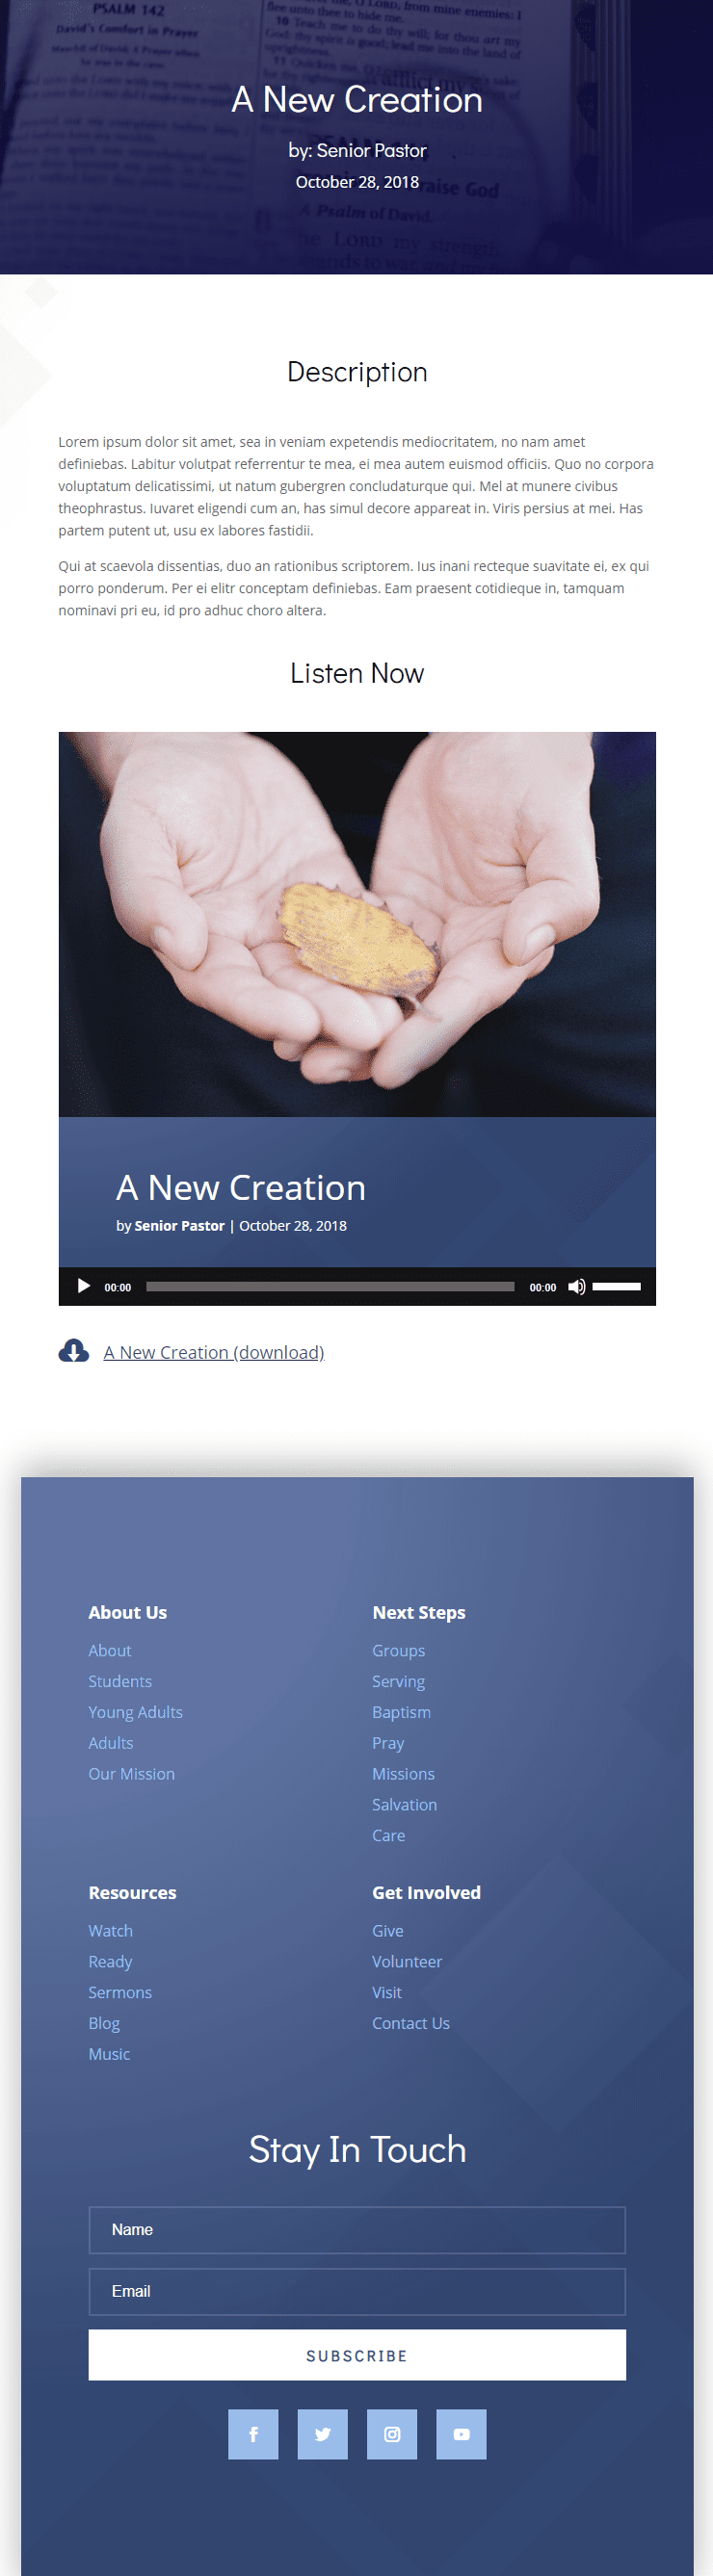
Here is the final result.
Now all you will need to do going forward is save the layout to your Divi library to be used for future sermon posts. And since you have your custom field group ready to go on all projects, you can simply update the custom field information on the backend without ever having to open the Visual Builder.
Also, with the sermons saved as projects, you can easily create a filterable portfolio to display your sermons!
Final Thoughts
I hope this tutorial helps shed some more light on dynamic content and how it can be used with the Advanced Custom Fields plugin to create a powerful layout for sermons. It may take some time to set everything up, but the payoff can definitely be worth it. Of course, this same process can be used to create all kinds of dynamic content for different post types. Let me know if you have any questions in the comments below. I look forward to hearing from you.
Cheers!


I really believe it’s time to take “Divi” to another level. It is very frustrating to see a builder with so much potential leaving things significantly essential behind. For example, the body field in dynamic fields, if I capturing the body of the backend I would not have to pull the layout in the frontend and write the content (Dynamic body does not exist in “Divi”), it would come straight from the backend and save me a Herculean work. Also the questions regarding global modules (Sneak-and-peak) not yet delivered. I will remain firm in learning the “Divi” believing that soon it will become grandiose and systemic and not just visual.
I must be missing something. When I begin the project, I can see the custom fields with the default editor, but once I begin to use the Divi builder, the custom fields disappear along with the default editor and do not appear anywhere on the screen.
Any ideas?
Hi
I have a question about dynamic content.
Is it possible to use dynamic content in posts (or projects) only if the layout is built into the body of the post itself?
Or can I create a “template page” that would serve to open the posts (or projects)?
If it is not possible to use template mode, is there any expectation for such an idea in the future?
If it is possible, how do I do it?
Thanks
Super tutorial! First time with ACF. Easy! Thx a lot 🙂
Another note: if I want to edit a second sermon, I can’t duplicate the first project (not with WordPress, yes?), so I have to create a new project and load the layout of the first from the Divi library. So it’s necessary to manipulate Divi; dynamic field are not so useful, we have to work with Divi too for a new projet/post. Or do I miss something? thx.
Just a note: after editing, if you come back to the project (to update some field for exemple), the dynamic fields are hidden! I can’t find them. normal? thx.
i like this new feature thanks for the valuable information
Thank you! Is there any way to add a “counter” to the audio player? I feel that’s one thing that’s lacking with most WP audio/video players.
How does this compare with functionality provided by plugins such as Sermon Browser and Sermon Manager? Would they be easy to integrate into the church layouts?
The layout itself doesn’t integrate with anything but should be able to be used with a number of different plugins. Especially if they have shortcodes you can use within Divi modules. I do know however that Sermon Hub (which we did a plugin highlight of not long ago) is specifically designed with Divi in mind.
Thanks for this tutorial 😉
This is rad! Thanks! If you also did an “Event” post like this, I would REALLY dig it!
you are the best
Isn’t this just duplicating what you would do in the Visual Builder? – why use dynamic data? I could understand f you had a database of Sermon Custom Posts and Divi had tools to make selections from that data available using some form of selection (be that manually from a dropdown/list etc), but just making field that you are going to load in the VB seems like a lot of extra work for no gain – other than not having to use the VB?
I can see your point Paul. It’s not for everyone. However, for some clients, having a few custom fields to update is a lot easier that searching for those elements inside the visual builder. Thanks for the input.
Yes Jason, I can certainly see that side of things as well and I hope I don’t sound ungrateful or rude – many of the articles here are interesting and inspirational (thank you). This is such a frustrating time using Divi when you’ve seen what Dynamic Data can do.
Dynamic Data is an obvious requirement for the templating system going forward, but I really hope something, even as basic as Dreamweavers 15+ year old Recordset and Repeat region functionality are brought to Divi by ET (rather than 3rd party plugins). Having built whole sites dynamically this way many moons ago (where users simply filled in boxes in a custom PHP CMS, very much as you just shown, albeit not inside WP) it has been a constant frustration ever since that there has never been a true ‘One Stop Shop’ for dynamic data in a builder for WordPress (yes – other builders and/or plugin combinations are available).
Having Divi to take care of the styling nitty gritty is fantastic….being able to combine that with even basic Dynamic Repeat and Show/Hide options on Sections or Rows or Modules within Divi would transform the builder.
With the right tools, once the data is independent from the design – web page design and reporting options rise a whole magnitude above what can currently be achieved. Dynamic data has already been added – at a basic level, you just need to add a query system, wrap the Sections/Rows/Modules with a new ‘Dynamic Parent Module’ and increment the data for each repeat. Just stopping dynamic data development at templates (IMHO) would be such missed opportunity for ET and its users.
It made me smile to see how excited Mak got with the recent update (on his live Dynamic Data video) On that basis I think he’d probably explode with joy if Divi has just a few extra Tools/Modules of its own for handling it (not that we want to see him explode).
Fingers crossed that the feedback has some impact.
Thanks, Paul. Your feedback is definitely much appreciated. I wish I knew more about the detailed plan going forward to comment, but unfortunately I don’t.
Also thanks for your constant improving 🙂
Yep, same point for me. I don’t really see the point of using custom fields here. It would be more straightforward just to import a premade layout from the library and edit the content directly in the imported layout. You might save a few seconds by using custom fields as you don’t have to open and close the modules, but still, why so much pain in emplementing ACF just to import raw data from the field to the divi modules?
It would be really useful if we could combine fields in a more complex way, like :
Let’s meet at {venue_name_field} on {date_field}
But that is not possible in a text module as it imports only the raw data from one single field.
We still have to import a layout anyway, so why not just edit the layout itself ?
Sorry guys, so far I don’t see the real benefits of using custom fields with divi builder as we can directly type the output in the divi modules, instead of typing it in the custom fields.
I actually could see the point if there were some kind of theme builder to make post templates using the divi builder, and if we could just select the post template and fill in the custom fields.
Please, no hard feelings. I’m still a divi lover !
I’m needing EXACTLY that functionality. Does anyone know if it will be added soon?
Having some sort of custom fields shortcodes would be great.
Thanks,
I love this new feature, but do I have to choose the layout from library each time, do I? So if I want to use it in woocommerce and I have 2000 products, is there a way to display my template by default in published products? It will be very helpful and will take divi to another leves I guess. Thank you for each upgrade I really apreciate.
Eli,
Yes. You will have to choose the layout from the layout each time. I can see your hangup for using this on such a large site. However, this will all change with the release of the Divi Theme Builder update…
https://www.elegantthemes.com/blog/theme-sneak-peeks/divi-feature-sneak-peek-the-divi-theme-builder
This is cool, thanks!
This is rad! Thanks! If you also did an “Event” post like this, I would REALLY dig it!
Good idea Jeremiah!
Great tutorial. I’m going to give this one a try. I can see a lot of applications. Thanks.
Glad it was helpful, Monique.