

Our goal with our Layout Pack Use Cases is to help you take a design to a functioning website that reflects everything a website built on a particular pack should be. In this instance, we’ve got a beautiful, inspiring yoga studio layout pack that we want to make functional. While our design team was designing the free Yoga Layout Pack for Divi, these were the exact things they kept in mind. And to help you take your yoga studio website a little bit further, we’re going to show you how to add memberships to your website. Concretely, that means we’ll show you how to use the Paid Member Subscription plugin and how to add the registration form to a separate page on your website. The style of this page, and of the form, will be completely in line with the style of the rest of your website.
- 1 Use Case Sneak Peek
- 2 The Setup
- 3 Part 1: Download & Install The Paid Member Subscriptions Plugin
- 4 Part 2: Change Plugin Settings
- 5 Part 3: Add Subscription Plans
-
6
Part 4: Create Member Registration Page
- 6.1 Step 1: Add New Page & Switch Over to Visual Builder
- 6.2 Step 2: Upload Team Layout
- 6.3 Step 3: Remove the Last Section
- 6.4 Step 4: Clone First Section (To Create Member Registration Section)
- 6.5 Step 5: Remove Gradient Background Color of New Section & Add Background Color
- 6.6 Step 6: Change Text Module within Member Registration Section
- 6.7 Step 7: Clone Row of Member Registration Section & Place in Team Section
- 6.8 Step 8: Add New Text Module with Registration Shortcode to Existing Row of Member Registration Section
- 6.9 Step 9: Modify Registration Form of Paid Members Subscriptions Plugin With CSS Code
- 6.10 Step 10: Link Registration Page to Your Calls to Action
- 7 Part 4: Manage Members
- 8 Part 5: Use Other Shortcodes According to Your Needs
- 9 Final Thoughts
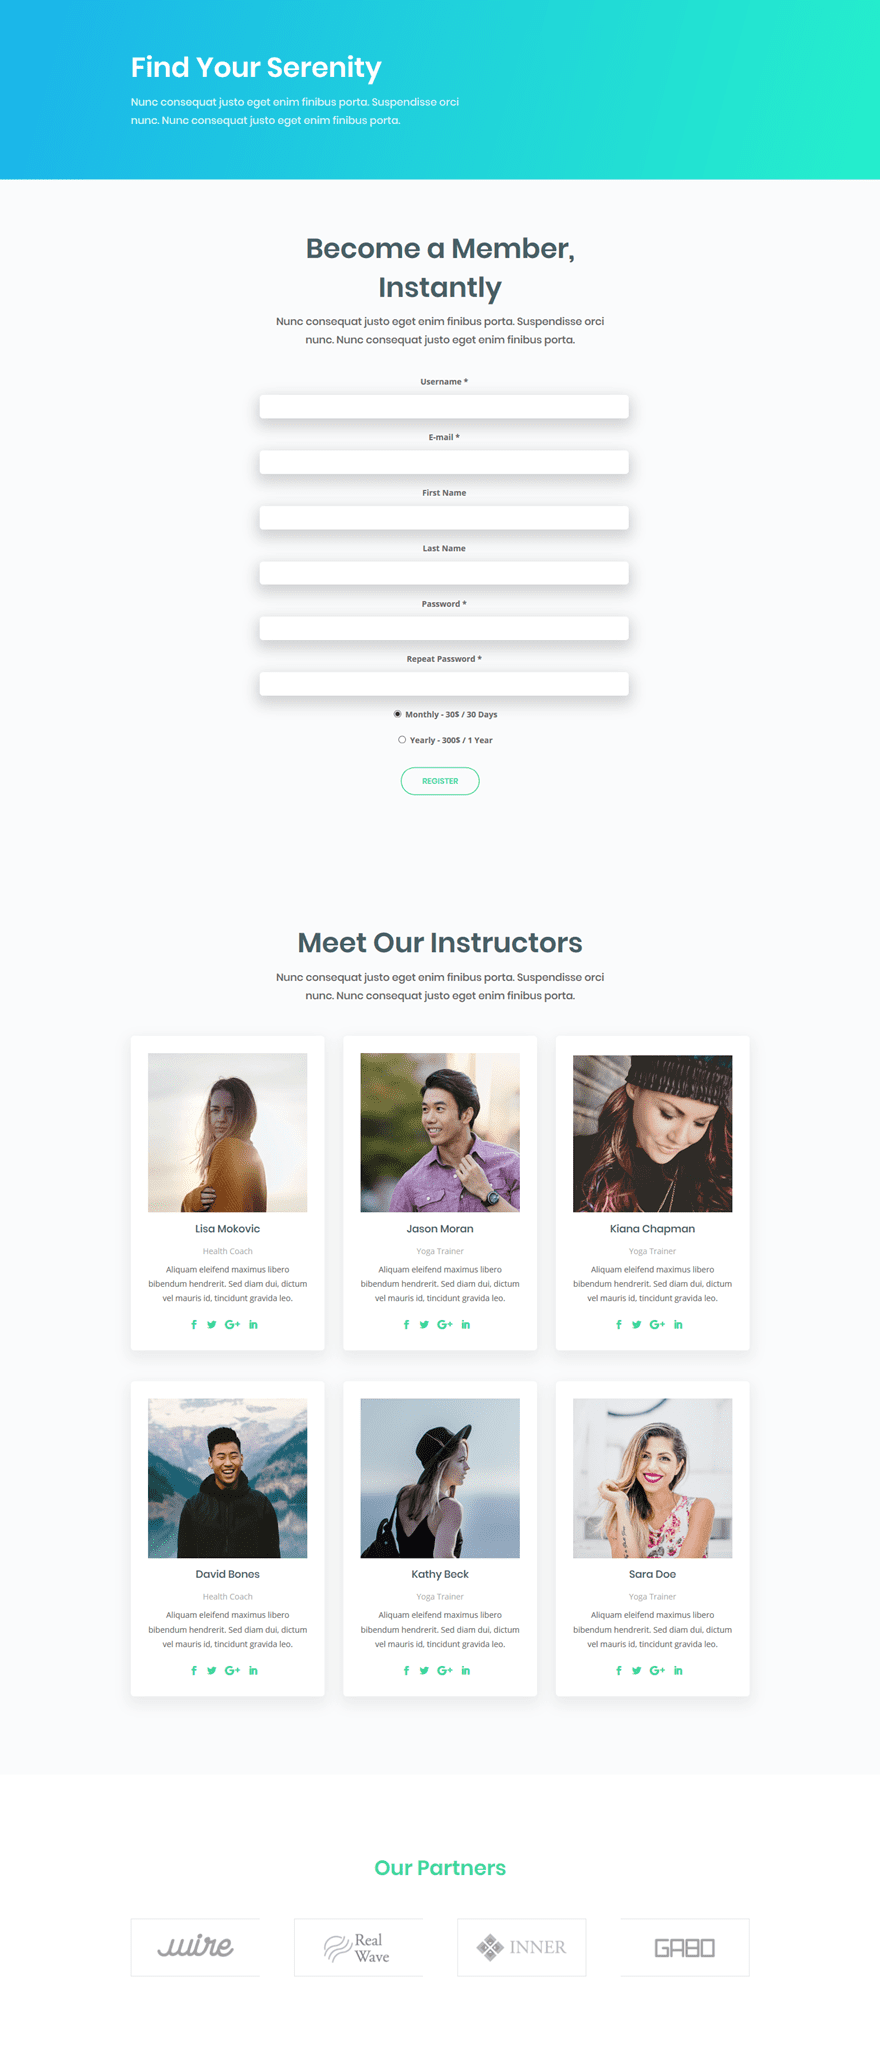
Use Case Sneak Peek
Before diving into the tutorial, let’s take a look at the result.
The Setup
1. Install and activate the Divi Theme
2. Install Plugins
3. Download the Layout Pack and Import the Yoga_All.json file to your Divi Theme Library.
4. Create new pages for each layout.
5. Create your primary menu.
If you are confused by the setup listed above, you can find more detailed instructions on how to setup your layout properly by checking out these 10 steps for using a layout pack for your new project.
Part 1: Download & Install The Paid Member Subscriptions Plugin
Step 1: Download Plugin
The first thing you will need to do, after installing the free Divi Yoga Layout Pack, is downloading the free Paid Member Subscriptions plugin which you can find on the following page.
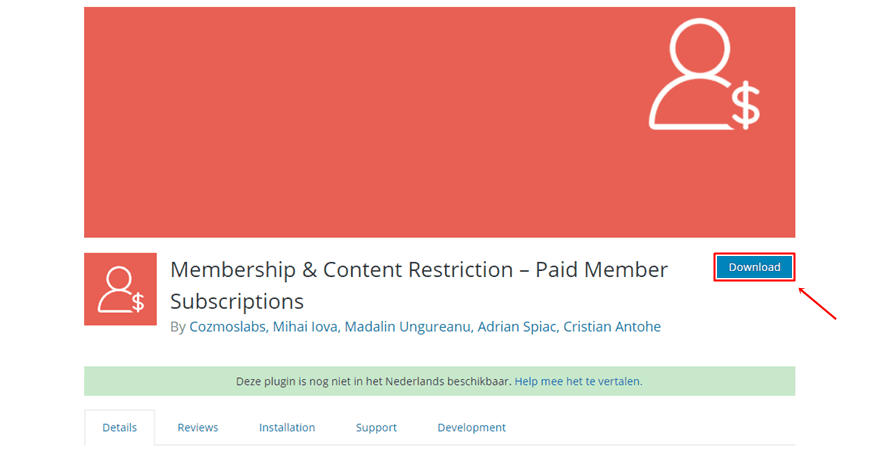
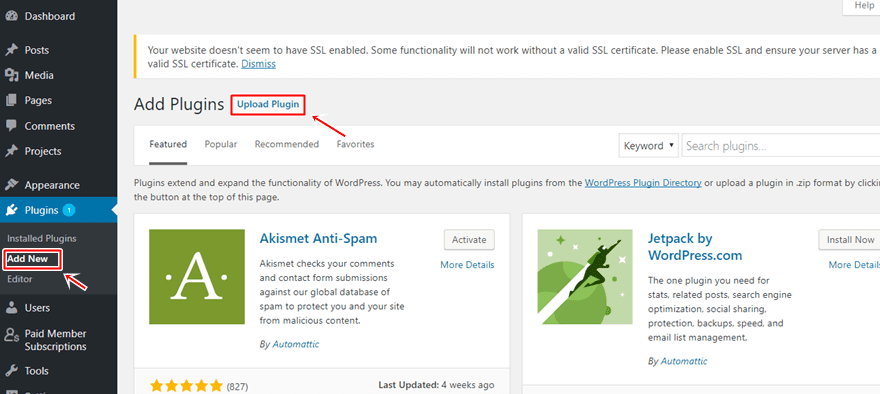
Step 2: Upload & Activate Plugin
Once you’ve downloaded the plugin, go to your WordPress website > Plugins > Add New and upload the plugin. Once it’s uploaded, make sure you activate it as well.
Part 2: Change Plugin Settings
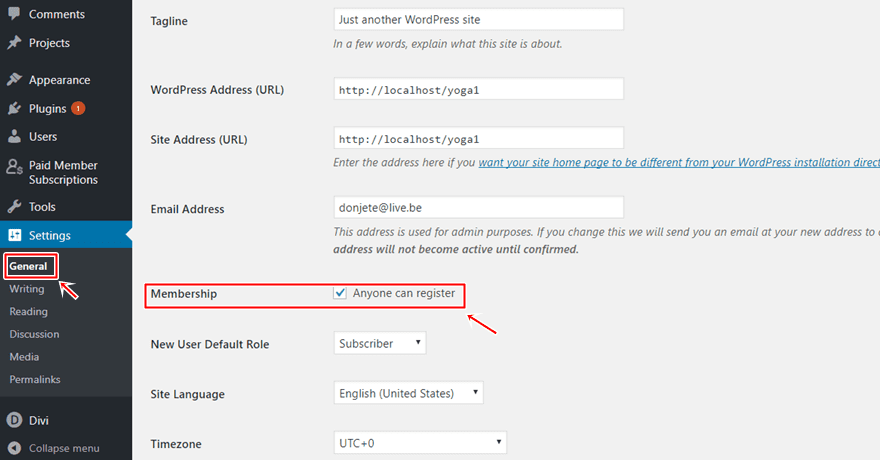
Step 1: Enable Membership For Everyone
If you want to make your registration form show up to all of your visitors, you have to enable an option within your settings. To do that, go to your WordPress website > Settings > General > Enable the ‘Anyone can register’ membership option.
Step 2: Choose Currency
Then, you have to choose the currency you use by going to Paid Member Subscriptions > Settings > Payments > Choosing a currency.
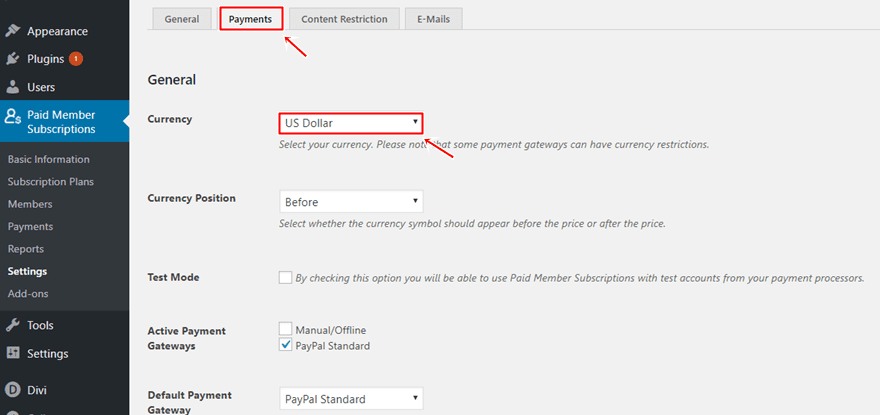
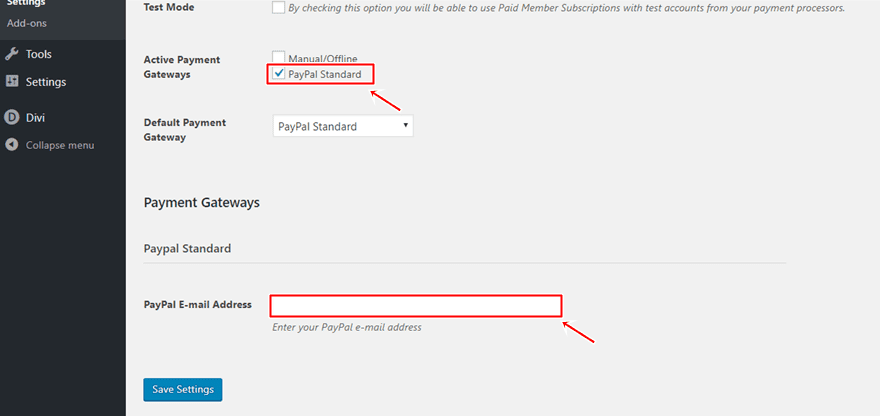
Step 3: Add PayPal Email Address
Scroll down the Payments tab to add your PayPal email address as well. This free plugin only allows you to receive payments through PayPal or manually/offline. Once you’ve added your PayPal email address to your settings, people who register will be redirected to the PayPal page to make a purchase.
Part 3: Add Subscription Plans
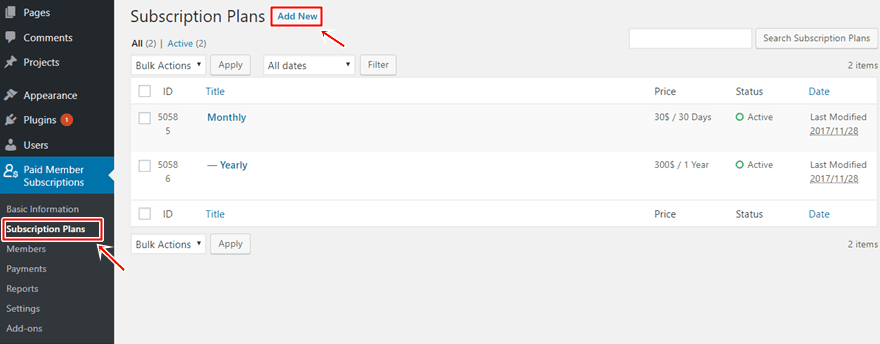
Step 1: Add New Subscription Plan
Once you’ve changed your settings, you can add subscription plans to your plugin. To do that, go to Paid Member Subscriptions > Subscription Plans > Add New.
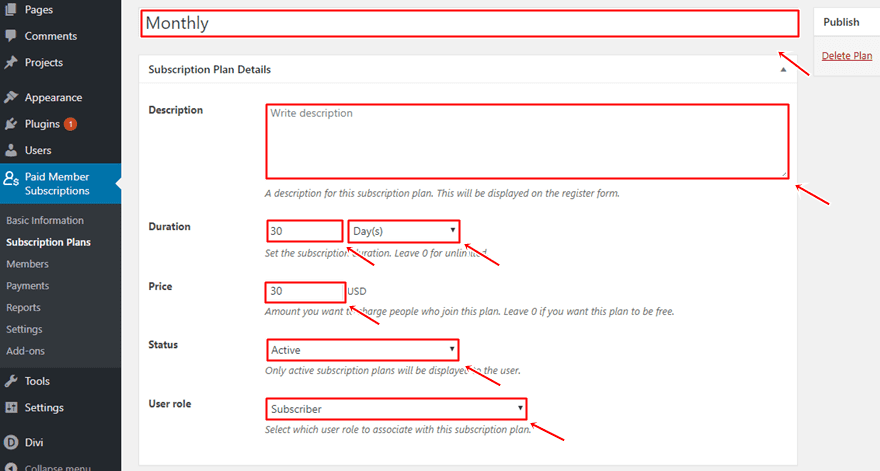
Step 2: Choose Copy & Settings
You can add a title, description, duration, price status and user role to your subscription plan that will match with your own yoga studio subscription plans. Create as many subscription plans as you need. Depending on if their status is active or not, these will show up on the registration form.
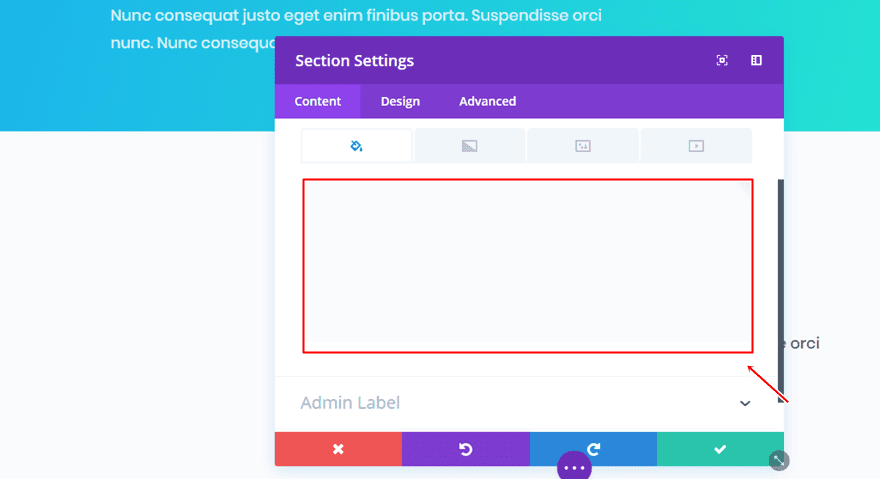
Part 4: Create Member Registration Page
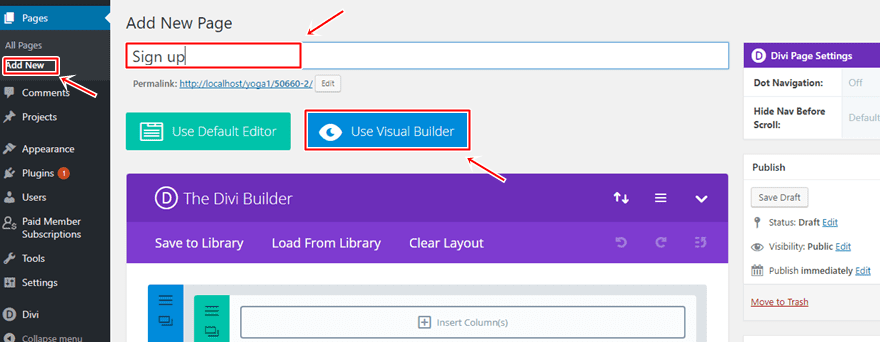
Step 1: Add New Page & Switch Over to Visual Builder
In this next part, we’re going to show you how to create a registration page using the free Divi Layout Pack. The first thing you will need to do, is creating a new page and give it a matching title. Then, enable the Divi Builder and switch over to Visual Builder right away.
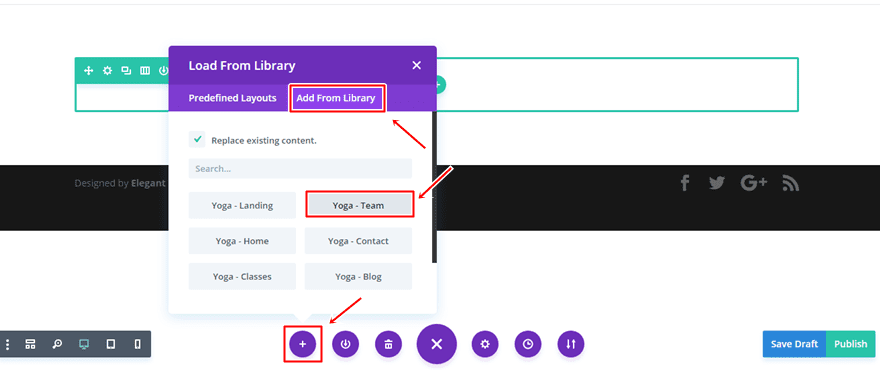
Step 2: Upload Team Layout
For this page, we’re going to upload the Team Layout of our Yoga Layout Pack and make modifications to it.
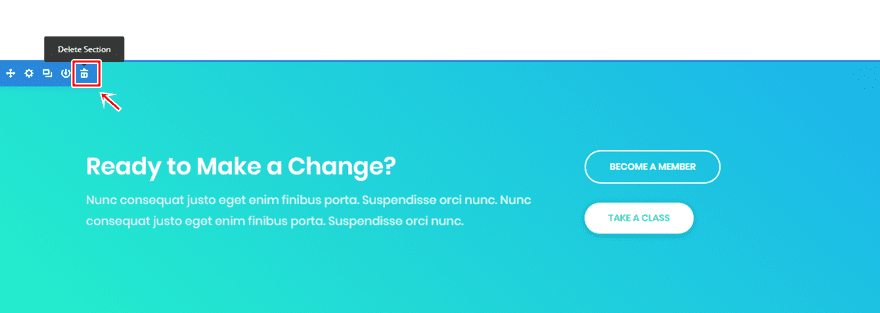
Step 3: Remove the Last Section
The first thing you’ll need to do is remove the last section because it contains a call to action to become a member. Since we’re already on the registration page, this isn’t really necessary.
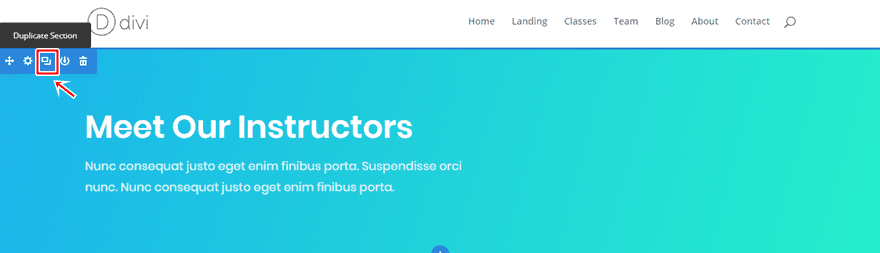
Step 4: Clone First Section (To Create Member Registration Section)
Then, clone the first section of the page once. We’ll use this cloned section to add the registration form. In the meantime, we’ll also reuse the Text Module to give our registration form and team section the right title.
Step 5: Remove Gradient Background Color of New Section & Add Background Color
Once you’ve cloned the first section, go ahead and remove the gradient background of it. Then, you can add ‘#fafbfc’ as the background color instead.
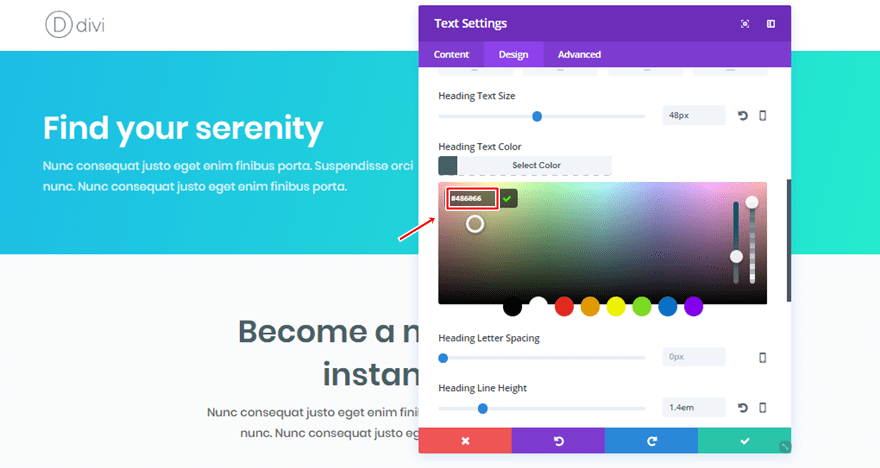
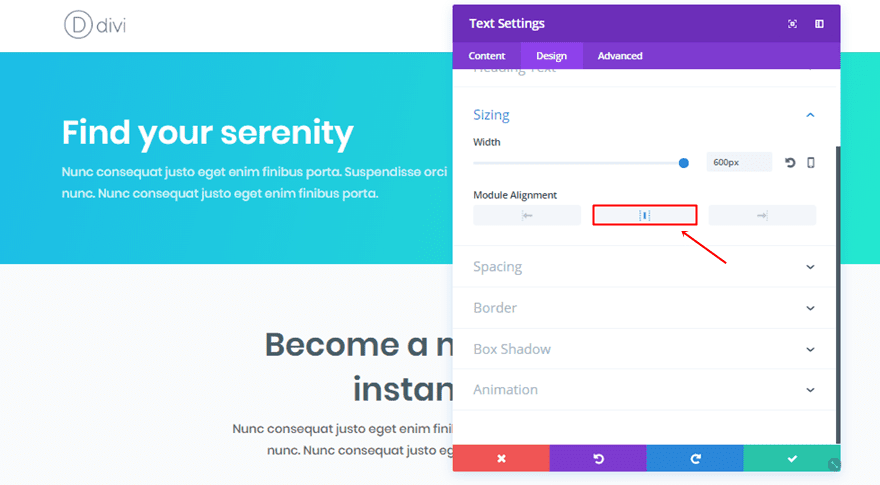
Step 6: Change Text Module within Member Registration Section
We’ll also need to make some changes to the Text Module. Besides changing the content, make the following changes to the Text subcategory:
- Text Color: #666666
- Text Orientation: Center
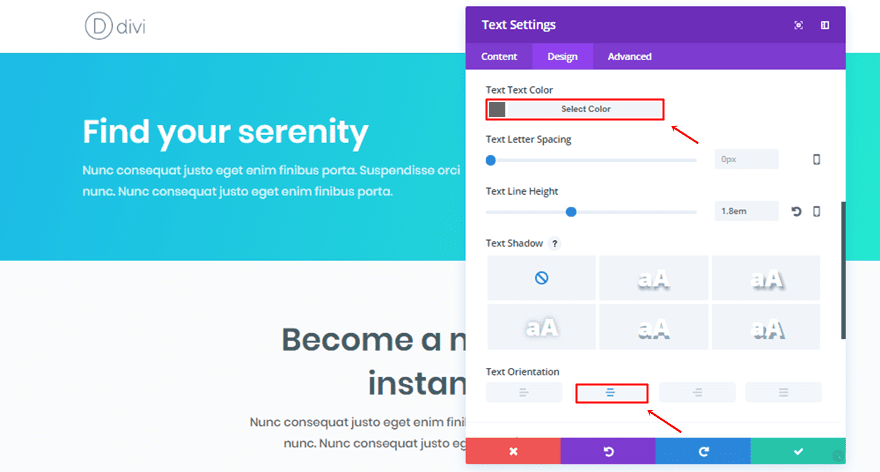
And the Header Text Color within the Header Text subcategory to ‘#486066’.
Lastly, change the Module Alignment in the Sizing subcategory to center.
Step 7: Clone Row of Member Registration Section & Place in Team Section
Then, clone the row with the Text Module and place it in the team section as well. Of course, make sure you change the copy to match that section.

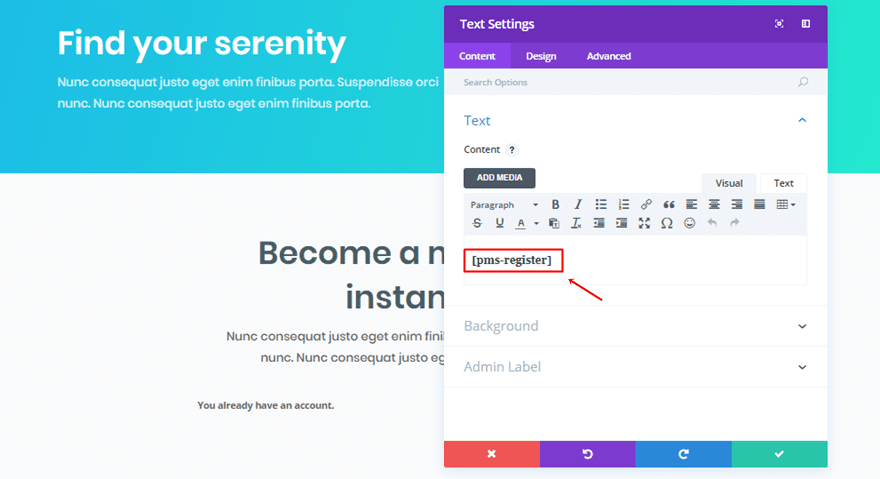
Step 8: Add New Text Module with Registration Shortcode to Existing Row of Member Registration Section
Now, it’s time to add the member registration form to your page. To do that, add a new Text Module to the existing row within the registration section. Before adding the shortcode, go to the Design tab of the Text Module and make the following changes to the Sizing subcategory:
- Width: 61%
- Module Alignment: Center
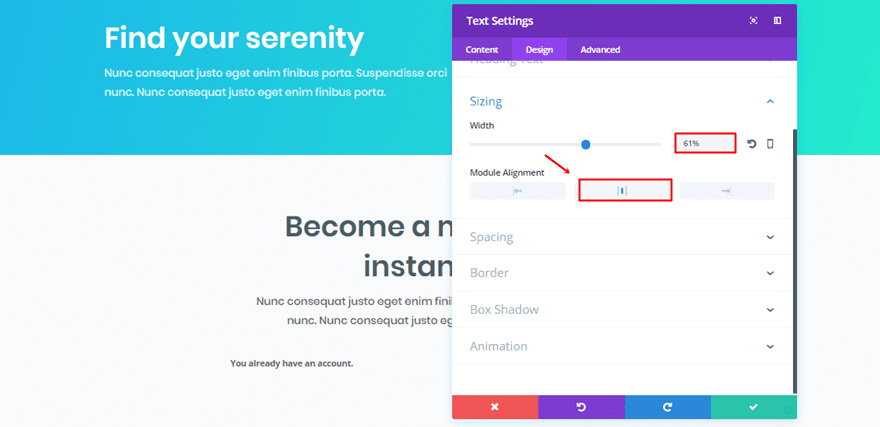
Then, add the ‘[pms-register]’ shortcode to the Content Box of the Content tab.
Step 9: Modify Registration Form of Paid Members Subscriptions Plugin With CSS Code
Without any modifications, the registration form doesn’t match the yoga layout pack. The Paid Member Subscriptions plugin is a third-party plugin which, unfortunately, doesn’t make it possible to use the Divi Builder to style the form. We can, however, use some CSS code lines to make the registration form match the layout pack. And that’s exactly what we did. You can copy the following CSS code and place it in Theme Customizer > Additional CSS:
#pms_register-form input[name="pms_register"] {
background: none;
border-radius: 50px;
padding-top: 12px;
padding-left: 36px;
padding-right: 36px;
padding-bottom: 12px;
border: 2px solid #44D89E;
color: #44D89E;
font-family: poppins;
font-weight: 600;
text-transform: uppercase;
font-size: 14px;
}

.et_pb_text ul {
list-style-type: none;
}

#pms_register-form input[type="text"] {
border-radius: 6px;
-webkit-box-shadow: 0px 10px 24px 6px rgba(0,0,0,0.16);
-moz-box-shadow: 0px 10px 24px 6px rgba(0,0,0,0.16);
box-shadow: 0px 10px 24px 6px rgba(0,0,0,0.16);
border: none;
padding-top: 12px;
padding-bottom: 12px;
margin-top: 10px;
}

#pms_register-form input[type="password"] {
border-radius: 6px;
-webkit-box-shadow: 0px 10px 24px 6px rgba(0,0,0,0.16);
-moz-box-shadow: 0px 10px 24px 6px rgba(0,0,0,0.16);
box-shadow: 0px 10px 24px 6px rgba(0,0,0,0.16);
border: none;
padding-top: 12px;
padding-bottom: 12px;
margin-top: 10px;
}

div.et_pb_text_inner #pms_register-form {
text-align: center;
}

form#pms_register-form label{
font-family: poppins;
font-weight: normal;
}

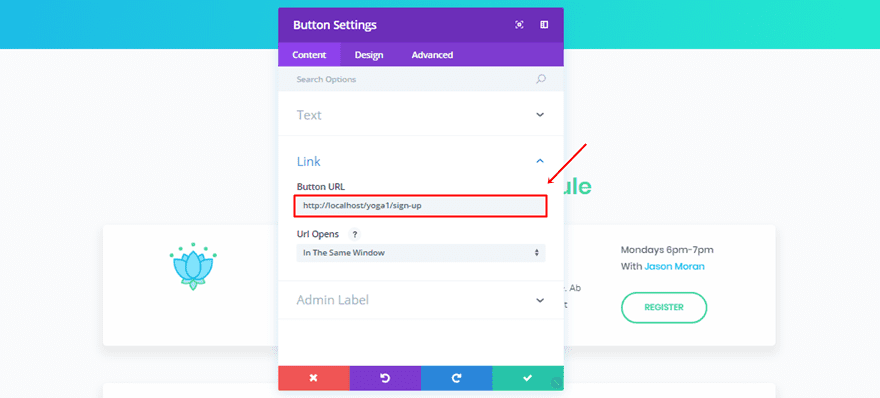
Step 10: Link Registration Page to Your Calls to Action
The last part of adding the registration page to your website is linking all the calls to action to that page. You simply have to open the Button Modules and add the registration page link to the Link subcategory within the Content tab:
Part 4: Manage Members
Step 1: View Full List of Members
There are two places where you can see the members on your website. The first place is the user section on your WordPress dashboard.
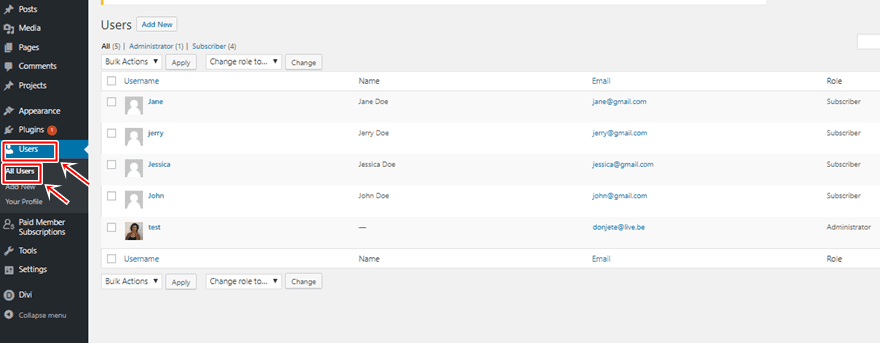
But, you can also see the users within your Paid Member Subscriptions plugin.
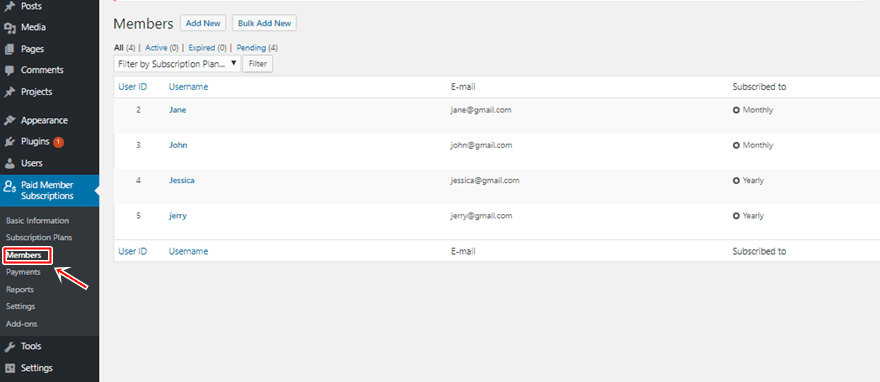
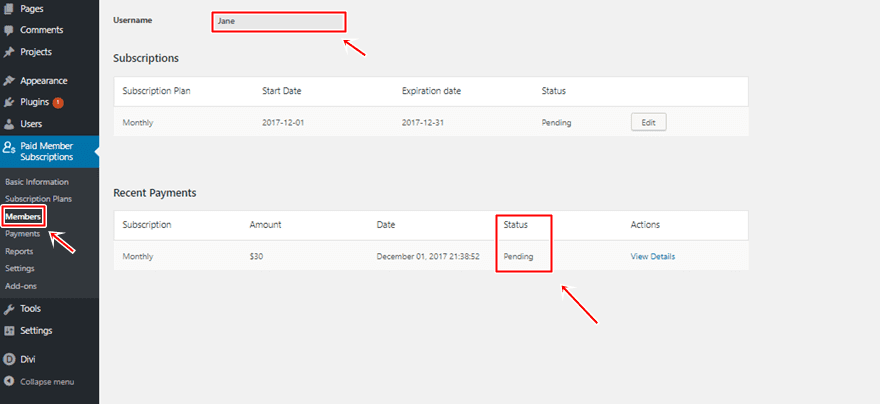
Step 2: View Payment Status
One of the things you can see within the plugin, which you can’t see in the user section on your WordPress dashboard, is the payment status.
Part 5: Use Other Shortcodes According to Your Needs
The Paid Member Subscription plugin offers you other options as well. You can add an account, subscriptions, login or recover password shortcode to any page you want.
Final Thoughts
In this post, we’ve shown you how to add memberships to yoga studio website. This post is a use case of the free Yoga Layout Pack which is part of the ongoing Divi design initiative where we provide you with free layout packs that’ll help you create beautiful websites with high-quality images included. If you have any questions or suggestions; make sure you leave a comment in the comment section below.
Be sure to subscribe to our email newsletter and YouTube channel so that you never miss a big announcement, useful tip, or Divi freebie!
Featured Image by Danielala / shutterstock.com


Done everything exactly but whenever I add the CSS code it gives me a 3 errors warning, and caution this could break your site. If I save anyway I just get standing input boxes and nothing like yours?
Just replace " with real quotes 🙂
How would you go about if one has the need of both memberships AND class bookings?
Wonderful, that’s really useful.
Hi there! Thank you for this! It’s actually exactly something we’re working on right now. A couple of questions: Is PMS better than Restrict Content Pro? Been experimenting with that, should we switch to this you think? Do they work together – wherein we have restrictions put in and just use PMS to beautify membership forms?
Thanks a ton!
I’ve used the membership plugin before but with Divi it takes it to a higher level.
This is super interesting! Thank you 🙂