

Every week, we provide you with a new and free Divi layout pack which you can use for your next project. Along with every layout pack, we also share a use case that’ll help you take your website to the next level.
This week, as part of our ongoing Divi design initiative, we’re going to show you how to add an e-book optin form with an immediate download to Divi’s SEO layout pack landing page. This way of approaching your optin forms is a win-win situation for both you and your visitors. You’ll be able to grow your email list and your visitors will be able to download valuable content right after sharing their name and email address with you. You won’t have to provide your visitors with an email containing the download; they’ll be able to click on the download button right away.
- 1 Use Case Sneak Peek
- 2 The Setup
- 3 Part 1: Download & Install the Bloom Plugin
- 4 Part 2: Create a Locked Content Optin Form
-
5
Part 3: Add Locked Content Optin Form to Landing Page
- 5.1 Step 1: Change Hero Section Spacing
- 5.2 Step 2: Remove Current Row
- 5.3 Step 3: Add One-Column Row
- 5.4 Step 4: Clone ‘Our Services’ Text Module & Place in New Row
- 5.5 Step 5: Change Text Subcategory
- 5.6 Step 6: Change Heading Text Subcategory
- 5.7 Step 7: Change Sizing
- 5.8 Step 8: Add New Text Module
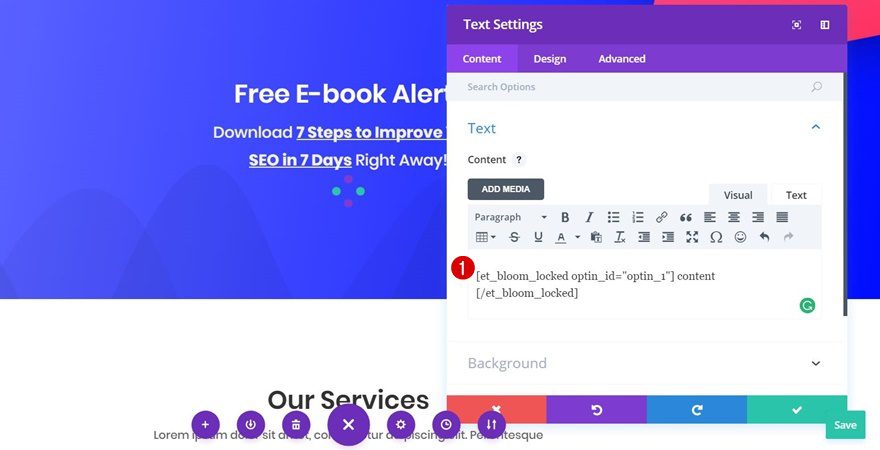
- 5.9 Step 9: Add Locked Content Optin Form Shortcode to Text Module
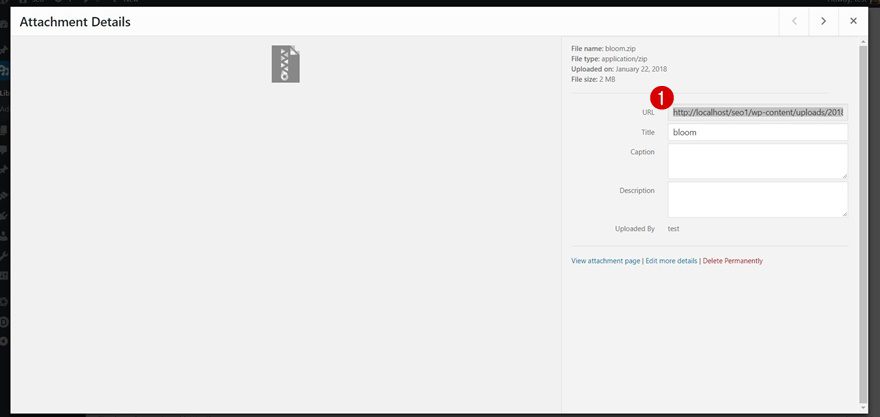
- 5.10 Step 10: Add Downloadable Zipped File to Media & Copy Link
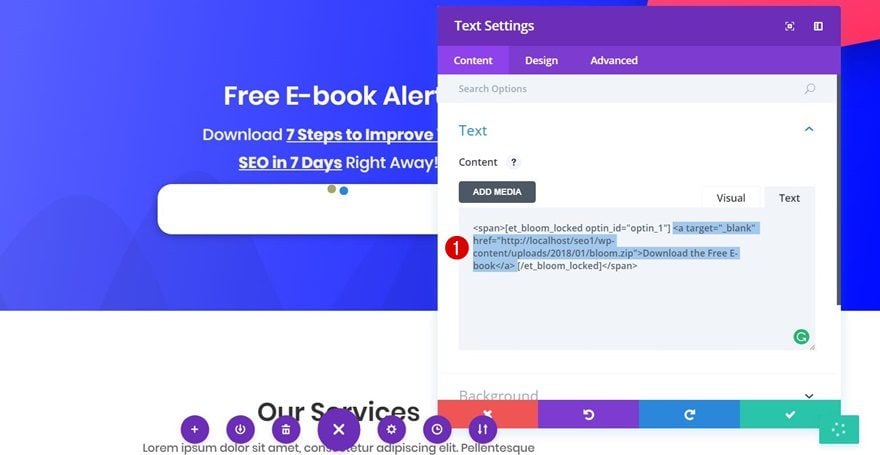
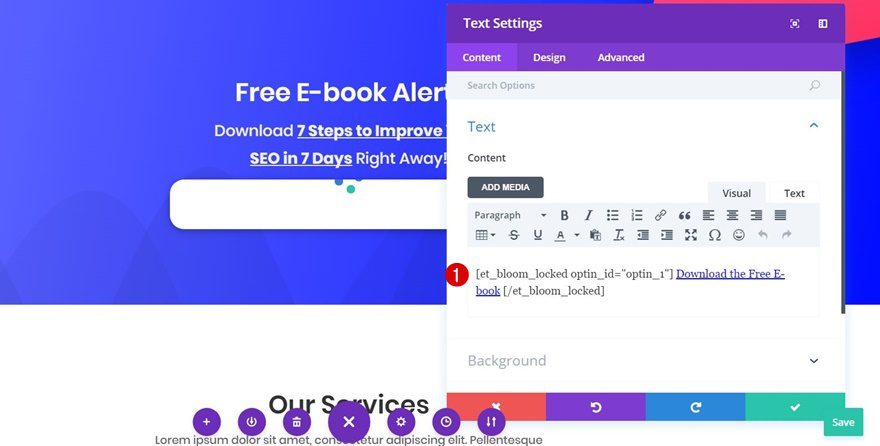
- 5.11 Step 11: Add Download Link Between Locked Content Optin Form Shortcode
- 5.12 Step 12: Add Background Color to Text Module
- 5.13 Step 13: Text Settings
- 5.14 Step 14: Sizing
- 5.15 Step 15: Spacing
- 5.16 Step 16: Border Settings
- 5.17 Step 17: Box Shadow
- 6 Final Thoughts
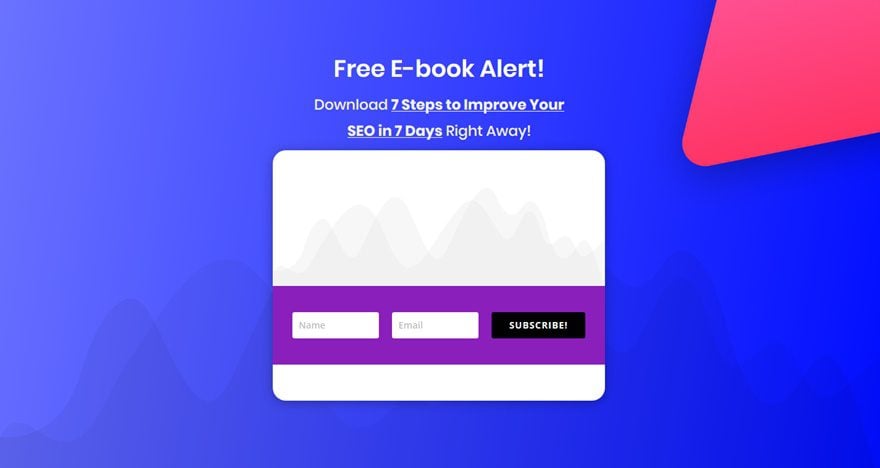
Use Case Sneak Peek
The custom and locked content opt-in form we’re going to add to the landing page looks like this:
After someone subscribes to your optin form, the following button will show up (instead of the optin form) on which they can click and start a download right away:

The Setup
1. Install and activate the Divi Theme
2. Install Plugins
3. Download the Layout Pack and Import the SEO_All.json file to your Divi Theme Library.
4. Create new pages for each layout.
5. Create your primary menu.
If you are confused by the setup listed above, you can find more detailed instructions on how to setup your layout properly by checking out these 10 steps for using a layout pack for your new project.
Part 1: Download & Install the Bloom Plugin
Step 1: Download Bloom
The first thing you’ll need to do is download the Bloom plugin. If you’re an Elegant Themes member, you can find the plugin in the Member’s Area after you log in. If you’re not an Elegant Themes member yet, go to the following page to become a member of our empowered community.
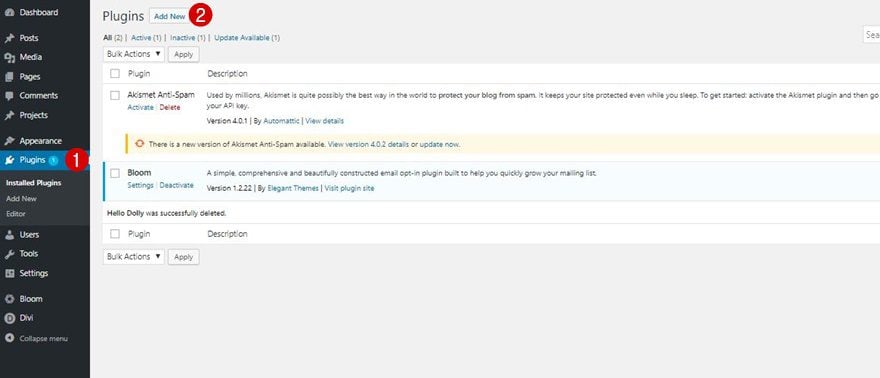
Step 2: Upload & Install Bloom
Once you download the Bloom plugin, go to your WordPress dashboard > Plugins > Add New > Upload Bloom and make sure you activate it as well.
Part 2: Create a Locked Content Optin Form
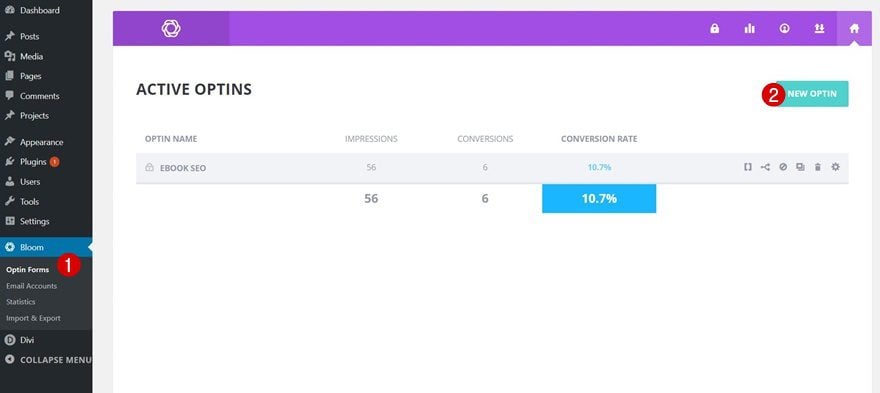
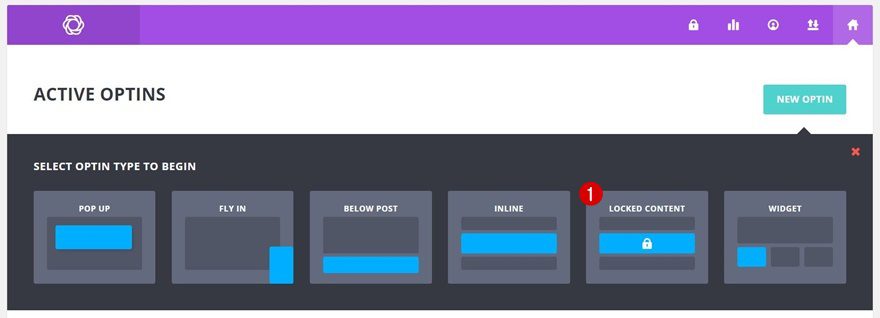
Step 1: Go to Bloom & Click on New Optin
The first thing we’re going to do is create a new locked content optin form for our website. To do that, go to Bloom > Optin Forms > And click on ‘New Optin’.
Step 2: Select Locked Content Optin Form
Once you click on ‘New Optin’, you’ll see a wide range of optin forms show up. The one we’ll be needing is the ‘Locked Content’ one.
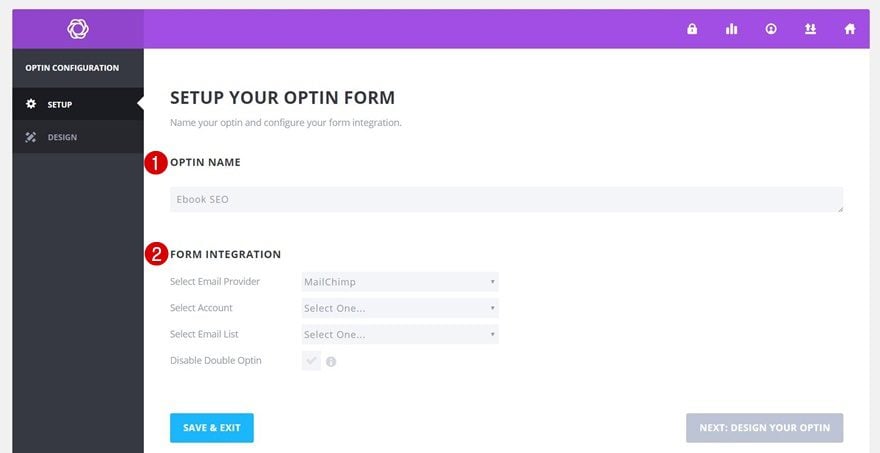
Step 3: Setup Form Integration
The next thing you will need to do is give a name to your new optin form and enable a form integration with the email provider you’re using.
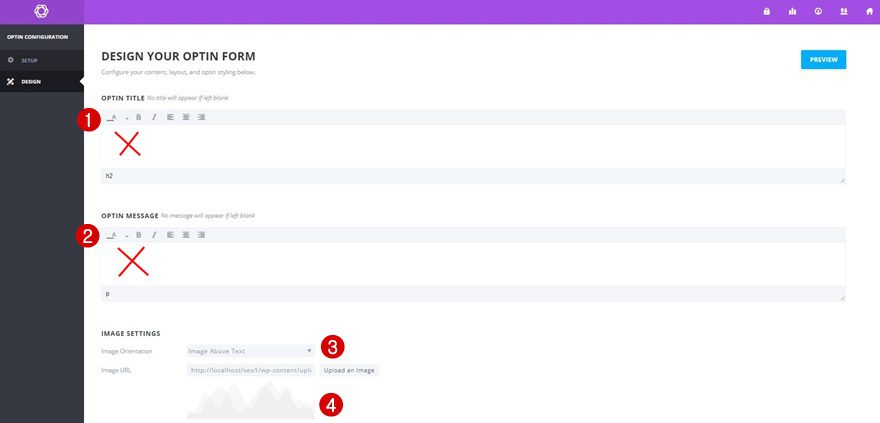
Step 4: Design Settings
Now that you’ve finished the practical part of the optin form, you can go ahead and change the design of it. The first thing you will need to do is remove the optin title and optin message altogether. Then, select ‘Image Above Text’ as the Image Orientation and select ‘section-bg-graph.png‘ as your image. This image is, after adding the SEO layout pack to your website, already present within your media folder.
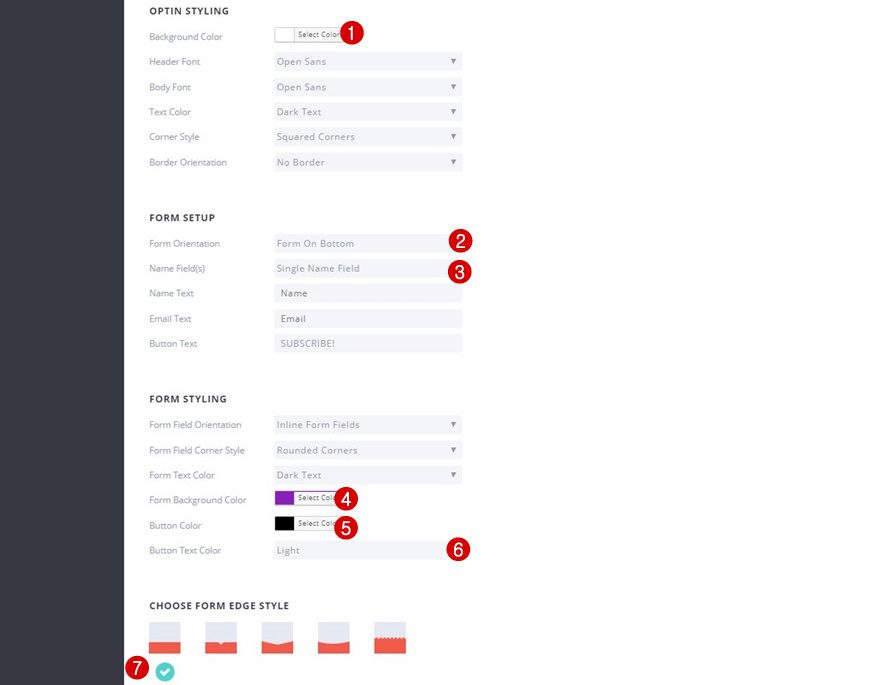
Scroll down the Design page and make sure the following changes apply to your optin styling, form setup and form styling:
- Background Color: #FFFFFF
- Form Orientation: Form on Bottom
- Name Fields: Single Name Field
- Form Background Color: #8a1fbb
- Button Color: #000000
- Button Text Color: Light
Step 5: Additional CSS Code
Last but not least, we’ll be adding some additional CSS code that will make our optin form look just a little better:
.et_bloom .et_bloom_form_header img, .et_bloom .et_bloom_form_header .et_bloom_form_text {
padding: 0px !important;
}

.et_bloom .et_bloom_form_container .et_bloom_form_header {
padding: 0px !important;
}

Part 3: Add Locked Content Optin Form to Landing Page
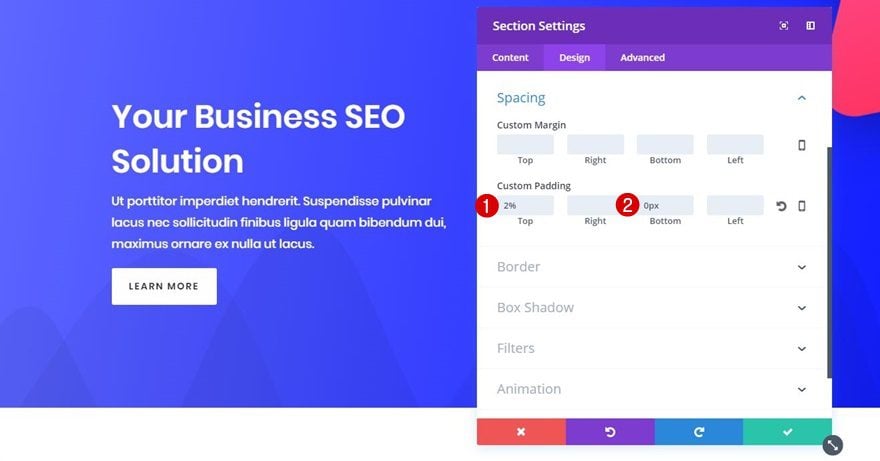
Step 1: Change Hero Section Spacing
Now that we’ve created the locked content optin form, we’re ready to start adding it to the landing page. Start off by opening the landing page with the visual builder, opening the hero section settings and changing the custom padding into:
- Top: 2%
- Bottom: 0px
Step 2: Remove Current Row
Continue by removing the row that’s currently being used within the hero section.
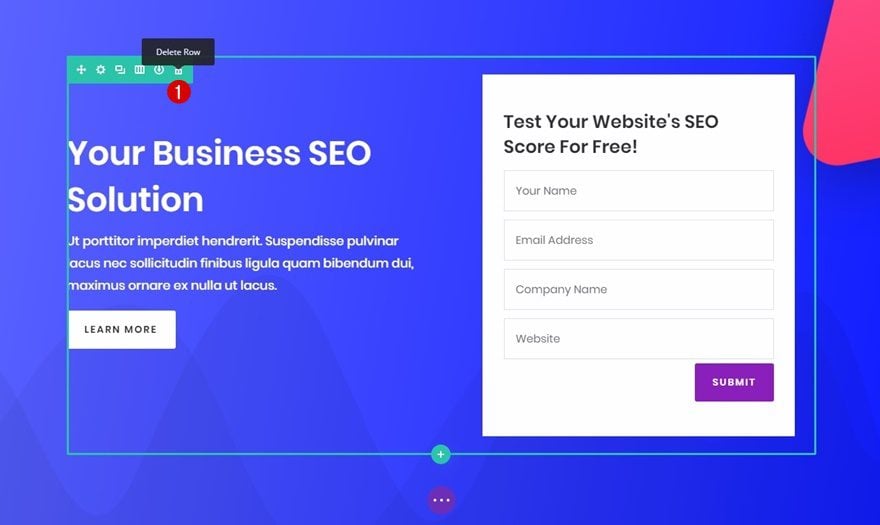
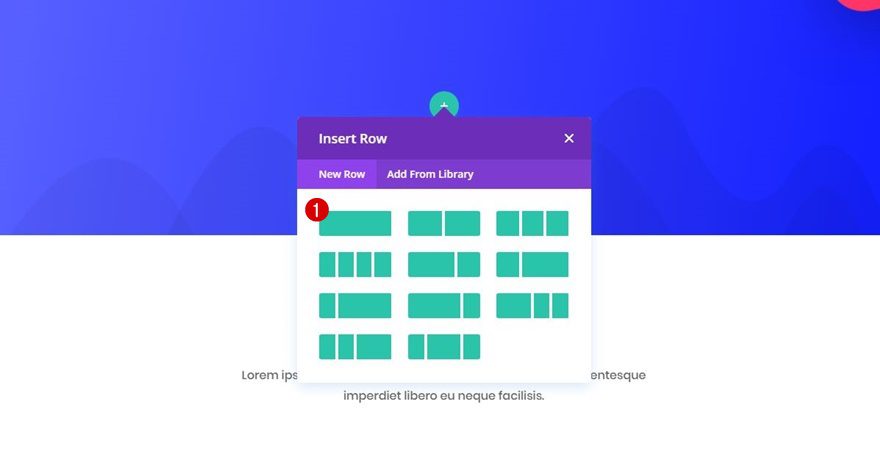
Step 3: Add One-Column Row
And, instead, add a row with one column to your section.
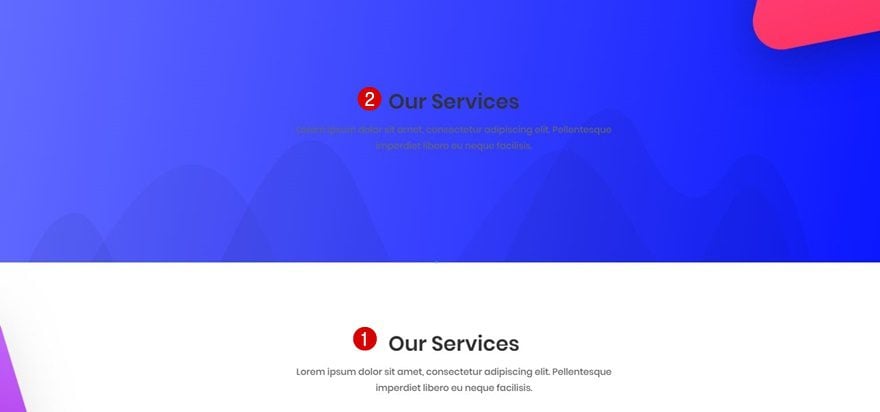
Step 4: Clone ‘Our Services’ Text Module & Place in New Row
Then, clone the ‘Our Services’ Text Module within the second section of the page and place it within the row you’ve just created.
Step 5: Change Text Subcategory
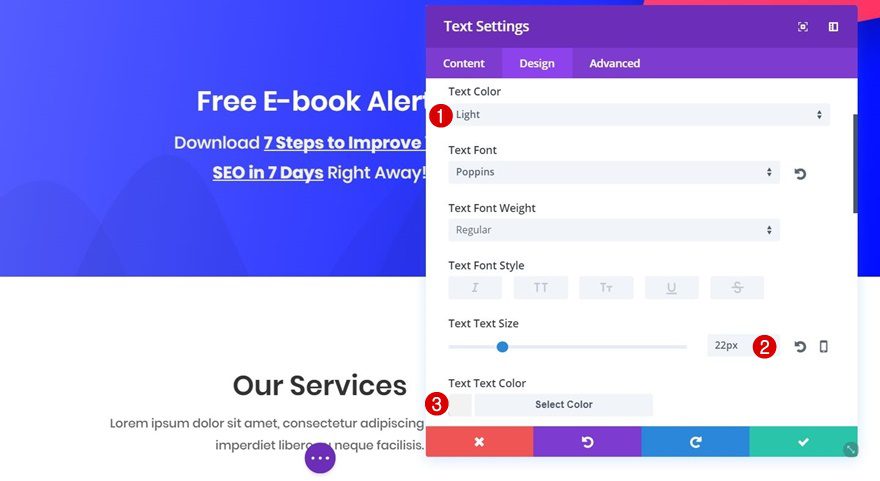
We’ll need to make some modifications to this Text Module. Besides changing the content, make the following changes to the Text subcategory:
- Text Color: Light
- Text Size: 22px
- Text Color: #f2f2f2
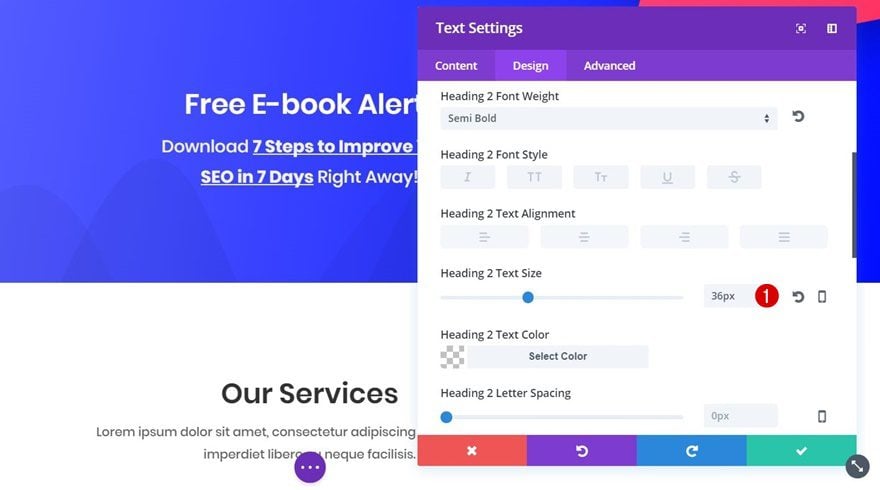
Step 6: Change Heading Text Subcategory
Scroll down the Design tab, open the Heading Text subcategory and change the Heading Text Size into ’36px’ as well.
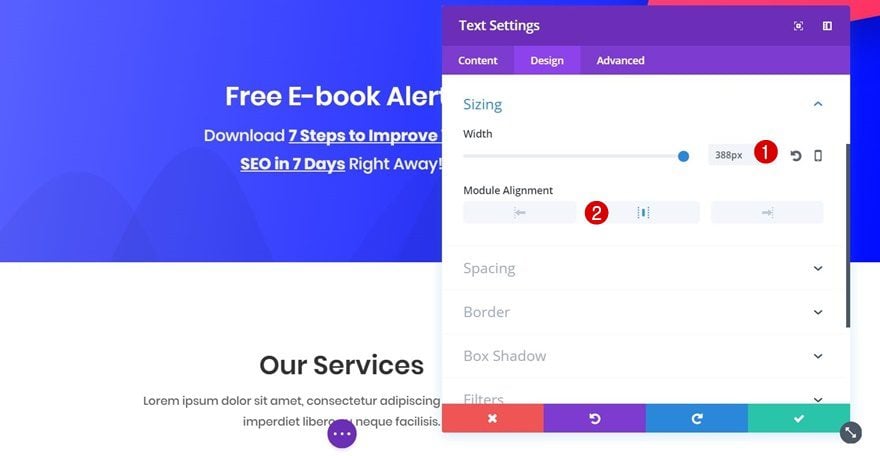
Step 7: Change Sizing
Next, open the Sizing subcategory and apply the following settings:
- Width: 388px
- Module Alignment: Center
Step 8: Add New Text Module
Right below the Text Module you’ve just edited, add another Text Module.
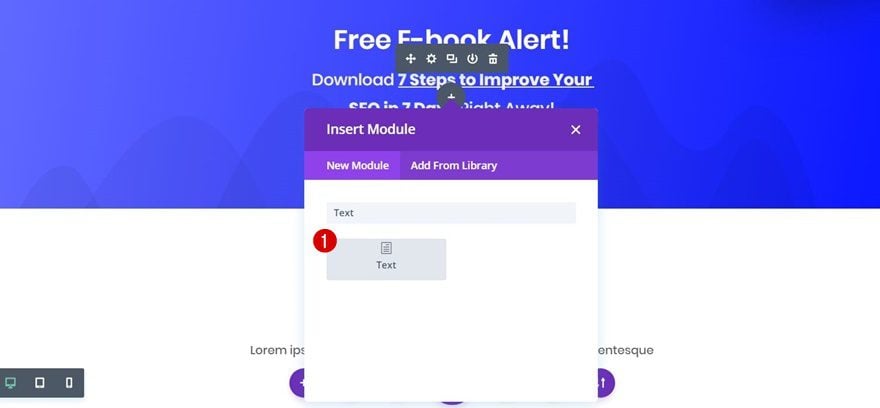
Step 9: Add Locked Content Optin Form Shortcode to Text Module
The first thing you’ll need to add to this Text Module is the shortcode of the locked content optin form we’ve created at the beginning of this post.

Step 10: Add Downloadable Zipped File to Media & Copy Link
Then, add a zipped file to your media folder containing the content you’d like to share with your visitors for free. Once you’ve added the zipped file, copy the link assigned to your zipped file.
Step 11: Add Download Link Between Locked Content Optin Form Shortcode
Right in between your optin form shortcode, add the link to your zipped file. Make sure you use your own zipped file URL for the ‘href’:
<a target="_blank" href="">Download the Free E-book</a>
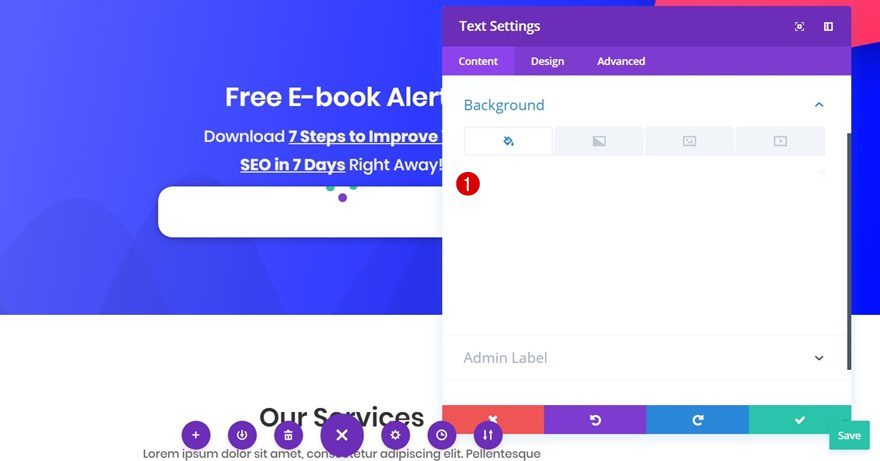
Step 12: Add Background Color to Text Module
Next, open the Background subcategory of your Text Module and change the background color into ‘#FFFFFF’.
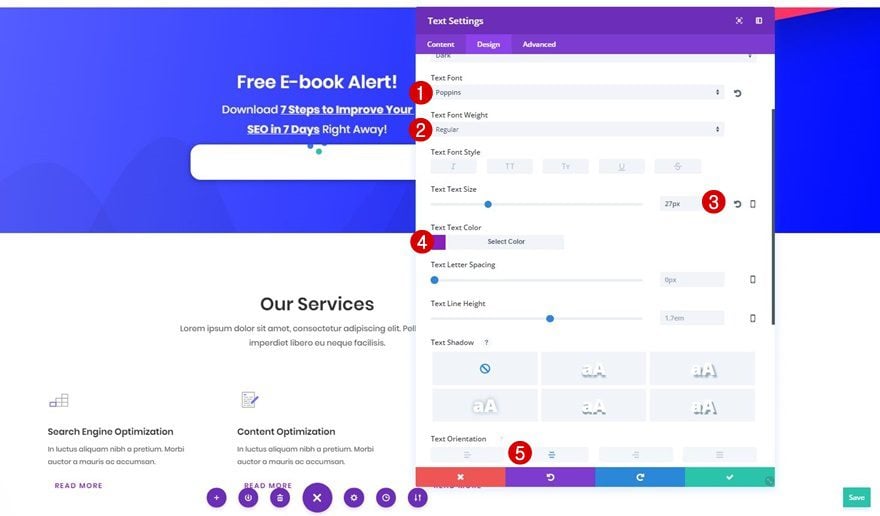
Step 13: Text Settings
Move on to the Design tab, open the Text subcategory and apply the following changes to it:
- Text Font: Poppins
- Text Font Weight: Regular
- Text Size: 27px
- Text Color: #8a1fbb
- Text Orientation: Center
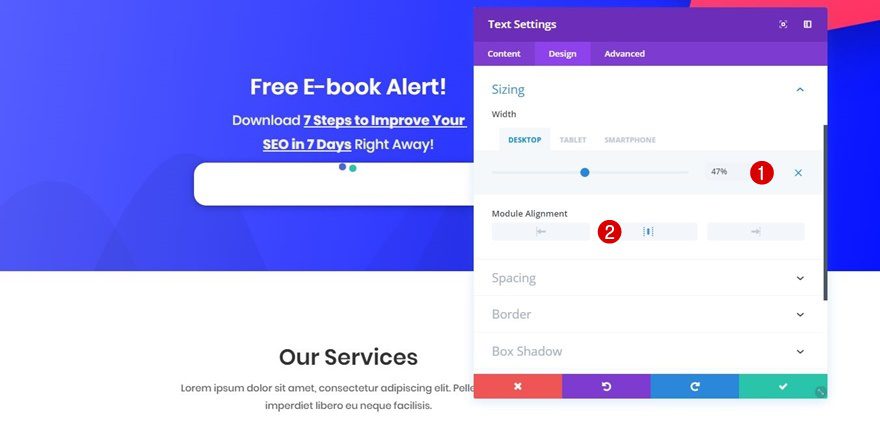
Step 14: Sizing
Then, open the Sizing subcategory and use the following settings for it:
- Width: 47% (Desktop), 100% (Tablet & Phone)
- Module Alignment: Center
Step 15: Spacing
This Text Module will need the following custom padding as well:
- Top: 0px
- Bottom: 25px

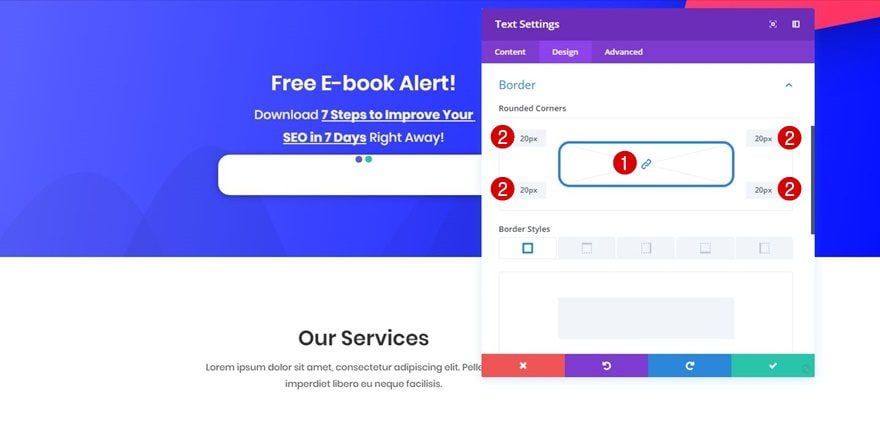
Step 16: Border Settings
Then, open the Border subcategory and add ’20px’ to each one of the corners.
Step 17: Box Shadow
Lastly, apply a subtle Box Shadow to your Text Module by clicking on the following Box Shadow option and using its default settings: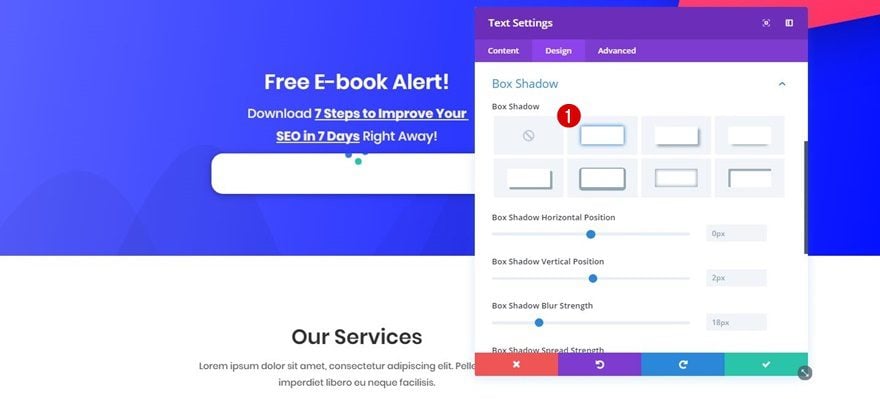
Final Thoughts
In this use case blog post, we’ve shown you how to add an e-book optin form to your website that immediately gets followed by a download button to Divi’s free SEO Layout Pack using Bloom. This use case is part of our ongoing Divi initiative where our design team shares a new layout pack with you each and every week. If you have any questions; make sure you leave a comment in the comment section below!


I have this method set up on my website and it has been giving problems lately. It doesn’t show the blue text with the link—just the white background. Please HELP!
Nice, thanks. How to make this happen in button instead of a text block? I’d like to use similar graphics in the download than other button links. Hovers etc.
Thank you for this tutorial. I have used Bloom many times already, but not as a locked content optin yet.
I have a lifetime membership. When I download the free layouts and open the zip file I get PDF files instead of json files. How can I fix this?
hello. Is there any way I can use this to deliver a webinar after the user types in their contact info into the locked content bloom pop up?
I would probably use Bloom if Elegant Themes integrated Mailchimp Groups. Been asking for that for ages.
Yes, this is critical.
+infinite
I have spent literally hours trying to develop a workaround and was hoping this tutorial would unveil one. I gave up and switched back to JotForm instead, which has its own downsides but Groups integration is more important.
Same here! Mailchimp groups integration needed urgently!!
How can we directly give them a downloadable pdf instead of a zip. Because customers first download zip, then unzip, and then openthe pdf. WE can reduce this one step. Isnt it?
Just upload the pdf instead of the zip; it will download the pdf (or if using most modern browsers, open the pdf in another window)
Very good article and very interesting. Thanks for sharing with all of us.
A nice tutorial, thank you. I appreciate the effort that went into it.
I find it unwittingly reveals a serious problem with the way that Bloom and Divi integrate. Copying shortcodes into Text Modules, copying links into shortcodes and then making Text Modules look like a button…it makes Pages and workflows so brittle and prone to breaking. Not to mention a documentation nightmare.
Bloom has some nice features, but I find it creates lots of additional little tasks to get it to work just right and then you have to remember all those hidden details and steps for next time.
Hopefully, ET will soon revamp Bloom to function more like the Visual Builder, and more in concert with Divi generally.
Cheers,
That’s exactly what I think about Bloom. Effective but too much manipulation.Too bad