

There are many reasons to display company logos on your website. A “Featured In” section of company logos could hold sway for potential investors or partners. Or an “Our Clients Include” section could establish valuable social proof with visitors. But whatever the reason, it is important to know how to add these logos to your website. In this tutorial, I’m going to go over three different methods for adding company logos to your website with Divi. I’ll even show you how to add logo galleries to any Divi Module!
Here is what will be covered in this tutorial:
- Preparing Your Logo Images
- Using the Divi Gallery Module to Display Logos with a Simple Drag and Drop
- Using the WordPress Gallery Embed to Display Logos
- Using the Divi Builder to Create a Custom Layout for Logos
Let’s get started!
- 1 Sneak Peek
- 2 Preparing your Logo Images
- 3 #1 Using the Divi Gallery Module to Display Company Logos (a simple drag and drop)
- 4 #2 Using the WordPress Gallery Embed to Display Company Logos (with any Divi Module)
- 5 #3 Using the Divi Builder to Create a Custom Layout for Company Logos
- 6 Final Thoughts
Sneak Peek
Here is a peek at a few of the designs possible using the techniques in this tutorial.
![]()
![]()
![]()
![]()
![]()
Preparing your Logo Images
When preparing your logos to be displayed on your website, it is important that you take the time to size your images using a photo editor before you add them to your site. This will save you the headache of trying to size and position your logos with custom widths, padding, or margins. Trust me. You don’t want to go down that road if you don’t have to.
Since every logo has a unique size, it is pretty much impossible to make them all have the exact dimensions. This is where a photo editor comes in handy. For example, using Photoshop, you can create a new file and set the document dimensions to whatever size you want all of your logo images to be (in this case 226px by 100px).
![]()
Then add the logo image to the document and resize and position the image directly in the center. Make sure it is a png image file with a transparent background.
![]()
Then export the image as a png file to keep the transparent background.
![]()
Then repeat the process for the rest of your logos.
You can keep the original color of the logo or use a photo editor to change them to whatever color you want. If you plan on adding your logos using a Divi (i.e. the image module or image gallery), you can always use Divi’s built-in filter effects to adjust the colors as well.
Subscribe To Our Youtube Channel
#1 Using the Divi Gallery Module to Display Company Logos (a simple drag and drop)
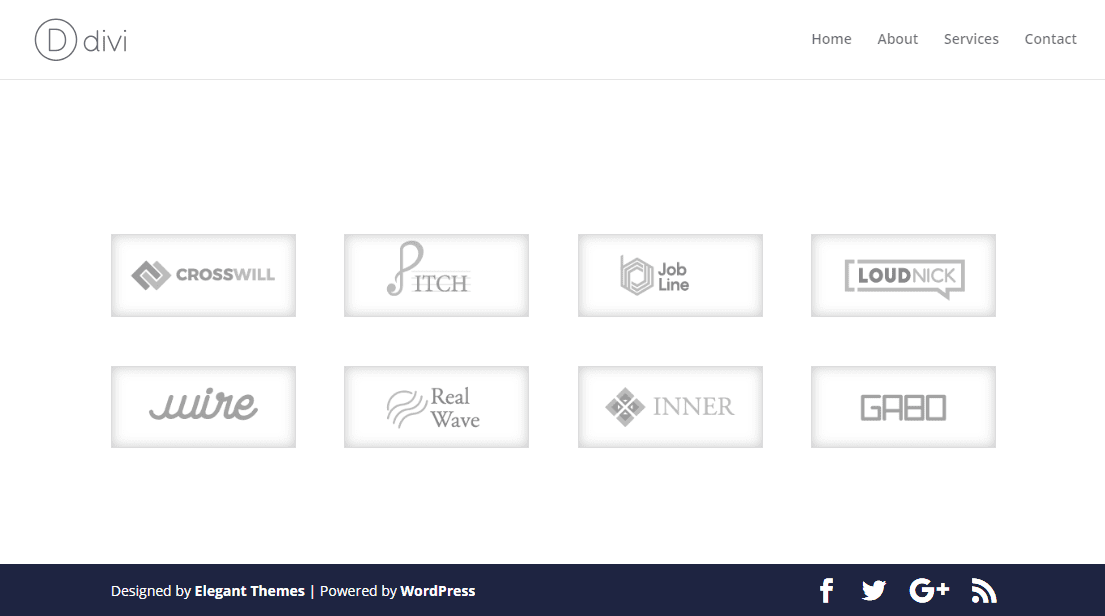
This first method for adding company logos to your site with Divi is pretty much as easy as it gets. Using Divi’s drag and drop feature, you can drag all of the company logos into the Divi Builder to instantly create and image gallery to display your logos in a grid.
To do this, create a new page and deploy the Divi Builder to build on the front end. Select the “Build from Scratch” option. Once the Divi builder is up and running, open the folder containing all of your images and select them. Then simply drag them into the browser window with the Divi Builder.
![]()
Divi will automatically add those images to a new Gallery Module and open the Gallery Settings to jump-start the customization process for you.
Since I’m adding 8 logo images and I don’t want to show any titles, captions or pagination, I can update the following:
Images Number: 8
Show Title and Caption: NO
Show Pagination: NO
![]()
By default, the gallery module will add a hover overlay with an icon for each image. You can adjust the overlay settings for the zoom icon color, the hover overlay color, or hover icon.
![]()
To keep things clean and simple, you can get rid of the hover overlay by setting the Zoom Icon Color and Hover Overlay Color to transparent.
After that, you can explore all of the design options to create unique designs for your image gallery. For example, you could add a border with a subtle box shadow.
Image Border Width: 1px
Image Border Color: #dddddd
Image Box Shadow: see screenshot
![]()
Here is how the final design would look on different browser sizes.
![]()
And because this gallery can be added to any column structure, you can easily create unique layouts for your company logos. Here is an example of a two column layout with a text module on the left and the image gallery module (with the logos) on the right. I added a background gradient just to show you a different look.
![]()
#2 Using the WordPress Gallery Embed to Display Company Logos (with any Divi Module)
You can also add company logos to your website using the WordPress Image Gallery shortcode. This is surprisingly easy to do and it is perfect for logos because in most cases, you won’t need to add custom styles to the images. What is great about this method is that you can deploy up to 9 columns for your logos that scale with your browser window allowing you to keep your column structure on mobile as well.
Here is how to do it.
In the Divi Builder, create a new section with a one-fourth three-fourths column structure.
![]()
Let’s say you want to have some text on the left of your company logos in a six column gallery. First add a text module in the left column and update the following:
Content: “As Featured In”
Text Font: Montserrat
Text Font Weight: Bold
Text Text Size: 26px
Text Orientation: center
![]()
Now add another text module in the right column. Under the content tab, delete the mock content currently there and click the “Add Media” button at the top of the content editor box.
This will bring up the Media Gallery popup. Next click the Create Gallery link in on the left of the popup. Then select the logo images you want to include in the gallery (i’m using eight images for this example). The click the Create Gallery button.
![]()
This will bring up the Edit Gallery page in the popup. Update the Gallery settings in the right sidebar as follows:
Link to: None
Columns: 8 (this should equal the number of images in the gallery so that they remain on one line)
Size: Full Size
Then click the Create a New Gallery button.
![]()
This will embed the necessary gallery shortcode built-in to WordPress and display the gallery inside the text module.
![]()
Now open the row settings, and update the following:
Make This Row Fullwidth: YES
Use Custom Gutter Width: YES
Gutter Width: 1
Equalize Column Heights: YES
With this setup, you have more room for you logos to breathe. Now all that is left to do is adjust the text on the left to be vertically aligned with the logos on the right. You could add the necessary custom padding to the left column to accomplish this, but in order to guarantee both modules remain vertically centered, you can add the following custom CSS to the Main Element under your Row Settings Advanced tab.
align-items: center;
This CSS works because we set Equalize Column Heights to YES, thus enabling the “display:flex” property for the row. For more info on this, check out how to vertically align content in Divi.
![]()
And to take out the gray border around our images, we need to add the following CSS snippet to our page settings:
.gallery img {
border: none !important;
}
![]()
Here is the final design.
![]()
Here it is with a black background added to the row.
![]()
On mobile, the columns do not break on any screen size. The images simply scale to a smaller size. I admit. Eight columns is probably too many on smartphone because the images become very small.
![]()
Embed Logo Galleries in Any Divi Module
Because this is an shortcode embed, you can add this gallery to almost any Divi Module which opens up a lot of different possibilities.
For example, you could add logo images inside of a toggle, an accordion, or even a tabs module.
Here is an example of a what it would look like when you add the wordpress gallery shortcode of your logos to two different tabs.
For this example, I selected 6 logos with 3 columns for each gallery.
![]()
This might come in handy for sites requiring a lot of logos.
#3 Using the Divi Builder to Create a Custom Layout for Company Logos
If you want to get a bit more creative with your company logo layouts, you can use the Divi Builder to design just about anything you can imagine. Divi’s row element supports column layouts up to 6 columns which is more than enough for most company logo layouts. I like the 6 column and 4 column layouts best for the logos in large part for how they respond on mobile.
In the following design, I’m going to show you some tips on how to take your company logo layouts to the next level.
First, let’s start with creating a new section with a six-column row.
Before we start adding anything to our columns, go to the row settings and update the following:
Custom Width: 90%
Gutter Width: 1
Equalize Column Heights: YES
Custom Padding: 4vw Top, 4vw Bottom
![]()
Save settings.
Then add an image module to your first column and then select one of your logo images.
![]()
Then continue to add a logo images to each column as follows:
Column 1: 1 logo
Column 2: 2 logos
Column 3: 3 logos
Column 4: 3 logos
Column 5: 2 logos
Column 6: 1 logo
![]()
Now with this setup, you can adjust the vertical alignment using a snippet of custom CSS. If you wanted to vertically center the content, you can add the same CSS snippet we add to vertically center our text next to the logo gallery in #2 above. Open the row settings and add the following CSS to the Main Element.
align-items: center;
![]()
As you can see, this creates a rounded layout for the logos.
But for this layout, I’m going to align the modules to the bottom of the row. So replace the “align-items: center” snippet with the following:
align-items: flex-end;
![]()
This aligns all the modules to the bottom of the row which will work well with the section Dividers that we will be adding.
Now we are ready to customize our section. Open the section settings and update the following:
Background: #2a3443
Top Divider Style: see screenshot
Top Divider Color: rgba(255,255,255,0.03)
Top Divider Height: 13vw
Top Divider Flip: vertical
Custom padding: 0px top, 0px bottom
![]()
For our heading, we are going to create a new section and place it above the section we just created. Create a new regular section with a one-column row structure.
Update the section settings as follows:
Background Color: #2a3443
Bottom Divider Style: see screenshot
Bottom Divider Color: rgba(238,238,238,0.09)
Bottom Divider Height: 13vw
Custom Padding: 0px bottom
![]()
Now save your settings and add a Text Module to the row and update the following:
For the content add the following:
<h2>As Featured In</h2>
Heading 2 Font: Montserrat
Heading 2 Font Weight: Bold
Heading 2 Text Alignment: center
Heading 2 Text Color: #ffffff
Heading 2 Text Size: 32px
Custom margin: 0px bottom
![]()
Finally, add an image module under the text module with a company logo that you want to stand out above the rest. Then update the following:
Image Alignment: center
Custom Margin: -75px
![]()
Check out the final result.
![]()
Final Thoughts
Creating a section on your website for company logos is actually pretty simple. Once you have the logo images properly sized using a photo editor, Divi can take care of the rest. The methods covered in this tutorial should give everything you need to create the layout you are looking to achieve with minimal effort. And with the power of Divi in your corner, you should have some fun creating some unique layouts of your own.
I look forward to hearing from you in the comments.
Cheers!


logos are almost always linked to a URL, but none of these examples mention which of these ways allow URL links, without the ability to link they aren’t going to help me, but thank you for the tutorial just the same.
You are right. I should have mentioned that in the post. #3 “Using the Divi Builder to Create a Custom Layout for Company Logos” will allow you to link each individual image to a custom url.
Thanks John paul!
Why can’t we just have a logo slider added to the modules?
Also, Divi seems not to be compatible with logo slider plugins out of the box…
Thanks anyways.
Cheers!
Hi, good afternoon. Thanks for the clear post. I.m going to try.
Love this! Thanks for posting such helpful detail. 🙂
Great Information….. Thank You So Much…….
this might seem silly but i am new to photoshop….how do you ‘Then add the logo image to the document and…’ i can’t figure out how to add the logo to the new image….newbie stuff!
Great stuff, Jason! Thank you.
Thanks, Mark! Glad you like it.