

As web designers, we are always looking for new and creative ideas to add to our websites. Thankfully, inspiration isn’t hard to find. For example, retro comic book art always makes a comeback. Sometimes it’s as typography, other times as photo filters. Lately, textures and illustrations with Ben Day dots are popping up in lots of places. Want to try them out for yourself?
In this article we’ll explain the origin of Ben Day dots and how to make them yourself. Additionally, we’ve got some examples of how to use this visual technique in web design.
- 1 Ben Day Dots and Half-Tone Dots
- 2 Ben Day Dots, Comic Books, and Roy Lichtenstein
- 3 The Rise of Retro Comic Book Art
- 4 How to Create Retro Comic Book Art With Photoshop
- 5 How to Create a Retro Comic Book Art Background With Illustrator
- 6 Ideas for Using Retro Comic Book Art in Web Design
- 7 Conclusion
Ben Day Dots and Half-Tone Dots
The terms “Ben Day dots” and “retro comic book art” tend to be used interchangeably. Actually, Ben Day dots came first. Benjamin Henry Day Jr. created them in 1879, in order to cut costs of color printing. They are a technique which places equally distant dots on a grid. Red dots printed over white make pink, blue and yellow dots make green.
Ben Day dots were inspired by half-tone dots which were used for lithographic and photographic printing in black and white. Both dot styles are arranged on a square grid, but half-tone dots are of different sizes while Ben Day dots are all the same.
Ben Day Dots, Comic Books, and Roy Lichtenstein
In the 1930s comic books came into the scene in a big way and Ben Day dots was the go-to printing technique. Ben Day dots were not exactly a fine art until Roy Lichtenstein was inspired by their generic uniqueness in the 1960s. It was Roy Lichtenstein’s work with comic book art which brought Ben Day dots into the limelight. What Lichtenstein did was copy small sections of pulp comic book pages and turn them into large scale masterpieces.
Even though Roy Lichtenstein used dots which resembled Ben Day dots, they were a little different. Art historians will tell you that they are more suitably called “Lichtenstein Dots.” The main difference is that Ben Day dots were tiny and on a square grid, while Lichtenstein dots were on an offset diagonal grid and considerably larger.
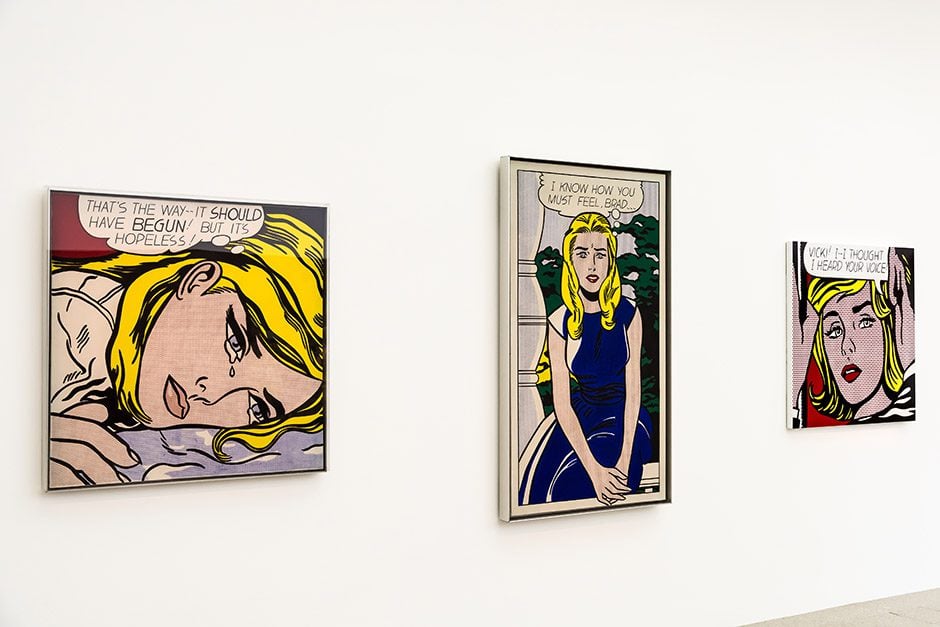
image credit Radu Bercan / shutterstock.com
The Rise of Retro Comic Book Art
Roy Lichtenstein’s art has become synonymous with retro comic book art. Plenty of artists have copied the Lichtenstein technique. Many designers have used comic book dots in their creations for branding schemes and marketing materials. Now you can add Ben Day dots or Lichtenstein dots to your websites as well.
Scroll through to learn how to make your own Ben Day dot creations. The final designs you will achieve will actually cover a variety of techniques; half-tone dots, Ben Day dots, and Lichtenstein dots. All in all, they are all retro comic book style design.
Let’s get to it.
How to Create Retro Comic Book Art With Photoshop
Half-tone dots are so common that Photoshop has a filter for them and it works with any image. What this filter does is turn the colors in the image into dots. The angle distribution of the dots is controlled by the color channels. When you apply the filter, your image is now made up of cyan, magenta, yellow and black dots. If you apply the half-tone filter to a pure color like red (#ff0000), green (#00ff00), or blue (#0000ff), the filter will not work because it will have no colors to separate from.
In order to create proper Ben Day dots and Lichtenstein dots, you need Adobe Illustrator. Click here to skip ahead.
How to Make a Photo Look Like Retro Comic Book Art in Half-Tone Dots with Photoshop
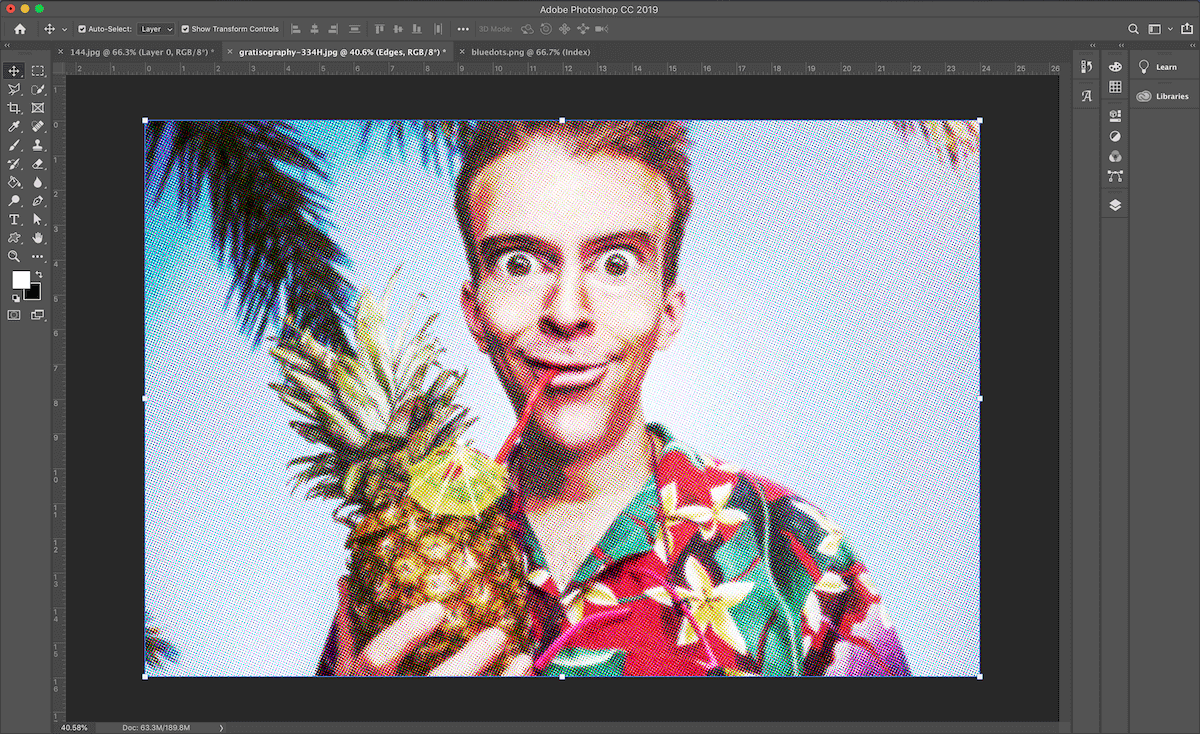
1. Choose the image you want to turn into comic book style dots.
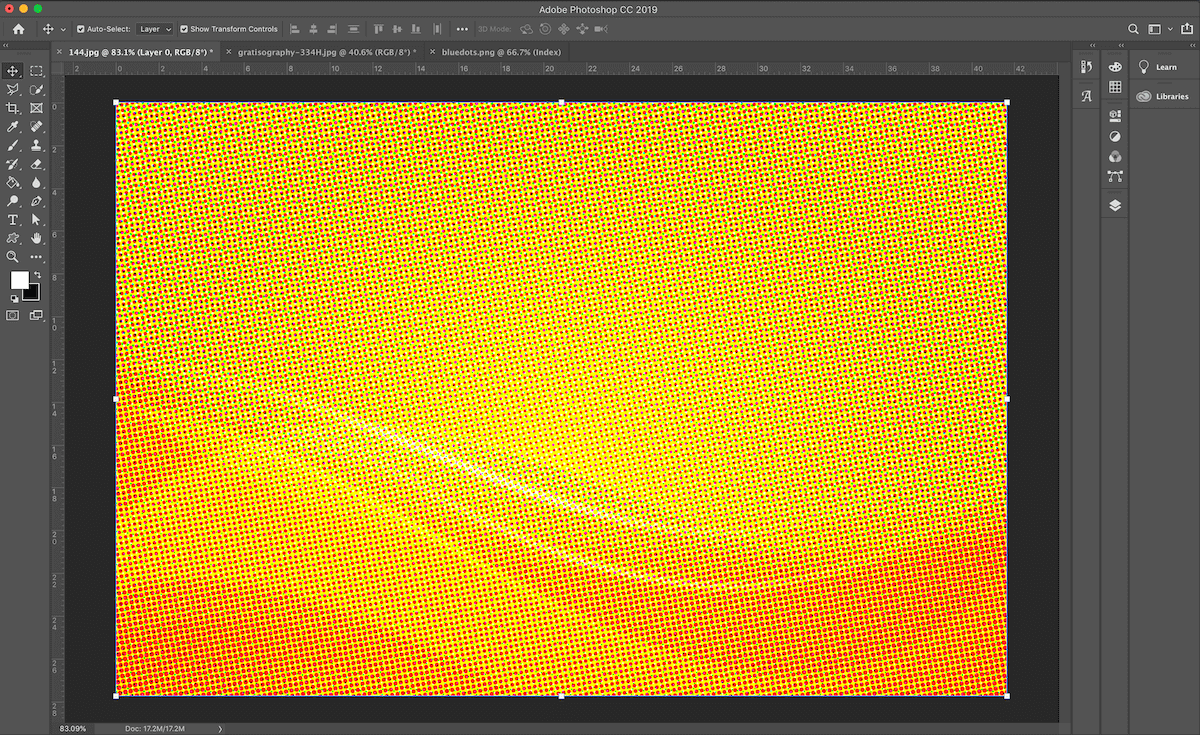
I chose this funny looking guy from the free stock photo site, Gratisography. Click here, if you want to use the same image to follow along. Open the image in photoshop and center it on your canvas.
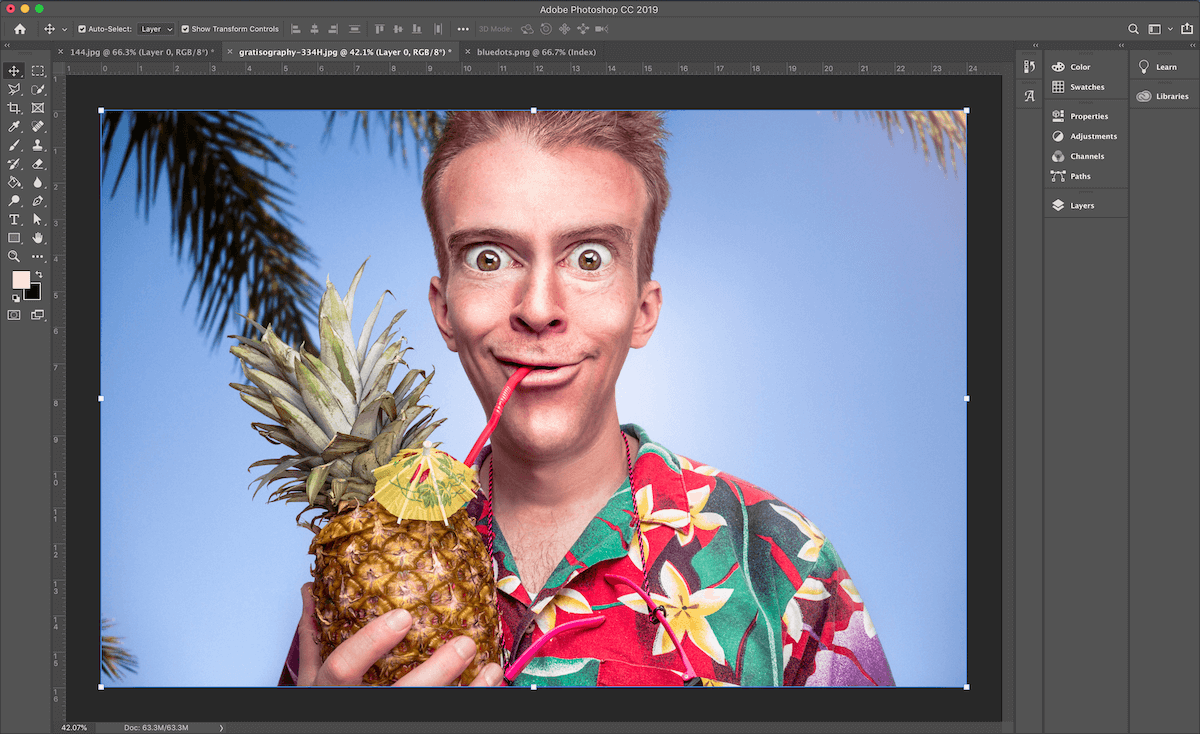
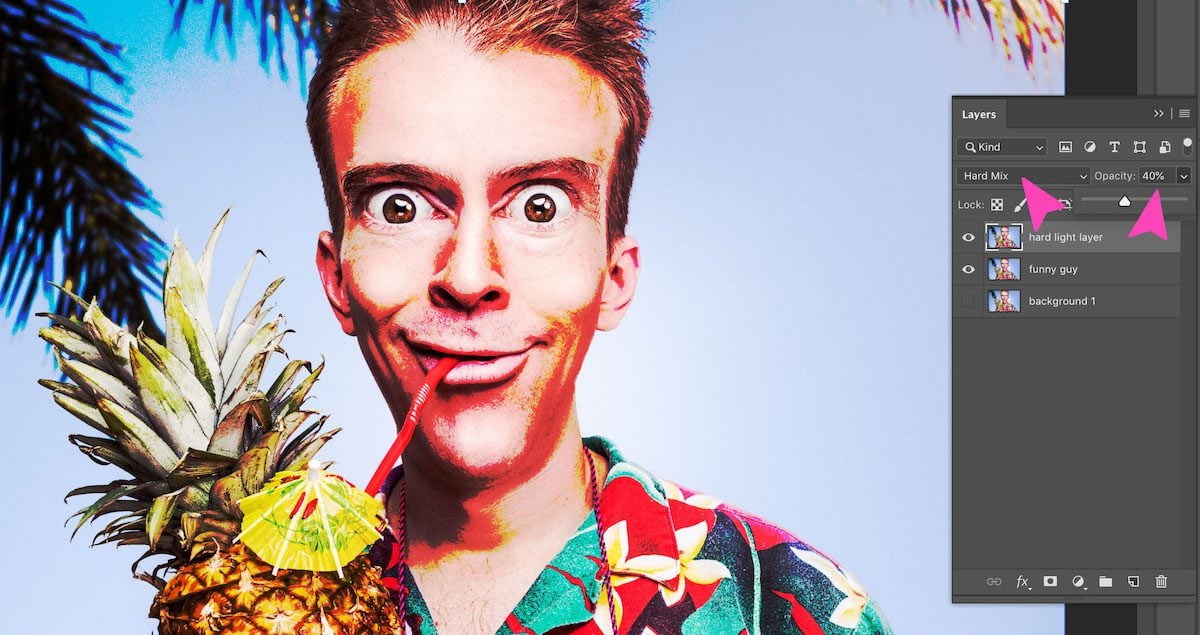
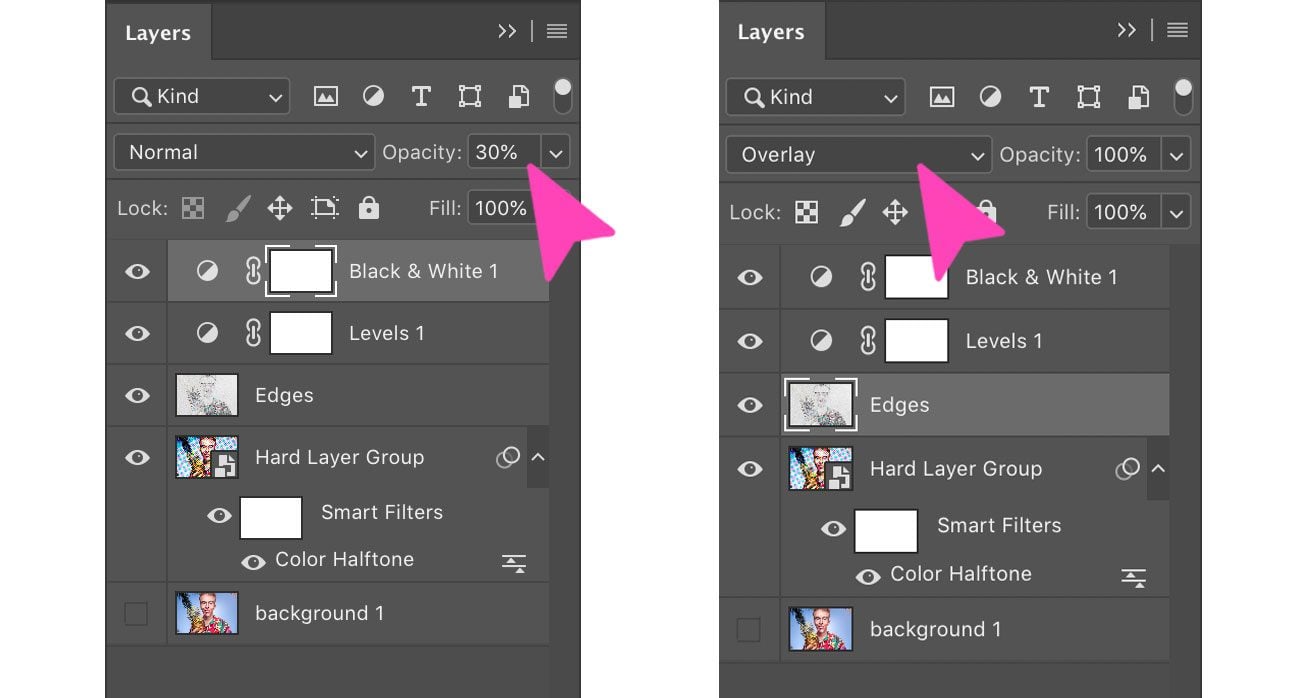
2. Duplicate the layer twice and hide the first one.
To duplicate, while the first layer is selected, right click and choose ‘duplicate layer’ or click Command+J on Mac and Ctrl+J on PC. Rename them so you don’t lose track of each one. Adjust the top layer’s blending option to ‘hard light’ and lower the opacity to around 40%. The colors will change dramatically, this will help get the grainy look of the half-tone dots.
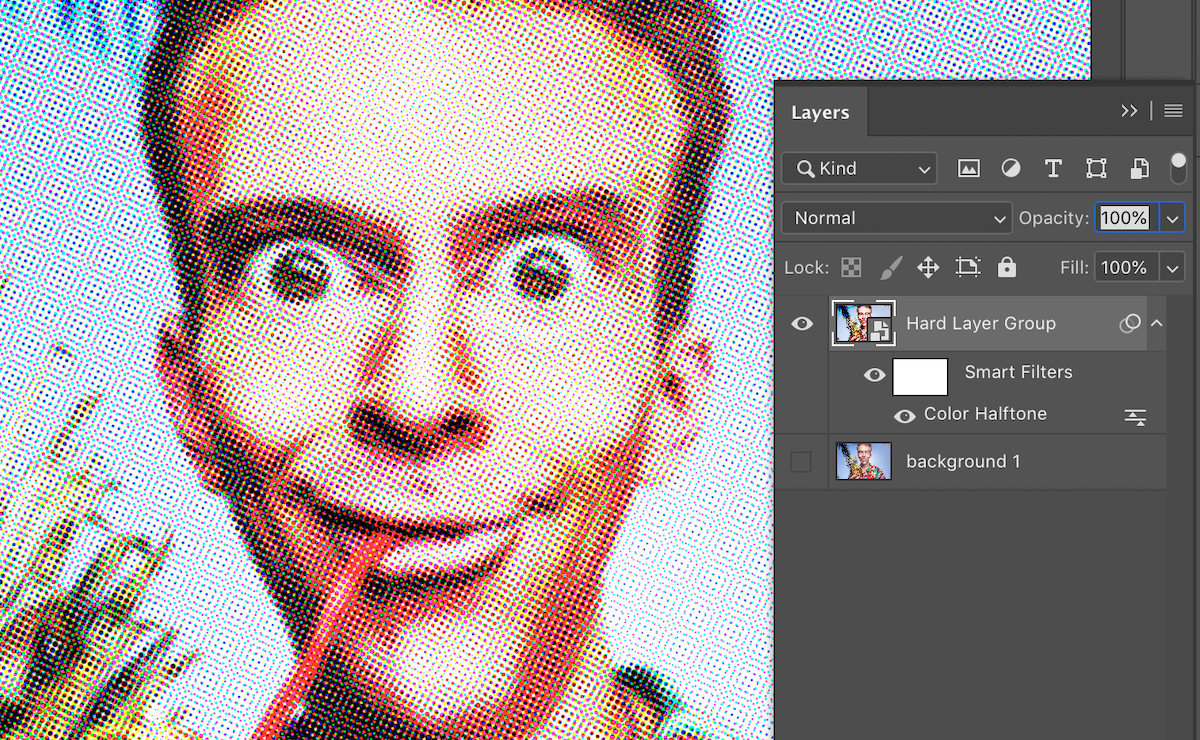
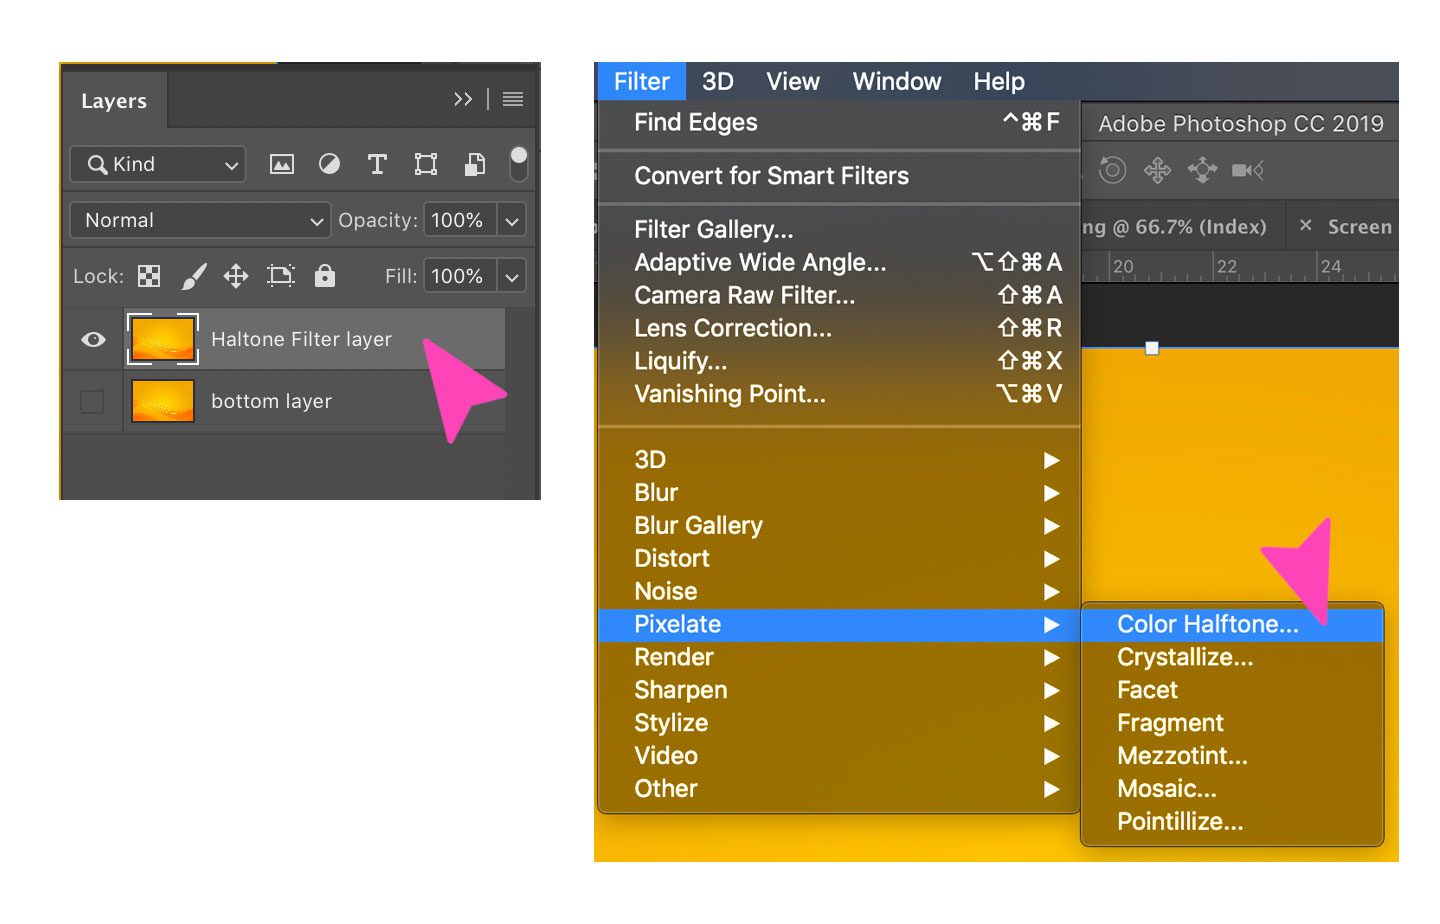
3. Group the top two layers and turn them into a smart object.
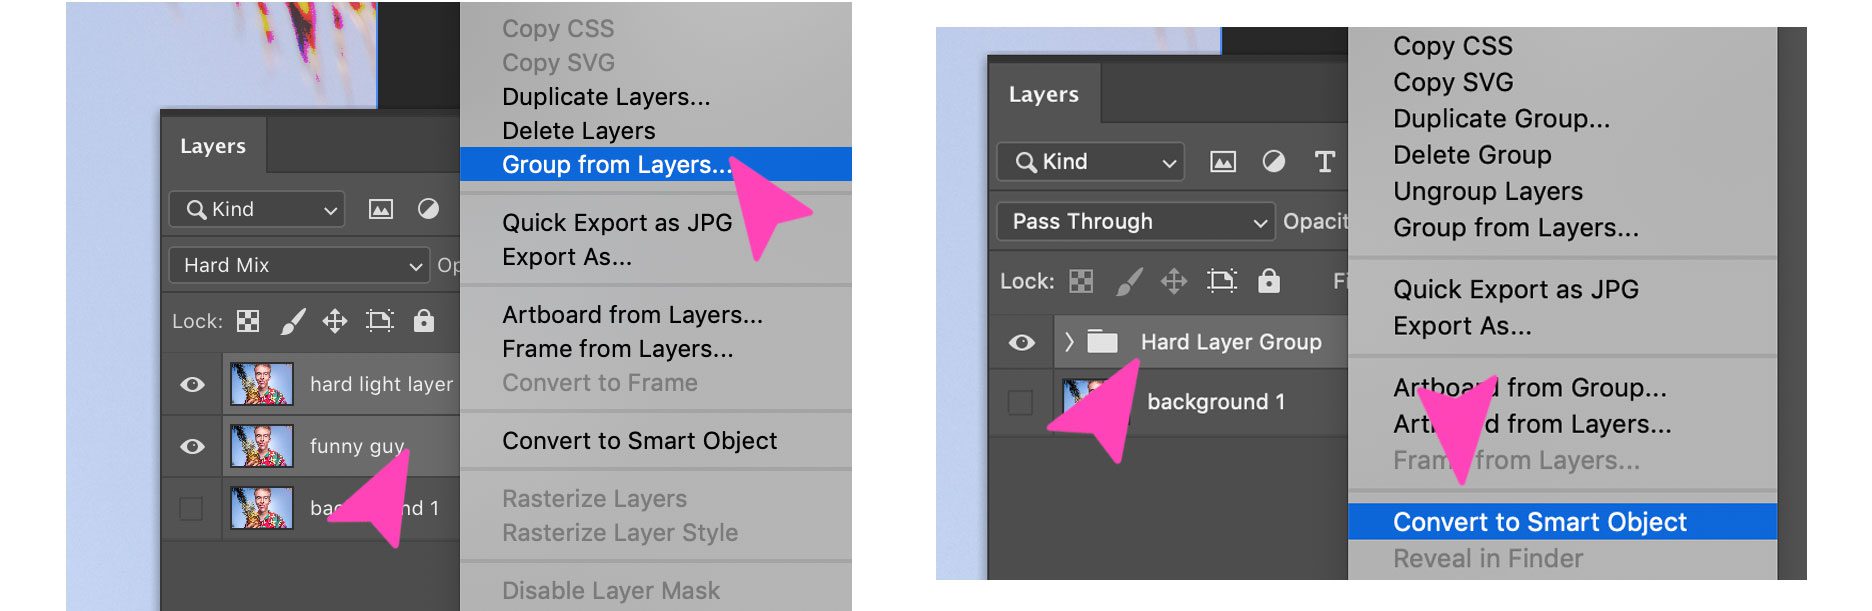
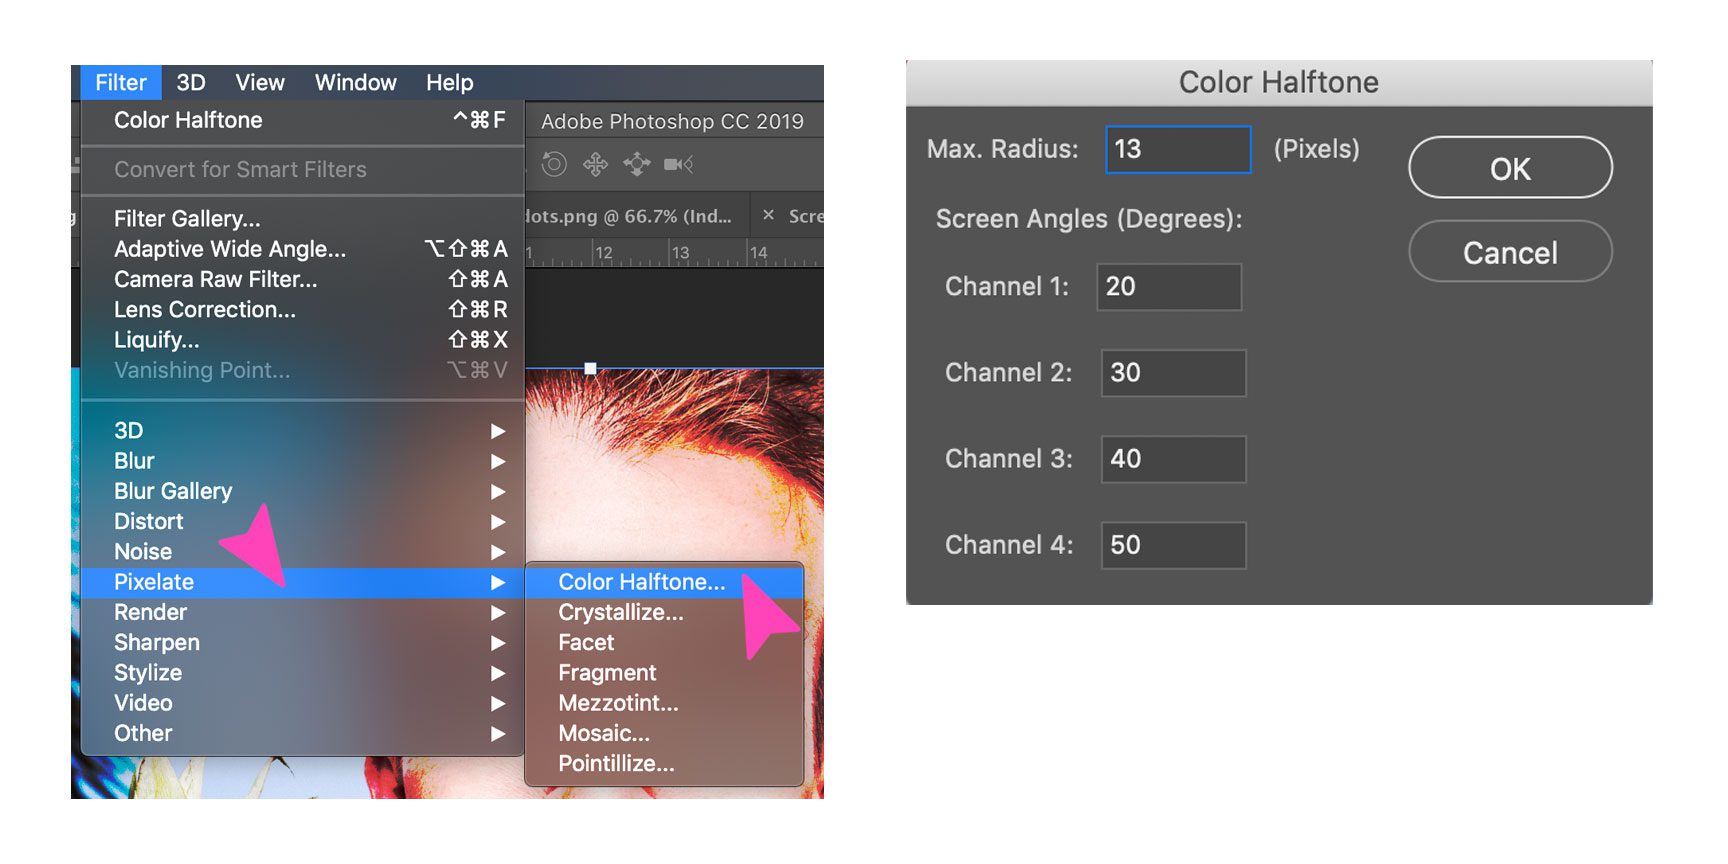
4. Apply the half-tone dot filter to the smart object.
In the Color Halftone settings popup, choose maximum size pixel at 13 and the channels at varying degrees. You can play with these to see different effects.
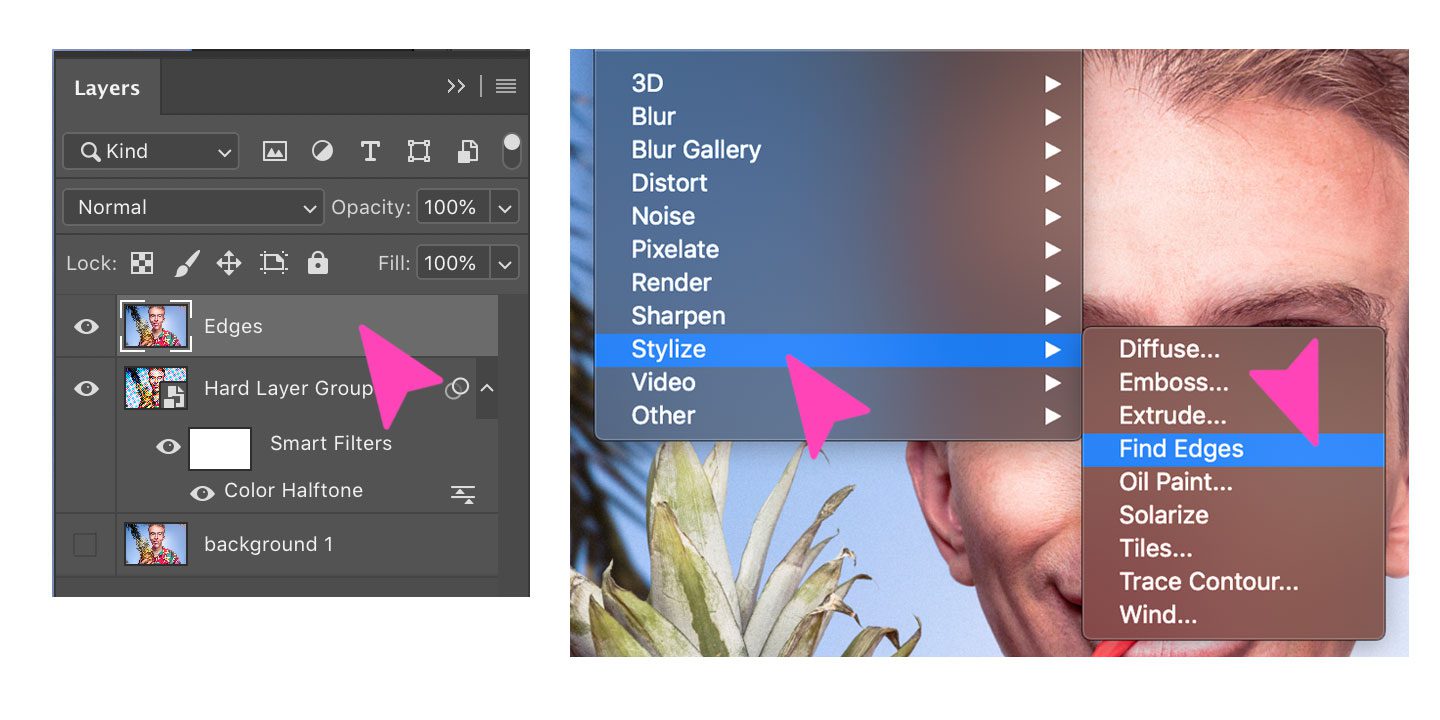
5. Duplicate the bottom layer and move it to the top.
Apply the ‘Find Edges’ filter to it and adjust the levels so that you see the outlines better. To achieve this, move the black triangle as far to the right and the white one to the left.


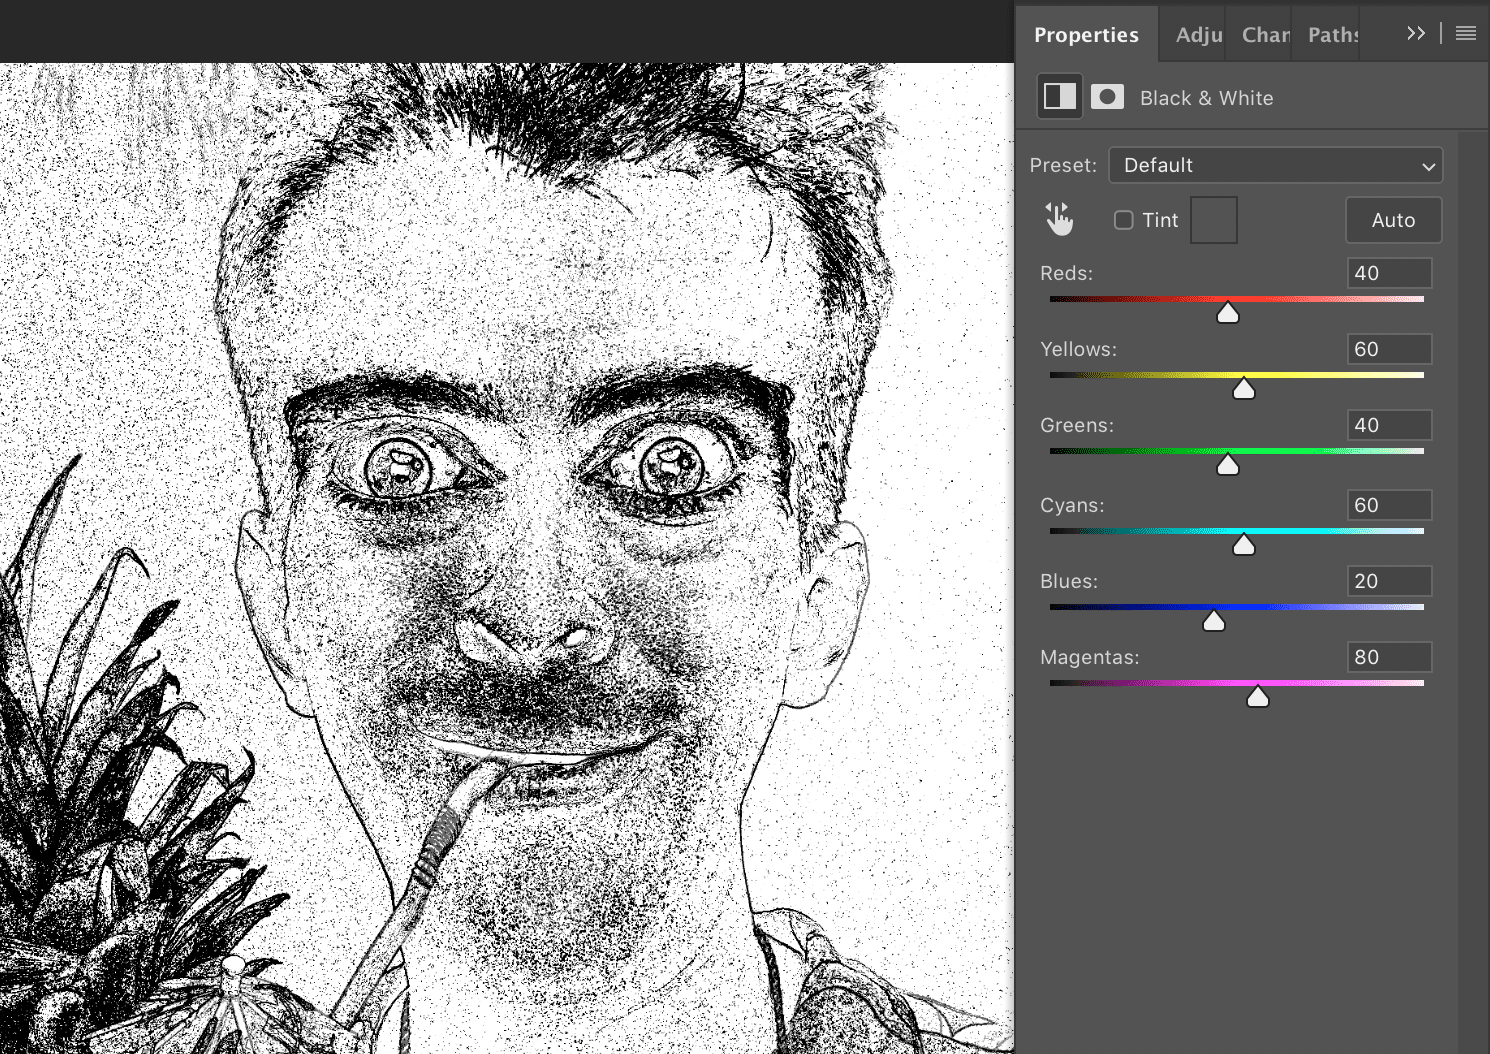
6. Use the adjustments to turn the layer into black and white.
Set the opacity of the adjustment layer to 30%. Finally, set the ‘find edges’ layer’s layering options to ‘overlay.’
The finished design!
How to Create a Retro Comic Book Art Background with Photoshop
1. Find a color background that has a nice design or gradient.
Open the image on your Photoshop dashboard and center it on the screen.
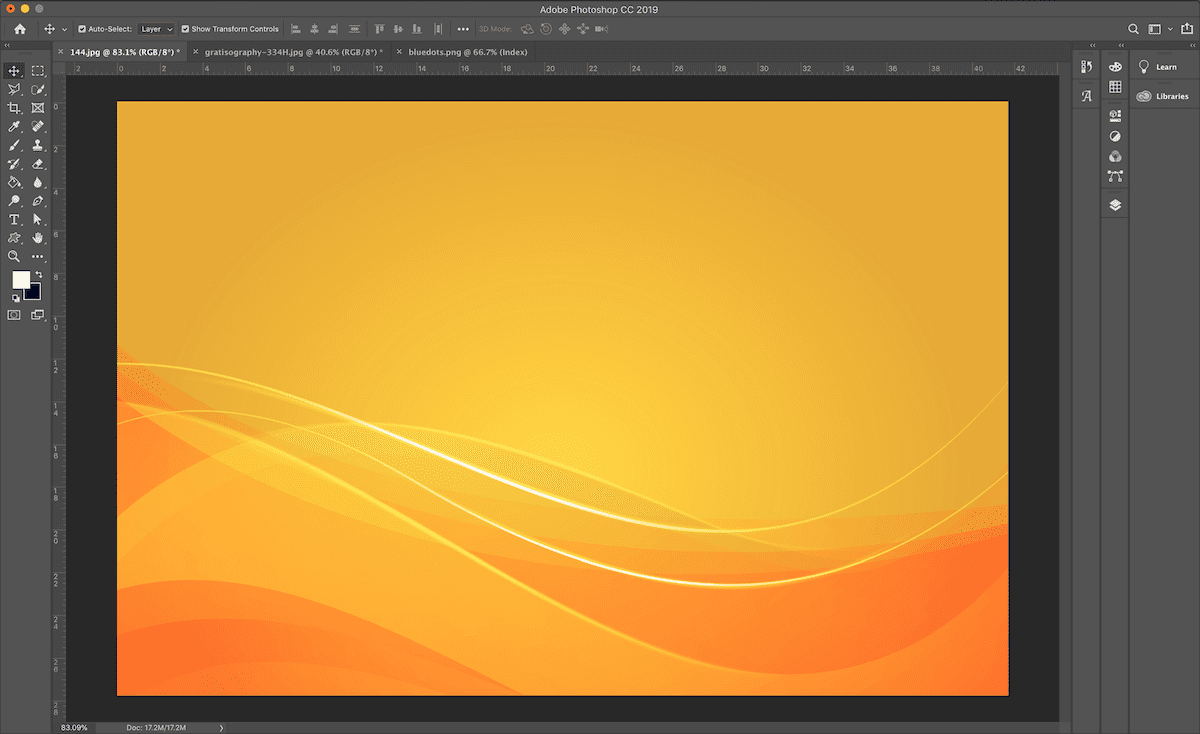
2. Unlock the background layer, duplicate it and hide the bottom one.
Apply the half-tone dot filter to the top layer. Adjust the parameters in the half-tone dot filter popup for different effects
3. The finished design!
How to Create a Retro Comic Book Art Background With Illustrator
As I mentioned before, half-tone dots are of different sizes in order to recreate contrast in an image. The Photoshop filter we used above is perfect for that effect. But if you want to create equal size dots like Ben-Day dots or Lichtenstein dots, you will need to use Adobe Illustrator and the integrated pattern maker. As I mentioned above, Ben Day dots are on a square grid and Lichtenstein dots are on an offset diagonal grid. Both can be achieved with the pattern maker in Illustrator.
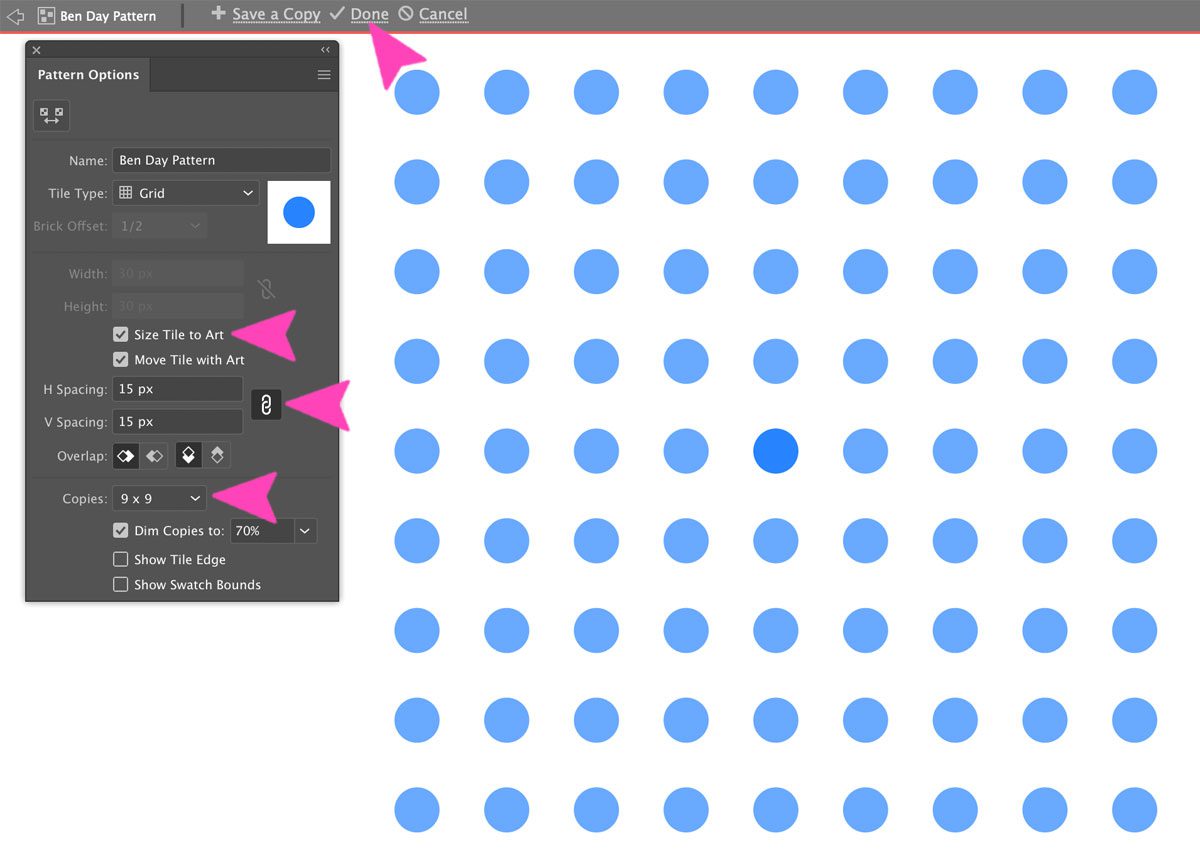
How To Create a Ben-Day Dot Pattern With Illustrator
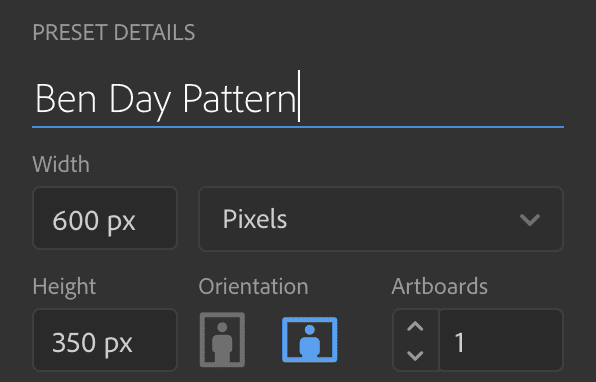
1. Create a new project on Illustrator.
The size doesn’t really matter. We used 600 x 350 px.
2. Select the Rounded Rectangle Tool.
Click once on the artboard and set the size of your shape. Make it 15px by 15px with a 7.5 ox corner radius. Change the color of the circle to a blue fill and no stroke.
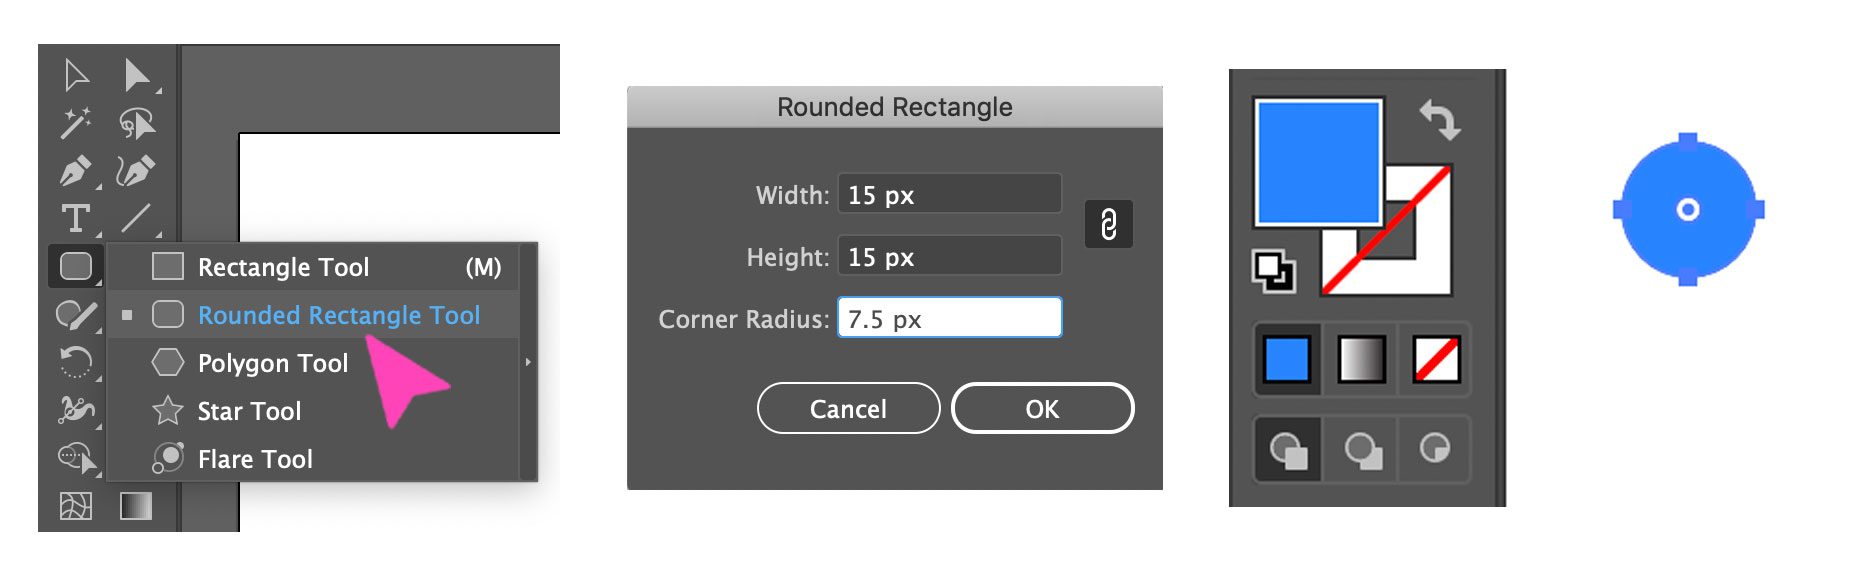
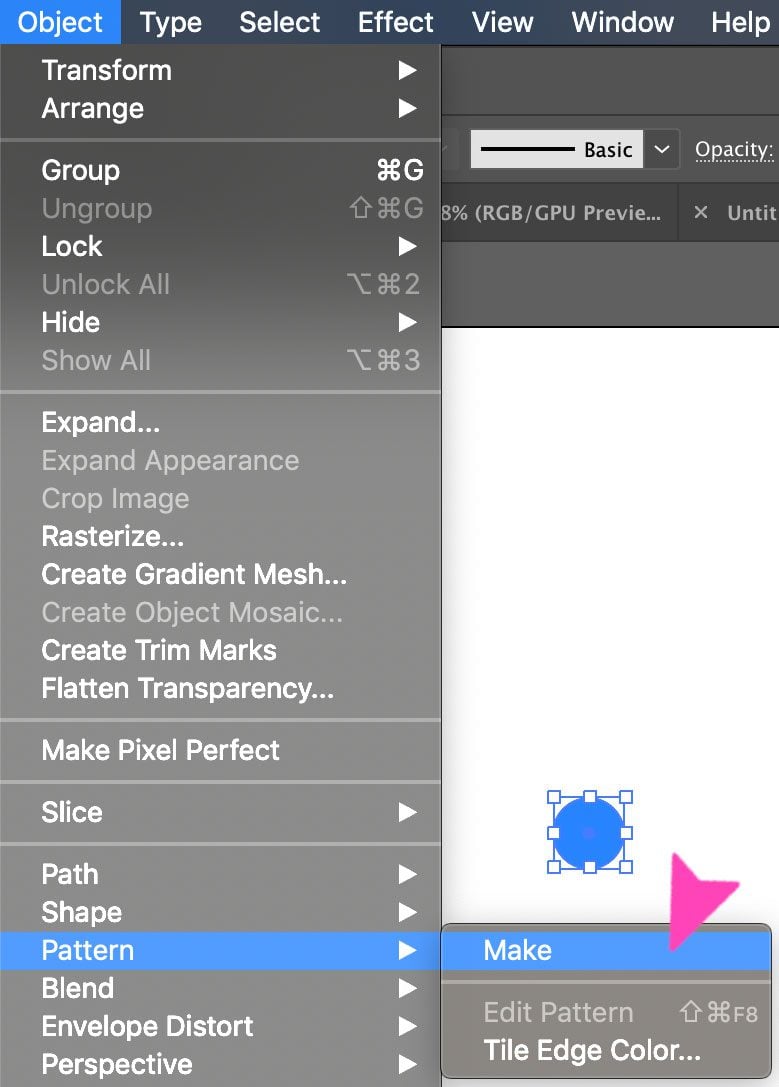
3. Click on ‘object’ in the top menu bar and select ‘pattern’ then ‘make.’
4. Adjust the preferences so the dots are on a square grid.
These are the preferences you need to choose:
- Select the Tile Type to Grid
- Check on Size Tile to Art
- Set H spacing and V spacing to 15 px by 15 px
- Select Copies to 9 x 9
When you see the pattern like the image below, click Done. This will automatically save the pattern to the Swatches panel.
How To Create a Lichtenstein Dot Pattern With Illustrator
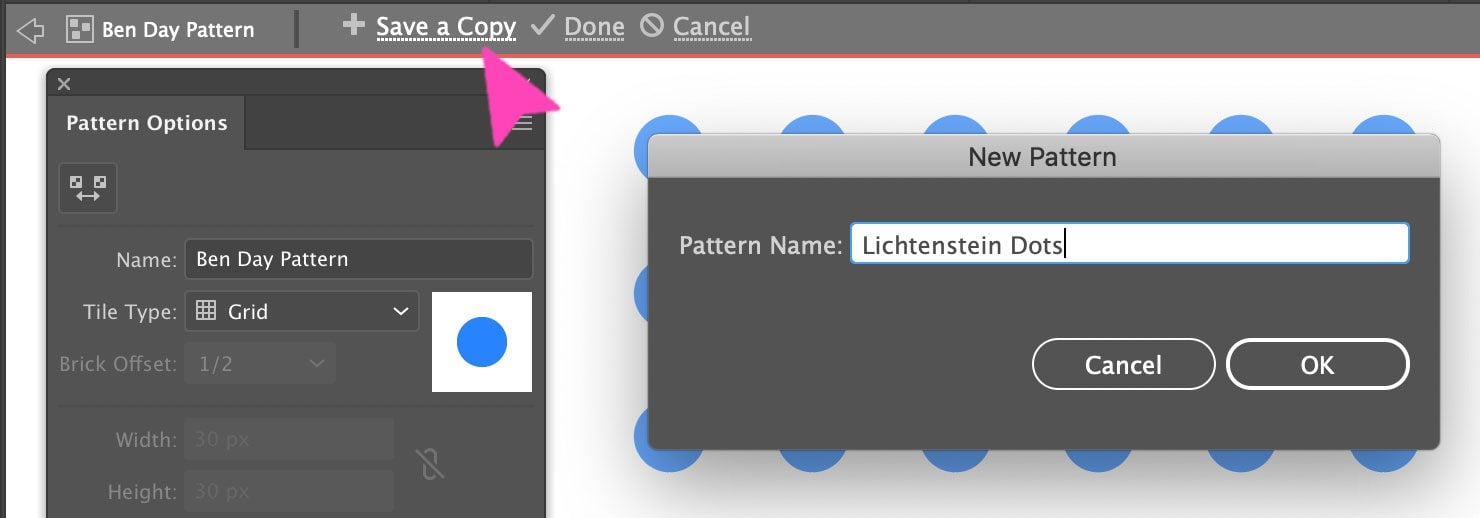
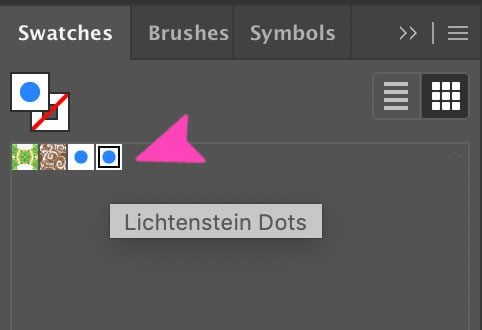
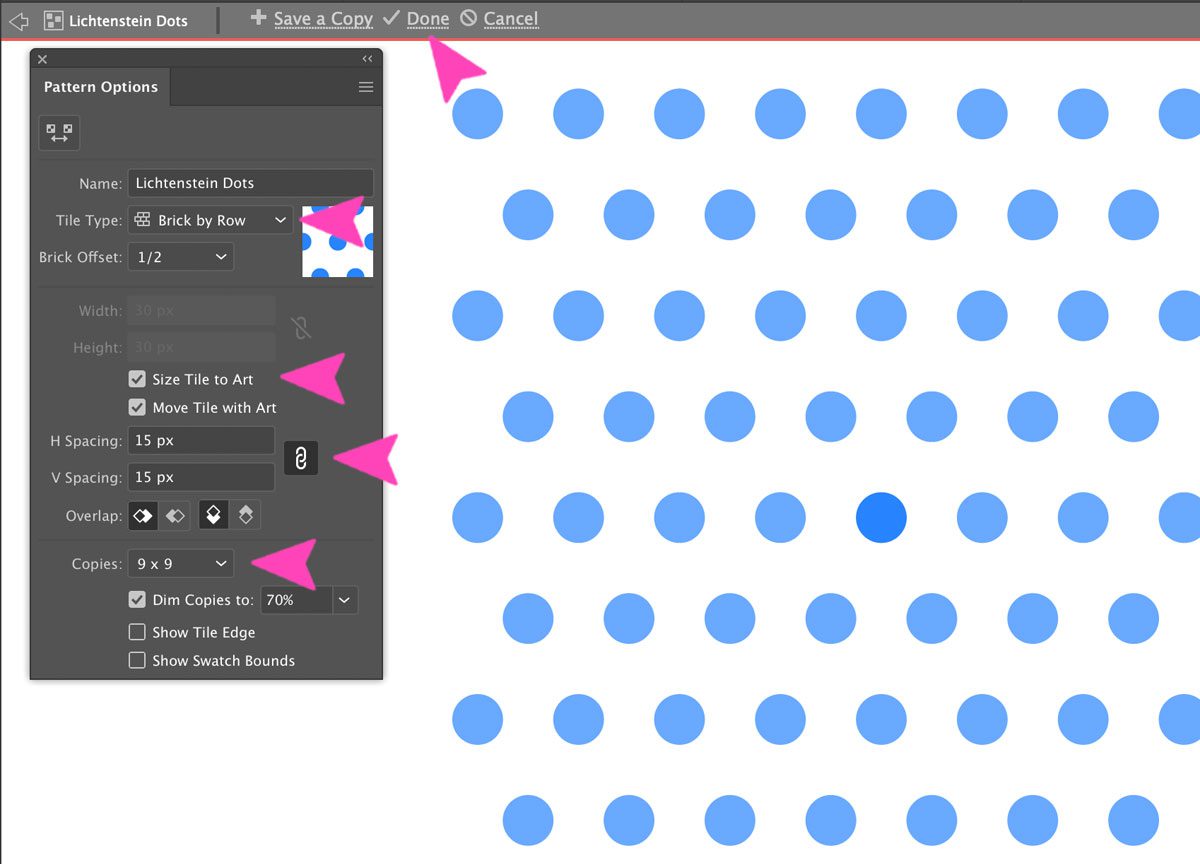
This pattern follows the same steps as the one above and changes only when it’s time to adjust the preferences in the pattern maker. Open the Ben-Day pattern preferences and press ‘Save a Copy.’ Name the new pattern ‘Lichtenstein Dots.’ When you click OK, it will save as a copy on the swatches panel. Close the Ben-Day dots pattern. Back in the Swatches panel, open the Lichtenstein dots pattern. You will see a popup with the name of the pattern when you hover over it. In the preferences, change only the Layout Type to ‘Brick by Row’ and click Done.
How to Add Retro Comic Book Art Patterns to Shapes
Now that you have created your own Retro Comic Book patterns, you can apply them to any shape you want at any time. First, you need to save the pattern swatches so that you can add them to any future project.
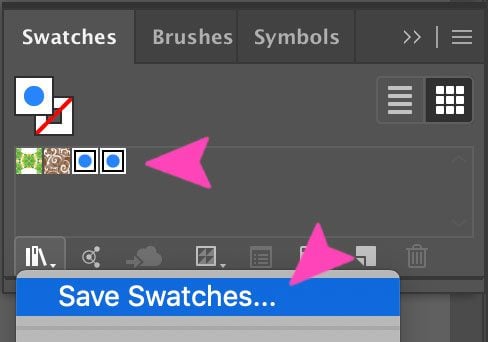
1. In the Swatches panel, select both of the new patterns we created.
Click on the Swatches library icon and choose ‘Save Swatches.” Name the new Swatches ‘Retro Comic Book Pattern’ and click OK.
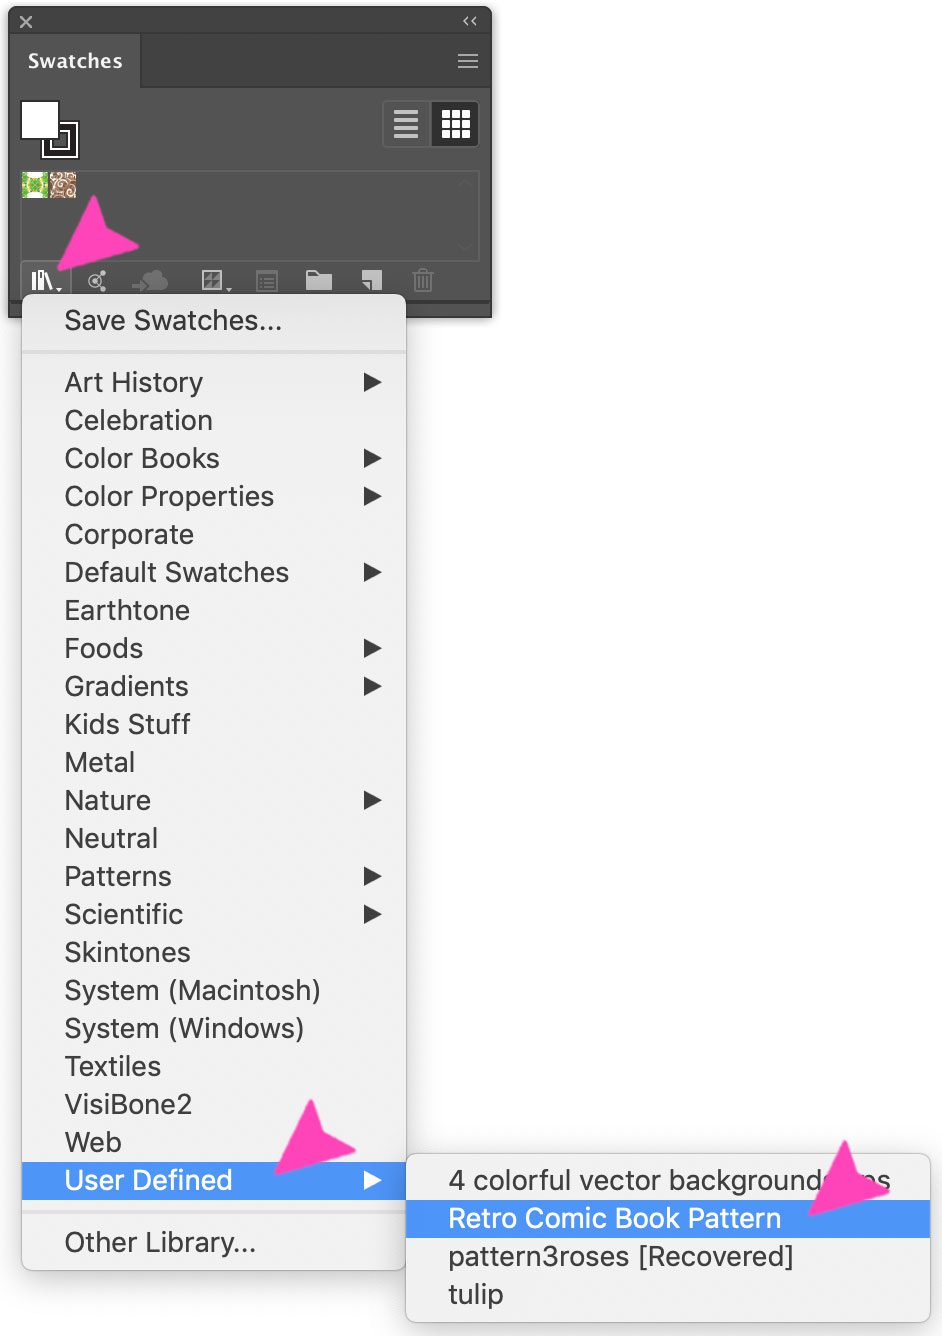
2. When you create a new project and want to use these patterns, go over to the Swatches panel.
You won’t see our new swatches there, so you need to import them in. Once again click on the Swatches library icon and scroll down to ‘user defined’ and then the ‘Retro Comic Book Pattern.’ A new window will open with the swatches and the regular colors with the comic book patterns included. Now they are ready to use on any shape you want.
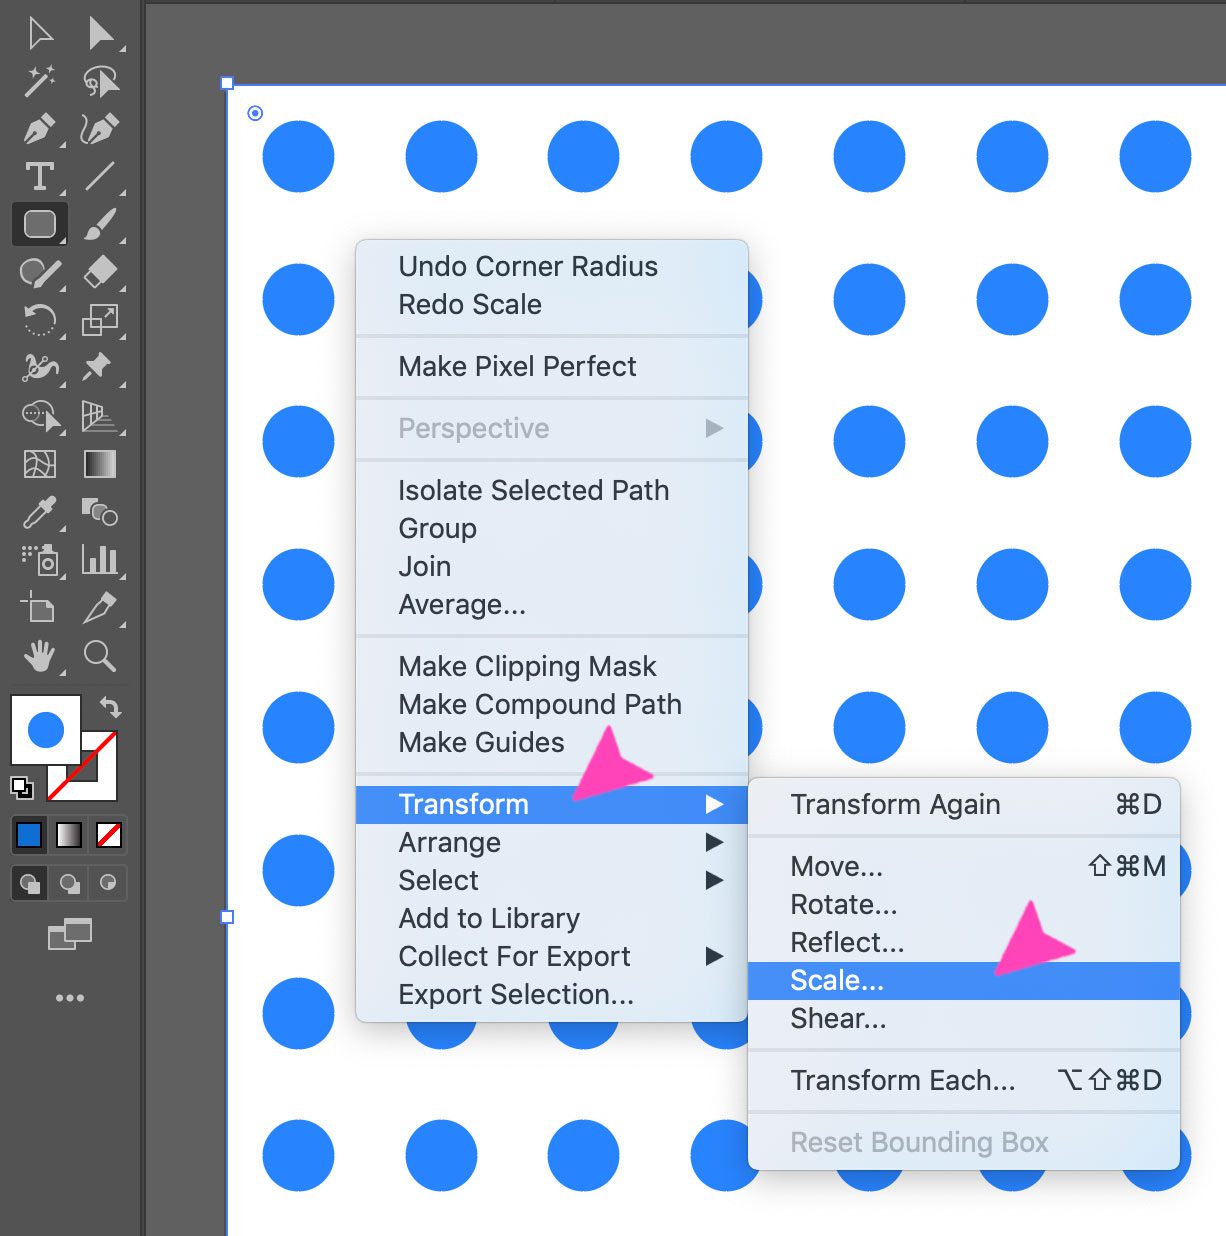
3. Create a new shape and fill it with one of the patterns.
The size of the dots will depend on the size of the shape you create. The maximum size of the shape is controlled by the size of the artboard.
The smaller the shape, the bigger the dots and vice versa. If you use a small shape and feel that the dots are too big, right click pattern inside the shape and select ‘transform’ then ‘scale.’ To make the dots super tiny, choose the following parameters.
- Uniform: 10%
- In Options: check Transform Patterns
Try different parameters for the ‘uniform’ option to get different sizes of dots.

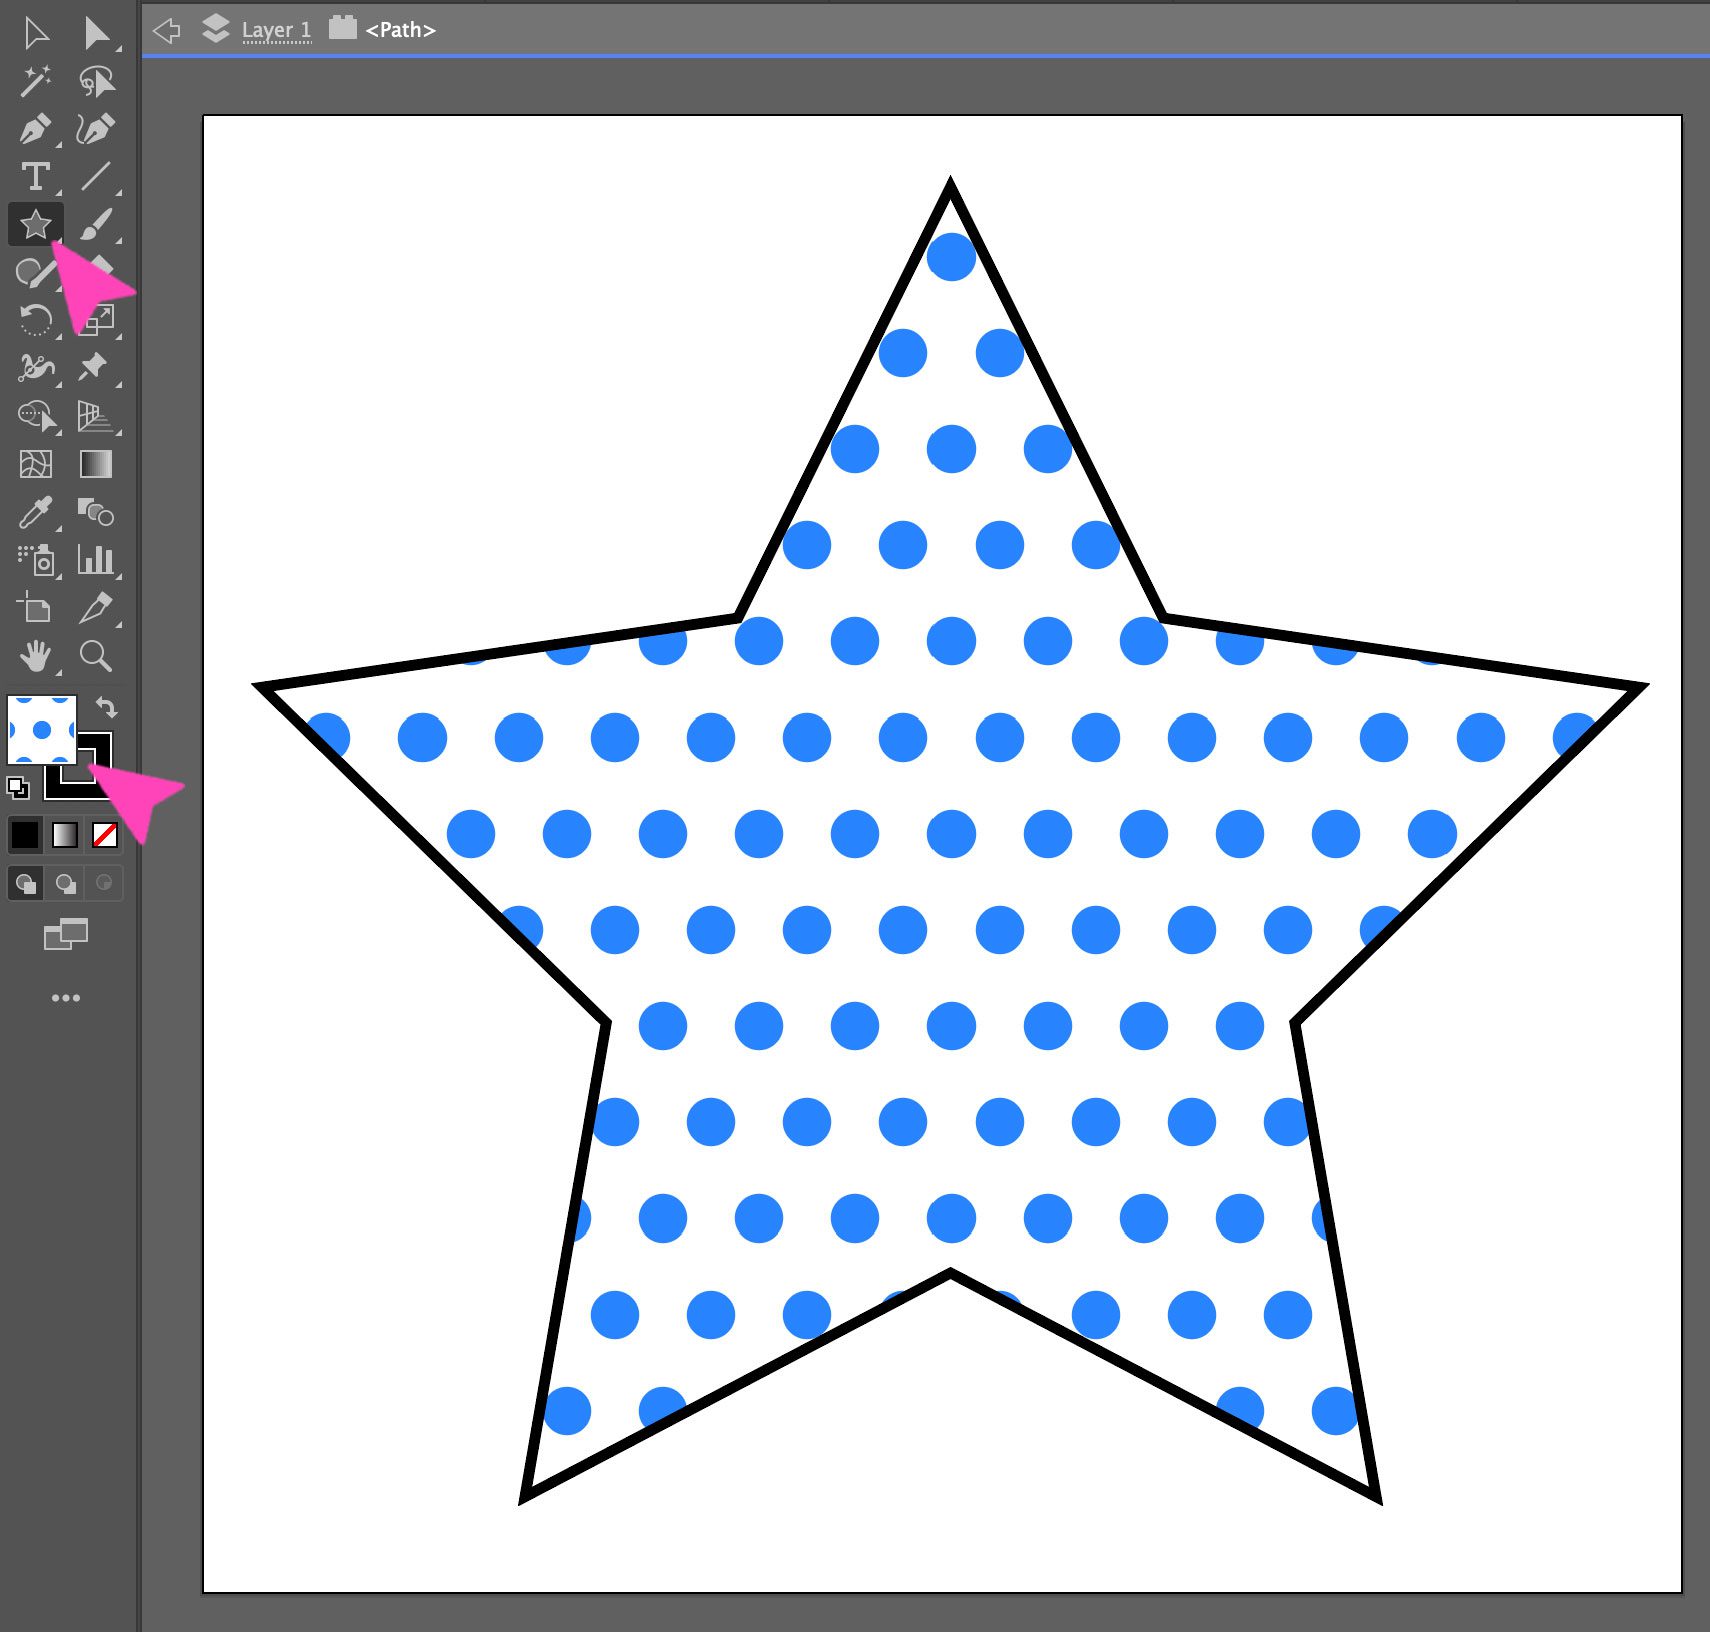
4. To create a star shape with a Retro Comic Book Style, create a new project at 1000 px by 1000 px.
In the color panel, click black for the stroke and the Lichtenstein pattern for the fill. Select the star shape and click on the canvas to make it appear.
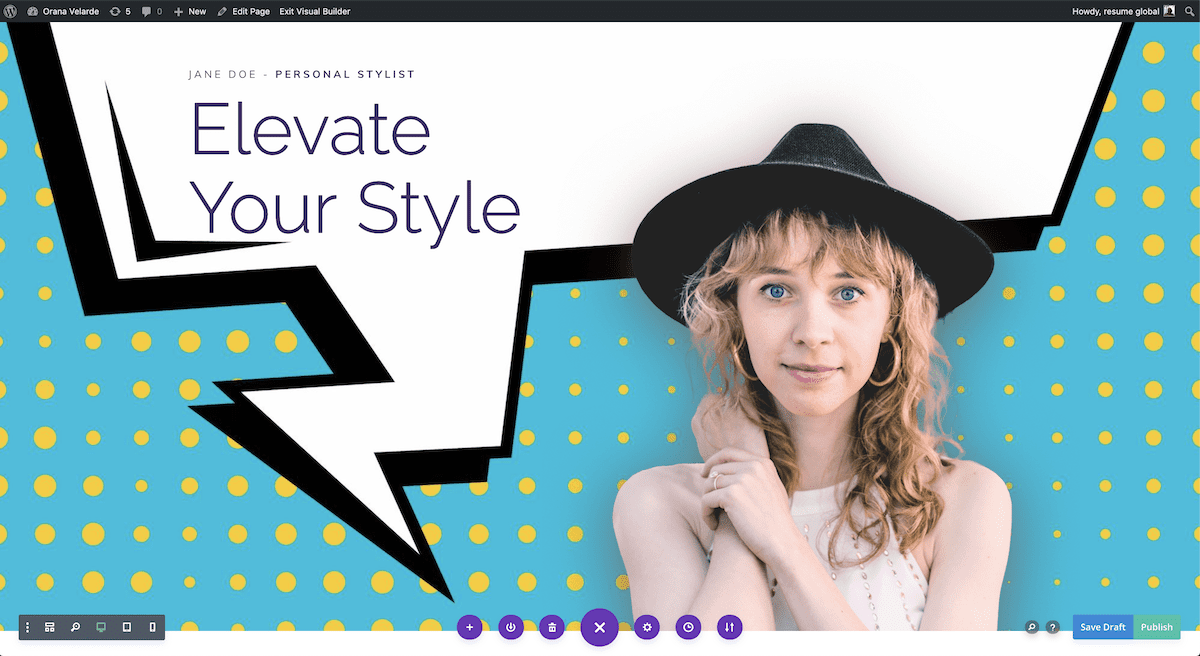
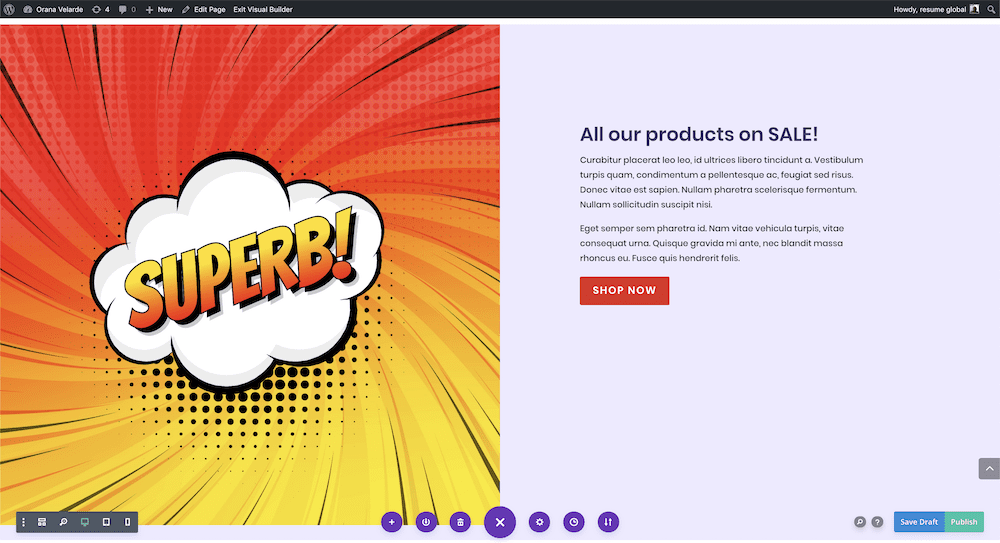
Ideas for Using Retro Comic Book Art in Web Design
The comic book art trend seems to be on the rise. Of course, not all brands will benefit from this style of creativity. For the fun, color-loving brands, Ben Day dots and Lichtenstein inspired graphics are perfect for a breath of fresh air. The best use for a comic book dot pattern is as a background, either over another color or without. Likewise, try using large speech bubbles as separators or comic book style exclamations with your content. You can make your own with the tutorials above or source some already designed images from Freepik.


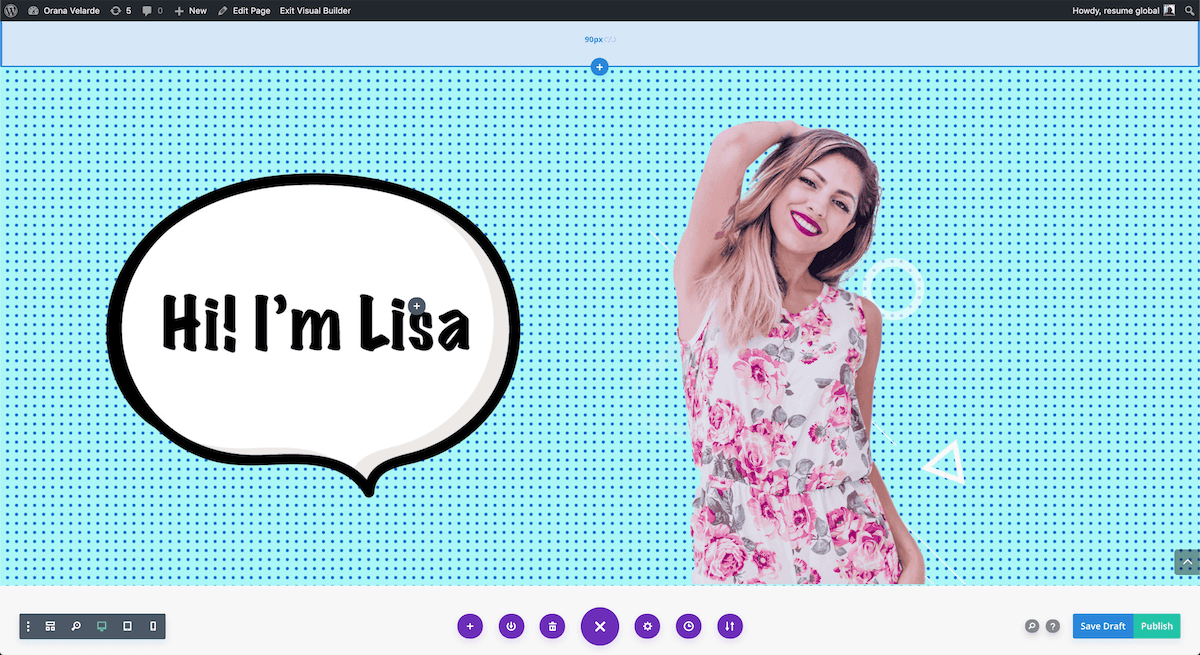
The designs below were achieved with comic book designs sourced from Freepik. As you can see, the designers took some liberties in how they designed the sizes of the dots. Nevertheless, they still perfectly embody the Retro Comic Book style in their own way.
Conclusion
As you can see, the possibilities with retro comic book design are quite varied. From classic styles to more modern versions, you can do pretty much anything. No matter if you create the patterns yourself or source some graphics online, you can create pretty amazing stuff with Retro Comic Book art and Divi. One final note: Now that you have mastered the retro comic book art, you might consider pairing your design with a retro font. There are a lot of great web fonts to choose from!


Leave A Reply